

Laravel Job Queue: Peeking Behind the Curtain (Part 1)
source link: https://medium.com/codelogicx/laravel-job-queue-peeking-behind-the-curtain-part-1-fa7b5d1c0390
Go to the source link to view the article. You can view the picture content, updated content and better typesetting reading experience. If the link is broken, please click the button below to view the snapshot at that time.
Laravel Job Queue: Peeking Behind the Curtain (Part 1)
Photo by Ben Griffiths on Unsplash
Intro
If you have used Laravel in any of your projects, you have most likely used its job queue as well. Job queues provide a great way to defer time-consuming tasks that are not required for the current request (e.g. sending emails or push notifications) for a later time. This will significantly improve the response time for the requests. Laravel supports multiple storage platforms such as Redis, Amazon SQS, or even a relational database as the queue backends. But, in this post, I’ll talk only about Redis as the queue backend. On another note, as we are using a fairly older version of Laravel (v5.8), the contents in this post might differ from the latest release of Laravel, but the general implementations should not differ too much.
Laravel provides a very simple interface to interact with its queue system. All the connection configurations for each queue driver that comes with the framework are stored in config/queue.php. Each piece of business logic that needs to be offloaded to a queue is encapsulated in a Job class. You create a new job when you run the make:job artisan command (e.g. php artisan make:job SendWelcomeEmail ). Now you dispatch this job to the queue by calling SendWelcomeEmail::dispatch($user) or using Laravel’s helper method dispatch(new SendWelcomeEmail($user)) from your controller (or wherever you see fit). A separate worker process, started by running php artisan queue:work , will pick up the job and process it. In this post, we’ll go through what happens from the time you dispatch the job and it gets processed by the queue worker. So buckle up and focus as we go through this journey together.
Prerequisites
As I am going to talk about Redis as the queue backend, let’s first briefly go over the data structures that are used by Laravel to implement its queue system.
Lists:
Lists in Redis are lists of strings, sorted by insertion order. You can add elements to a list by pushing new elements on the head (on the left) or on the tail (on the right) of the list. The LPUSH command adds the new element to the head of the list, and RPUSH command will add it at the tail of the list. Similarly, you can remove elements from the head of the list with LPOP, and use RPOP to remove it from the tail. Lists are used by Laravel as the data structure to store the jobs, new jobs are pushed to the tail of the queue with RPUSH and the worker process will fetch jobs to process from the head of the queue with LPOP, thereby maintaining the FIFO structure for a queue. The job which gets into the queue first will be processed first.
Redis lists have another special feature that is used by the queue system. These are blocking operations on lists. When you call LPOP or RPOP on an empty list you get back null. To find out whether there is any new item in the list you need keep running one of those commands. This causes unnecessary processing on both the client and the redis server. So Redis implements commands called BLPOP and BRPOP which are similar to LPOP and RPOP , but the difference is that these commands will block for a user specified time unless a new element is added to the list. For example,BLPOP mylist 5 will block for 5 seconds if the list is empty, but as soon as a new item is added to the list it will return that item. If no item is added within 5 seconds, it will return null just like its non-blocking version.
Sorted Set:
Sets in Redis are collections of unique, nonrepeating string elements. In sorted sets, each element in the collection is also assigned a floating-point number called score, and the elements are ordered based on the scores associated with them. The ZADD command will add a new item in the set, ZRANGE will output the contents of the set in sorted order. We can also operate on the scores, ZRANGEBYSCORE will return the elements whose score falls within the range provided in the command and ZREMRANGEBYSCORE will remove all the elements from the set whose score falls within the given range. Let’s see some examples. In the following example, we’ll have a list of tech companies with the year of their establishment as the score.
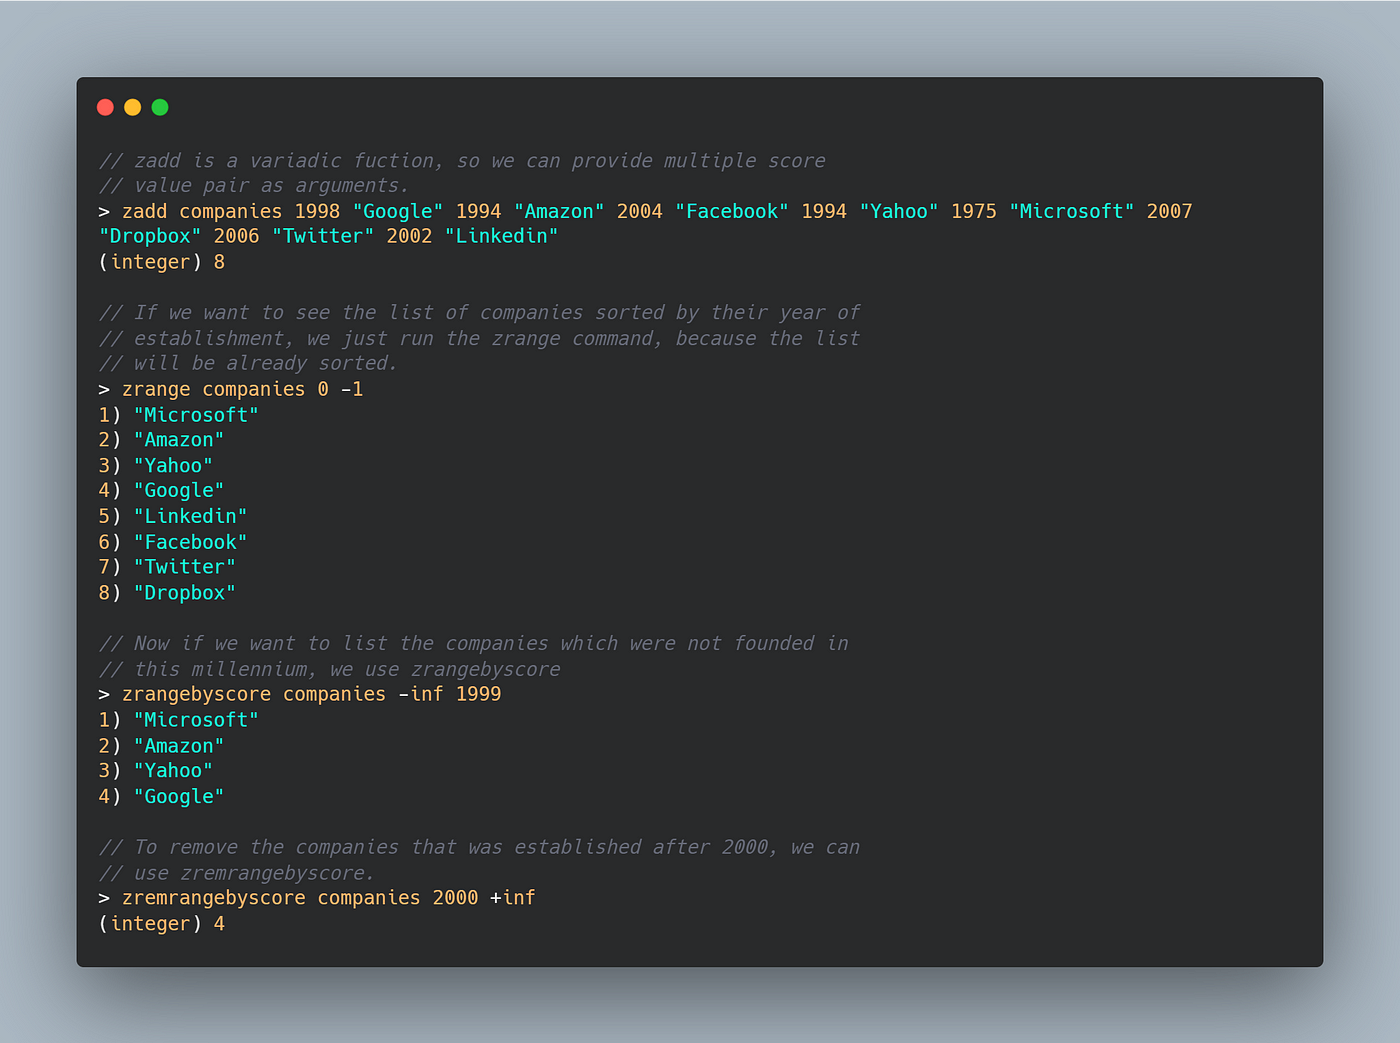
Redis sorted set operations
For more detailed information on the Redis commands consult their docs. When you dispatch a delayed job or retry a failed job, behind the scene Laravel stores those jobs in a sorted set inside Redis. In the next sections, we’ll see how the Laravel queue uses Redis and what happens behind the scenes when you dispatch a job and when your jobs are processed.
Dispatching Jobs
There are mainly two ways you dispatch a job, you either call SendWelcomeEmail::dispatch($user) or dispatch(new SendWelcomeEmail($user)). In the first case, the dispatch method is provided in the Dispatchable trait that is included in your job class and for the second case, the dispatch method is a helper method that is globally available throughout your project. They both essentially do the same thing, create an instance of Illuminate\Foundation\Bus\PendingDispatch class injecting the instance of your job class as arguments. ThePendingDispatch class doesn’t do much, it just sets the queue, connection, delay, etc information in the underlying job class.
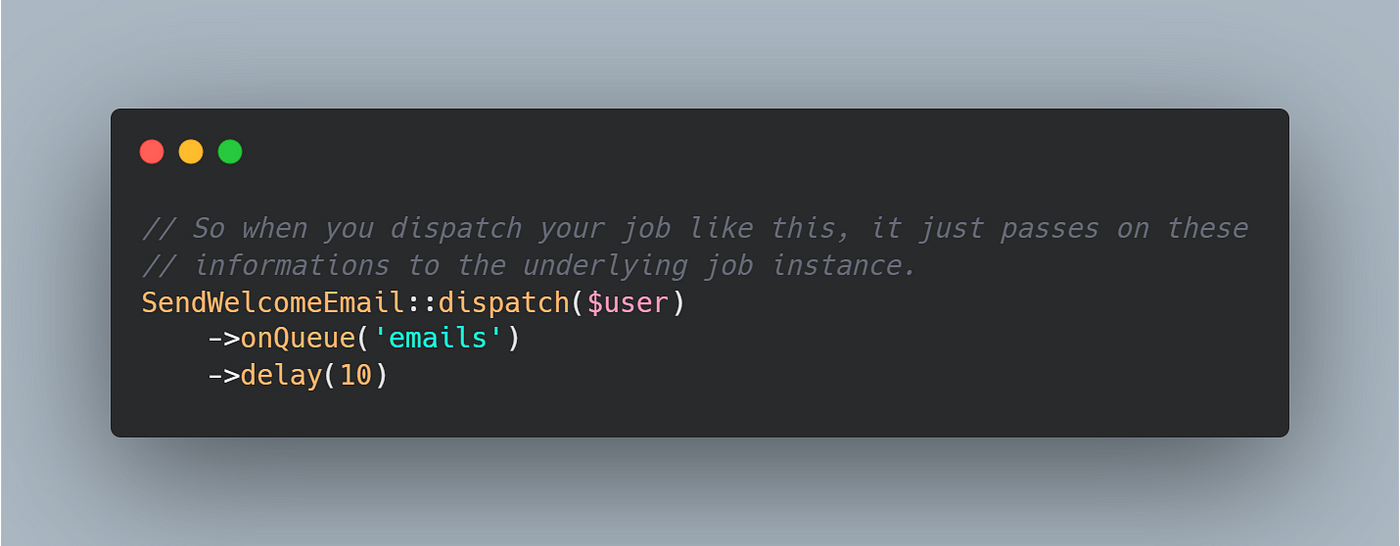
Dispatching jobs
The interesting bit happens in the destructor for the class.
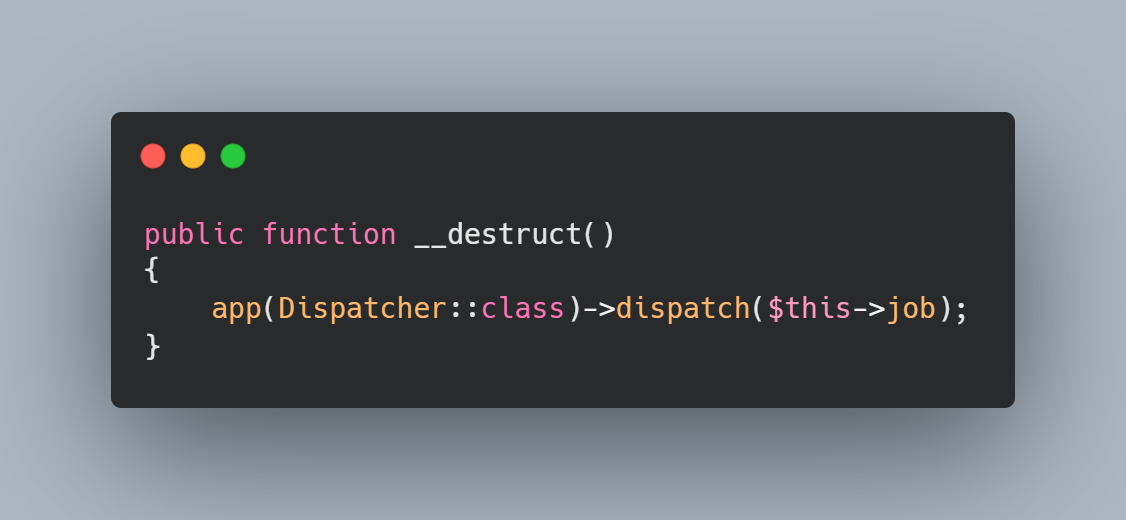
PendingDispatch::__destruct()
So during the shutdown sequence of the script, the destructor will create an instance of the Illuminate\Bus\Dispatcher class and call the dispatch() method on it. Before we look into the dispatch() method, let’s first see the constructor of the Dispatcher class.
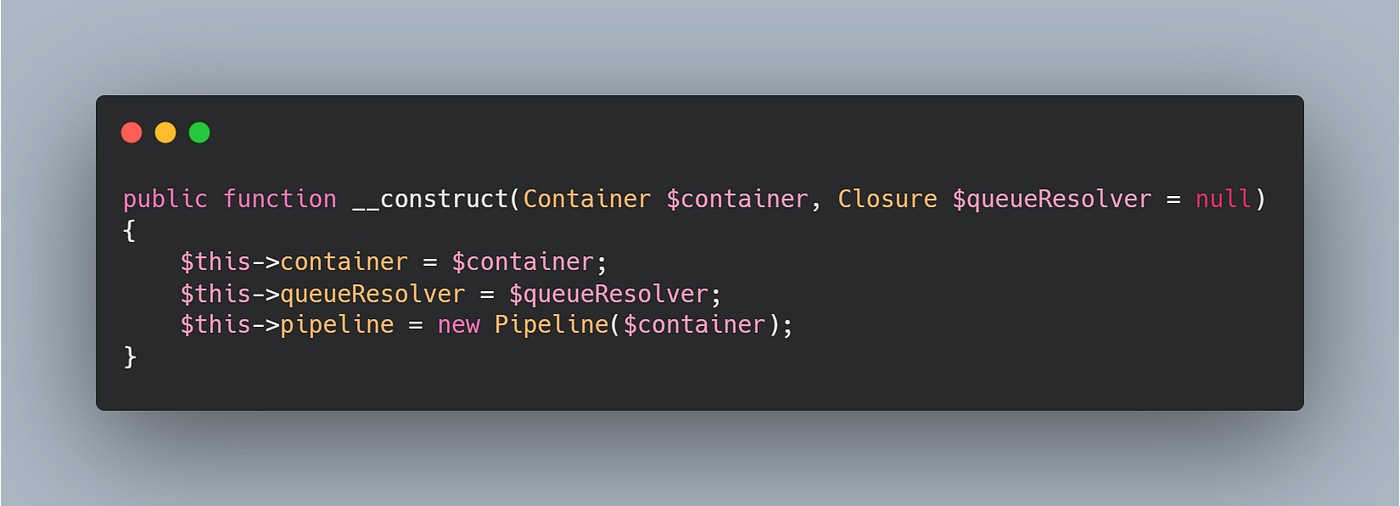
Dispatcher::__construct()
Here the closure $queueResolver is injected by the framework’s DI container, and is responsible for fetching the appropriate queue driver based on the configuration you set in your config/queue.php file. If you are curious, the binding happens in Illuminate\Bus\BusServiceProvider and the closure internally calls the Illuminate\Queue\QueueuManager@connection() method.
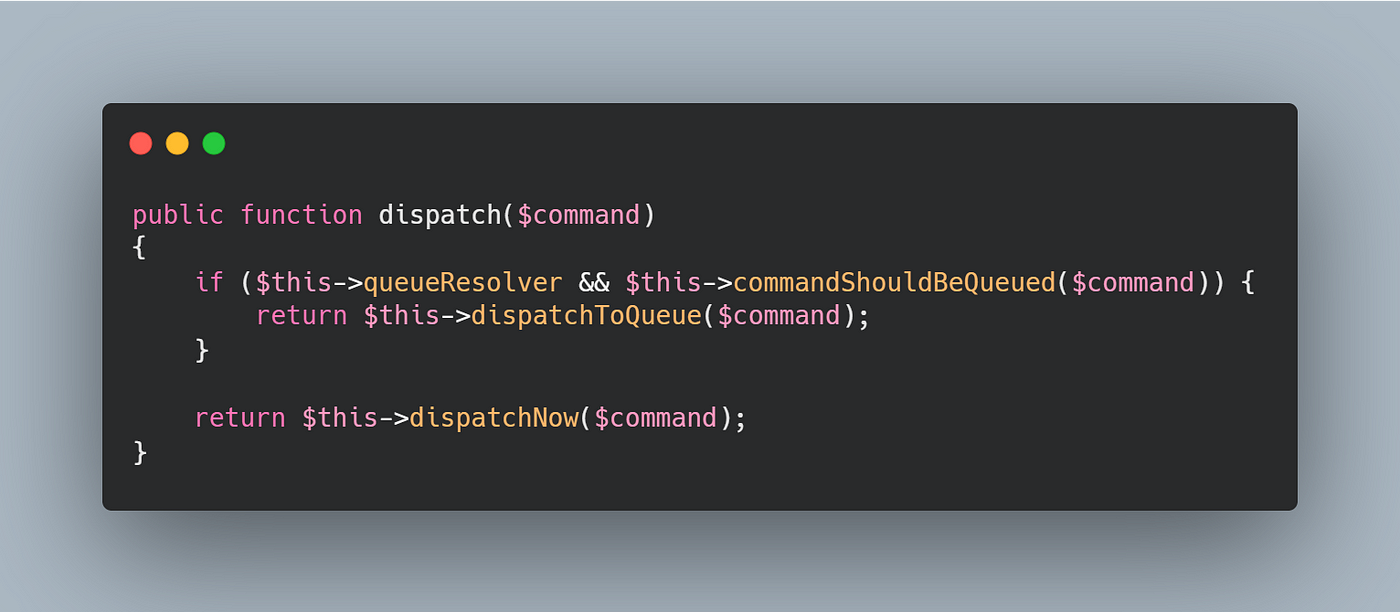
Dispatcher::dispatch()
The dispatch() method in the Dispatcher class will dispatch the job class into the queue backend if your job class implements the Illuminate\Contracts\Queue\ShouldQueue interface otherwise it will run it synchronously by calling dispatchNow(). Remember this method, we’ll come back to it again later. Now let’s look at how the job is added to the queue, this happens in dispatchToQueue() method.
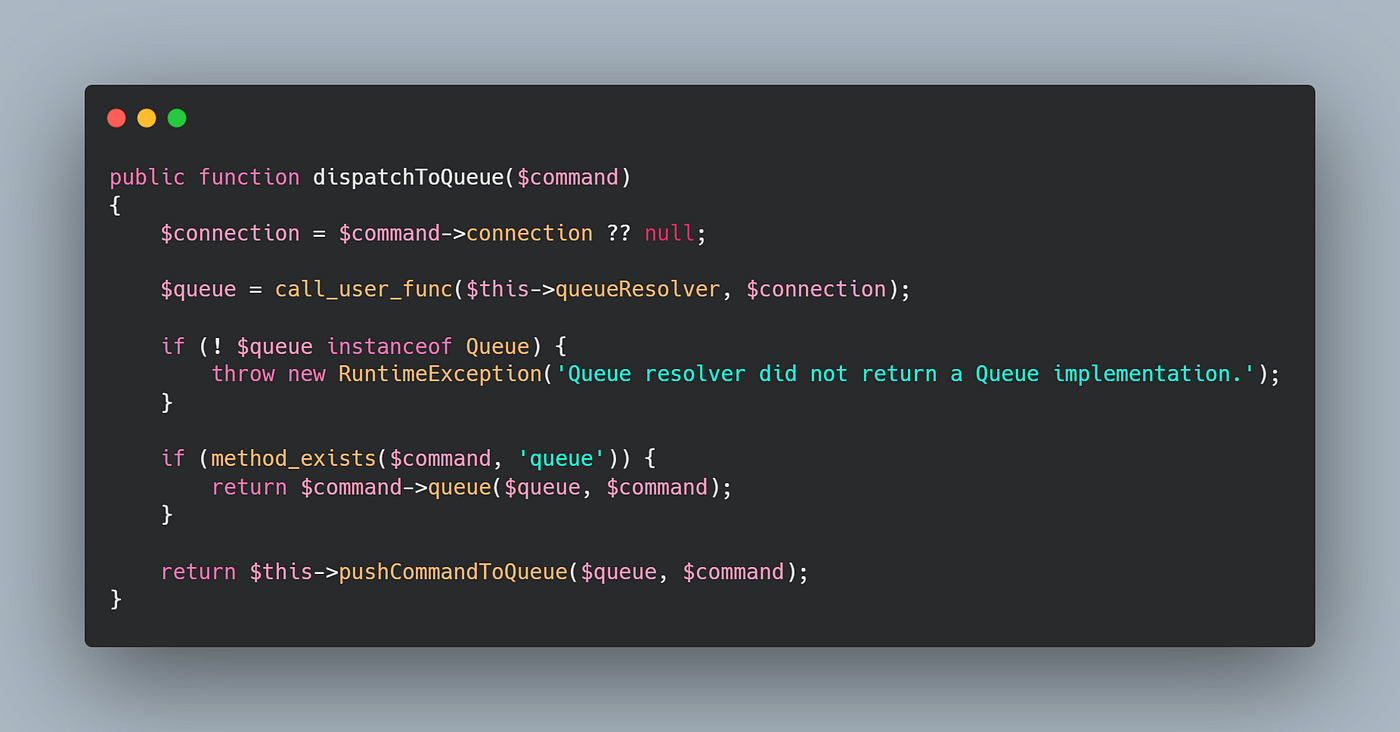
Dispatcher::dispatchToQueue()
Here you can see, that it will first resolve a concrete implementation of the queue driver using the queue resolver we talked about earlier. If you have specified the connection where your job should be dispatched in the job class, then the queue driver for that specific connection is returned, otherwise, we’ll get the driver for the default connection. In our example, we’ll receive an instance of Illuminate\Queue\RedisQueue class. If your job has a method called queue(), the dispatcher will call that method passing in the queue driver and instance of the job class (I don’t think this behavior is documented), otherwise, it will call the pushCommandToQueue() which just sends the job to the queue driver instance for storage.
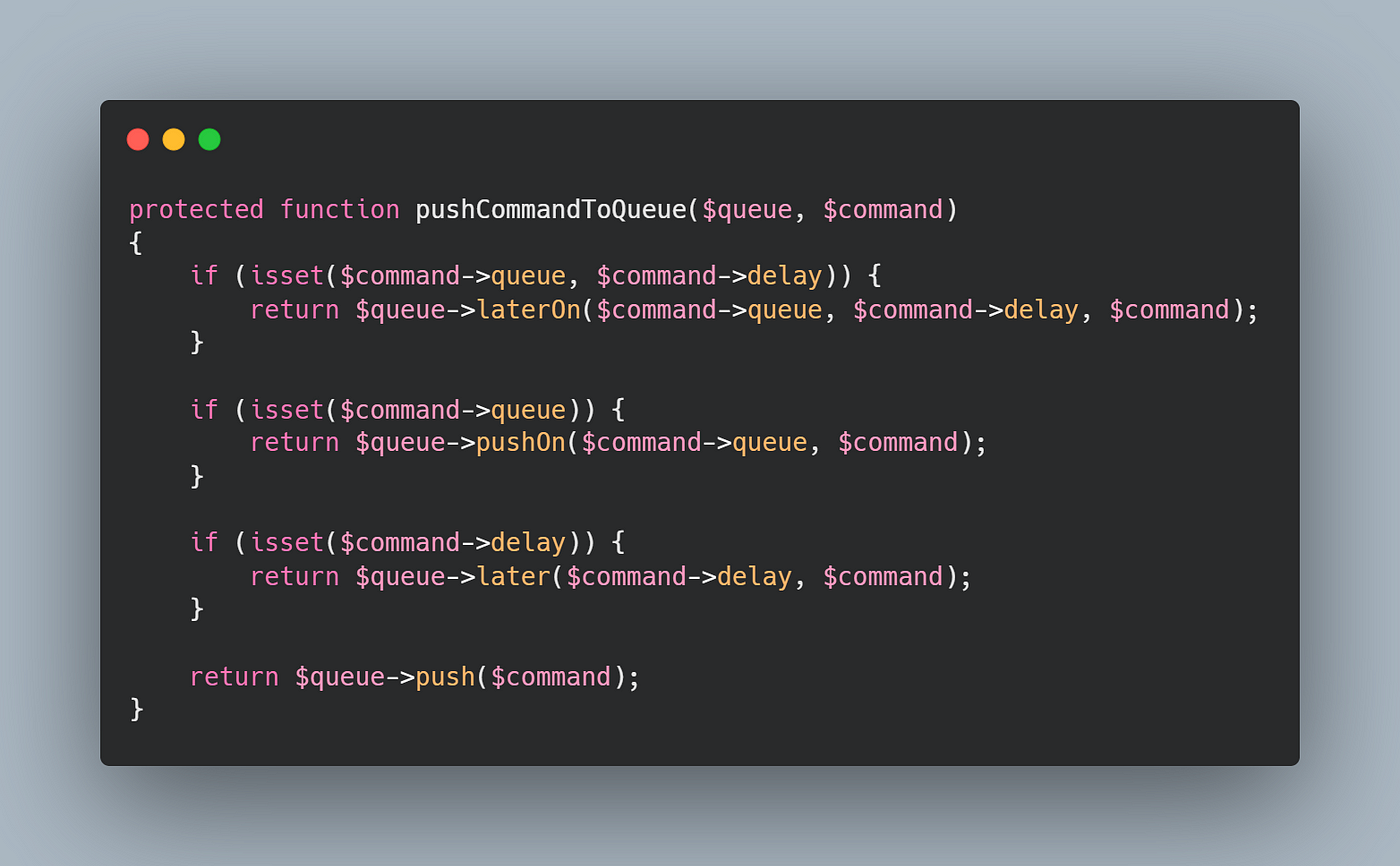
Dispatcher::pushCommandToQueue()
Depending on if you are pushing the job to a specific queue and/or adding any delay, it calls the appropriate methods on the queue driver implementation. We’ll first look into the normal job dispatching which is available for processing instantly and then we’ll look into how delayed jobs work.
The push() method in the RedisQueue class consists of only one line:

RedisQueue::push()
It creates the payload and calls pushRaw() with the payload and queue name. The main payload generation happens in the createObjectPayload() method in the base Queue class the RedisQueue class inherits from:
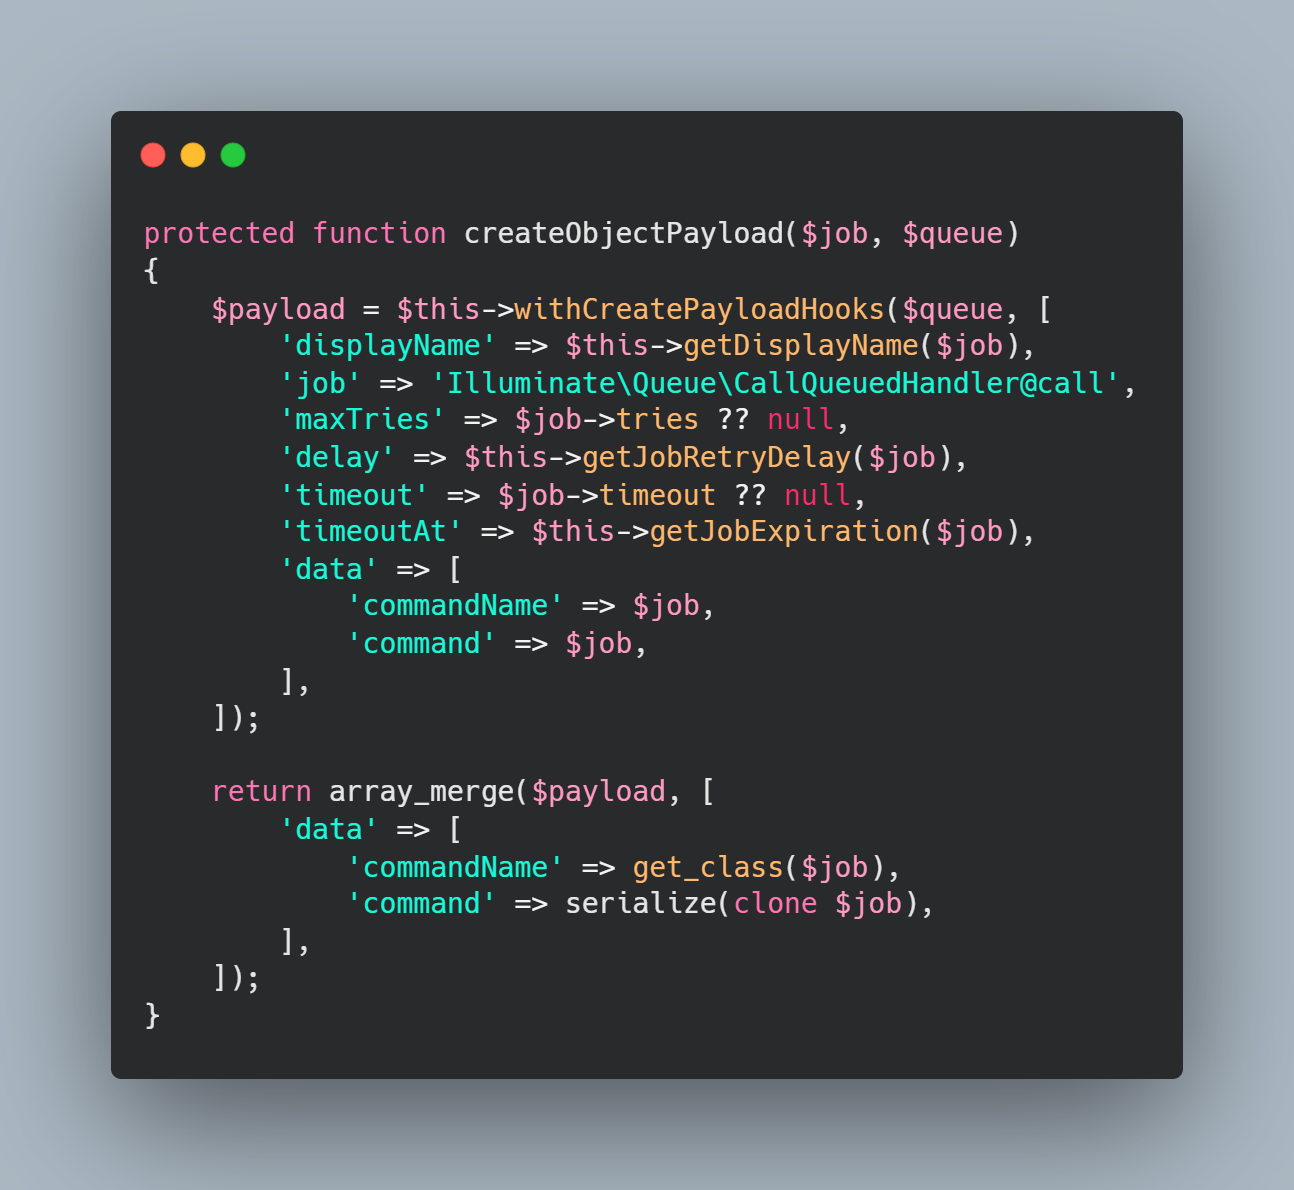
Queue::createObjectPayload()
The payload basically stores information like the delay, timeout, no of times the job could be retried, etc. The job property in the payload array is set to Illuminate\Queue\CallQueuedHandler@call, what it is and what it does we’ll find out when we talk about how jobs are processed. The data property contains the full namespace of the job class itself and serialized version of the job instance. All this data is then stored in Redis. As I said earlier, Laravel uses Redis lists to store the queue data. The key for the list is generated like this:
1) If you specify the name during dispatch with $job->onQueue('emails') method, the generated queue name would be queues:emails.
2) Otherwise, the default queue name would be used from your queue configurations. e.g. queues:default.
So all the different queues that you use will create different lists in the Redis server, e.g queues:emails, queues:process_image, queues:default etc. The job payload is then pushed into one of the queues.
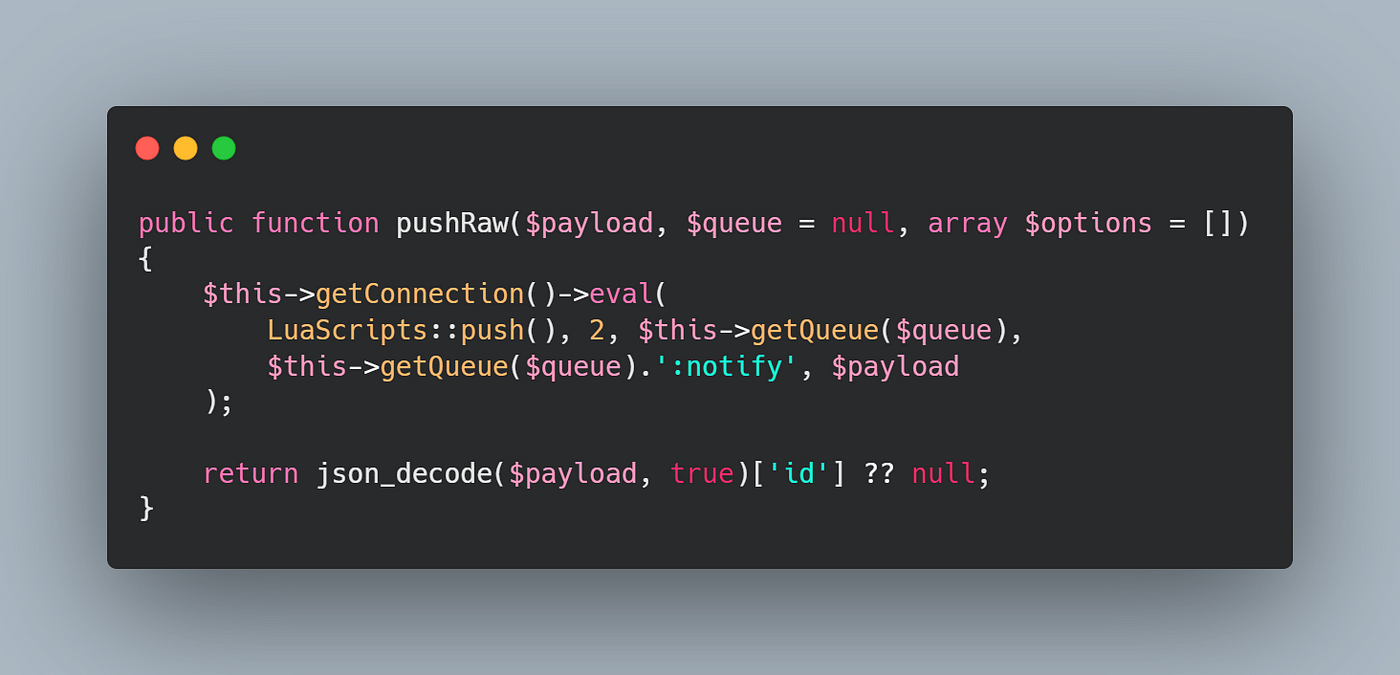
RedisQueue::pushRaw()
If an operation requires multiple calls to the Redis server, those are done using Lua scripts that are evaluated directly in the Redis server. Even if you don't know Lua, you can clearly understand that it basically calls RPUSH Redis command to add the job payload at the end of the queue.
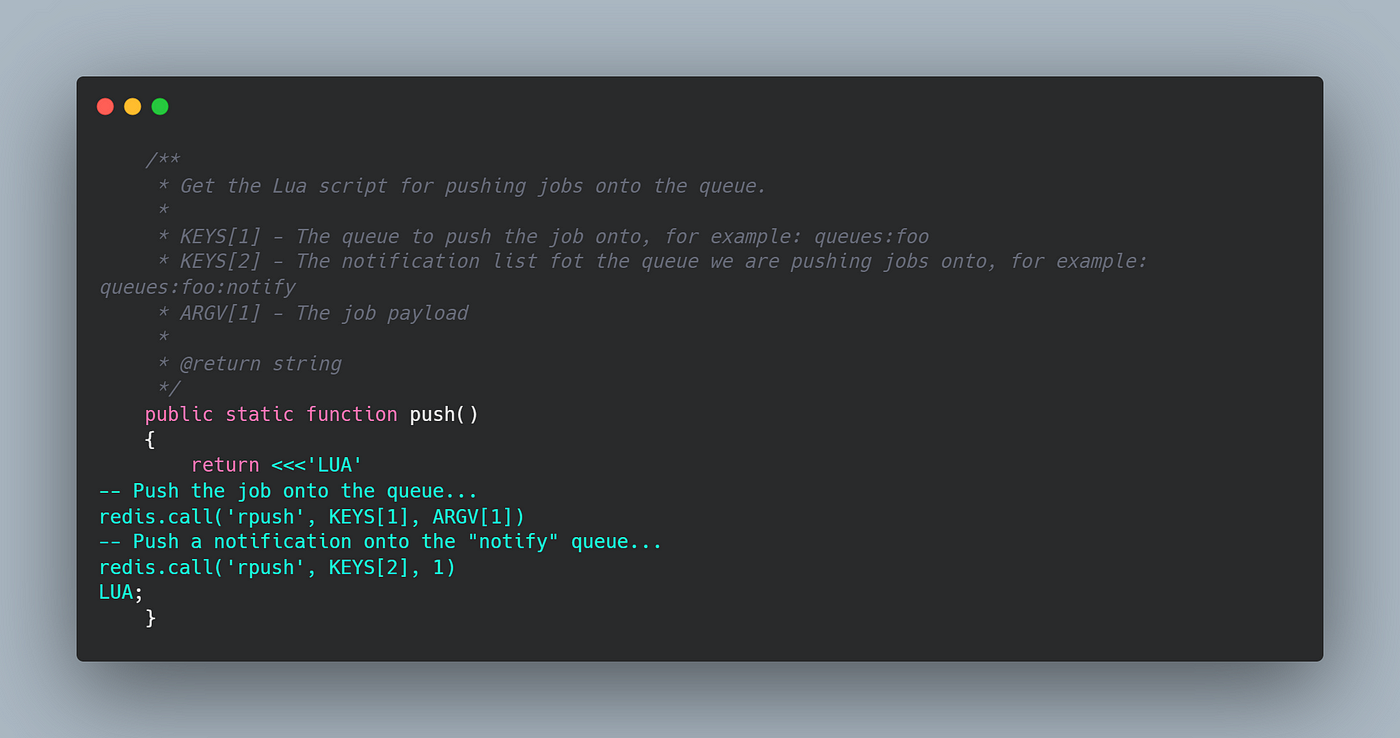
LuaScripts::push()
Other than pushing the job into the list, it is also pushing the number ‘1’ into the notify list for the queue. Keep this behavior in your mind, we’ll find out why when we look into how jobs are processed.
The delayed jobs are stored in a sorted set in Redis.
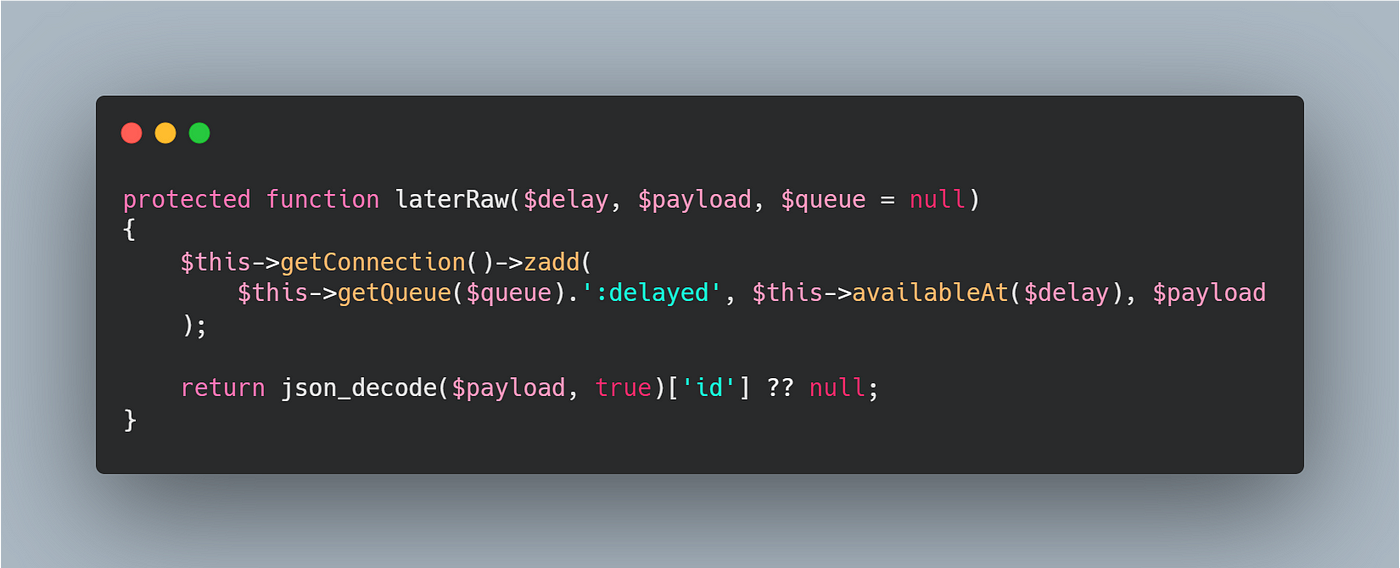
RedisQueue::laterRaw()
The key for the sorted set is generated by appending :delayed at the end of the current queue name, for example queues:default:delayed, queues:emails:delayed etc. If you remember our earlier discussion about sorted sets, each element in sorted sets is added with a score. Here, the score would be the timestamp when the job would be available for processing. So if you added 5 minutes delay to your job, the score would be $currentTimeStamp + 300;. Now to get all the jobs available for processing you can just run ZRANGEBYSCORE queues:emails:delayed -inf current_timestamp, this will return all the jobs that are expired at the moment and are available to be processed. So this means, that if you add 5 minutes delay to your job, you can be sure that it won’t be processed before the 5 minutes are over, but there is no way you can make sure that it gets processed exactly after the 5 minutes threshold is crossed. It totally depends on the no of items in your current queue.
So that’s it about job dispatching. In the next part, we’ll see how jobs are processed.
Recommend
About Joyk
Aggregate valuable and interesting links.
Joyk means Joy of geeK