

Learning Svelte: Let's Build a Word Puzzle | Keyhole Software
source link: https://keyholesoftware.com/2022/06/14/lets-learn-svelte-by-making-a-word-puzzle/
Go to the source link to view the article. You can view the picture content, updated content and better typesetting reading experience. If the link is broken, please click the button below to view the snapshot at that time.
Learning Svelte: Let's Build a Word Puzzle
Svelte is a growing JavaScript component framework compiler delivered in a developer-friendly package. Usage of Svelte has been growing – IBM and even Apple (in its newest beta of Apple Music) have been using it for their frontend needs.
While it’s not as widely adopted as React or Angular, Svelte does have attractive advantages.
- Its compiler-based approach allows for a smaller package delivered to the client.
- There is no shadow dom. There is no diffing. The compiler puts what’s needed on the page, and Svelte tracks ‘reactivity’ through variable assignment.
- State management is built into Svelte, no third-party inter-component state library necessary.
- Styles are scoped to the component, but global styles are easy to add.
- Components are written like an HTML page – js in the
scripttag, styles in thestyletag, and HTML powered up with directives elsewhere. Not everything needs to be JavaScript!
All in all, this comes to a cleaner developer experience, which is why I’m writing this post. I think it’s a tool we developers need to get on board with. So, let’s embark on an active learning assignment: making a word puzzle with Svelte!
WormWord
Requirements
Before beginning development and the true learning of Svelte, let’s consider our requirements. What might we desire for a word guessing game?
- Choose a secret word from a list that the user will need to guess over a set number of attempts.
- The word should be between 3 and 10 characters in length.
- The user should have an indication for whether the letters they guessed are in the secret word, or if the word they guessed is the right length.
- Users should have a soft keyboard that displays the guess status of each letter.
- The page should be optimized for mobile use.
Getting Started
With our requirements determined, it’s time to begin the real work. To get up and running quickly, we can start with a SvelteKit app.
npm init svelte worm-wordcd worm-wordnpm install |
At this point, you might get some options, including the ability to use TypeScript. While TypeScript can be useful in large projects, for this one, it isn’t necessary. However, it is good to note for future reference that TypeScript can be utilized in Svelte projects out-of-the-box.
Let’s also make a library directory to hold our components, utility functions, and state management code.
mkdir -p src/lib/componentsmkdir src/lib/utilsmkdir src/lib/state |
Letter Component
For the user’s enjoyment, let’s make ours look like popular word board games from the past, where each letter has a tile. Since the positions of our letters are important for giving clues to our secret word, we should have a way to display letters in the game. We could start this in a dedicated Letter.svelte file, but let’s do it in the root component for the app instead, and move logic into component files as they are built.
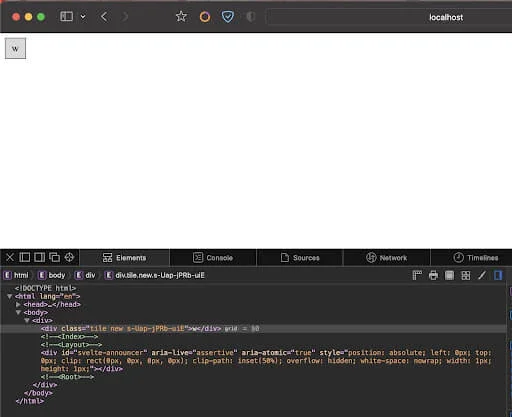
src/routes/index.svelte:<script>let char = 'w';let status = 'new';</script><div class="tile {status}">{char}</div> |
We’ll add some styling in a minute. Let’s first see what’s going on here. We have a script tag that defines some variables, and we have just a div containing the variable. Note that we can template in html just by using { curly braces, much like in JSX. However, the majority of the component logic should live in its script tag, much like a Vue component.
Note that we are also able to dynamically switch the div’s class based on the value of status.
Let’s flesh out “status” a little bit more. What states can a letter be in? A letter space could either have no letter yet, or it could have a letter. “new” should cover the case where there is no letter in the space yet. An incorrect word guess could either have “correct”, “wrong”, or “close” letters. Here, “close” means that the letter is in the secret word, but in the wrong position, and a “correct” letter is both in the word and in the right position.
Let’s add some jsdoc-style soft typing for status, and we can use styling to indicate the status by changing the background color of the letter.
src/routes/index.svelte:<script>let char = 'w';/** @type {'new' | 'close' | 'wrong' | 'right'} */let status = 'new';</script><div class="tile {status}">{char}</div><style>.tile {/* square */border: 1px solid black;width: 2rem;height: 2rem;/* center the character */display: grid;justify-content: center;align-items: center;}.new {/* gray */background-color: rgb(218, 218, 218);}.close {/* yellow */background-color: rgb(236, 236, 83);}.wrong {/* red */background-color: rgb(255, 90, 90);}.right {/* green */background-color: rgb(110, 216, 110);}</style> |
At this point, let’s run the development server and take a peek at localhost:3000.
npm run dev |
You can play with values of status to see the different background colors for each letter status. Let’s make a few letters and imagine what an entire word might look like.
src/routes/index.svelte (just the script part):<script>let wordGuess = 'worm';let statusList = ['new', 'close', 'wrong', 'right'];let zippedWordData = [...wordGuess].map((char, index) => {let statusIndex = index % statusList.length;return { char, status: statusList[statusIndex] };});</script> |
Since we’re still learning Svelte, let me point out the differences. In the script tag, we’ve replaced the char variable with a wordGuess. We’ve also put the relevant statuses into an array. We then iterate to create an array of letter-and-status-data that we’ll use to render the word.
Let’s render a whole word!
src/routes/index.svelte:<div class="wordGuess">{#each zippedWordData as guessLetter}<div class="tile {guessLetter.status}">{guessLetter.char}</div>{/each}</div> |
{#each} is one of several html templating blocks that, along with {#if}, {#await}, and {#key} make adding logic to a component simple. In this example, we are iterating over zippedWordData to get the status and char for the word “worm” that we are treating as our word guess. Let’s style this “word guess,” and we have a new class called wordGuess.
src/routes/index.svelte:<style>.wordGuess {display: grid;gap: 0.25rem;max-width: 25rem;grid-template-columns: repeat(10, 10fr);}(...etc.) |
We should then see:

Of course, at this point, we have gotten a little beyond what a ‘Letter’ is. Let’s pull what makes a Letter into its own component. We moved the tile and the various status styles on over to a new file.
src/lib/components/Letter.svelte:<script>export let char = '';export let status = 'new';</script><div class="tile {status}">{char}</div><style>.tile {display: grid;justify-content: center;(...etc.)</style> |
What’s new here is the export keyword. This marks the variable as a component property, which can be put into the component as an attribute, as we can see back in index.svelte.
src/routes/index.svelte:<script>import Letter from '../lib/components/Letter.svelte';let wordGuess = 'worm';(...)</script><div class="wordRow">{#each zippedWordData as guessLetter}<Letter char="{guessLetter.char}" status="{guessLetter.status}" />{/each}</div> |
Here we are importing the Letter component, and using its char and status parameters.
At this point, it’s worth checking that our guess of ‘worm’ looks exactly the same as it did. We can also try a few different words to see how they look. We’re still just cycling through the statuses and don’t have any logic hooked up there yet.
The pattern of “grow out an idea, contain into a component, use that component to grow another idea” is one that Svelte works pretty well for. Its ease of extraction and fuss-free imports make sketching out an idea nearly trivial.
Let’s do it again. This time, we are going to make a list of ‘guesses’, and we’ll want to display each guess as a list from top to bottom.
Guess Component
Let’s replace our wordGuess with an array of words. To keep things from looking samey, we can add a bit of randomness to the status of each letter, just to see how it will look. We can then iterate over an array of words using {#each}.
src/routes/index.svelte:<script>import Letter from '../lib/components/Letter.svelte';let wordGuesses = ['worm', 'engineer', 'testing', 'run', 'kanban'];let statusList = ['new', 'close', 'wrong', 'right'];let zipWordData = (wordGuess) =>[...wordGuess].map((char) => {let statusIndex = Math.floor(Math.random() * 10) % statusList.length;return { char, status: statusList[statusIndex] };});let guessesWithStatus = wordGuesses.map(zipWordData);</script>{#each guessesWithStatus as word}<div class="wordGuess">{#each word as guessLetter}<Letter char="{guessLetter.char}" status="{guessLetter.status}" />{/each}</div>{/each}<style>.wordGuess {display: grid;gap: 0.25rem;max-width: 25rem;grid-template-columns: repeat(10, 10fr);margin: 0.5rem;}</style> |
Maybe here you can see where we are going. We will extract everything but the word data, move the logic into lib/components/Guess.svelte, and import the component back into index.svelte.
src/lib/components/Guess.svelte:<script>import Letter from './Letter.svelte';export let word;let statusList = ['new', 'close', 'wrong', 'right'];let zipWordData = (someWord) =>[...someWord].map((char) => {let statusIndex = Math.floor(Math.random() * 10) % statusList.length;return { char, status: statusList[statusIndex] };});let guessWithStatus = zipWordData(word);</script><div class="wordGuess">{#each guessWithStatus as guessLetter}<Letter char="{guessLetter.char}" status="{guessLetter.status}" />{/each}</div><style>.wordGuess {display: grid;gap: 0.25rem;max-width: 25rem;grid-template-columns: repeat(10, 10fr);margin: 0.5rem;}</style> |
Now index.svelte should have all of that out of it and look much cleaner.
src/routes/index.svelte:<script>import Guess from '../lib/components/Guess.svelte';let wordGuesses = ['worm', 'engineer', 'testing', 'run', 'kanban'];</script>{#each wordGuesses as word}<Guess {word} />{/each} |
That’s so satisfying! Let’s make sure everything is still working well.

Looks like it is! Nice work.
Wrapping Up
Today, we looked at and learned the basics of Svelte and Svelte components, some features of its html templating, and how it’s similar to and different from other mainstream javascript frontends. But, this is just the start.
Next time, we will use the element to allow users to type into the app in order to actually guess a word, use Svelte’s writable store to track state for previous guesses, and use its derived store to calculate the state of each letter in the list of guesses.
I hope you’ll tune in for my next posts! We’ll continue learning Svelte through this example application. Thank you for reading, and if you enjoyed, check out some of our other posts on the Keyhole Dev Blog.
Recommend
About Joyk
Aggregate valuable and interesting links.
Joyk means Joy of geeK