

Data Testing for Machine Learning Pipelines Using Deepchecks, DagsHub, and GitHu...
source link: https://hackernoon.com/data-testing-for-machine-learning-pipelines-using-deepchecks-dagshub-and-github-actions
Go to the source link to view the article. You can view the picture content, updated content and better typesetting reading experience. If the link is broken, please click the button below to view the snapshot at that time.

Quite some time ago, I have experimented with combining two of my interests: data science and video games. For a small personal project, I have scraped images from two of my favorite GameBoy games (Super Mario Land 2: 6 Golden Coins and Wario Land: Super Mario Land 3) and built an image classifier detecting from which game an image comes. It was lots of fun!
But this project pretty much never left a Jupyter Notebook ? And while I personally like Notebooks as a storytelling tool for structured narrative (and some ad-hoc experimentation), such a setup comes with quite a few limitations. For starters, building any ML/DL project is an iterative process, often with dozens or hundreds of experiments. Each of those either preprocesses the data slightly differently, adds some new feature(s), uses a different model and its hyperparameters, etc.
How to track all of those? We could create a spreadsheet and manually note down all the details. But I am sure it would become very annoying and cumbersome after just a few iterations. And while this could work for some of the points I have mentioned, it would not solve the issue with data. We simply cannot track data and its transformations that easily in a spreadsheet.
That is why this time I would like to approach this project differently, that is, use the available tools to have a properly versioned (including data) project with experiment tracking and some sanity checks for the data. Sounds much better than experiment tracking in a spreadsheet, right?
In this article, I will show you how to use tools such as DagsHub, DVC, MLFlow, and GitHub Actions to create a full-fledged ML/DL project. We will cover the following topics:
introduction to the project,
setting up a repository with DagsHub,
versioning the data with DVC,
tracking experiments with MLFlow,
setting up automatic data sanity checks using GitHub Actions and Deepchecks.
Let’s jump right into it!
Project description
As I have already mentioned in the introduction, we will be trying to solve a binary image classification problem. When I previously worked on this project, I compared the performance of a logistic regression model to that of a Convolutional Neural Network. In this project, we will implement the latter using keras.
Below you can find an example of the images that we will be working with.
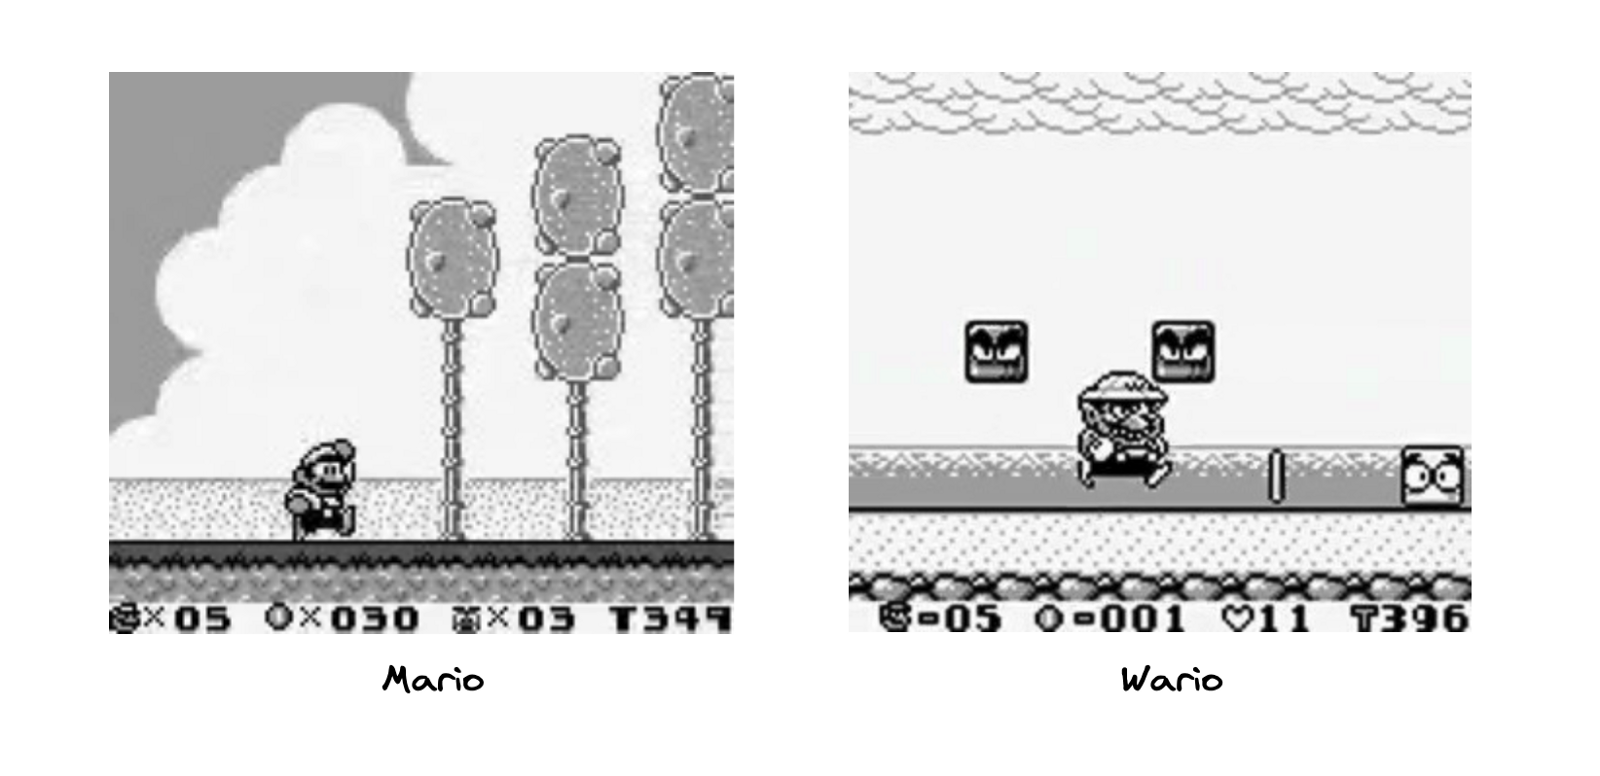
Image by author
I will not go into much detail in terms of getting the data, processing it, building the CNN, or even evaluating the models, as I have already covered those quite extensively in the past. If you are interested in those parts, please refer to my previous articles:
Part I describing getting the data, preprocessing it, and training a logistic regression and a CNN in
keras,Part II describing training a CNN in PyTorch.
For the v2 approach to this image classification task, we use the following project structure:
https://gist.github.com/erykml/fb7580867c9e859120c36c5508e0239f
We will cover all the elements throughout the article, but for now we can briefly mention the following:
all data is stored in the
datadirectory and each subdirectory stores data from different stages.the
.githubhidden directory is responsible for the GitHub Actions workflows.the
notebooksdirectory contains Notebooks used for exploration, those are not relevant for the project’s functionalities.the
srcdirectory contains the project’s entire codebase. Each script covers a different part of the pipeline.requiremets.txtcontains the list of required libraries for running the project.poetrycould work just as well.
Setting a clear project structure is definitely helpful in keeping everything organized and facilitates running experiments that modify only parts of the entire pipeline. There are still quite a few things we could add to the structure, but let’s keep it simple and focus on the other elements of the project’s setup. We will mention some potential extensions at the end of the article.
Setting up a repository with DagsHub
As the first building block of our project, we will use DagsHub. In a nutshell, it is something like GitHub, but tailor-made for data scientists and ML engineers (as opposed to software engineers). On DagsHub we can easily host and version not only our code but also our data, models, experiments, etc.
You might be thinking now “sounds great, but we need to sign up for one more service and, on top of that, our entire codebase is already on GitHub”. Fortunately, that is not a problem. We can either fully migrate a repository or — which is even more convenient — mirror an existing one. This way, we can continue working using the existing GitHub repository and it will be mirrored in real-time to DagsHub. For this project, we will be using the repo mirroring option — the main GitHub repository will be mirrored to this one on DagsHub.
As you can see in the image below, the UI of DagsHub is very similar to the one of GitHub. This way, we do not have to learn yet another tool from scratch, as everything seems very familiar from the very beginning. In the image below, you can already see that there are some new tabs available (experiments, annotations) and we will cover them later on. In the image, we display all the files in the repository, but we can easily filter them, for example, to display only Notebooks or files tracked with DVC.

Image by author
We will not cover all of the functionalities of DagsHub, but it is also worth mentioning that it offers the following:
annotating data using fully integrated Label Studio, an open-source tool for labeling structured and unstructured data.
commenting and starting discussions under all types of files.
comprehensive comparison (including diff) of any files a data scientist might want to use. As long as the data is stored on DagsHub, we can easily compare Notebooks, tables, CSV files, annotations, various kinds of metadata, and even images.
Versioning data with DVC
You are certainly already familiar with the concept of versioning the code with Git. Unfortunately, GitHub does not work that well with data, as it has a file limit of 100MB. This means that uploading a binary file (or a video file in our case) can already exceed this limit. On top of that, comparing different versions of data sets of any kind is also not the most pleasant experience. That’s why we need another tool for the job.
DVC (data version control) is an open-source Python library that essentially serves the same purpose as Git (even with the same syntax) but for data instead of code. The idea of DVC is that we keep the information about different versions of our data in Git, while the original data is stored somewhere else (cloud storage like AWS, GCS, Google Drive, etc.).
Such a setup requires a bit of DevOps know-how. Thankfully, DagsHub can save us quite some hassle, as each DagsHub account comes together with 10GB of free storage for DVC.
First, we need to install the library:
pip install dvcThen, we need to instantiate a DVC repo:
dvc initRunning this command creates 3 files: .dvc/.gitignore, .dvc/config, and .dvcignore. You can find more information about what they contain here. Then, we need to connect our freshly created DVC repo to DagsHub. As we have mentioned before, by using DagsHub we do not have to manually set the connection to cloud storage. The only thing we need to do is run the following commands in the terminal:
https://gist.github.com/erykml/b879e7f34f0c053b0be5c161240cad39
To make it even easier, DagsHub provides us with all of those under the Remote tab. We just need to copy-paste them into the terminal.
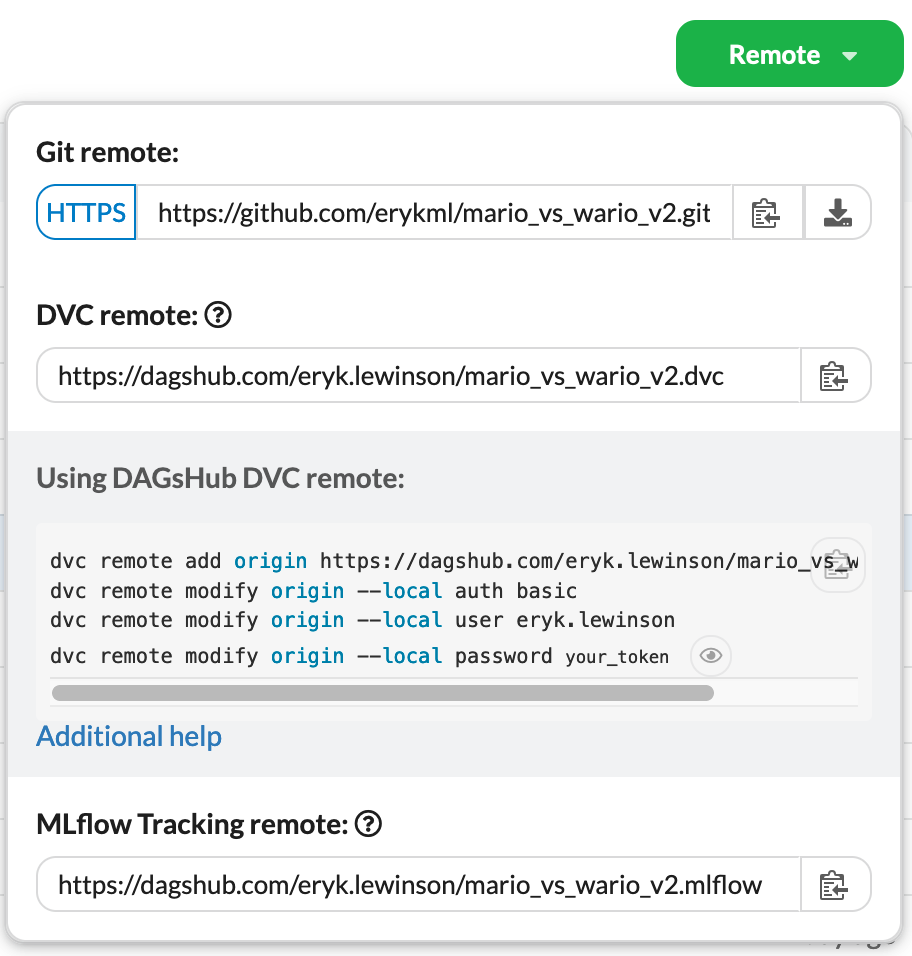
Image by author
Having connected to the DVC remote, we commit the previously mentioned files to Git:
git add.
git commit -m "Initialized DVC"
git push
Thanks to the mirroring functionality, we only need to push our files to GitHub, as DagsHub will automatically sync all the changes from there.
Now it is time to build a full pipeline, where the intermediate data outputs are tracked by DVC. To make the process easier, we created a separate .py file for each step of the pipeline. In our case, the steps are as follows:
get_videos.py— downloads the videos of the two games (full gameplays, from start to finish) from YouTube. The downloaded videos are stored in thedata/videosdirectory.extract_frames.py— extracts the images from mp4 video files. The output is stored in thedata/rawdirectory.create_train_test_split.py— splits the extracted images into training and test sets. The outputs of this stage are stored in thedata/processeddirectory.train.py— trains the CNN to classify the images. Outputs the trained model to themodelsdirectory and some other files (metrics.csvandparams.yml) to the root directory.
Based on those steps, we can create a pipeline using the dvc run command. For readability, the steps are divided into 4 chunks, each corresponding to a separate stage of the pipeline. In practice, you do not have to commit and push after each step. We did it for full transparency and tractability.
https://gist.github.com/erykml/22603287af4c546705c9b4afdc6b8918
As you can see in the committed files, DVC saves the pipeline stages into two files: dvc.yaml (stored in a human-readable format) and a dvc.lock (pretty much unreadable). While creating the pipeline, we used the following DVC commands:
-n- the name of the stage,-d- the dependency of the stage,-o- the output of the stage.
Below, you can see what the pipeline looks like in the YAML file.
https://gist.github.com/erykml/1dee99105604343dad4d1b9801f1a874
DVC will automatically track all directories and files under the outs.
On top of that, DagsHub offers a visual preview of the DVC pipeline. You can find it under the list of files in the repository. As you can see below, it makes it much easier to understand the entire pipeline than reading the dvc.yml file.
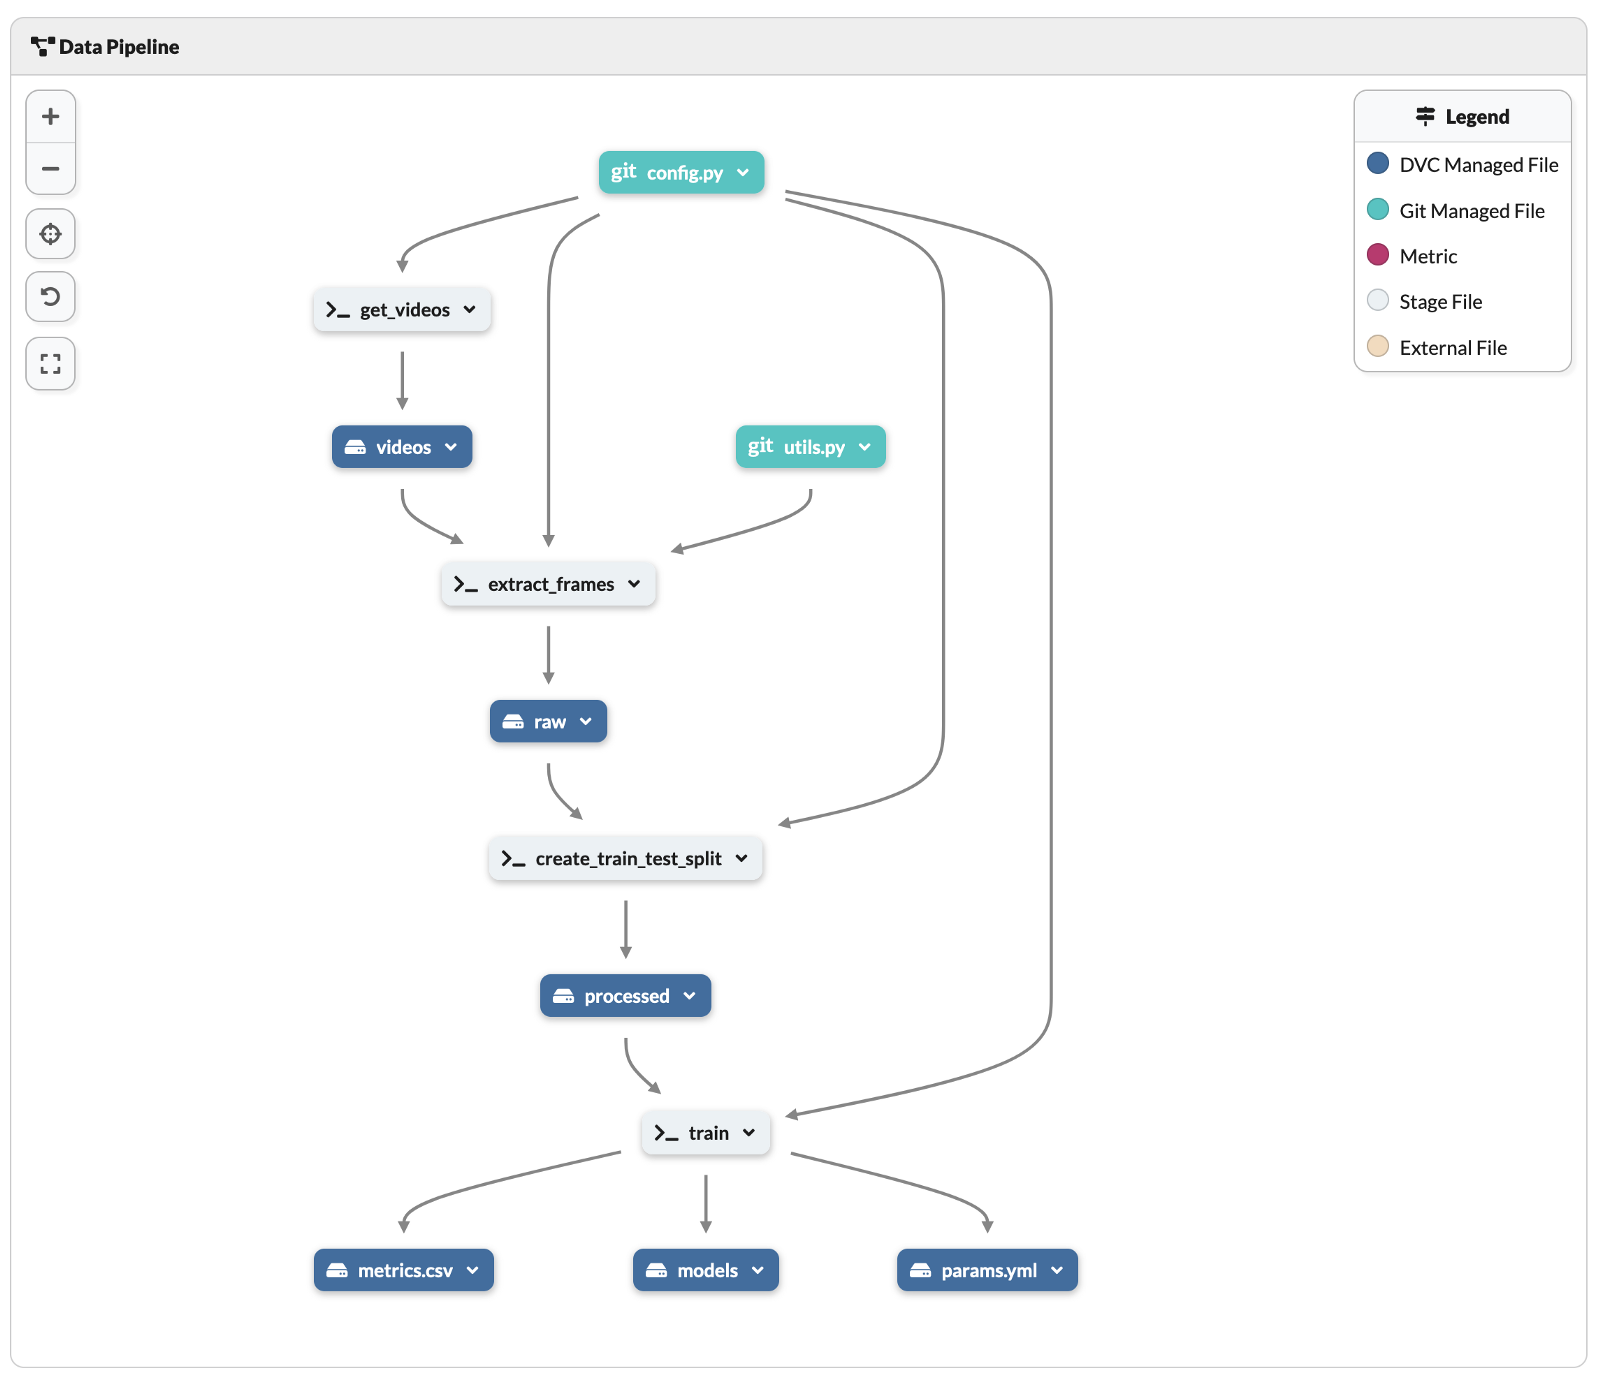
Image by author
Having defined the entire DVC pipeline, we can use the dvc repro command to reproduce the complete or partial pipeline by executing the stages defines in dvc.yml.
Lastly, it is worth mentioning that we can access and inspect all data stored with DVC on DagsHub, including quite some metadata. You can see an example below.
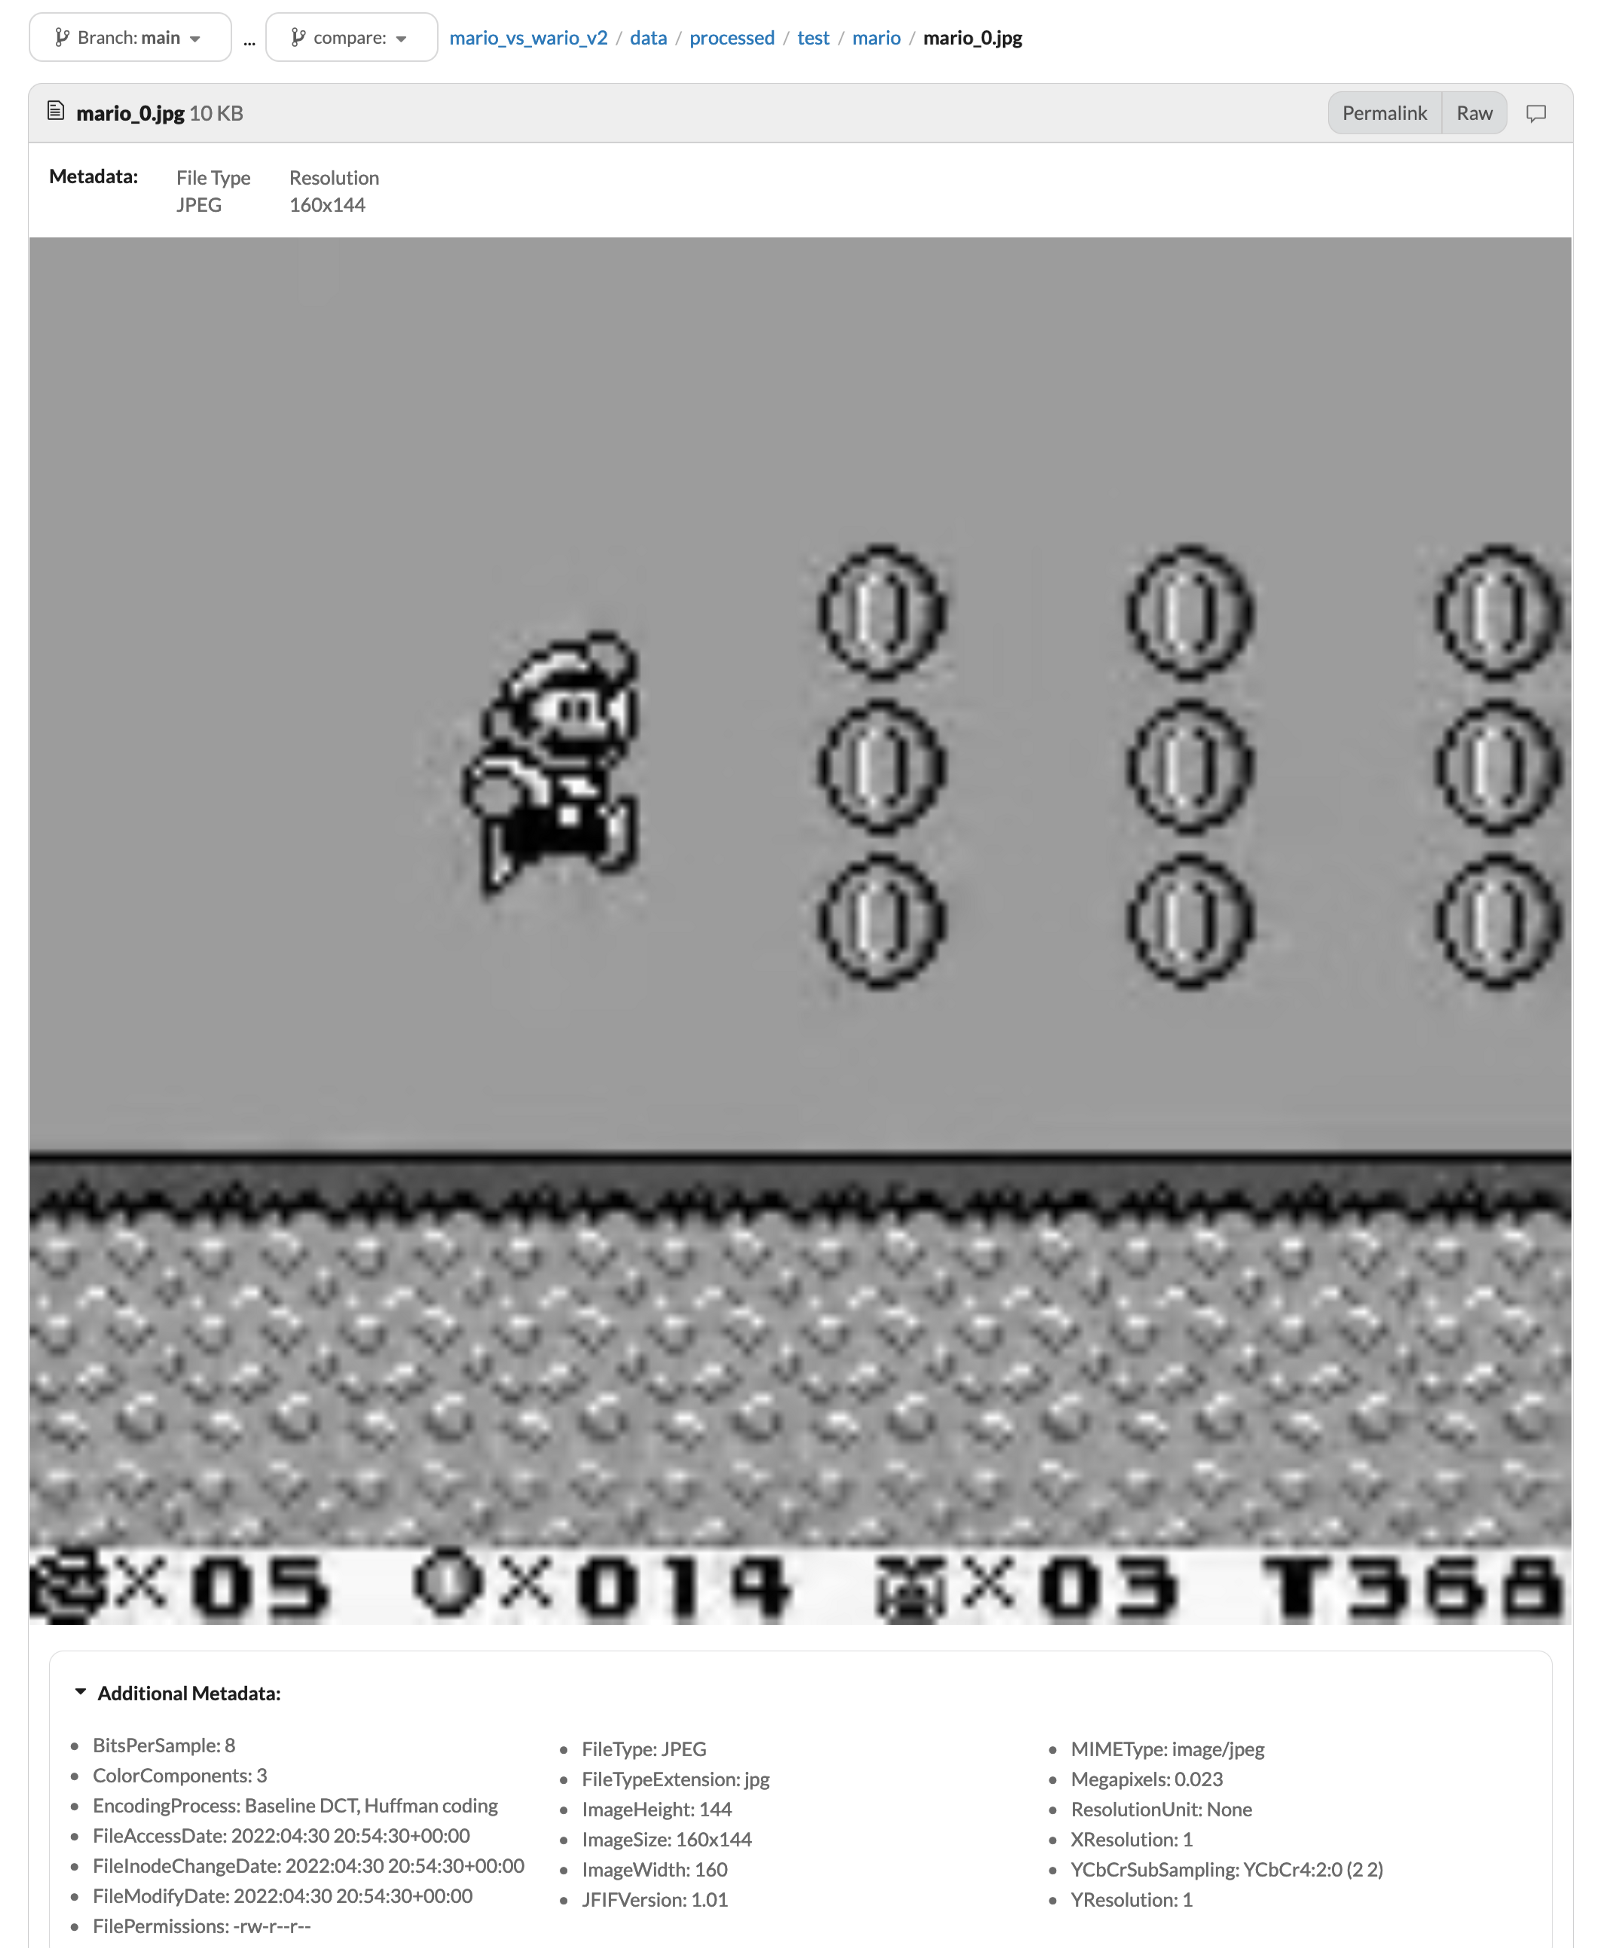
Image by author
Experiment tracking with MLFlow
The next point on our wish list for this project is experiment tracking. To do so, we will use another open-source library — MLFlow (MLFlow Tracking to be precise). With MLFlow’s functionalities we will log quite a lot of details about our experiments, starting with the name through the model’s hyperparameters and ending with the corresponding scores.
Similar to DVC, we also need a server to host MFLow. And just as before, that is also facilitated by DagsHub. We can find the details required for authentication under the Remote tab in our DagsHub repository. After we set up the MLFlow remote, all of our experiments will be logged under the Experiments tab in our DagsHub repository.
In the script below, you can see how to implement tracking with MLFlow. It is an abbreviated version of the full training script, which excludes some not strictly relevant elements (creating data generators, defining the NN’s architecture, etc.). However, we will mention some things about the MLFlow implementation:
in lines 7–9 we connected to the MLFlow remote provided by DagsHub,
in line 13 we used MLFlow’s TensorFlow autologger. It’s a convenient method that saves us the manual effort of specifying all the potential hyperparameters and other specs of the model. There are such autologgers for pretty much all relevant ML/DL libraries. Please see here for a list.
in line 19 we indicated we are starting a run of MLFlow — the library will track the things (manually specified or picked up by the autologger) within the context of the run (indicated using the
withstatement).in lines 45–54 we manually logged some parameters (size of the images, the learning rate, and the number of epochs) and metrics (test set’s loss and accuracy). While this was not explicitly needed (as we are using the autologger), we wanted to show both approaches.
https://gist.github.com/erykml/079b43c68ae3b1fb25fc3fe3fc5efc18
As a small bonus, it is worth mentioning that there is an alternative, more lightweight way of tracking experiments — using Git and DagsHub. To do so, we have to use the dagshub library. In lines 36–43 we have shown how to log some metrics and hyperparameters using the dagshub library.
The dagshub logger creates two files in the project’s root directory (unless specified otherwise): metrics.csv and params.yml. These are the two files we indicated in the last step of our DVC pipeline as outputs of the train.py script. When we commit those two files to git, DagsHub will automatically recognize them and put their values under the Experiments tab. We can clearly locate them when looking at experiments marked with the Git label in the source column.
The biggest advantage of using the dagshub client is that those experiments are fully reproducible — as long as we are using DVC to track data, we can switch to the project’s state at the time of finishing an experiment with a single git checkout. Such a thing is also possible with MLFlow, but not as simple.
You can also write your own custom logger which combines the best of the two approaches to tracking experiments. You can find an example here.
That would be all regarding the details of the implementation of experiment tracking. Moving on to inspecting some results, the following image presents the state at which an experiment called dream hookworm was still running — we see the accuracy and loss updated as the model is being trained.
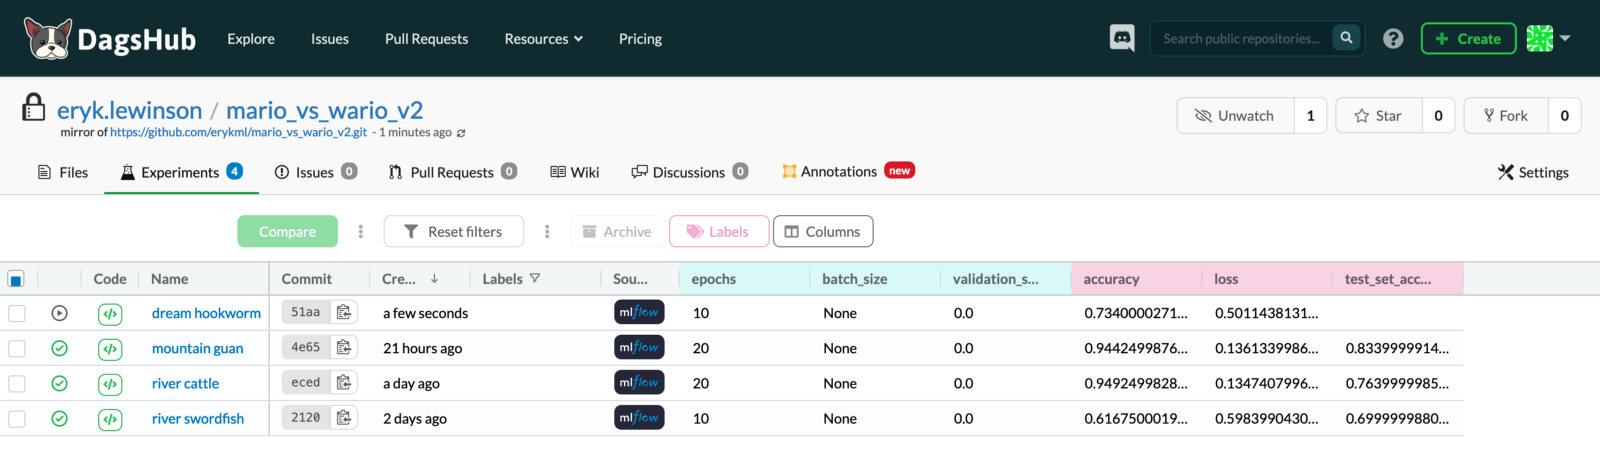
Image by author
In the Experiments tab, we can mark the variants we want to compare and press the compare button.

Image by author
In the following image, we see some of the hyperparameters tracked by MLFlow. As you might have guessed, we see that many hyperparameters because we are using MLFlow’s TensorFlow autologger. At the end of the list, you can also see the hyperparameter added by us manually — img_size. After that, we can see the relevant metrics.
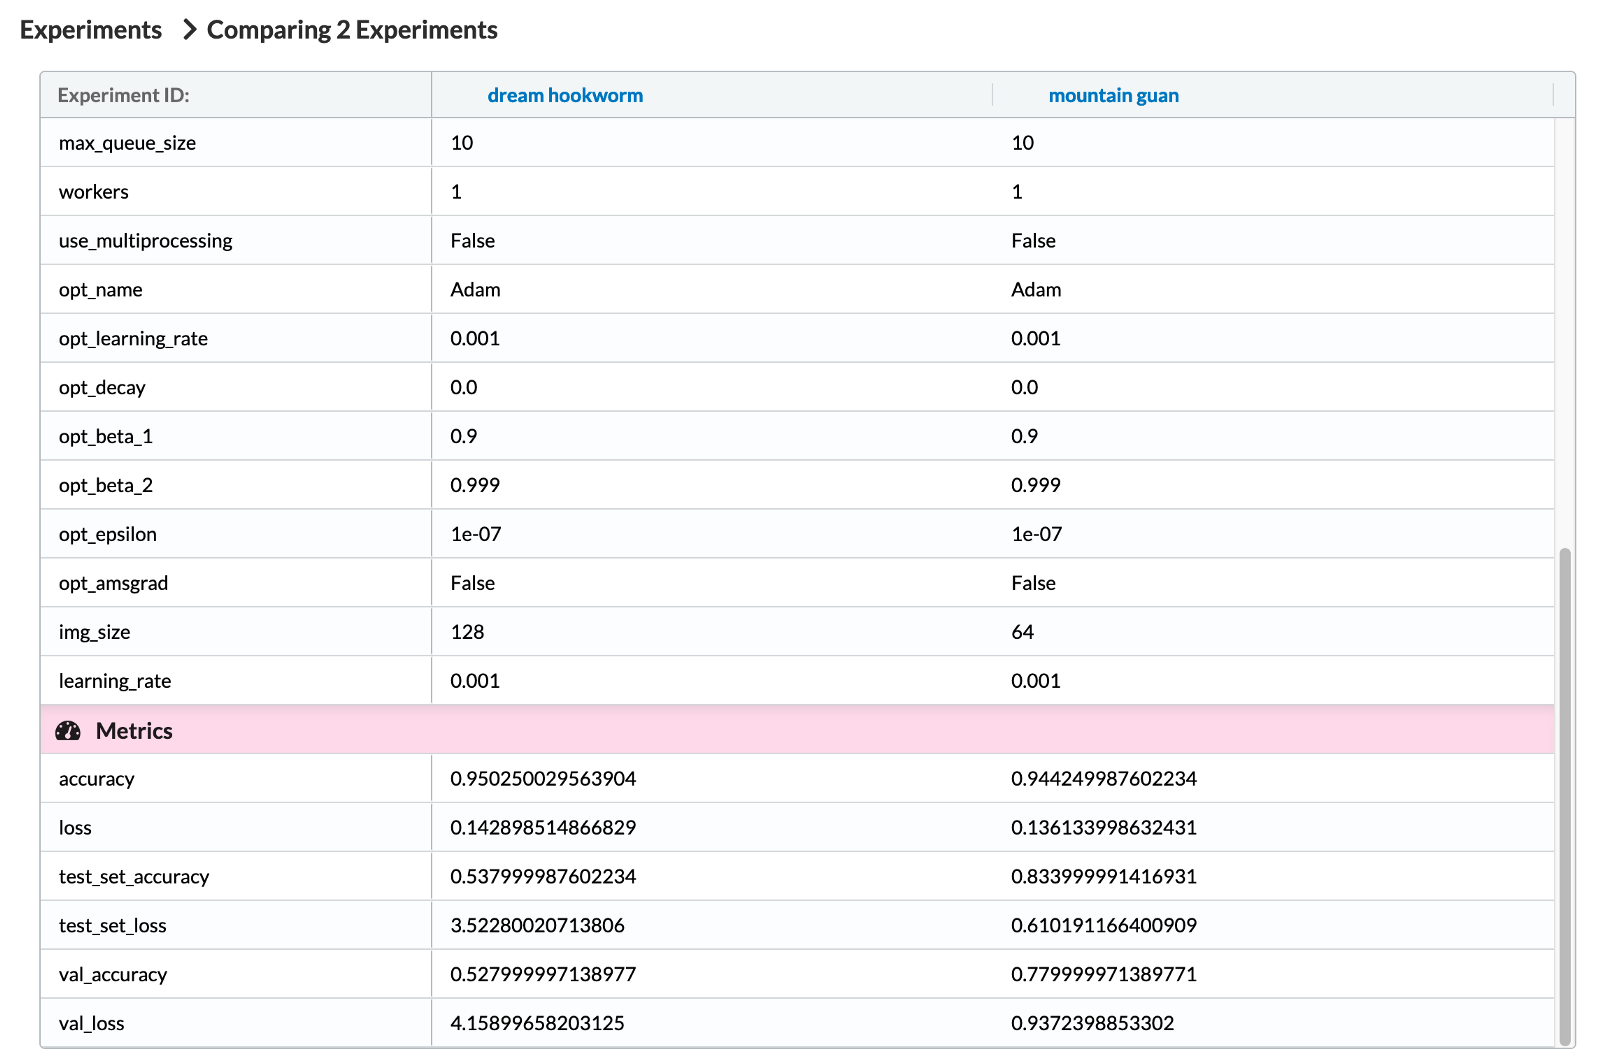
Image by author
The two analyzed experiments differ by two hyperparameters — the number of epochs and the considered image size (the size of the square image being passed into the first layer of the NN). You can also see the values of the hyperparameters and the corresponding training set accuracies in the following parallel coordinate plot.
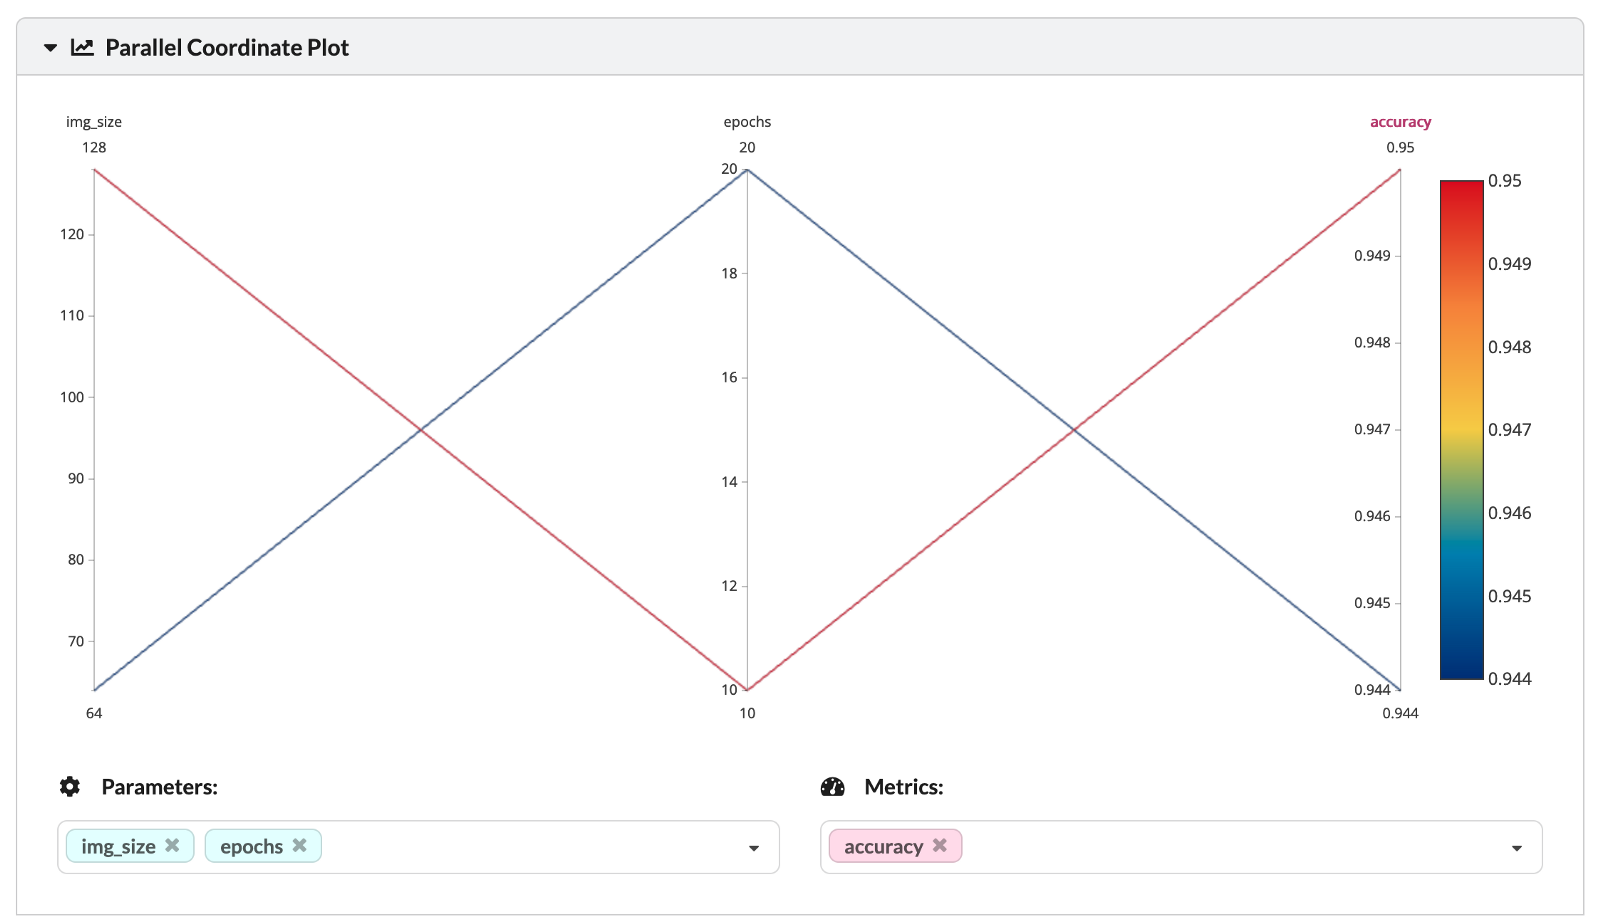
Image by author
Lastly, we can dive even deeper into analyzing various performance metrics of the experiments.
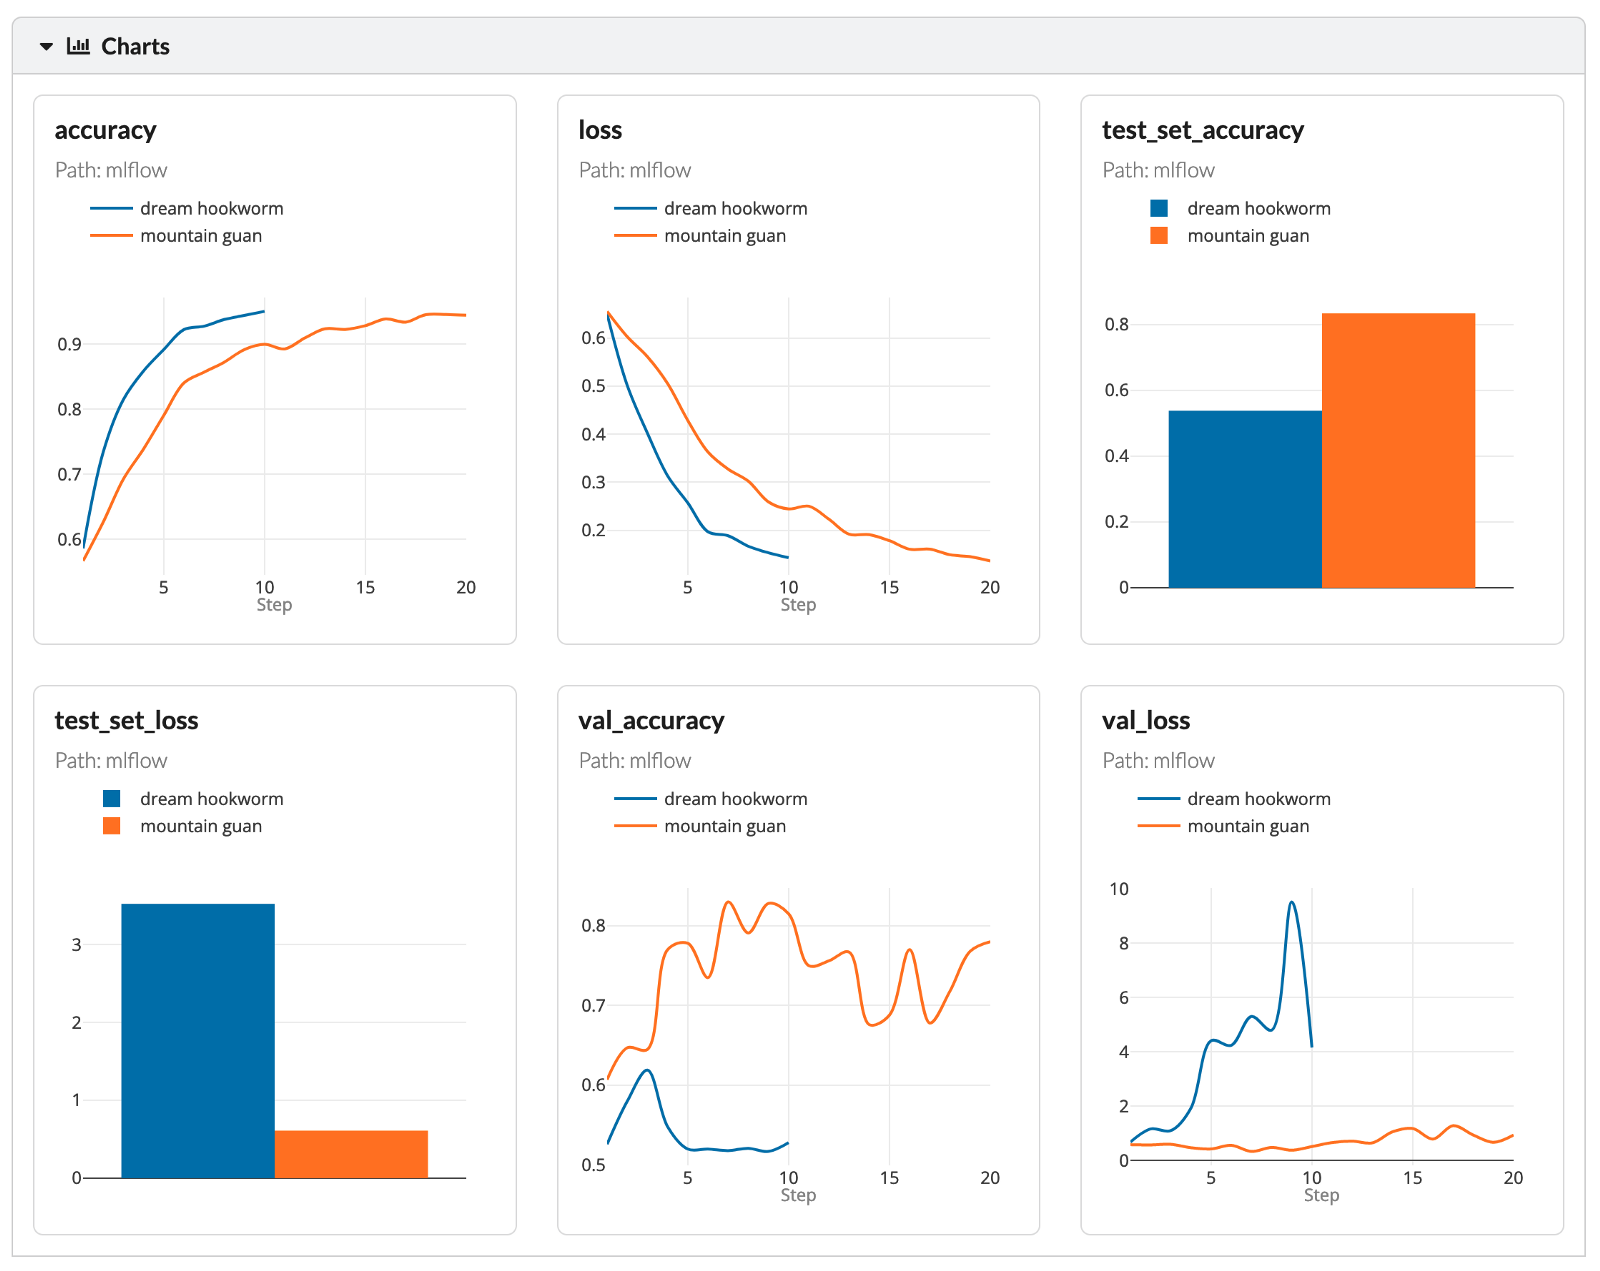
Image by author
As the goal of this part was just to showcase the functionalities of MLFlow tracking, we will not spend more time analyzing the results of the experiments.
Automating data sanity checks with GitHub Actions and Deepchecks
As the very last step of our project, we would like to create automated sanity checks for our data. Let’s illustrate that with a hypothetical example that could be applied to our project. In a video game such as the ones considered (the genre of side-scrolling platformers), the vast majority of time is spent trying to finish some level or just exploring. We see our main character running around and doing things (mostly jumping).
However, as in all games, there are some other screens as well (menus, black/white transition or loading screens, end credits, etc.). We could argue that those should not be included in the data. So let’s imagine we manually went through images and deleted the ones we deemed unsuitable for our data sample. This could raise a question: did our actions significantly change something in the data, for example, the balance of classes? Or maybe we introduced some other bias?
That could also be very relevant when some of our data transformations involve cropping the images — we could cut some HUDs (gaming lingo, heads-up display, or simply the status bar*)* from one class while keeping them there for the other. This would lead to creating a classifier which simply checks if that particular pixel has a value of X and then confidently decides from which game the image comes.
For exactly such a scenario it would be great to have some automated data sanity checks. We will show how to build those using GitHub Actions and Deepchecks. But first, we need to answer some helper questions.
What is GitHub Actions?
GitHub Actions is a tool used for automating software workflows. For example, software engineers use GitHub Actions to automate actions such as merging branches, handling issues, running unit or application tests, etc.
However, that does not mean that they are useless for data scientists. We can use GitHub Actions for many things, including:
automating ETL processes,
checking whether the current model should be retrained or not,
deploying a new model,
running automated data sanity checks.
Some things to keep in mind about GitHub Actions:
supports the main programming languages used for data science: Python, R, Julia, etc.
is free for public repositories and offers 2,000 minutes/month for private repositories (for the free GitHub accounts),
works great with the main cloud providers,
automated emails whenever workflow fails,
GitHub Action’s machines are not suited for very computationally heavy tasks, for example, training deep learning models.
What is Deepchecks?
In short, deepchecks is an open-source Python library for testing ML/DL models and data. The library can help us out with various testing and validation needs throughout our projects — we can verify the data’s integrity, inspect the distributions, confirm valid data splits (for example, the train/test split), and evaluate the performance of our model, and more!
GitHub Actions + Deepchecks
At this point, it is time to combine the two building blocks to automatically generate a data validity report every time we push some changes to the codebase.
First, we create a script generating the data validity report with deepchecks. We will use the library’s default suite (in the deepchecks’s lingo, this corresponds to a collection of checks) used to verify the correctness of the train/test split. Currently, deepchecks provides suites for tabular and computer vision tasks, however, the company is also working on an NLP variant.
https://gist.github.com/erykml/248a6599236fab145e0ab5da4c35d90c
Additionally, we could have specified an instance of a fitted model while using the run method. However, at the time of writing this article, deepchecks supports fitted scikit-learn and PyTorch models. Unfortunately, this means that our keras CNN will not work. But this will probably change in the near future, as deepchecks is still a relatively new and constantly developed library. Running the script will result in the generation of an HTML report in the root directory.
Now it is time to schedule running the sanity checks. Thankfully, using GitHub Actions is very easy. We just have to add a .yaml file to the .github/workflows directory. In this .yaml file, we specify things such as:
the workflow’s name
the trigger for the workflow — can be either a cron schedule, or as in our case, a push or pull request to the main branch
the permissions of the workflow
the OS where the workflow will run (Ubuntu, Windows, or macOS) — different pricing in minutes applies to different systems!
the env variables (used for storing secrets) we want to access. To use those, we first need to define them in our GitHub repository. To do so, in the repo go to Settings > Security > Secrets > Actions.
the steps that the workflow should execute
https://gist.github.com/erykml/21c60f22655796b89859c2c02b1f9d73
The script executes the following steps:
Sets up a Python 3.10 instance on Ubuntu.
Installs the dependencies from the
requirements.txt.Pulls the data from DVC — in this step we need to authenticate using the username and password (stored as GitHub Actions secrets). We only pull the data from the DVC pipeline stage that generates the train/test split.
Removes the old validation file if it exists.
Runs the script generating the data validation report.
Commits the files (using a template action:
stefanzweifel/git-auto-commit-action@v4).Adds a comment (using a template action:
peter-evans/commit-comment@v1).
After committing this file to GitHub, we will see our new workflow in the Actions tab.
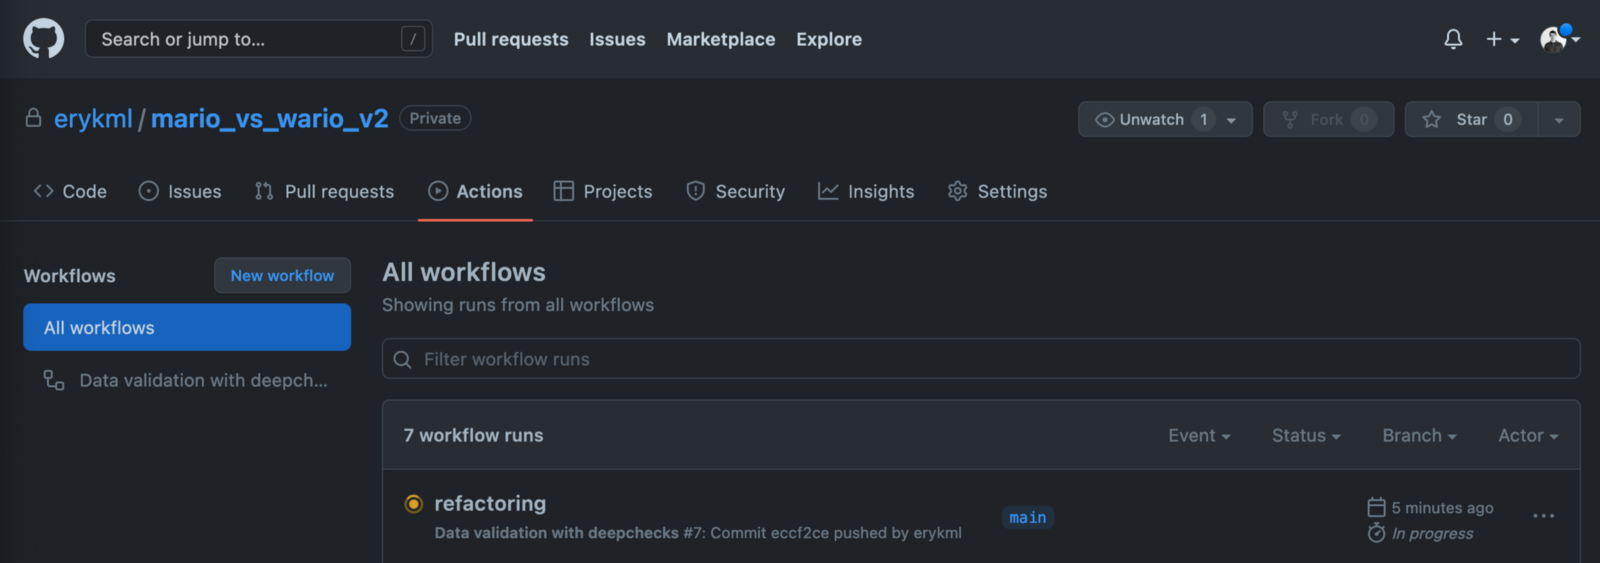
Image by author
We can dive deeper to see all the steps of the workflow, together with detailed logs. Those definitely come in handy when something goes wrong and we need to debug the pipeline.
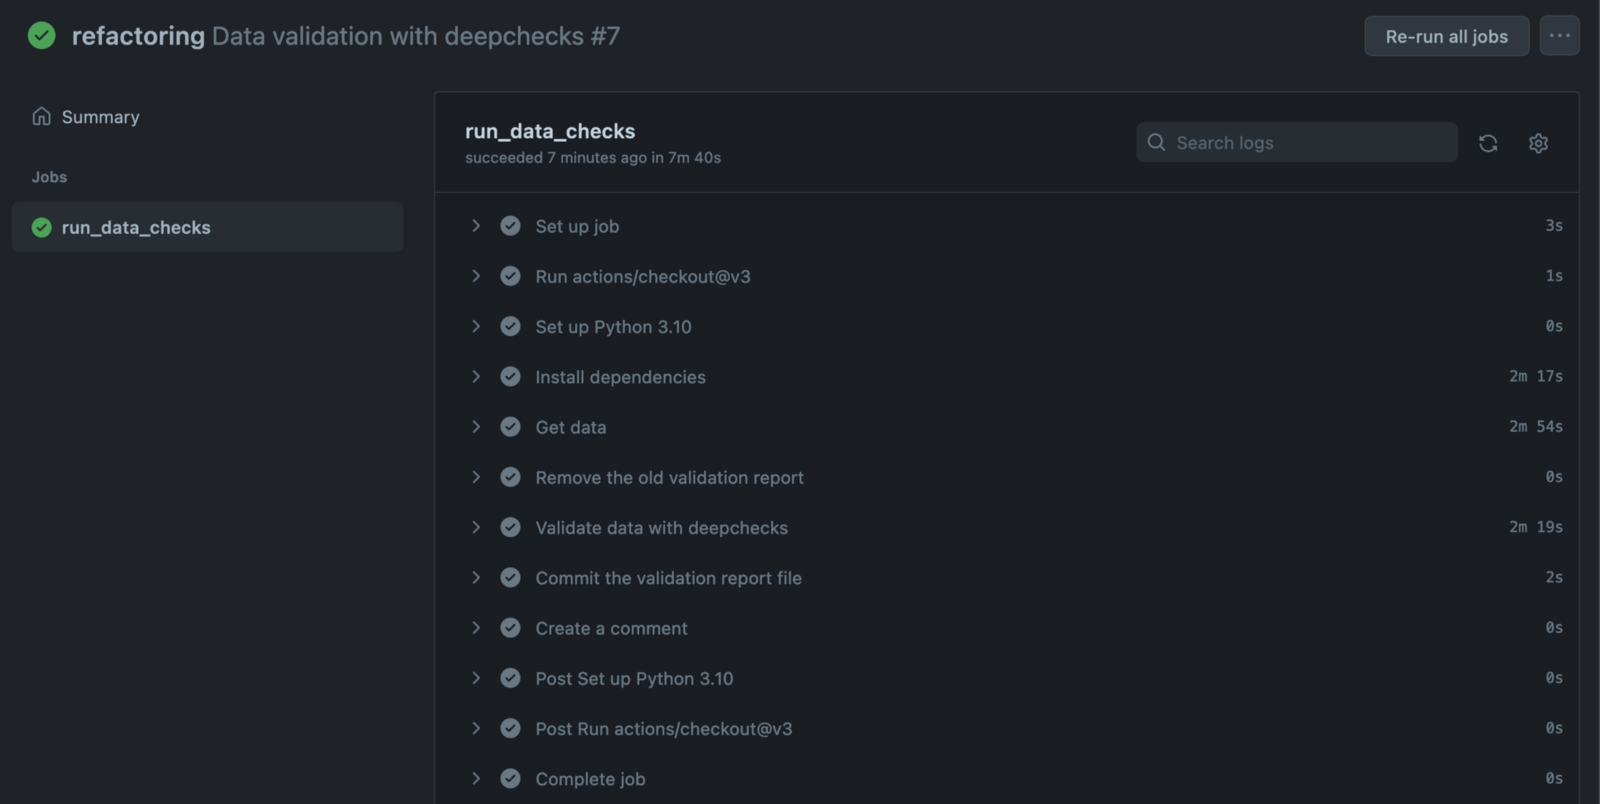
Image by author
After the workflow is finished, we can see that the GitHub bot posted a comment to our commit.
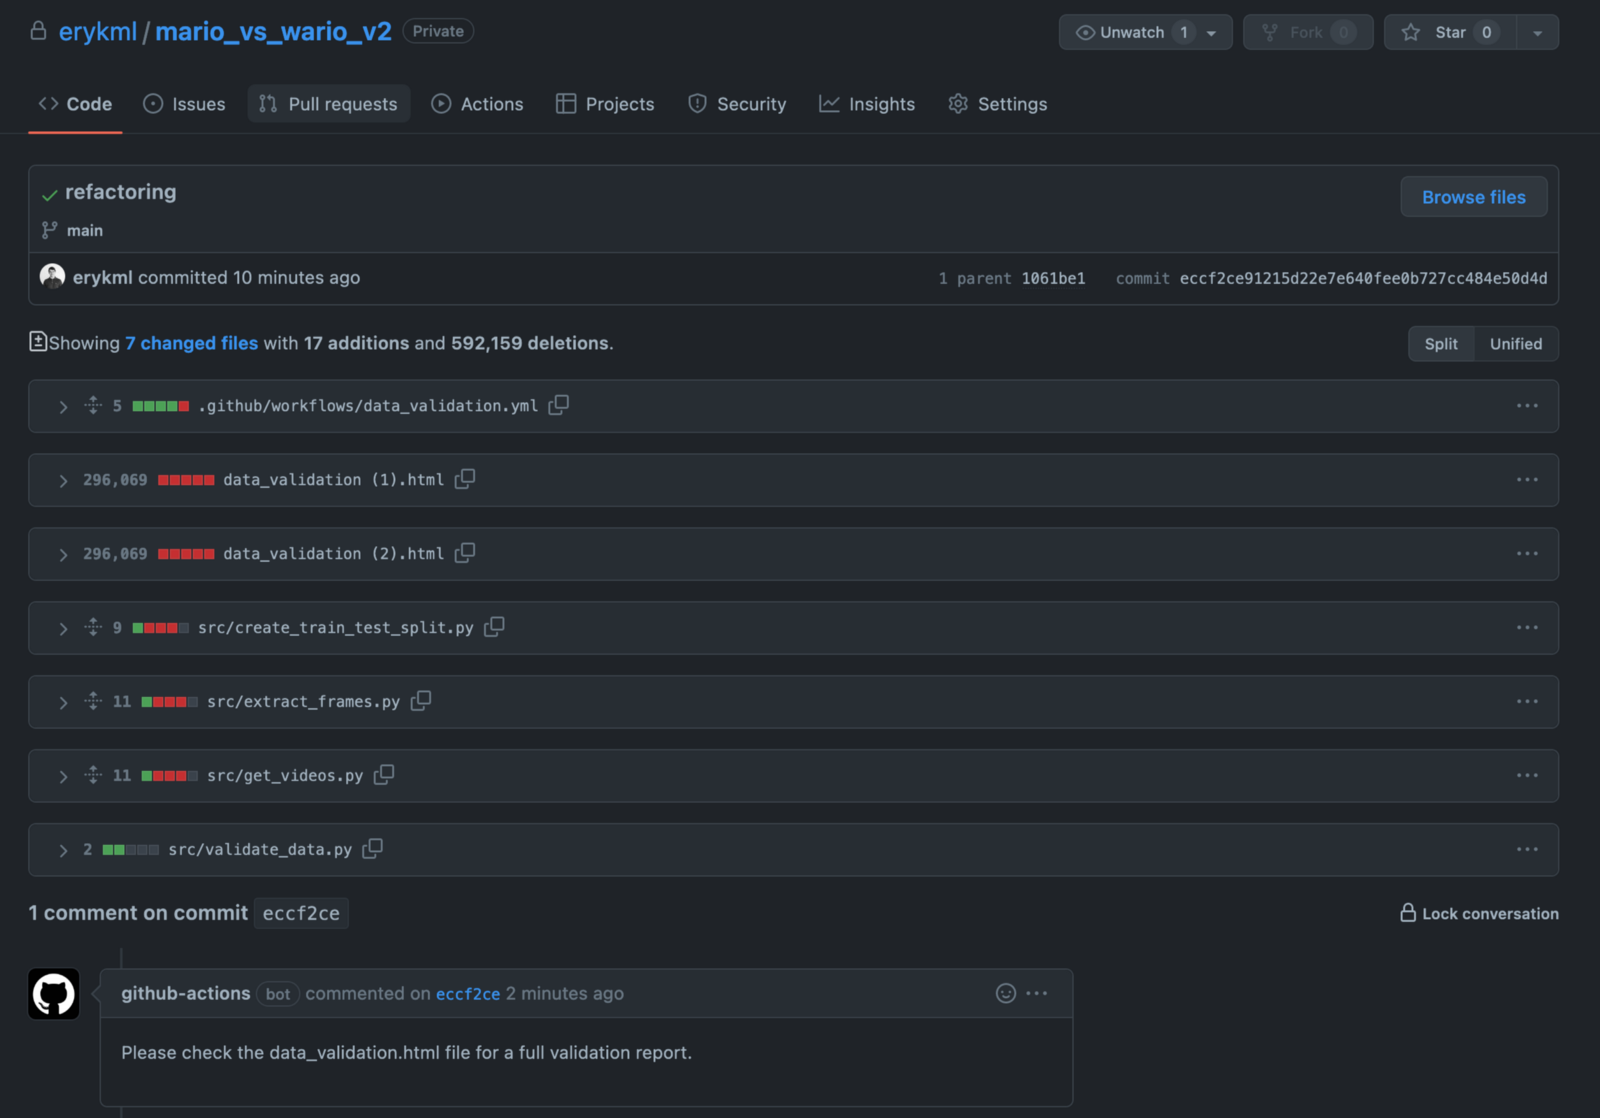
Image by author
And now for the most interesting part — we can find the data_validation.html report in our repository. It was automatically added and committed by the GitHub bot. To have it locally as well, we just need to pull from the repo.
For brevity, we present only some parts of the data validation report. Fortunately for us, the library also generates useful comments about the checks — what they are and what to look out for.
In the first image, we can see that the classes are perfectly balanced. This should come as no surprise, given this was exactly how we defined the splits.
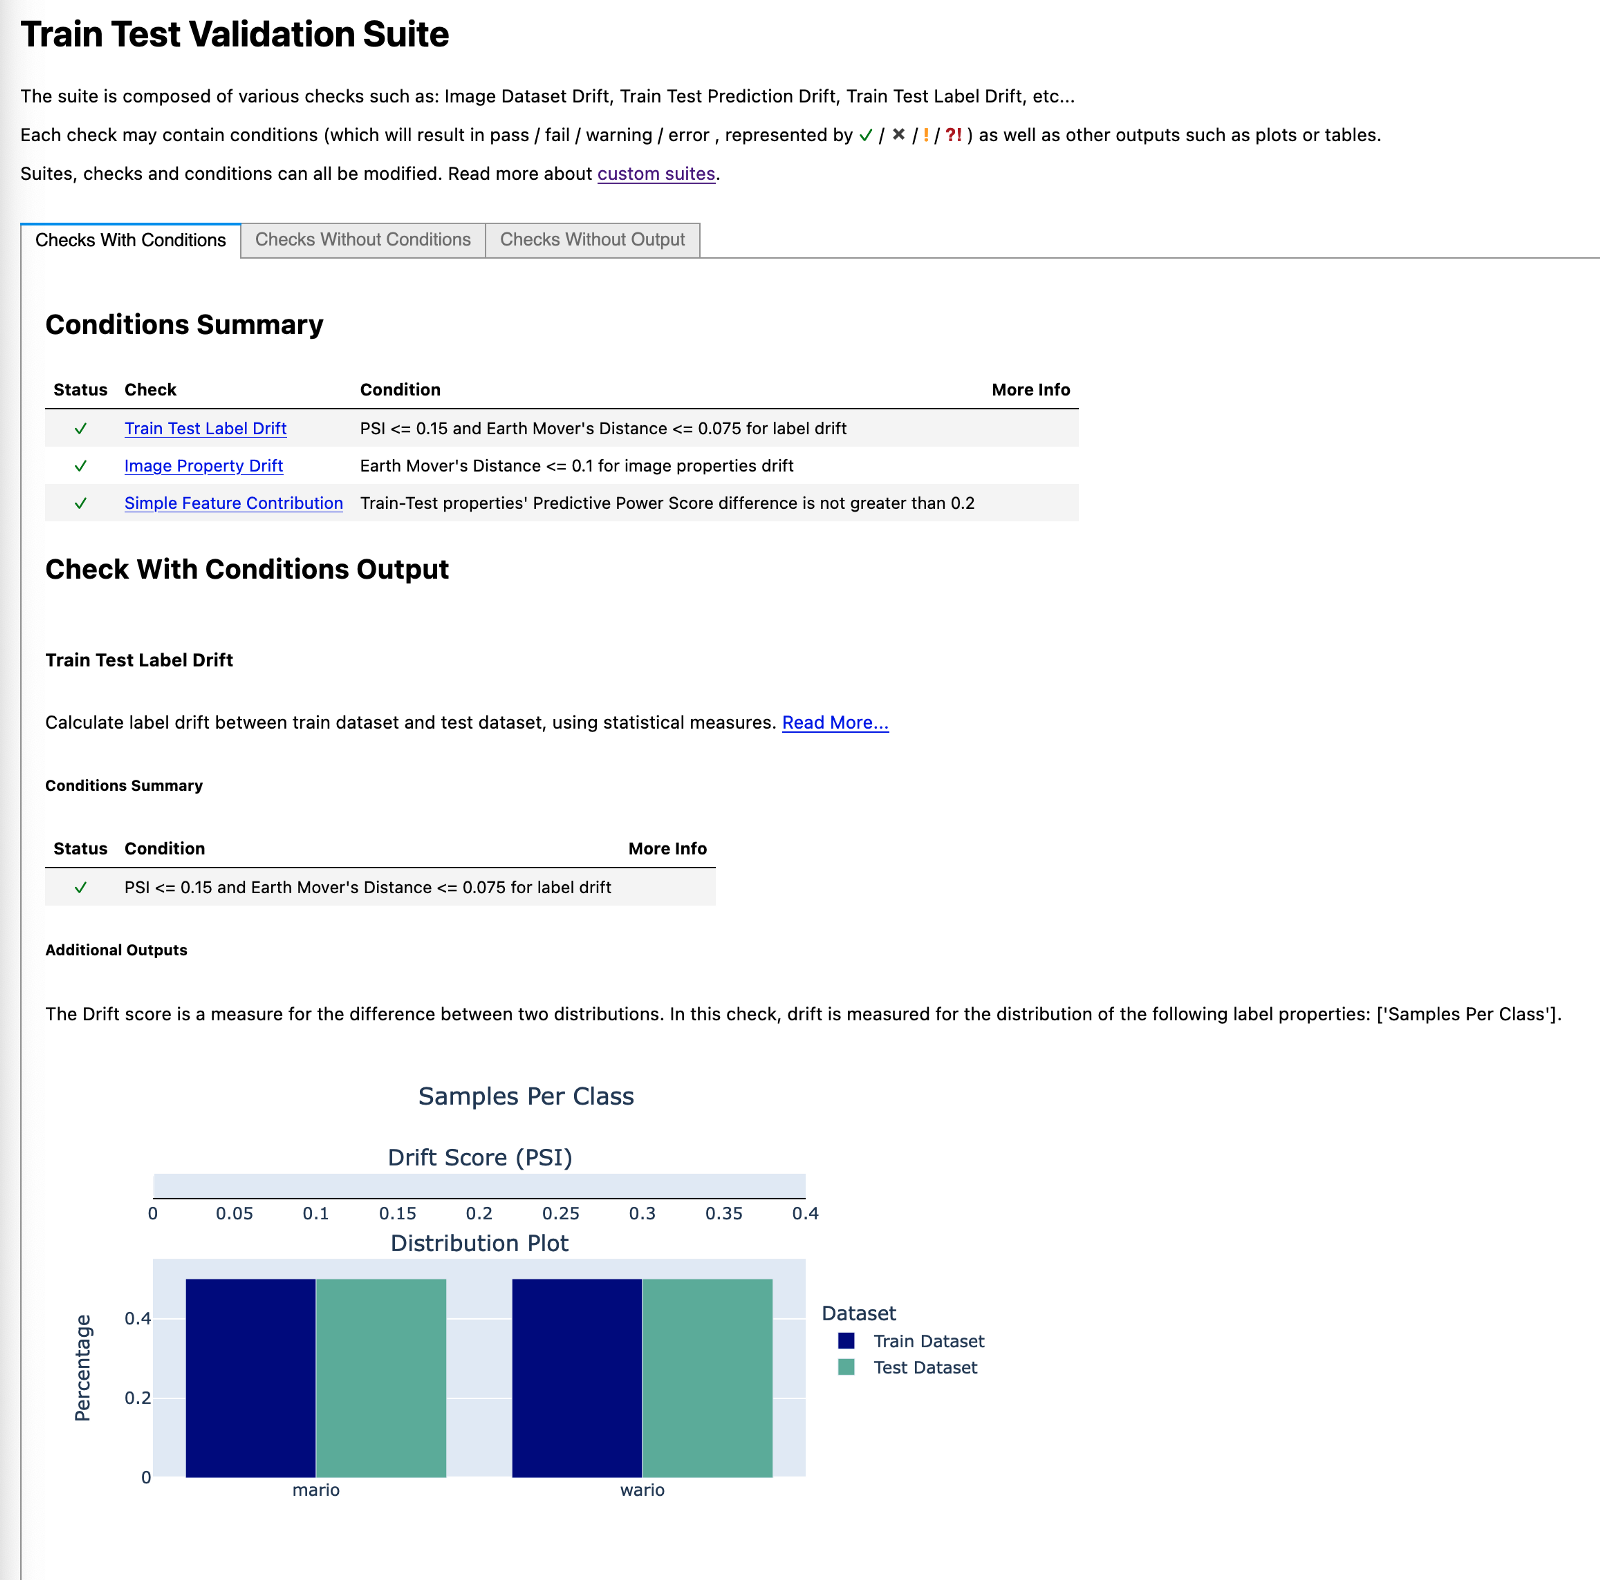
Image by author
In the second image, we can see the distribution plot of the brightness of the images over the train and test sets. Seems like the split was successful, as they are very similar. According to the documentation, it would be alarming if the Drift score (Earth Mover’s Distance) would be above 0.1.
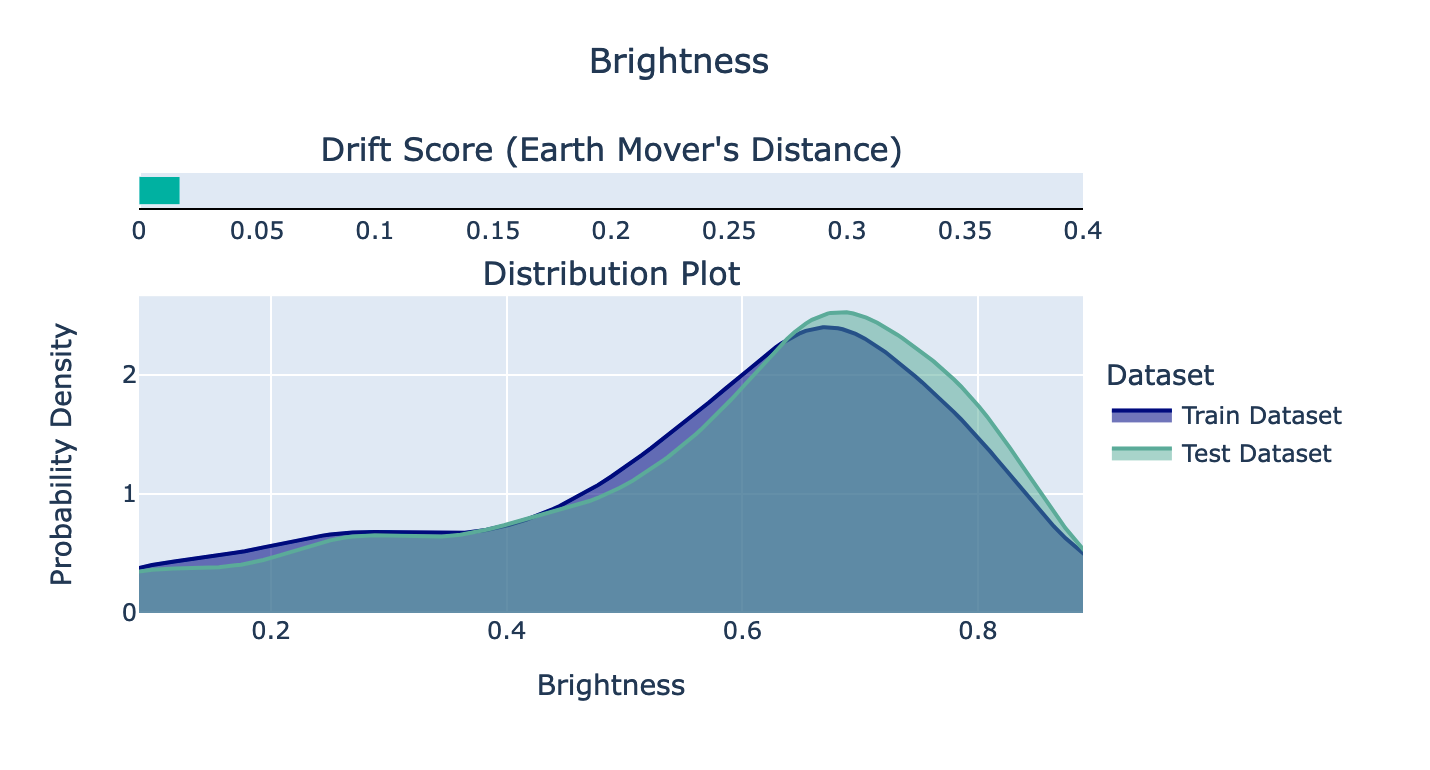
Image by author
Lastly, we look at the Predictive Power Score of the images’ area. As you can see in the comments, the difference in the PPS should be no greater than 0.2. That condition is satisfied, as we have a perfect PPS of 1 for all classes and datasets. Why is that? Simply the images from the two video games are of different sizes. The images from the Mario game are 160x144, while the Wario ones are 320x288 (double the size). This is probably just due to the fact that the videos were recorded using different emulator settings (originally, the games were for the same console, so they had the same output size). While this means that we can use the area of the image to perfectly predict the class, that is not the case in the actual model, as there we do reshape the images while loading them using ImageDataGenerator.
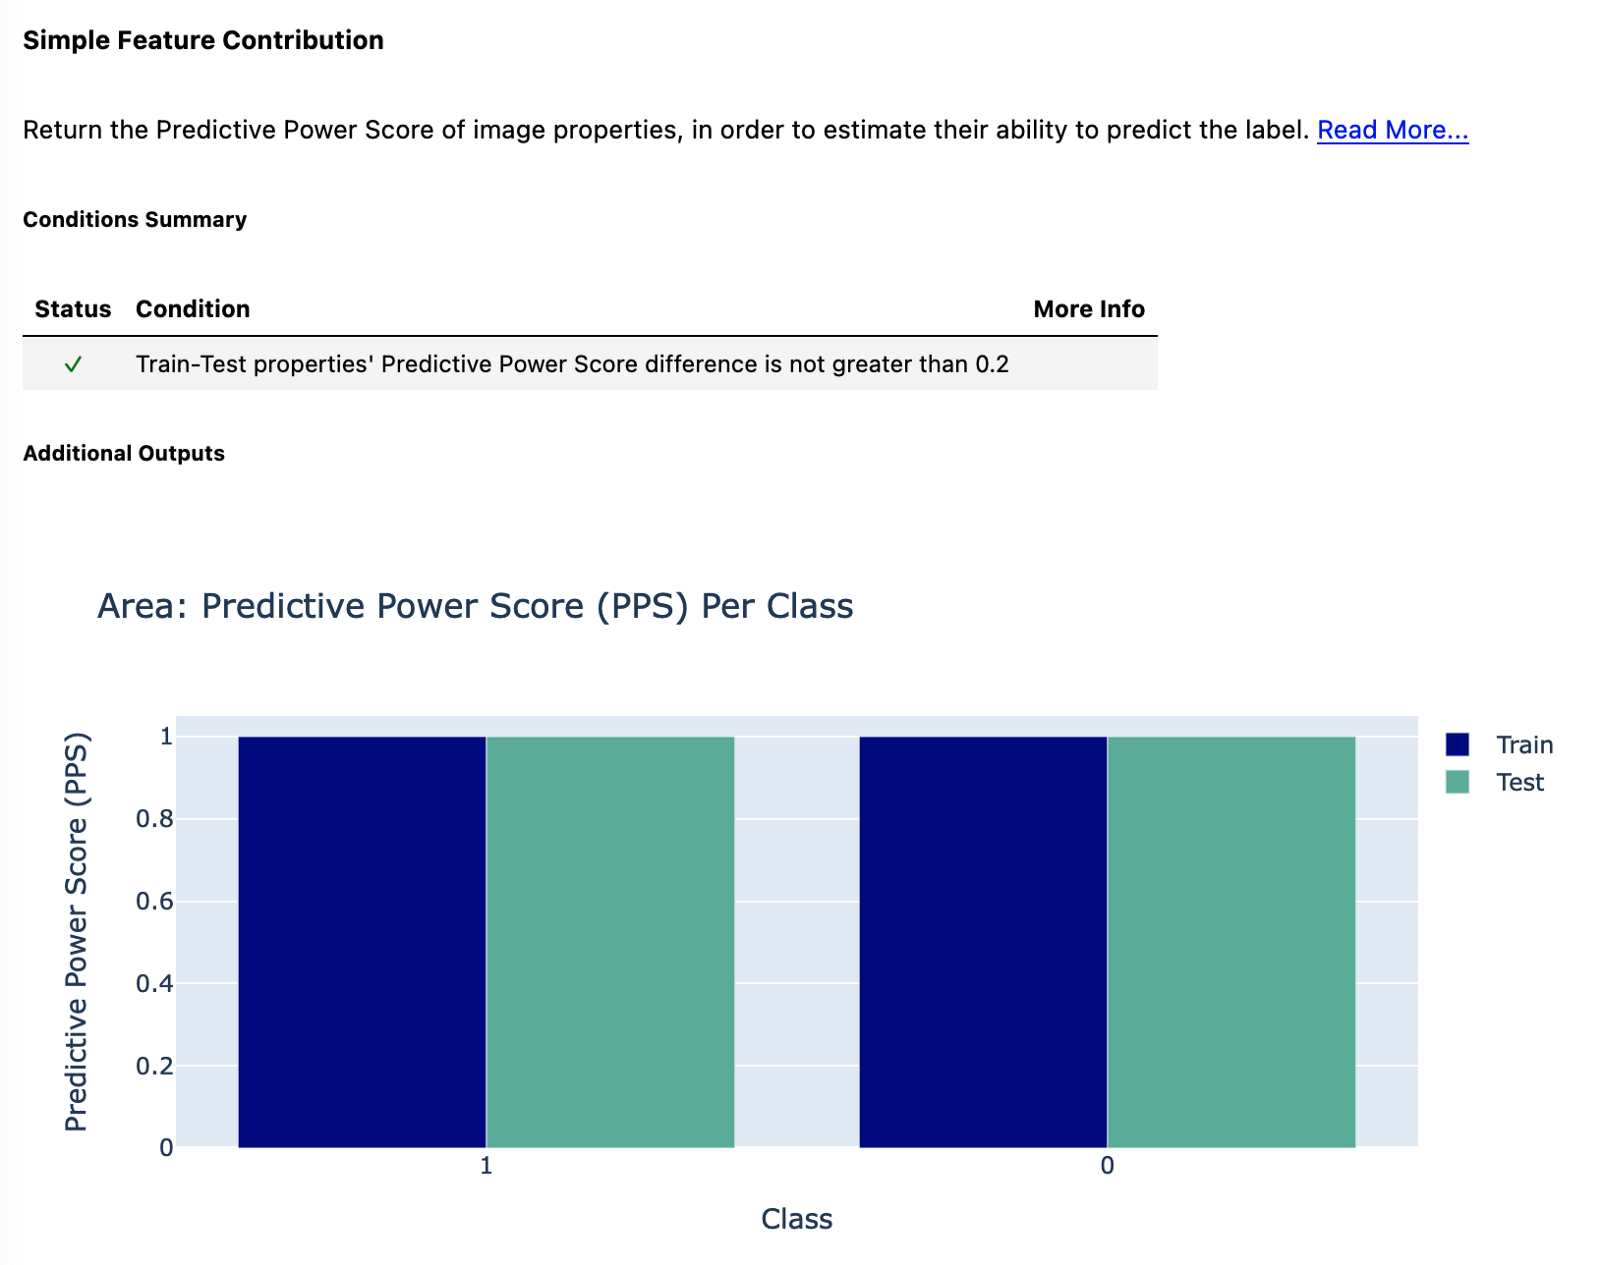
Image by author
There’s more
We have covered quite a lot in this article already. From everything residing in a single Jupyter Notebook to a fully reproducible project with data versioning and experiment tracking. Having said that, there are still a few things we could add on top of our project. The ones that come to mind are:
poetry — for improved dependency management.
hydra — a library used for managing configuration files, that is, accessing parameters stored in some configuration file from inside a Python script. It is useful for avoiding hard-coding certain values.
pre-commit — we could set up a process for automatically formatting Python code with a formatter of choice (e.g. black), checking the style and quality of the code (flake8), sorting the import lists (isort), etc.
adding unit tests for our custom functions.
Wrapping up
In this article, we demonstrated a modern approach to creating ML/DL projects with code and data versioning, experiment tracking, and automating parts of the activities such as creating data sanity check reports. It definitely requires more work than having a single Jupyter Notebook for everything, but the extra effort quickly pays off.
At this point*,* I wanted to thank the DAGsHub support for helping out with some questions.
You can find the code used for this article on my GitHub or DagsHub. Also, any constructive feedback is welcome. You can reach out to me on Twitter.
Resources
MLFlow
Data augmentation in Keras
Deepchecks
GitHub Actions
</div
Recommend
About Joyk
Aggregate valuable and interesting links.
Joyk means Joy of geeK