

Implementing Microservices in NodeJS
source link: https://frontegg.com/blog/implementing-microservices-in-nodejs
Go to the source link to view the article. You can view the picture content, updated content and better typesetting reading experience. If the link is broken, please click the button below to view the snapshot at that time.

What is a microservice?
A microservice is an application architecture that takes every application function and puts it in its own service, isolated from the others. These services are loosely coupled and independently deployable.
This architecture emerged as a solution to the old monolithic approach to web application development. In monolithic software, everything is built as one unit. All business logic is grouped into one extensive application.
This approach complicates the process of updating a codebase because it affects the entire system. Even the smallest code changes require building and deploying a new version of the whole software. Additionally, scaling application-specific functions means you have to scale the entire application.
Microservices resolve these challenges of monolithic systems by fragmenting the application from a whole into several smaller parts.
When Should You Use Microservices?
In essence, the microservice architecture solves the problem of accelerating the development of an extensive complex application.
There is no valid general answer to the question, “which is better?” The answer depends on various situations as each of them has its benefits and drawbacks.
Here are the things you should expect from a microservice architecture in terms of pros and cons:
Benefits:
- Language agnostic: microservices are not limited to a specific programming language. Each microservice can be written in a different language that supports the chosen communication protocol.
- Scalability: when a large team is involved in the project, then the application is easier to maintain as the microservices and their responsibilities can be shared between the developers.
- Unlimited iterations: iterating over microservices will be much easier as the developers are no longer limited by the other components.
- Unit testing: because microservices are separate apps with a focus on a specific functionality, it makes it easier for a developer to write test scripts to validate that specific functionality.
Drawbacks:
- Hard to manage as a whole unit: “divide et impera” the famous quote of Julius Caesar that means divide and conquer, can be applied on a very large scale even here, but with caution, as too many moving parts can become hard to manage.
- Difficult to trace: If the architecture becomes too complex, the communication channel between microservices is very wide, or in the case of a bug or an error, it becomes hard to trace back and identify the point of failure.
- Requires large expertise: building and deploying a microservice requires very high soft-skills in terms of planning and coordination.
- Challenging testing: testing is a double-edged sword as microservices are harder to test as a whole. Integration and end-to-end testing can also be challenging.
- Audit logs: can be harder to acquire and investigate.
In terms of architecture, SaaS microservices is a good fit as microservices can be a good choice for a SaaS app. As this type of software involves paying users for a highly available service, breaking the software into smaller pieces allows for faster recovery times. At the same time, the evolution of a SaaS application is heavily inspired by its community, therefore, it is subject to many constant changes. With microservices and decoupling, developers gain flexibility that was otherwise impossible with a monolith architecture.
Monolithic applications can be difficult to scale horizontally, as the entire application must be replicated. This becomes harder if the application depends on a single database. Microservices, on the other hand, can be scaled, duplicated, or load-balanced depending on individual services. If you need to send more emails, you just need to scale the microservice that takes care of the email functionality. Today you have 10 users, tomorrow you have 1000; SaaS applications can sustain massive growth over a short period, that’s why their architecture must allow easy scaling in the most cost-effective way.
This will also reduce resource consumption, which will lead to lower billing notes. Therefore, it is safe to say that microservices is the next phase in SaaS enterprise architecture.
The best way to figure out whether you need microservices is to ask yourself: Do I have problems regarding my monolith application? If yes, then maybe you should consider moving to microservices. If no, then stick to it—no need to invest time to solve a problem that doesn’t exist.
How Does Microservices Communication Work?
Communication to microservices is a crucial aspect that must be chosen wisely because the services are independent of each other. Improper use of the communication protocol can lead to poor performance in the application. You must choose the communication protocol according to the specific needs of your application.
There are two styles of communication from which you can choose: synchronous and asynchronous communication. This is the basis for request-response and event-based models.
In the first scenario, the synchronous style, the client sends a request and waits for the response. The disadvantage of this approach is that it is a blocking model. However, it is not always a problem when you have a very read-heavy application—your application is more oriented towards reading and receiving information from the outside. In such a case, the synchronous style might be a good choice, especially when it involves live data.
The other option we have is asynchronous communication, which is a non-blocking model. Asynchronous communication is recommended over synchronous communication when you need a resilient microservice. In this scenario, the client sends a request, receives acknowledgment of the request, and forgets about it. This approach is the best fit for an application that is write-heavy and cannot afford to lose data records.
Here are some solutions that you can choose from when it comes to microservices communication:
- REST over HTTP;
- REST over HTTP/2;
- WebSocket;
- TCP sockets;
- UDP packets;
Just think well about the proper communication protocol that best suits your needs because this will make the application more responsive and efficient.
Why NodeJS for Microservices?
When building a microservice, there are a lot of top programming languages to choose from. One of them is NodeJS. So, why is NodeJS the best choice for this?
- Single-threaded & asynchronous: NodeJS uses the event loop to execute the code, allowing asynchronous code to be executed, thereby enabling the server to use a non-blocking mechanism to respond.
- Event-driven: NodeJS uses event-driven architectures built on a common pattern in software development known as publish-subscribe or observer pattern that enables powerful applications to be built, especially real-time applications.
- Fast & Highly scalable: The runtime environment is built on top of one of the most powerful JavaScript engines, V8 JavaScript Engine, thus the code is executed quickly and facilitates the server to handle up to 10,000 concurrent requests.
Ease of development: Creating multiple microservices can result in duplicated code. Microservices framework for Node.js are easy to create because it abstracts most of the underlying system. So creating a microservice with this programming language can be as easy as writing a few lines of code.
Implementing a Microservices Architecture
We’ll start by creating a microservice for user management that will communicate using TCP packets and be responsible for CRUD operations with users. We’ll test it using PacketSender, a free utility to send network packets that support TCP.
A microservice is further defined by its architecture and scope. Therefore, from a demo point of view, implementing a microservice via HTTP would not be different from implementing a NodeJS API.
At the same time, using REST over HTTP is very easy. The problem arises when switching from this protocol to something else. That’s why, for this article, we’ll use an asynchronous pattern with TCP packages to communicate with the microservice.
We’ll be using NestJS as a framework for our application. It is not a NodeJS microservice framework—it’s a framework for building server-side applications. However, it has multiple inbuilt features for microservices that make the work easier.
Step I – Microservice setup
Building microservices with Node.js is fairly easy, especially with the NestJS framework. The starting point is to create a new NestJS application using their CLI using the following command.
npx @nestjs/cli new user-microserviceThis command creates and initializes a new project. To start building a microservice, you need to install the following package.
npm i --save @nestjs/microservicesLastly, in order to have a microservice up and running, we need to update the main.ts file with the following content.
NestJS supports several built-in transport layer implementations called transporters. The above code will create a microservice that communicates over the TCP transport layer bind to port 8875 on the local machine.
Step II – Microservice listen for messages
We can use a message pattern or an event pattern to communicate with the microservice.
The message pattern acts like a request-response method. It is suitable for exchanging messages between services and the event pattern when you just want to publish events without waiting for a response.
In our case, we’ll only implement the functionality that will create a user based on a given input and we’ll get the created user. Therefore, we’ll register a message pattern named create_user in the app.controller.ts file.
We’ll abstract the logic of creating a new user as it can be implemented in various ways based on the needs and the database used and we’ll focus only on microservice-related topics.
The payload that we use to create a new user has the following format:
A simple object with an email and a password
Step III – Test the microservice
To test this microservice, we’ll use PacketSender to send a TCP package to our application. For this, set the Address and Port to 127.0.0.1:8875 and select TCP from the dropdown on the right. To encode our message use the ASCII field and complete it with the following value:
122#{"pattern":"create_user",
"data":{"email":"[email protected]","password":"12345678"},
"id":"ce51ebd3-32b1-4ae6-b7ef-e018126c4cc4"}pattern– is the message that we are lis ting for,create_user;data– is the JSON object that we want to send, an object with anemailand apassword;
The value 122 represents the length of our message starting from the first curly bracket up to the last one (both included).
Packet Sender Configuration
If we hit Send we’ll see the following log:
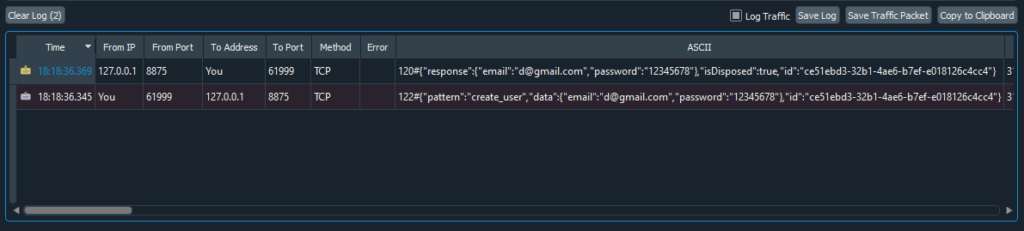
Log activity
The 2nd one is what we sent to our microservice and the 1st one is what we received. Inside response is the object returned by our microservice, the user that was created.
Step IV – API Gateway
Now that we have our microservice and have conducted a quick test to see if it can receive a request and return a response, it’s time to create an API Gateway and connect that to the microservice.
For this we’ll create a new NestJS application using the same steps described above, then update the app.module.ts file with the following content.
We will use .env files in which we’ll store any configuration-related values. These files will be read with the help of a configuration service. The microservice can be found at host 127.0.0.1:8875, where the port is 8875.
With the code above, we inject a new object that represents the connection to our users-microservice using ClientProxy. This NestJS class provides several built-in utilities to exchange messages with a remote microservice.
To use this connection object, we can inject it inside AppController or AppService as it follows:
Now, each time the API will be hit with a POST request at route create-user the API Gateway will forward the request to the microservice along with the payload and then return response from microservice back to the user.
</div
Recommend
About Joyk
Aggregate valuable and interesting links.
Joyk means Joy of geeK