

GitLab CI: Deploy to FTP / SFTP with lftp
source link: https://savjee.be/2019/04/gitlab-ci-deploy-to-ftp-with-lftp/
Go to the source link to view the article. You can view the picture content, updated content and better typesetting reading experience. If the link is broken, please click the button below to view the snapshot at that time.
GitLab CI: Deploy to FTP / SFTP with lftp
Lately, I’ve been using GitLab CI more and more to replace my Jenkins server. The main purpose is to run unit tests on my code and to deploy it to various services. A few older projects still require deployment to a shared web hosting provider using FTP or SFTP.
To handle that I’ve been using lftp, an open source utility that can upload files over various network protocols such as FTP, SFTP, HTTP, fish and even torrents. It is, however, a bit tricky to configure and get the hang of it. So let me walk you through my setup.
Getting started
To start using GitLab CI you have to create a .gitlab-ci.yml file in the root directory of your project. This file tells GitLab what Docker image it should use and what steps to go through.
You can pretty much pick any Docker image you’d like as your basis. There are a few who have lftp pre-installed but in this case, I’m just going take a plain Ubuntu LTS image.
image: ubuntu:18.04This is a barebones image, without much software installed. So if we want to use lftp, we have to install it ourselves. I’ll do this in the before_script section:
before_script:
  - apt-get update -qy
  - apt-get install -y lftp
Now that we have everything that is required, we can add a build phase with just one step: sync (or mirror) a local directory with the remote FTP server:
build:
  script:
    - lftp -e "open ftp.mywebhost.com; user $FTP_USERNAME $FTP_PASSWORD; mirror -X .* -X .*/ --reverse --verbose --delete local-folder/ destination-folder/; bye"
That lftp command is quite long and seems complex but let’s break it down:
- The
-eparameter tells lftp what commands it should execute. It’s followed by our commands surrounded by quotes.
Inside the quotes, we find these commands:
- We start by making a connection to the desired FTP/SFTP server:
open ftp.mywebhost.com;. Here it’s important to set the correct hostname or IP address of your server. - When connecting to an FTP/SFTP host you need to authenticate yourself, so that’s what we do here:
user $FTP_USERNAME $FTP_PASSWORD;. These are passed as environment variables that we’ll configure in one of the next steps - After authenticating we can start transferring files. In this case, I’m using the
mirrorcommand. More about that later! - After mirroring both directories we are done and can close the connection by saying
bye.
The mirror command
The mirror command of lftp has quite a lot of features and parameters.
-
The
-Xparameter excludes certain files and directories. In my case, I don’t want any hidden files or directories to be uploaded to the server (like for instance the.gitdirectory). Here you can use wildcards like*and?(glob-style). -
The
--reverseoption is a tricky one. By default, lftp takes the remote server as the source and a local directory as the target. Meaning if you would run themirrorcommand it would download the files from the FTP server and put them in our container. We want the opposite to happen, so we--reversethe operation. -
The
--verboseoption tells lftp to log every action it takes. This makes it easy to debug our CI pipeline in case something goes wrong. This isn't mandatory. -
Then we have
--deletewhich removes files from the FTP server if they aren’t in your repository anymore. Whether to include this or not depends on your use case. In my case, I want to deploy websites to an FTP server and if I remove a file in my git repository, it should also be removed from the server. -
And finally we have the two directories that have to be synced, starting with the
local-folder/(a folder in your git repository) and ending with thedestination-folderon the remote server.
Environment variables: username & password
Before we can test our CI pipeline, we have to store our FTP username and password somewhere. Putting it in the gitlab-ci.yml file would be very insecure because everyone can see it (especially if your code is open source).
Instead, you should store it as an environment variable:
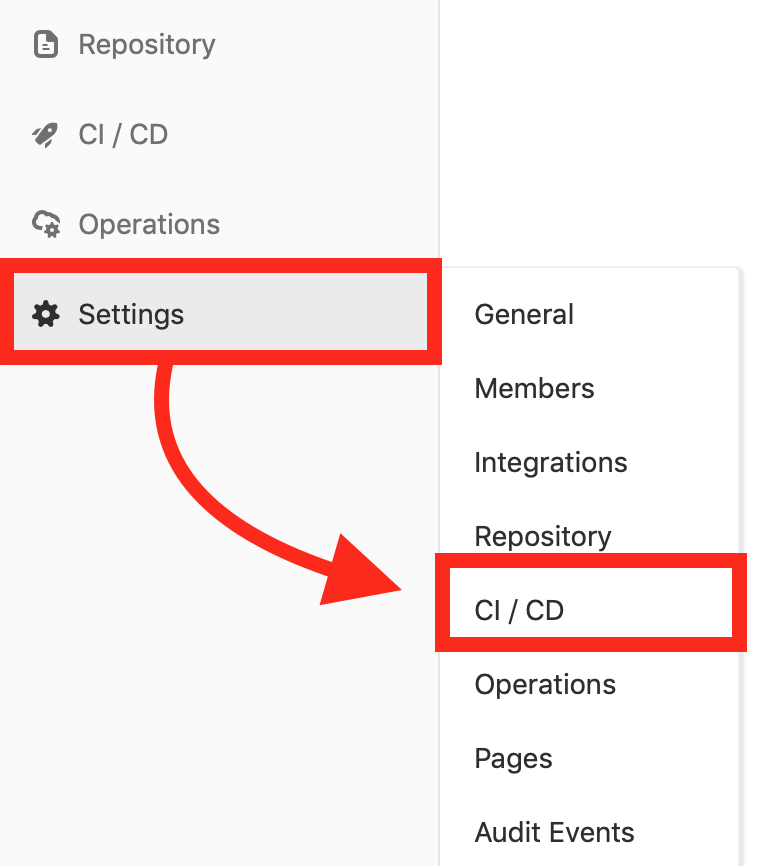
- Go to your project on gitlab.com
- In the sidebar, go to “Settings” and open “CI / CD”
Now enter your credentials in the “Environment variables” section. In the lftp command we used $FTP_USERNAME and $FTP_PASSWORD so we’ll define their values here:
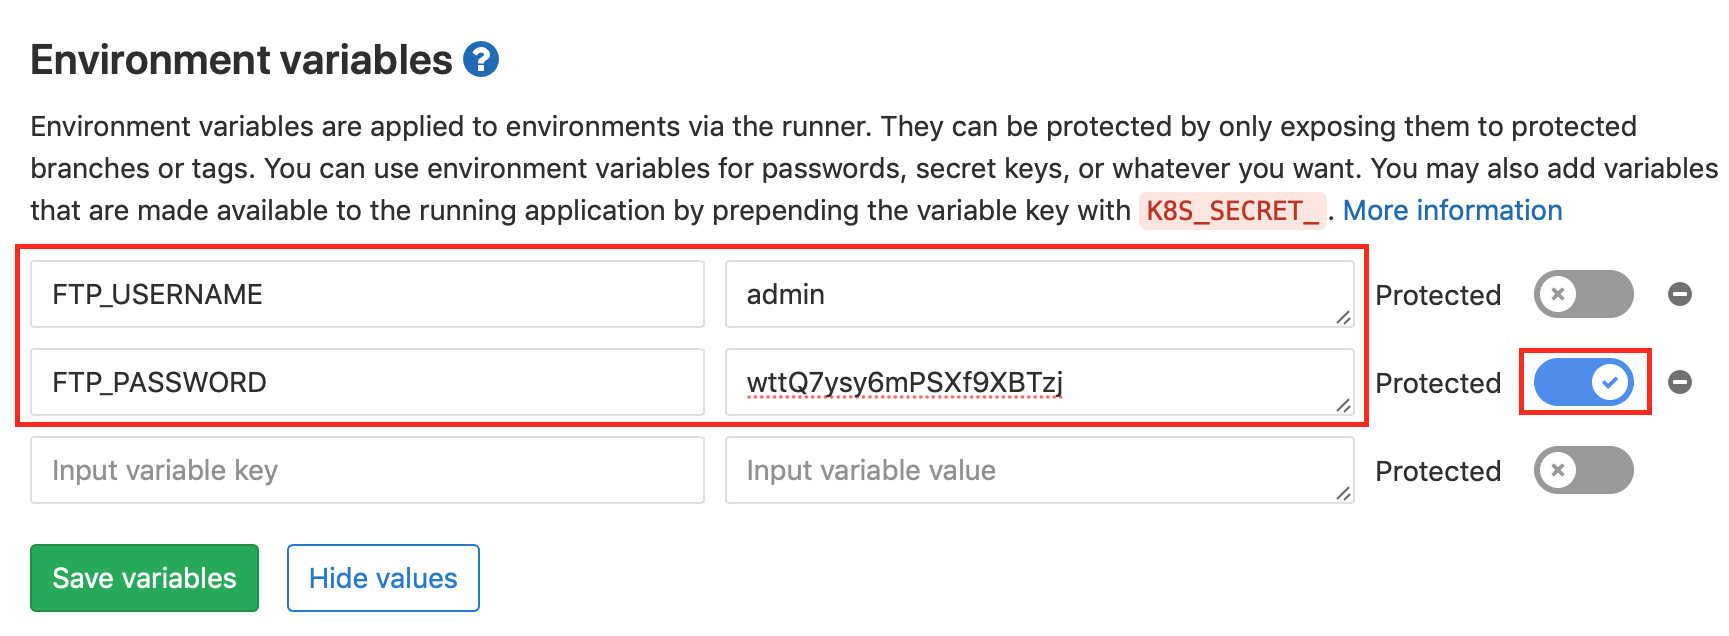 Configuring the FTP credentials as environment variables in GitLab CI.
Note that here we don’t include the dollar sign $. It’s also wise to enable the “Protected” options. This will make sure that your password is only passed along in “protected” branches. So if you make a new branch, it won’t have access to the password unless you explicitly allow it. Again, probably more interesting for projects that are open source of have a team of contributors.
Click on “Save variables” and now we’re ready to test it out!
Testing the GitLab CI pipeline
To test your pipeline you just have to commit some new changes to your git repository and push them to GitLab. Alternatively, you can also trigger a build manually by going to “CI / CD” and clicking on “Run Pipeline”.
If everything was configured correctly you should see your job running successfully:

A successfully complete GitLab Pipeline
You can even see detailed log messages from your job. Including what files were transferred and removed (because we added the --verbose option to lftp.
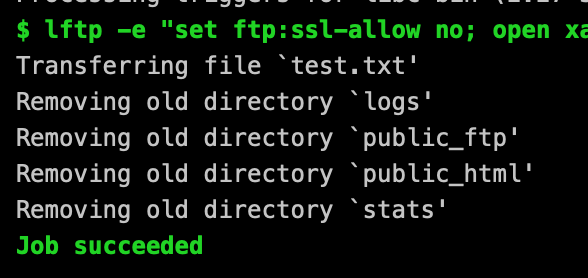
Verbose log of lftp uploading and deleting files on a remote server
Complete .gitlab-ci.yml file
Here is the complete .gitlab-ci.yml file for reference:
image: ubuntu:18.04

before_script:
  - apt-get update -qy
  - apt-get install -y lftp

build:
  script:
    # Sync to FTP
    - lftp -e "open ftp.mywebhost.com; user $FTP_USERNAME $FTP_PASSWORD; mirror -X .* -X .*/ --reverse --verbose --delete local-folder/ destination-folder/; bye"
Issues with FTP connections
For security reasons, lftp will try to use a secure SSL connection with your FTP server. Some web hosting providers don’t support that.
You could encounter this issue:
mirror: Fatal error: Certificate verification: Not trustedWhen you do, check if you’re using the correct hostname. Some web hosting companies require you to use a generic hostname if you want a secure connection.
If that’s not the case you have two alternative solutions. You can add the set ssl:verify-certificate no command. This means that lftp will ignore error regarding the certificate of the server BUT it will still use encryption to transfer your files to the server.
lftp -e "set ssl:verify-certificate no; open ftp.mywebhost.com; user $FTP_USERNAME $FTP_PASSWORD; YOUR_COMMANDS_HERE; bye"If that doesn’t work you can also disable SSL altogether by adding set ftp:ssl-allow no as the first command. Like so:
lftp -e "set ftp:ssl-allow no; open ftp.mywebhost.com; user $FTP_USERNAME $FTP_PASSWORD; YOUR_COMMANDS_HERE; bye"However, this could leak your username, password and the files you transfer. So use only when you really have to!
Enjoy
That was it! You can now deploy your website or web app with GitLab CI to an FTP server. While you’re at it, consider adding some automated tests as well to catch bugs before they hit your users ;)
Interesting links
Recommend
About Joyk
Aggregate valuable and interesting links.
Joyk means Joy of geeK