

Implementing Passwordless Authentication in ASP.NET Core
source link: https://code-maze.com/aspnetcore-passwordless-authentication/
Go to the source link to view the article. You can view the picture content, updated content and better typesetting reading experience. If the link is broken, please click the button below to view the snapshot at that time.

We value your privacy
Implementing Passwordless Authentication in ASP.NET Core
Want to build great APIs? Or become even better at it? Check our program Ultimate ASP.NET Core Web API and learn how to create a full production-ready ASP.NET Core API using only the latest .NET technologies. Bonus materials included!
In this article, we are going to learn how to implement passwordless authentication in ASP.NET Core Identity.
Passwordless authentication is a method of authenticating a software user’s identity without requiring a password or any other knowledge-based secret. Essentially, how do we know that Joe is Joe, without having him tell us a secret that only Joe should know? To achieve this, we can use various alternative methods. These could range from high-tech biometric information like facial recognition or fingerprints to simpler things like social media or email.
Using ASP.NET Core Identity, we will handle authentication quite simply with the use of an email address.
Let’s begin.
Setting Up the Project
For this article, we are going to create a new project using the latest ASP.NET Core Web API. To keep things simple, we will not bother ourselves with creating a front-end. We can use a simple tool like Postman to query our API.
Next, let’s install the Identity and EF Core packages by typing the installation commands into the console:
Install-Package Microsoft.AspNetCore.Identity
Install-Package Microsoft.AspNetCore.Authentication.JwtBearer
Install-Package Microsoft.EntityFrameworkCore
Install-Package Microsoft.EntityFrameworkCore.SqlServer
These commands prompt Nuget the package manager to fetch and install all the related packages.
Now, let’s make some modifications to our appsettings.json file:
"AllowedHosts": "*",
"ConnectionStrings": {
  "loginAppConnection": "Server=.;Initial Catalog=weatherDB;Integrated Security=true"
},
"JWT": {
  "Key": "This is my supper secret key for jwt",
  "Issuer": "https://codemaze.com",
  "Audience": "codemaze.com"
}
Right after the AllowedHosts option, we add in the connection string to our database, and the information for our JWT. We will use both of them later in the project.
Now, we’re ready to create the login for our application.
Creating the Login Endpoint
Let’s create a new controller that handles user authentication. We’ll name this the AccountController, in our Controllers folder:
private readonly UserManager<IdentityUser> _userManager;

public AccountController(UserManager<IdentityUser> userManager)
{
    _userManager = userManager;
}
In this controller, we create a private field called userManager which we import from Microsoft.AspNetCore.Identity. By initializing this in our constructor, we’ll be able to inject it at runtime and use it to manage our users’ identities.
Next, let’s create the login GET endpoint:
[HttpGet]
public IActionResult Login(string returnURL)
{
    return Ok(new {
        Message = "Unrecognized user. You must sign in to use this weather service.",
        LoginUrl = Url.ActionLink(action: "", controller: "Account", values:
        new
        {
            ReturnURL = returnURL
        },
        protocol: Request.Scheme),
        Schema = "{ \n userName * string \n  email * string($email) \n }"
    });
}
We can use this to return a visual cue to our users to log in to our app. In regular MVC applications, this would typically be a View result containing a form to accept username and password. However, since we are making ours an API, we simply return an OK result with our message and useful instructions like the login URL, and the expected schema.
Next, let’s add the POST endpoint:
[HttpPost]
public async Task<IActionResult> Login(LoginModel model)
{
    var user = await userManager.FindByEmailAsync(model.Email);
    var returnUrl = HttpContext?.Request.Query.FirstOrDefault(r => r.Key == "returnUrl");

    if(user is null)
    {
        return Unauthorized();
    }
    else
    {
        // Our authentication code here...
    }
}
This endpoint should accept a username and email string and then try to authenticate the user. If we are genuine users, we can proceed with login and redirect them to the returnUrl provided. Otherwise, we will get a 403 access denied response.
We will replace the commented part with actual code shortly.
To continue, let’s create the LoginModel class:
public class LoginModel
{
    public string? UserName { get; set; }

    [Required]
    [EmailAddress]
    public string? Email { get; set; }
}
This is a simple class that contains an optional username and a required email. We will pass it between the client and our app.
So, before we go any further, let’s map out the game plan for our authentication.
How Passwordless Authentication Works
We want every user who visits our WeatherForecast endpoint to be authenticated. If that’s not the case, we will send them to log in at the Account endpoint, where they will need to provide their username and email address.
Let’s illustrate the steps in a diagram:
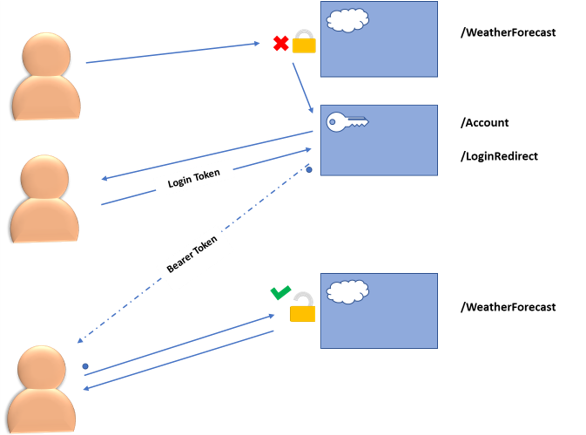
Once we are able to verify our user’s email, we will generate a login/authentication token for them. We would typically email this token to them in a clickable link, which redirects them safely to our app. In this demonstration, however, we will be returning it to the user for the purpose of simplicity. Once the user lands on our app using the login token, we will log the user in, and generate a bearer token to maintain the current session. At this point, the logged-in user can visit the WeatherForecast endpoint, and receive information.
Now that we have a clear plan for our authentication process, let’s go ahead and implement it in our code.
Adding Passwordless Authentication
To add the authentication, let’s add the logic into the else part of our Login method:
var token = userManager.GenerateUserTokenAsync(user, "Default", "passwordless-auth");
var url = Url.ActionLink(action: "", controller: "LoginRedirect", values: new {
    Token = token.Result,
    Email = model.Email,
    ReturnUrl = returnUrl?.Value
}, protocol: Request.Scheme);
return Ok(url);
We’re generating a user token, and adding it to a link that we’ll send to the user’s email address. For this demonstration, however, we’re just outputting the link in an Ok response.
This link contains three portions: the authentication token, the user’s email address, and the encoded return URL.
The authentication token is what helps us recognize this user’s session, the email address maintains the user’s identity, while the return URL helps us forward the returning user to whatever page they were on before getting authenticated. These are all exposed in a get request for simplicity.
To continue, let’s create another LoginRedirectController:
private readonly UserManager<IdentityUser> _userManager;
private readonly IConfiguration _iconfiguration;

public LoginRedirectController(UserManager<IdentityUser> userManager, IConfiguration iconfiguration)
{
    _userManager = userManager;
    _iconfiguration = iconfiguration;
}
Here, we initialize the UserManager, and the IConfiguration objects in the constructor. We’ll inject both classes later from our Program.cs file.
The LoginRedirect controller has one sole endpoint. For ease of explanation, we’ll split it into two parts. The first part handles the user authentication:
[HttpGet]
public async Task<IActionResult> Login(string token, string email, string returnUrl)
{
    var user = await _userManager.FindByEmailAsync(email);
    var isValid = await _userManager.VerifyUserTokenAsync(user, "Default", "passwordless-auth", token);

    if (isValid)
    {
        await _userManager.UpdateSecurityStampAsync(user);

        await HttpContext.SignInAsync(
            IdentityConstants.ApplicationScheme,
            new ClaimsPrincipal(
                new ClaimsIdentity(
                    new List<Claim>
                    {
                        new Claim("sub", user.Id)
                    },
                    IdentityConstants.ApplicationScheme
                )
           )
        );

        /* JWT management logic... */

        return new RedirectResult($"~{returnUrl}");
    }

    return Unauthorized();
}
Whenever our user hits this endpoint, it confirms their authentication token and signs them in. If the user is on a web browser, signing in will place session authentication cookies on their browser. After authentication, if users are visiting from a web application, they should get redirected to whatever page they were on before the authentication process began.
JWT Authentication
The second part of this Login action handles the JWT for other non-browser clients:
/* sign in logic ... */
var tokenHandler = new JwtSecurityTokenHandler();
var tokenKey = Encoding.UTF8.GetBytes(_iconfiguration["JWT:Key"]);
var tokenDescriptor = new SecurityTokenDescriptor
{
    Subject = new ClaimsIdentity(new Claim[]
    {
        new Claim(ClaimTypes.Email, email)
    }),
    Expires = DateTime.UtcNow.AddMinutes(10),
    SigningCredentials = new SigningCredentials(new SymmetricSecurityKey(tokenKey), SecurityAlgorithms.HmacSha256Signature)
};
var jwToken = tokenHandler.CreateToken(tokenDescriptor);

if(ReturnUrl is null)
{
    return new OkObjectResult(new Tokens { Token = tokenHandler.WriteToken(jwToken) });
}
As a result, this generates a bearer token with a set expiry time. If our users are visiting from an API navigator like Postman as in this instance, they will receive this bearer token which we use to maintain their authenticated status across the session.
Let’s quickly create the model for a token. We’ll name this class Tokens:
public class Tokens
{
    public string? Token { get; set; }
    public string? RefreshToken { get; set; }
}
Now that we’ve put together the main body of our code, let’s iron out a few dependencies and setups needed to get our code working properly.
Finalizing Our Code
Let’s put the Authorize decorator on top of our WeatherForecastController. This is what prevents unauthorized users from accessing the endpoints:
[Authorize]
[ApiController]
[Route("[controller]")]
public class WeatherForecastController : ControllerBase
For this to work, we need to add the authentication service to the builder object in the Program.cs file. We’ll need to set up JWT, Identity, and Application Cookies. These are the three components that help us manage authentication around our app both for APIs and for MVC applications.
First, let’s set up the JWT:
builder.Services.AddAuthentication(x =>
{
    x.DefaultAuthenticateScheme = JwtBearerDefaults.AuthenticationScheme;
    x.DefaultChallengeScheme = JwtBearerDefaults.AuthenticationScheme;
}).AddJwtBearer(o =>
{
    var Key = Encoding.UTF8.GetBytes(Configuration["JWT:Key"]);
    o.SaveToken = true;
    o.TokenValidationParameters = new TokenValidationParameters
    {
        ValidateIssuer = false,
        ValidateAudience = false,
        ValidateLifetime = true,
        ValidateIssuerSigningKey = true,
        ValidIssuer = Configuration["JWT:Issuer"],
        ValidAudience = Configuration["JWT:Audience"],
        IssuerSigningKey = new SymmetricSecurityKey(Key)
    };
});
We already have an article on JWT implementation in ASP.NET Core, so feel free to read it if you need more information about this registration process.
Next, let’s set up the application cookies:
builder.Services.ConfigureApplicationCookie(options =>
{
    options.ExpireTimeSpan = TimeSpan.FromHours(1);
    options.SlidingExpiration = true;
    options.LoginPath = new PathString("/Account");
    options.ReturnUrlParameter = "ReturnURL";
});
By configuring the application cookies, we’re setting a session expiry time of 1 hr, and making sure that all unauthenticated users get redirected to the /Account endpoint. The optional ReturnURL parameter will help future applications to know where to redirect the user to after a successful login.
Now, let’s add the Identity manager:
builder.Services.AddIdentity<IdentityUser, IdentityRole>()
    .AddEntityFrameworkStores<IdentityDbContext>()
    .AddDefaultTokenProviders();

builder.Services.AddDbContext<LoginContext>(options =>
    options.UseSqlServer(Configuration.GetConnectionString("loginAppConnection")));

builder.Services.AddTransient<IdentityDbContext, LoginContext>();
builder.Services.AddSingleton(Configuration);
With the Identity service, we will manage our application users, recognize our username and email, and any other information we choose to identify a user by. For it to be able to store this information, we supply a database context and also the configuration object which we’ll use to validate our JWT based on our secret.
Data Storage for Our App
Next, let’s set up the data storage for our user Identity information. Since we’re using EntityFramework and the Identity library, the database schema is already created for us. However, we have no data to initialize our users. We could either use the in-memory storage or a SqlServer database. For this example, we have chosen the SqlServer storage.
So, to initialize it, let’s create the DBInitializer class and give it the CreateDbIfNotExists and Initialize static methods:
private static async void CreateDbIfNotExists(WebApplication app)
{
    using (var serviceScope = app.Services.CreateScope())
    {
        var services = serviceScope.ServiceProvider;
        try
        {
            var identityUser = services.GetRequiredService<UserManager<IdentityUser>>();
            var loginContext = services.GetRequiredService<LoginContext>();

            loginContext.Database.EnsureCreated();

            await Initialize(identityUser, loginContext);
        }
        catch (Exception ex)
        {
            var logger = services.GetRequiredService<ILogger<Program>>();
            logger.LogError(ex, "An error occurred creating the DB.");
        }
    }
}
From the CreateDbIfNotExists method, we get the identity manager and login contexts from our injected scope, ensure that the database has been created, and then we call the Initialize method and pass in both variables.
Of course, we have to create the Initialize method:
public static async Task Initialize(UserManager<IdentityUser> userManager, LoginContext context)
{
    // Look for any students.
    if (context.Users.Any())
    {
        return;   // DB has been seeded
    }

    var users = new IdentityUser[]
    {
        new IdentityUser {UserName = "sally", Email = "[email protected]"},
        new IdentityUser {UserName = "emily", Email = "[email protected]"},
        new IdentityUser {UserName = "alberto", Email = "[email protected]"}
    };

    foreach (IdentityUser u in users)
    {
        await userManager.CreateAsync(u);
    }

    context.SaveChanges();
}
In this method, we first check whether there are any users in the database. If there is none, then we seed the database with sample users. We execute this method at startup and only if we are in the development environment.
Finally, let’s complete our setup by applying the method we’ve created, and using it to the services we’ve added.
In our Program.cs file, we are going to add a line to our if block to run our methods in development:
if (app.Environment.IsDevelopment())
{
    app.UseSwagger();
    app.UseSwaggerUI();
    DBInitializer.CreateDbIfNotExists(app);
}
Adding it to the if block makes sure that we only initialize and seed the database when we’re in the development environment. That way, we don’t have to worry about mistakenly overwriting our production databases.
And we place our use statements right below that:
app.UseAuthentication();

app.UseAuthorization();

app.MapControllers();

app.MapControllerRoute(
    name: "Identity",
    pattern: "{area:exists}/{controller=Home}/{action=Index}/{id?}");

app.MapControllerRoute(
    name: "default",
    pattern: "{controller=Home}/{action=Index}/{id?}");
The UseAuthentication() and UseAuthorization() methods apply the authentication and authorization services that we configured earlier. The MapControllers() and MapControllerRoute() methods apply specific routes for Identity and the default controller routing for our Web API.
We’re now ready to run our secure weather forecast app.
Running Our Application
Initially, when we hit our WeatherForecast endpoint with Postman since we are unauthenticated, we are immediately redirected to /Account endpoint. This endpoint tells us to sign in, and gives us the right endpoint and schema for logging in:
{
    "message": "Unrecognized user. You must sign in to use this weather service.",
    "loginUrl": "https://localhost:7120/Account?ReturnURL=%2FWeatherForecast",
    "schema": "{ \n userName * string \n  email * string($email) \n }"
}
On submitting our username and email with a POST request to the /Account endpoint, we get the LoginRedirect token:
"https://localhost:7120/LoginRedirect?Token=CfDJ8HVPYdZR%2FHtNu9DNqfu%2BvfEg1L0MAKxdTC159dPkwF0FiZi1SmGQdFhVOVMUHJ33aHTiDPJeBuX2XmFiLRPg3oqM0fPOD8c8lj%2Fgw6l
%2BJbJVerbatYUoopK4TuB6qdTL%2Brvsvmgu5wAeSdY%2F%2FBVdPThR2FEipvhIFndmpkYanmcceMzKh4C2SZMr9zenTTN41P%2BBzyd3L%2FZQTuoTmgCAfunim6qyE9
%2Fhd1E%2BP8TIIZQ%2FzAcNm5xEWU0FYt4XMp9vNQ%3D%3D&[email protected]"
Let’s visit this address with a GET request, to successfully log in to the application:
Now that we’re signed in, we can successfully access the /WeatherForecast endpoint and get our top-secret weather information:
And that’s how we get a secure weather API!
Conclusion
In this article, we have shown how to authenticate our users without having them go through the trouble of remembering a password. Using this style of email authentication, we can have users log into a website or API. They simply have to prove that they own an email that is signed up with us.
Want to build great APIs? Or become even better at it? Check our program Ultimate ASP.NET Core Web API and learn how to create a full production-ready ASP.NET Core API using only the latest .NET technologies. Bonus materials included!
Share:

© Copyright code-maze.com 2016 - 2022
Recommend
About Joyk
Aggregate valuable and interesting links.
Joyk means Joy of geeK