

Android App Distribution Tutorial: From Zero to Google Play Store
source link: https://www.raywenderlich.com/28238259-android-app-distribution-tutorial-from-zero-to-google-play-store
Go to the source link to view the article. You can view the picture content, updated content and better typesetting reading experience. If the link is broken, please click the button below to view the snapshot at that time.

Android App Distribution Tutorial: From Zero to Google Play Store
Learn how to generate a release build of your app, create a Google Play Store listing and finally release your app on the Play Store.
Version
You finished your Android app and celebrated its perfection with many flagons of ale (or pitchers of beer). Hooray! Now you’re ready to send your app out into the world. Soon it will reside not only on your Android device, but also on the devices of people around the globe. It’s an exciting step! But how will you do this? Well, the most common way to share an Android app is through the Google Play Store, where more than 2.8 million Android apps are available.
In this tutorial, you’re going to learn about both of the ways to distribute Android apps on the Google Play marketplace.
Getting Started
Download the starter project by clicking the Download Materials button at the top or bottom of the tutorial.
Of course, before you can publish an app, you need to have one that’s finished. For this tutorial, you’ll use a simple app that allows users to search for books, view their covers and share them with friends. :]
Open the project in Android Studio. Build and run to preview the app.

Working With the Package Name
First, set a new package name for the app. The package name needs to be unique and remain unchanged in Google Play. Commonly, developers use the reverse domain name format, like this:
com.your_domain.app_name
The best way to refactor an app’s package name in Android Studio is to start in the Project pane. With the Android view chosen, select the settings icon:

You’ll see a drop-down menu with several project viewing options. Make sure Compact Middle Packages is unchecked.

Now you can refactor the parts of the package name separately. Right-click on the package named raywenderlich, and select Refactor ▸ Rename. After you see a warning window, click Rename Package in the window.

Next, you’ll see a new window where you can change the old name to your name or domain name. Click Refactor to enable renaming the package.

After you apply changes, check the Android view to make sure you changed your folder’s name.
Packaging Your App for Distribution
Android requires that APKs are digitally signed with a certificate before they can be installed. The certificate identifies the developer of the app. You can find more information about app signing in the official documentation.
There are two ways of distributing apps – using the traditional Android Application Package (APK) format and the new Android App Bundle (AAB) format. In August 2021, Google decided all new apps ready for publishing to Google Play have to be in the form of the Android App Bundle to support Dynamic Delivery. However, when you need a full application package just to do a clean install to a new device, use the APK format.
In the following sections, you’ll learn about both of them. But, before you jump into it, you need to create a keystore for your app.
Creating a New Keystore
To create a signed app bundle or package, you’ll use KeyStore — the storage place for your saved certificates. Be sure to keep these private!
Luckily, you’ll need to use only one command line. Open Android Studio Terminal and add the following line to it:
keytool -genkey -v -keystore my-app-release-key.keystore -alias alias_name -keyalg RSA -sigalg SHA1withRSA -keysize 2048 -validity 10000
However, before you run it, you’ll need to modify it:
- Instead of my-app-release-key, specify a name for your keystore. Usually, developers replace it with company’s name.
- Replace alias_name with an alias for the new key, which is a name you’ll use later with the keystore path and password.
- Replace “10000”, with the number of years that the key will be valid. Make this at least 25 so that you can sign app updates with the same key throughout the lifespan of your app.
Once you fill in the information, run the command. Next, enter a password for the keystore. It needs to be at least 6 characters long, and it needs to remain private.

Then, you’ll be asked to re-enter the password. And, the terminal will ask you to answer a few personal questions — like, “what is your name?”, “what is your organization called?”, etc. All information will be stored in your keystore.

After you answer the questions, the terminal will finish the process, and Android Studio will create your keystore inside the app folder. Don’t lose it, because you’ll need it and its password info to make any updates to your app! If you are using a version control system, you shouldn’t be including this file in it. Don’t allow unauthorized people to have access to it, either.
With your app keystore ready, you can finally learn how and where to use it.
Creating a Signed APK
If you want to distribute the app in one file, you can create a Signed APK. With this method, you’ll package all your app’s resources into one zip file.
In Android Studio, select Build ▸ Generate Signed Bundle / APK…. You’ll see a window for choosing an app format. Select APK.

Next, you have to sign the app. To do that, you need to use the keystore data created in the previous section. Select Choose existing… and navigate to its location. Then, fill out its password, alias name and enter a wanted password for the app key.

Check Remember passwords to make things easier in the future and click Next.
The next step asks you to choose a destination folder for your signed bundle. Select the proper folder, then select release for the Build Variants. Finally, click Finish.

When the packaging process is complete, Android Studio will notify you that your APK is ready and let you open it in the File Manager.

Now that you generated your APK successfully, you can install it on a device by double-clicking on it.
Creating a Signed Bundle
The App Bundle is a new delivery format for Android apps that helps to deliver an optimized version of your APK. It only includes what your users need. This reduces your app size, which is a plus for many users. It means that your users will receive a special version of your APK that only includes the language, screen density and resources they need per unique user configuration.
Now it’s time for you to create your own Android app bundle. Just like in the previous section, select Build ▸ Generate Signed Bundle / APK…. When you’re asked to choose between building an Android App Bundle or an APK, select Android App Bundle.

Notice that there’s a difference between the window you build an APK with and the window you build an AAP with, though. There’s an option to export an encrypted key. When building an APK, it’s not needed. As before, choose the keystore path, enter an alias name and passwords, and click Next. Then, choose Build Variant and click Finish. You’re already a pro at this! :]
When the packaging process is complete, Android Studio will notify you that your bundle is ready and let you browse it in the File Manager.

Using the Google Play Developer Console
Finally, you’re ready to start the process of sharing your app with other people. In the browser, sign in to your Google account.
Then, navigate to Google Play Developer Console.
Next, agree to the Google Play Developer distribution agreement, pay the one-time $25 fee and then complete your profile with the required personal information.
Now you’re ready to start publishing apps on Google Play. Click Create app.

Specify the default language for the app, the app name, the app category and whether the app is free or paid.

Then, check all the fields in the Declarations section. Finally, click Create app.

This creates a draft store listing for your app. Don’t be overwhelmed by all the information and options. There’s not that much left for you to do.
If you take a look at the Publish your app on Google Play section, you can see that this part is locked.

You have to complete the initial setup tasks first. So what are the initial setup tasks? Take a look at the Set up your app section.

Here is the list of tasks you need to do before you continue:
- Set up app access and content rating.
- Set up app target audience and news apps.
- Set up COVID-19 contact tracing and status apps.
- Select an app category and provide contact details.
- Finally, you must set up your store listing.
Answering Questions About App Access
Google wants to know whether you restrict some functionality of your app. For example, you might limit certain functionality based on a user’s location. In this case, select the All functionality is available without special access option.

Answering Questions About Content Ratings
To receive a rating for your app, you first need to answer a few questions about its suitability for children, level of violence, and more.
After selecting Content ratings, click Start questionnaire.

In the beginning, you must give your email address and choose the category of your app.

In this case, choose Utility, Productivity, Communication, or Other. For this app, you can select No for all the questions.

On the Summary page, you’ll see a rating for all ages for some countries and age 3 for other countries.

Answering Questions About Target Audience and Content
Before finishing this section, you must also complete the Ads section. BookFinder doesn’t display ads.

Then, you can determine the target age for your app. Click Start in the Target audience and content section:

Select 18 and over.

Because your target audience doesn’t include children, you must declare whether you think your app might unintentionally appeal to children. After making a selection, click Next.
Answering Questions About News Apps
The BookFinder is not a news app. So, select No for this section:

Answering Questions About COVID-19 Contact Tracing and Status Apps
The BookFinder has nothing to do with COVID-19, so select the My app is not a publicly available COVID-19 contact tracing or status app option.

Choosing Store Settings
In this section, you will provide some information about your app. Choose App in the App or game field. Then choose Productivity in the Category field:

Next, provide your contact information.

Enter a short description of no more than 80 characters and a full description of no more than 4,000 characters. Google Play Store will show each of these descriptions in different places of your app listing.

When you’re finished with this, scroll down a little and you’ll see that the Google Play Console asks you to upload graphic assets for your app.
You’ll need to upload a 512×512 high-resolution version of the app icon and a 1024×500 feature graphic to display at the top of the page.
If you’re using this sample app, use these resources:
When you upload your app icon, you’ll see a small thumbnail of how it will look when listed on the Play Store.

Next, you have to provide at least two screenshots of your app. You can provide up to a maximum of eight images per form factor: phone, tablet, Android TV and Wear OS.
If you have the app on an Android device, you can simply take screenshots straight from the device.
If you prefer to use an emulator for the screenshots, you can easily do that, too. Build and run the app and navigate to the screen you want to use. With the app opened in Android emulator, click the camera icon on the top menu.

By default, the emulator will save this screenshot to the Desktop. Now, you can upload it to the Google Play Console.
Publishing Your App on Google Play
After completing all of these steps, you can now publish your app.
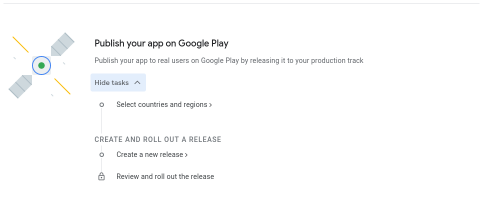
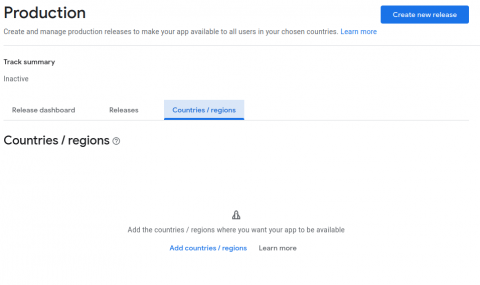
Click Select countries and regions. Then, choose which countries you want your app to be available in. For this example, choose all of the countries.
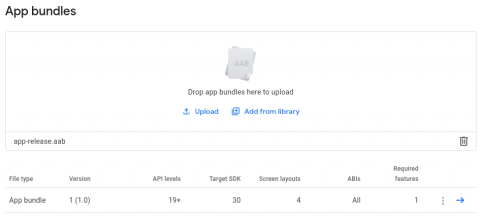
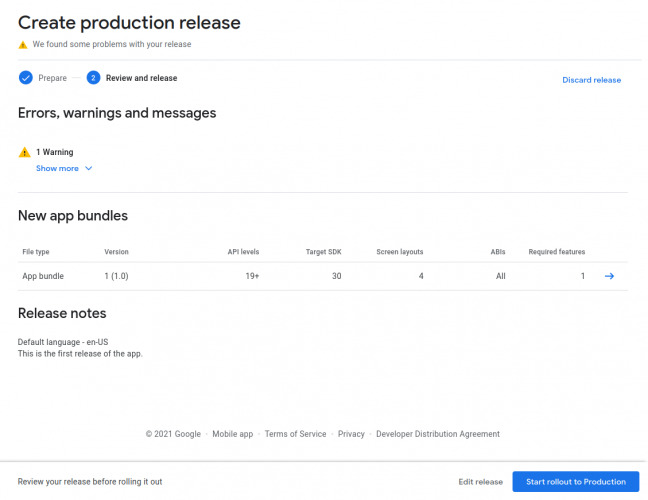
After choosing countries and regions, click Create new release. In this section, upload your app bundle or APK. If you’ve built and generated a signed bundle or APK, you’ll have one. The name of the file is app-release.aab or app-release.apk:
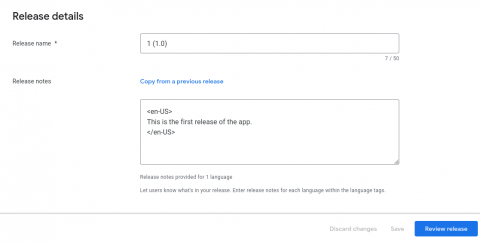
Once you’ve uploaded your app bundle or APK, give a release name to differentiate your app releases. It could be something simple, like 1 (1.0). Then, enter a note in the Release notes field. Finally, click Review release.
In the final screen, you’ll see a warning about a missing deobfuscation file. Ignore it. Click Start rollout to Production. Your app will be released to Google Play.
Where to Go From Here?
Google Play Developer Console has several other features, such as teammate invitations and Google Apps keys (necessary for apps that use Google Maps and similar services). Read about these features and more on the Android Developer Page and the Google Play Developer Help Center.
Before you submit your app, your team should test it carefully to minimize the risk of possible bugs. To learn more about this process, check out Use testing tracks to get invaluable early feedback from users.
We hope you enjoyed this tutorial. If you have any questions or comments, please join the forum discussion below!
raywenderlich.com Weekly
The raywenderlich.com newsletter is the easiest way to stay up-to-date on everything you need to know as a mobile developer.
Get a weekly digest of our tutorials and courses, and receive a free in-depth email course as a bonus!
Recommend
About Joyk
Aggregate valuable and interesting links.
Joyk means Joy of geeK