

我用Python爬虫爬取并分析了C站前100用户最高访问的2000篇文章
source link: https://blog.csdn.net/FRIGIDWINTER/article/details/121094823
Go to the source link to view the article. You can view the picture content, updated content and better typesetting reading experience. If the link is broken, please click the button below to view the snapshot at that time.
最近系统地学习了正则表达式,发现正则表达式最大的应用之一——网络爬虫之前一直没有涉猎,遂借此契机顺带写一个爬虫的demo备用。选择对象是CSDN排行榜前100用户,各自按访问量从高到低排序的前20篇文章,使用一些简单的数据分析手段看看技术热点,方便今后拓宽技术栈。
主要爬取的数据是文章标题和访问量,先总体可视化总体文章的技术关键词;然后按访问量分组,可视化每个访问段的技术热点。
获得服务器API
首先我们要知道通过什么接口可以获得网站数据:首先进入博客总榜,按F12进入控制台,选中Network选项卡监视网络请求,然后刷新网页。从下图可以看到在API"https://blog.csdn.net/phoenix/web/blog/all-rank?page=1&pageSize=20"中我们可以拿到我们想要的用户信息——主要是用户名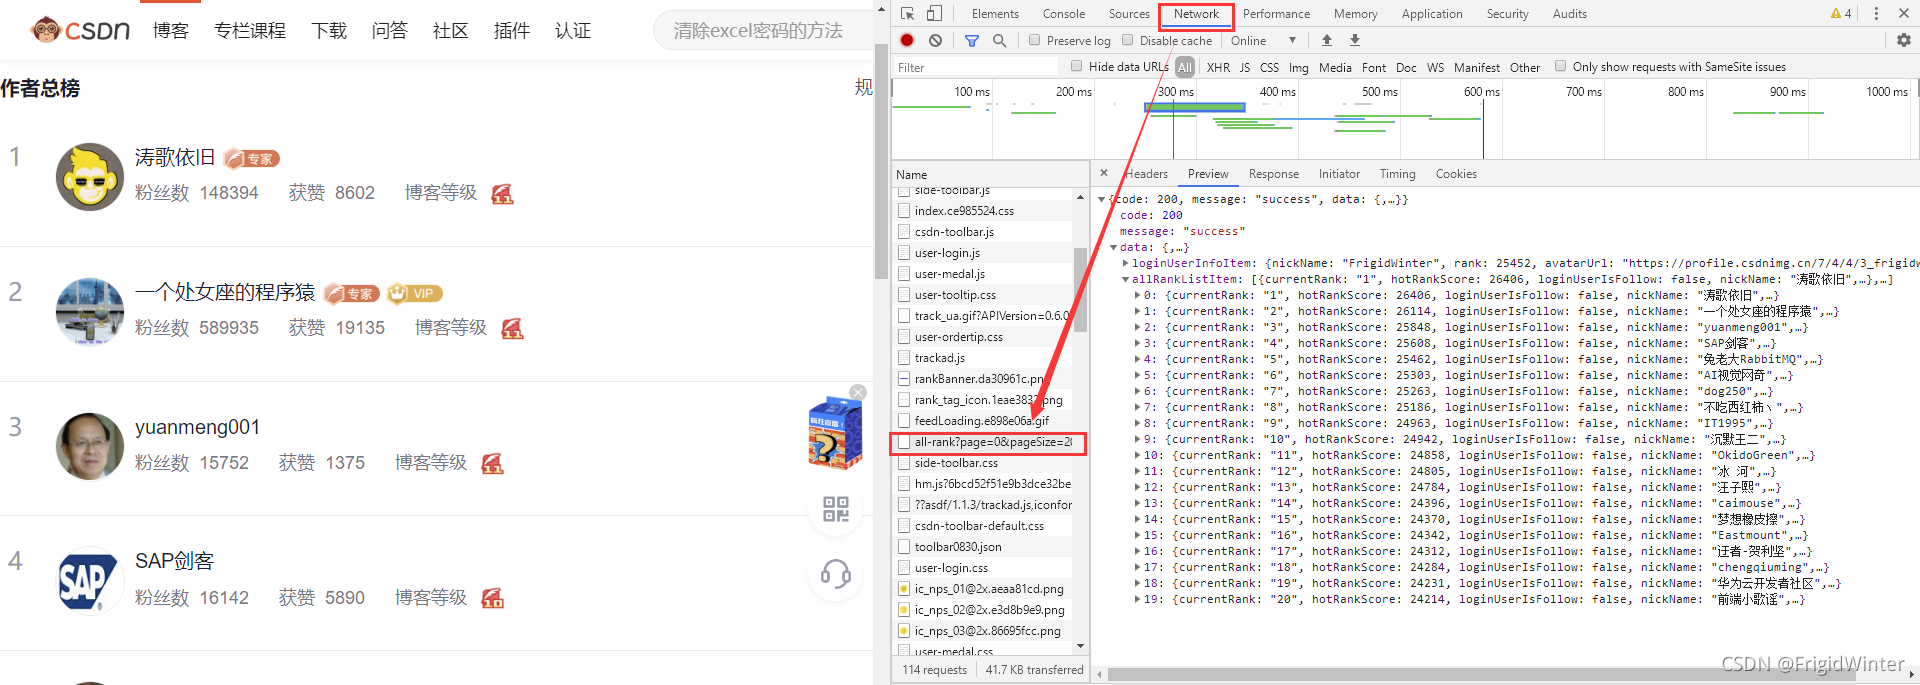
现在到用户博客首页,同样地,按F12进入控制台,选中Network选项卡监视网络请求,然后点击按访问量排序,则可以发现另一个关键APIhttps://blog.csdn.net/community/home-api/v1/get-business-list?page=1&size=20&businessType=blog&orderby=ViewCount&noMore=false&username={},如下图所示。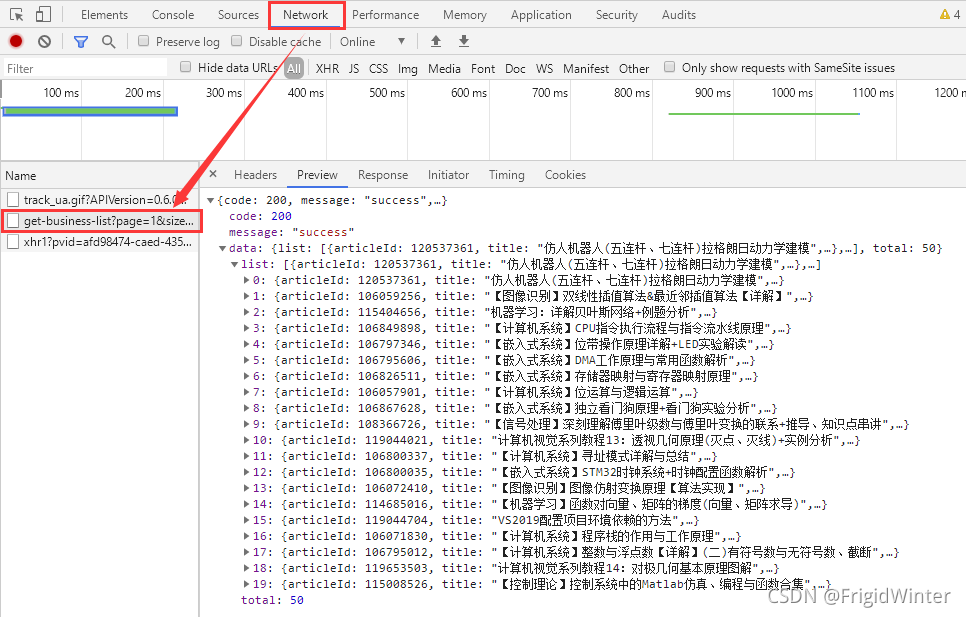
我们与服务器的交互就依靠这两个API进行。
程序总体设计
思考一下,我们总共有如下的公共变量:
# 请求头
headers = {
            'User-Agent':
            'Mozilla/5.0 (Windows NT 6.1; WOW64) AppleWebKit/537.36 (KHTML, like Gecko) Chrome/63.0.3239.132 Safari/537.36'
        }
# 排行榜url
rankUrl = "https://blog.csdn.net/phoenix/web/blog/all-rank?page={}&pageSize=20"
# 按访问量排行的文章列表
mostViewArtical = "https://blog.csdn.net/community/home-api/v1/get-business-list?page=1&size=20&businessType=blog&orderby=ViewCount&noMore=false&username={}"

userNames =[] # 用户名列表
titleList = []	# 文章标题列表
viewCntList = [] # 访问量列表
为便于管理,引入一个类进行爬虫,专门负责与服务器进行数据交互
class GetInfo:
    def __init__(self) -> None:
        # 请求头
        self.headers = {
            'User-Agent':
            'Mozilla/5.0 (Windows NT 6.1; WOW64) AppleWebKit/537.36 (KHTML, like Gecko) Chrome/63.0.3239.132 Safari/537.36'
        }
        # 排行榜url
        self.rankUrl = "https://blog.csdn.net/phoenix/web/blog/all-rank?page={}&pageSize=20"
        # 按访问量排行的文章列表
        self.mostViewArtical = "https://blog.csdn.net/community/home-api/v1/get-business-list?page=1&size=20&businessType=blog&orderby=ViewCount&noMore=false&username={}"

        self.userNames = []
        self.titleList, self.viewCntList = [], []
交互完成后,再使用别的库进行数据分析,将两个过程分离开
用户名爬取
定义一个私有的初始化函数
def __initRankUsrName(self):
    usrNameList = []
    for i in range(5):
        response = requests.get(url=self.rankUrl.format(i),
                                headers=self.headers)
        response.encoding = 'utf-8'
        response.raise_for_status()
        soup = BeautifulSoup(response.text, 'html.parser')
        information = json.loads(str(soup))
        for item in information['data']['allRankListItem']:
            usrNameList.append(item['userName'])
    return usrNameList
这里获取用户名主要是为了动态生成第二个API
再定义一个私有函数,输入参数是用户名列表:
def __initArticalInfo(self, usrList):
    titleList = []
    viewCntList = []
    for name in usrList:
        url = self.mostViewArtical.format(name)
        # print(url)
        response = requests.get(url=url, headers=self.headers)
        response.encoding = 'utf-8'
        response.raise_for_status()
        titleList.extend(re.findall(r"\"title\":\"(.*?)\"", response.text))
        viewCntList.extend(re.findall(r"\"viewCount\":(.*?),", response.text))
    return titleList, viewCntList
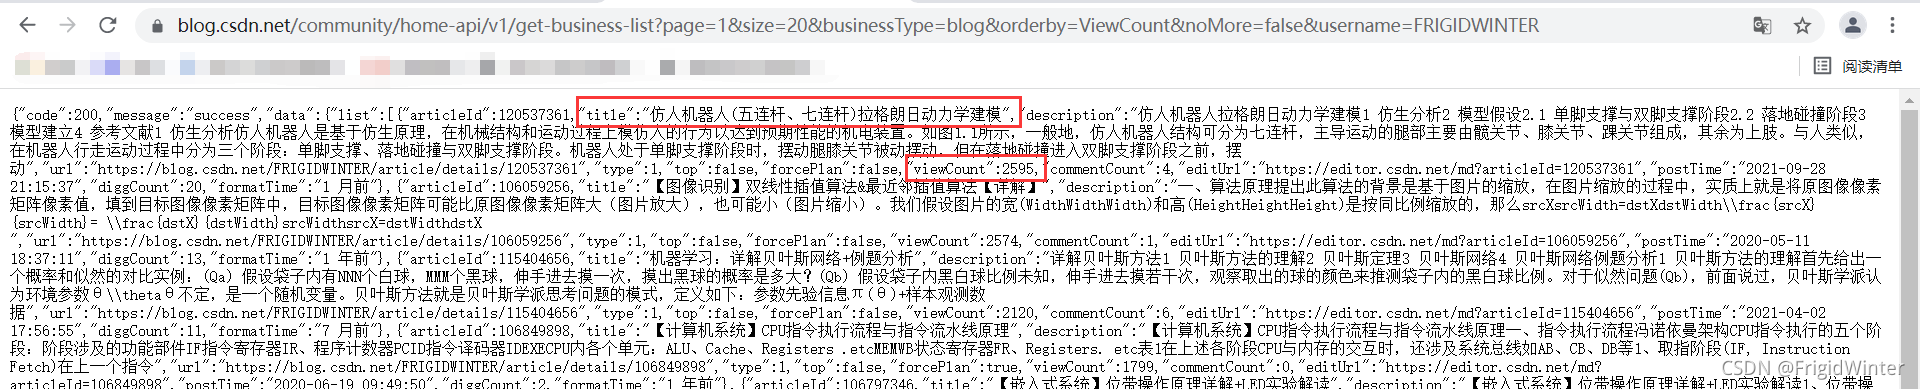
这里我使用正则表达式直接处理字符串,并返回文章标题列表、访问量列表。可以随便访问一个API做实验,这里以我的用户名为例,可以看到要获取文章标题就是以\"title\":\"(.*?)\"去匹配,其中\用于转义;要获取访问量就是以\"viewCount\":(.*?),去匹配,访问数字没有加引号。
事实上,用正则匹配不需要将返回的字符串加载为Json字典,可能有更快的处理效率(但不如json灵活)
这个爬虫类就设计好了,完整代码如下:
class GetInfo:
    def __init__(self) -> None:
        # 请求头
        self.headers = {
            'User-Agent':
            'Mozilla/5.0 (Windows NT 6.1; WOW64) AppleWebKit/537.36 (KHTML, like Gecko) Chrome/63.0.3239.132 Safari/537.36'
        }
        # 排行榜url
        self.rankUrl = "https://blog.csdn.net/phoenix/web/blog/all-rank?page={}&pageSize=20"
        # 按访问量排行的文章列表
        self.mostViewArtical = "https://blog.csdn.net/community/home-api/v1/get-business-list?page=1&size=20&businessType=blog&orderby=ViewCount&noMore=false&username={}"

        self.userNames = self.__initRankUsrName()
        self.titleList, self.viewCntList = self.__initArticalInfo(
            self.userNames)

    def __initArticalInfo(self, usrList):
        titleList = []
        viewCntList = []
        for name in usrList:
            url = self.mostViewArtical.format(name)
            # print(url)
            response = requests.get(url=url, headers=self.headers)
            response.encoding = 'utf-8'
            response.raise_for_status()
            titleList.extend(re.findall(r"\"title\":\"(.*?)\"", response.text))
            viewCntList.extend(
                re.findall(r"\"viewCount\":(.*?),", response.text))
        return titleList, viewCntList

    def __initRankUsrName(self):
        usrNameList = []
        for i in range(5):
            response = requests.get(url=self.rankUrl.format(i),
                                    headers=self.headers)
            response.encoding = 'utf-8'
            response.raise_for_status()
            soup = BeautifulSoup(response.text, 'html.parser')
            information = json.loads(str(soup))
            for item in information['data']['allRankListItem']:
                usrNameList.append(item['userName'])
        return usrNameList


info = GetInfo()
使用也很方便,只需要实例化调用其中的列表属性即可。
将文本数据存成csv格式,先设计表头:
if not os.path.exists("articalInfo.csv"):
    #创建存储csv文件存储数据
    with open('articalInfo.csv', "w", encoding="utf-8-sig", newline='') as f:
        csv_head = csv.writer(f)
        csv_head.writerow(['title', 'viewCnt'])
注意编码格式为utf-8-sig,否则会乱码
接下来存数据:
length = len(info.titleList)
for i in range(length):
    if info.titleList[i]:
        with open('articalInfo.csv', 'a+', encoding='utf-8-sig') as f:
            f.write(info.titleList[i] + ',' + info.viewCntList[i] + '\n')
总体数据可视化
新建一个模块专门用于可视化数据,与爬虫分离开,因为爬虫是慢IO过程,会影响调试效率,后面可以试试用协程来处理爬虫。
首先,把爬虫的信息读取到txt文件去
df = pd.read_csv('articalInfoNor.csv', encoding='utf-8-sig',usecols=['title', 'viewCnt'])
titleList = ','.join(df['title'].values)
with open('text.txt','a+', encoding='utf-8-sig') as f:
    f.writelines(titleList)
如何返回分词结果:
def getKeyWordText():
    # 读取文件信息
    file = open(path.join(path.dirname(__file__), 'text.txt'), encoding='utf-8-sig').read()
    return ' '.join(jieba.cut(file))
借助词云库可视化一下:
bg_pic = imread('2.jpg')

#生成词云
wordcloud = WordCloud(font_path=r'C:\Windows\Fonts\simsun.ttc',mask=bg_pic,background_color='white',scale=1.5).generate(text)
image_colors = ImageColorGenerator(bg_pic)

#显示词云图片
plt.imshow(wordcloud)
plt.axis('off')
plt.show()

#保存图片
wordcloud.to_file('test.jpg')

这个大大的“的”是什么鬼?显然高频关键词里有太多语气助词、连接词,我们最好设置一个停用词列表把这些明显不需要的词屏蔽掉。我这里采用修饰器的方法让代码更简洁,关于修饰器的内容可以参考Python修饰器
def splitText(mode):
    stopWords = ["的","与","和","建议","收藏","使用","了","实现","我","中","你","在","之","年","月","日"]
    def warpper(func):
        def warp():
            textSplit = func()
            if mode:
                temp = [word for word in textSplit if word not in stopWords]
                return ' '.join(temp)
            else:
                return ' '.join(textSplit)
        return warp
    return warpper
当mode=True时启用屏蔽,否则关闭屏蔽,那么之前的函数应该修改为:
# 返回关键词文本
@splitText(False)
def getKeyWordText():
    # 读取文件信息
    file = open(path.join(path.dirname(__file__), 'text.txt'), encoding='utf-8-sig').read()
    return jieba.cut(file)
再来一次:

现在就正常多了。可以看到Python和Java是绝对的领先,之后是各位总结的方法论等等,算法的词频反而不高?
我把数据进一步分层为
1、访问量>10W
2、访问量5W~10W
3、访问量1W~5W
4、访问量5K~1W
5、访问量5K以下
先来看看数据分布情况:

我猜如果分段分得再细一点可能趋于正态分布~
分组可视化看看:

>10W的词云

5~10W的词云

1~5W的词云

5k~1W的词云
感觉从这里开始更百花齐放一些,似乎也更关注具体问题的解决

5k以下的词云
不得不感叹python在每个阶段都是牌面
import requests
from bs4 import BeautifulSoup
import os, json, re, csv

class GetInfo:
    def __init__(self) -> None:
        # 请求头
        self.headers = {
            'User-Agent':
            'Mozilla/5.0 (Windows NT 6.1; WOW64) AppleWebKit/537.36 (KHTML, like Gecko) Chrome/63.0.3239.132 Safari/537.36'
        }
        # 排行榜url
        self.rankUrl = "https://blog.csdn.net/phoenix/web/blog/all-rank?page={}&pageSize=20"
        # 按访问量排行的文章列表
        self.mostViewArtical = "https://blog.csdn.net/community/home-api/v1/get-business-list?page=1&size=20&businessType=blog&orderby=ViewCount&noMore=false&username={}"

        self.userNames = self.__initRankUsrName()
        self.titleList, self.viewCntList = self.__initArticalInfo(
            self.userNames)

    def __initArticalInfo(self, usrList):
        titleList = []
        viewCntList = []
        for name in usrList:
            url = self.mostViewArtical.format(name)
            # print(url)
            response = requests.get(url=url, headers=self.headers)
            response.encoding = 'utf-8'
            response.raise_for_status()
            titleList.extend(re.findall(r"\"title\":\"(.*?)\"", response.text))
            viewCntList.extend(
                re.findall(r"\"viewCount\":(.*?),", response.text))
        return titleList, viewCntList

    def __initRankUsrName(self):
        usrNameList = []
        for i in range(5):
            response = requests.get(url=self.rankUrl.format(i),
                                    headers=self.headers)
            response.encoding = 'utf-8'
            response.raise_for_status()
            soup = BeautifulSoup(response.text, 'html.parser')
            information = json.loads(str(soup))
            for item in information['data']['allRankListItem']:
                usrNameList.append(item['userName'])
        return usrNameList

info = GetInfo()

if not os.path.exists("articalInfo.csv"):
    #创建存储csv文件存储数据
    with open('articalInfo.csv', "w", encoding="utf-8-sig", newline='') as f:
        csv_head = csv.writer(f)
        csv_head.writerow(['title', 'viewCnt'])

length = len(info.titleList)
for i in range(length):
    if info.titleList[i]:
        with open('articalInfo.csv', 'a+', encoding='utf-8-sig') as f:
            f.write(info.titleList[i] + ',' + info.viewCntList[i] + '\n')
from wordcloud import WordCloud,ImageColorGenerator
import matplotlib.pyplot as plt
from imageio import imread
import jieba
import pandas as pd
from os import path

df = pd.read_csv('articalInfoCom.csv', encoding='utf-8-sig',usecols=['title', 'viewCnt'])
titleList = ','.join(df['title'].values)
with open('text.txt','a+', encoding='utf-8-sig') as f:
    f.writelines(titleList)

def splitText(mode):
    stopWords = ["的","与","和","建议","收藏","使用","了","实现","我","中","你","在","之","年","月","日"]
    def warpper(func):
        def warp():
            textSplit = func()
            if mode:
                temp = [word for word in textSplit if word not in stopWords]
                return ' '.join(temp)
            else:
                return ' '.join(textSplit)
        return warp
    return warpper

# 返回关键词文本
@splitText(True)
def getKeyWordText():
    # 读取文件信息
    file = open(path.join(path.dirname(__file__), 'text.txt'), encoding='utf-8-sig').read()
    return jieba.cut(file)


text = getKeyWordText()
#读取txt文件、背景图片
bg_pic = imread('2.jpg')

#生成词云
wordcloud = WordCloud(font_path=r'C:\Windows\Fonts\simsun.ttc',mask=bg_pic,background_color='white',scale=1.5).generate(text)
image_colors = ImageColorGenerator(bg_pic)

#显示词云图片
plt.imshow(wordcloud)
plt.axis('off')
plt.show()

#保存图片
wordcloud.to_file('test.jpg')
Recommend
-
85
Python入门第二节
-
102
前言 你身处的环境是什么样,你就会成为什么样的人。现在人们日常生活基本上离不开微信,但微信不单单是一个即时通讯软件,微信更像是虚拟的现实世界。你所处的朋友圈是怎么样,慢慢你的思想也会变的怎么样。最近在学习 itchat,然后就写了一个爬虫,爬取了我所有的...
-
76
我用Python爬取微信好友,最后发现一个大秘密
-
67
点击上方“程序人生”,选择“置顶公众号” 第一时间关注程序猿(媛)身边的故事 作者
-
57
-
43
目录 操作环境 编译器:pycharm社区版 python 版本:anaconda python3.7.4 浏览器选择:Google浏览器 需要用到的第三方模块:requests , lxml , selenium , time , bs4,os
-
17
目的:爬取携程网址 火车 中的单程与中转 单程 url=“https://trains.ctrip.com/trainbooking/search?tocn=%25e5%258d%2583%25e5%25b2%259b%25e6%25b9%2596&fromcn=%25e6%259d%25ad%25e5%25b7%259e&day=2020-1...
-
26
Python 爬取Steam热销榜信息 最近学习了一下爬虫,练练手,第一次写文章,请多多包涵O(∩_∩)O 爬取Steam热销榜:游戏排名、游戏名字、价格、好评率、游戏详情页面跳转链接。 一、开始爬虫前 1.引入库 热销榜...
-
6
刚学习python一个多月的小白,做个爬虫项目操练一下,如有不足,敬请雅正。 可行性分析 wallhaven上面有许多精美的壁纸,一张一张下载有时过于繁琐,本文便向读者展示如何自动化爬取
-
3
一、推理原理 1.先去《英雄联盟》官网找到英雄及皮肤图片的网址: lol.qq.com/data/info-h… 2.从上...
About Joyk
Aggregate valuable and interesting links.
Joyk means Joy of geeK