

How to Create an AWS CloudFormation Fargate Template
source link: https://mydeveloperplanet.com/2021/10/26/how-to-create-an-aws-cloudformation-fargate-template/
Go to the source link to view the article. You can view the picture content, updated content and better typesetting reading experience. If the link is broken, please click the button below to view the snapshot at that time.
In the previous post, you learnt how to deploy a basic Dockerized Spring Boot application to AWS Fargate. Wouldn’t it be great if this manual configuration could be provisioned from a plain text file which can be part of your version control system? With a single action, all necessary resources are configured in the right order. In this post, you will learn how to create an AWS CloudFormation template. Enjoy!
1. Introduction
It is advised to read the previous post first because in this post, you will execute the identical steps but this time the steps are configured in a CloudFormation template. However, if you already know what AWS Fargate is, it is just fine to skip it and start right away. With CloudFormation, the configuration of your infrastructure can be provisioned easily and the infrastructure can be treated as code. Of course, the provisioning will be easy once you have configured the template correctly. The latter can be quite a challenge, but the AWS documentation and examples will help you along the way. The proof of the pudding is in the eating, so let’s see how the configuration of the previous post, where you deployed a Spring Boot application to AWS Fargate, can be transformed to a CloudFormation template. You will do so step by step because the complete template can be overwhelming at first.
The sources being used in this blog are available at GitHub. The templates being used are present in directory cf_templates.
2. Create the App
The Spring Boot App is a basic application with a Hello Rest endpoint which returns a hello message including the host where the application is running. The app is used before in a previous post. The controller is the following:
@RestControllerpublic class HelloController {@GetMapping("/hello")public String hello() {String message = "Hello AWS!";try {InetAddress ip = InetAddress.getLocalHost();message += " From host: " + ip;} catch (UnknownHostException e) {e.printStackTrace();}return message;}}A Dockerfile is available in the root of the repository and the dockerfile-maven-plugin is added to the pom file.
Run the build in order to create the jar file and the corresponding Docker image.
$ mvn clean verifyVerify whether the Docker image is available in your local Docker repository.
$ docker imagesREPOSITORY TAG IMAGE ID CREATED SIZEmydeveloperplanet/myawsplanet 0.0.1-SNAPSHOT 765984f7cfc2 24 seconds ago 666MB3. Upload Image to ECR
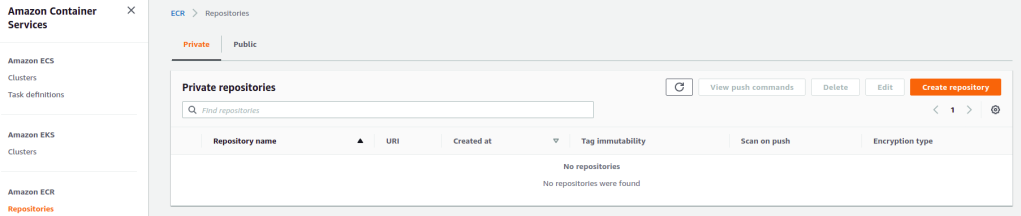
Now that you have created the Docker image, you need to upload it to ECR, the AWS Docker repository. Navigate in AWS to the ECS Service and select in the left menu the Repositories section. First thing to do, is to create a repository by clicking the Create repository button.
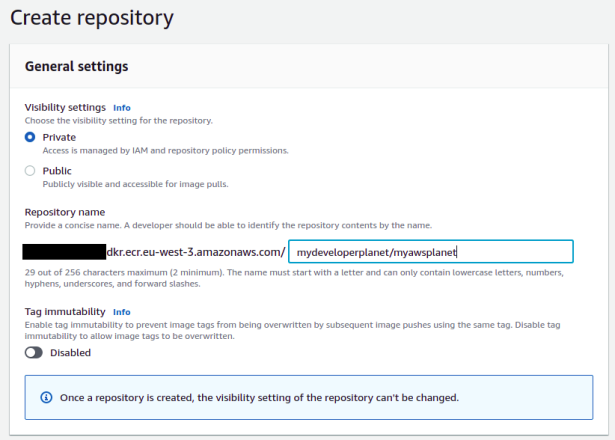
Give the repository a recognizable name like mydeveloperplanet/myawsplanet and click Create repository button.
In order to see how you can push the Docker image to the repositoyry, click the View push commands button which is available in the repository overview.
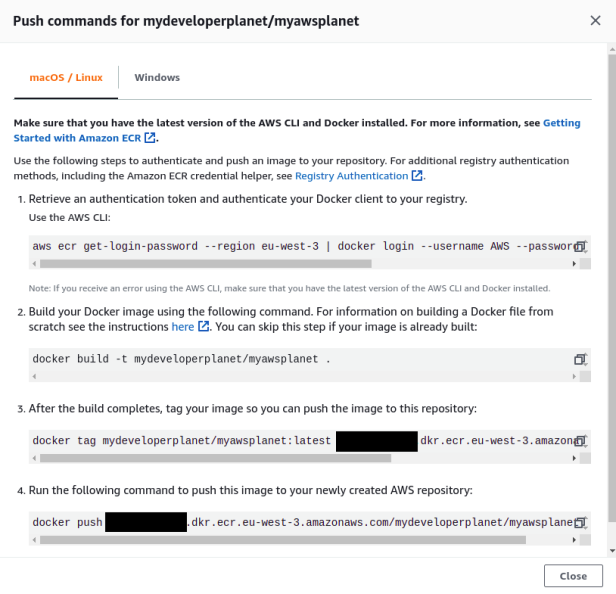
Execute step 1, which will provide you temporary credentials in order to be able to gain access to the repository. The <account ID> needs to be replaced with your AWS account ID.
$ aws ecr get-login-password --region eu-west-3 | docker login --username AWS --password-stdin <account ID>.dkr.ecr.eu-west-3.amazonaws.comSkip step2, building the Docker image is already executed by means of the Maven build. In step 3, adjust the command in order to use version 0.0.1-SNAPSHOT instead of latest for identifying the local Docker image.
$ docker tag mydeveloperplanet/myawsplanet:0.0.1-SNAPSHOT <account ID>.dkr.ecr.eu-west-3.amazonaws.com/mydeveloperplanet/myawsplanet:latestIn step 4, you push the local Docker image to the remote AWS Docker repository.
$ docker push <account ID>.dkr.ecr.eu-west-3.amazonaws.com/mydeveloperplanet/myawsplanet:latestAfter successful upload, the Docker image is visible in the repository.
4. Add Task Definition
First thing to do, is to create the CloudFormation yaml template. You can do so by means of a text editor, but when using IntelliJ, you can also make use of the AWS CloudFormation plugin. This plugin will give you some validation and autocomplete features which can be very handy when writing the yaml template. Creating the yaml file with IntelliJ can be done by right-clicking the project, choose New, and select AWS CloudFormation YAML Template.
The configuration for the task definition is present in the cf_templates/template_task_definition.yaml file in the repository. The official AWS documentation for creating the Task Definition will be the main source of information. Create a task definition in the Resources section.
Set the property RequiresCompatibilities to FARGATE because of course you will run the task in a Fargate cluster.
Resources:MyTaskDefinition:Type: AWS::ECS::TaskDefinitionProperties:RequiresCompatibilities:- "FARGATE"The Docker image you need to use is present in the ECR registry. In order to be able to access the registry, a task execution role is needed. This role needs to be created only once. For simplicity, it is assumed that this role already exists. If not, see the AWS documentation. Navigate to the IAM Service and choose Roles in the left menu. Search for ecs in the search bar. Click the ecsTaskExecutionRole and copy the ARN.

Add the role in the Properties section.
Properties:...ExecutionRoleArn: "arn:aws:iam::<replace with account ID>:role/ecsTaskExecutionRole"Set the task CPU to 256, which corresponds to 0.25 vCPU and set the task memory to 512, which corresponds to 0.5 GB. Both settings are required when the task is deployed at a Fargate cluster.
Set the NetworkMode to awsvpc. This value must be explicitely set for Fargate because the default is bridge.
The container definition must contain the name and the image of the Docker image you want to run. The image must refer to the URI of the image in the ECR repository.
Set the soft limit (MemoryReservation) and hard limit (Memory) to respectively 256 and 512.
Finally, set the port mapping to 8080 since the Spring Boot application runs on port 8080 in the container. Remember that it is not necessary to set a host port, Fargate will take care of this.
The complete task definition is as follows:
AWSTemplateFormatVersion: "2010-09-09"Description: "CloudFormation template for creating a task definition"Resources:MyTaskDefinition:Type: AWS::ECS::TaskDefinitionProperties:RequiresCompatibilities:- "FARGATE"ExecutionRoleArn: "arn:aws:iam::<replace with account ID>:role/ecsTaskExecutionRole"Cpu: 256Memory: 512NetworkMode: "awsvpc"ContainerDefinitions:- Name: "myawsplanet"Image: "<replace with account ID>.dkr.ecr.eu-west-3.amazonaws.com/mydeveloperplanet/myawsplanet:latest"MemoryReservation: 256Memory: 512PortMappings:- ContainerPort: 8080Protocol: tcp5. Create a Stack
Now that you created the task definition, it would be nice to see whether it actually works. Therefore, you need to create a stack in CloudFormation. Navigate to the CloudFormation service and click the Create Stack button.
In step 1, select Upload a template file and navigate to the template on your local machine. Click the Next button. At this time, some validation of the template is done. E.g., when the error [/Description] 'null' values are not allowed in templates is shown, the Description field at line 2 is empty.

In step 2, give the stack the name MyFirstStack and click the Next button.

In step 3, click the Next button. In step 4, you get the opportunity for reviewing everything and when this seems ok, click the Create stack button. In the Events tab of the stack, the progress of creating the stack can be followed.

Navigate to the ECS service and click Task Definitions in the left menu. Verify whether the task definition has been created.

6. Add Cluster
The configuration for the cluster is present in the cf_templates/template_cluster.yaml file in the repository. This file starts from the template_task_definition.yaml file where you will add the cluster configuration. The official AWS documentation for creating the ECS Cluster will be the main source of information. Create an ECS Cluster in the Resources section and give it the name MyFargateCluster.
ECSCluster:Type: 'AWS::ECS::Cluster'Properties:ClusterName: MyFargateClusterNavigate to the stack and click the Update button.

In step 1, choose Replace current template and upload file template_cluster.yaml.

In the next steps, just click the Next button up to the Review step. Click the Update stack button and watch the Events tab for successful creation.
Navigate to the ECS Service and verify whether the cluster is created.

7. Add ALB
For creating a service which will run the task, an Application Load Balancer (ALB) is needed. The configuration for the ALB is present in the cf_templates/template_alb.yaml file in the repository. This file starts from the template_cluster.yaml file where you will add the ALB configuration. The official AWS documentation for creating the ALB will be the main source of information. Do not use this AWS documentation since this one is for a Classic Load Balancer and this is not what you need here. Create an ALB in the Resources section and give it the name FargateAlb.
The ALB configuration requires the configuration of the subnets to use. For simplicity, you will use the default VPC. Navigate to the VPC service and click Subnets in the left menu. Column Subnet ID will show you the ID’s which can be used.

The configuration up till now looks as follows. Note that also the Type is set to application. It is not really necessary to define this because application is the default, but it does not hurt to be explicit in what you are doing.
FargateAlb:Type: 'AWS::ElasticLoadBalancingV2::LoadBalancer'Properties:Name: FargateAlbSubnets:- subnet-580b0331- subnet-7102210a- subnet-c40f7b89Type: applicationAdd Target Group MyFargateTargetGroup. The configuration corresponds to paragraph Service and the part Container to load balance in the previous post. The VpcId is retrieved from the VPC Service and section Your VPCs in the left menu. Clicking the VPC will show you the ID.
MyFargateTargetGroup:Type: 'AWS::ElasticLoadBalancingV2::TargetGroup'Properties:Name: MyFargateTargetGroupVpcId: vpc-9d55b7f5Protocol: HTTPPort: 8080HealthCheckPath: /actuator/TargetType: ipAdd the listener for the ALB. You want to route all the traffic of the ALB to the specified Target Group of type forward. This is explained in the AWS documentation. In this case, the TargetGroupArn must refer to the Target Group created above. This is accomplished with !Ref. Similarly, a reference is created to the Load Balancer.
Listener:Type: 'AWS::ElasticLoadBalancingV2::Listener'Properties:DefaultActions:- TargetGroupArn: !Ref MyFargateTargetGroupType: forwardLoadBalancerArn: !Ref FargateAlbPort: 80Protocol: HTTPAdd a Security Group for the ALB. Note that the AWS documentation for this configuration resides at the EC2 section.
Give the Security Group a description and a name. Next, add inbound rules for traffic over port 80 for IPv4 and IPv6. It is important to specify both the FromPort and the ToPort. Otherwise you will get the error Invalid value for portRange. Must specify both from and to ports with TCP/UDP.
FargateAlbSG:Type: 'AWS::EC2::SecurityGroup'Properties:GroupDescription: SG for the Fargate ALBGroupName: FargateAlbSGSecurityGroupIngress:- CidrIpv6: ::/0FromPort: 80ToPort: 80IpProtocol: TCPDescription: 'Inbound rule for IPv6 traffic'- CidrIp: 0.0.0.0/0FromPort: 80ToPort: 80IpProtocol: TCPDescription: 'Inbound rule for IPv4 traffic'Last thing to do, is to refer from the ALB to the Security Group. Note that the Security Group must refer to the ID of the Security Group and not the name. You can use the !GetAtt function for this. If you refer to the Security Group with !Ref, you will receive the error Security group 'FargateAlbSG' is not valid (Service: AmazonElasticLoadBalancing; Status Code: 400; Error Code: ValidationError; Request ID: 05774148-e1a7-4b25-82a1-e8d0d1059731; Proxy: null)
FargateAlb:Type: 'AWS::ElasticLoadBalancingV2::LoadBalancer'Properties:...SecurityGroups:- !GetAtt FargateAlbSG.GroupIdUpdate the stack with the new template, navigate to the EC2 service and verify whether the Load Balancer, Security Group and Target Group are created.
The created Load Balancer.

The created Target Group.

The created Security Group.

8. Add SG for Containers
The configuration for the Security Group for the containers is present in the cf_templates/template_sg_containers.yaml file in the repository. This file starts from the template_alb.yaml file where you will add the Security Group for the containers configuration. Create a Security Group in the Resources section and give it the name Alb2FargateContainers.
In this case, all traffic between the ALB and the containers is allowed. You configure a SourceSecurityGroupId which refers to the Security Group of the ALB. In order to specify that all traffic is allowed, you set IpProtocol to -1. In case of using a Source Security Group, it is not allowed to set an IP range. See the AWS documentation section SourceSecurityGroupName.
Alb2FargateContainers:Type: 'AWS::EC2::SecurityGroup'Properties:GroupDescription: SG for traffic between ALB and containersGroupName: Alb2FargateContainersSecurityGroupIngress:- IpProtocol: -1SourceSecurityGroupId: !GetAtt FargateAlbSG.GroupIdDescription: 'Inbound rule for all traffic'Update the stack with the new template and verify at the EC2 service whether the Security Group is created.

9. Add Service
In the previous sections, you did quite some preparation work which will be used for creating the ECS Service. The configuration for the Service is present in the cf_templates/template_service.yaml file in the repository. This file starts from the template_sg_containers.yaml file where you will add the ECS Service configuration. The official AWS documentation for creating the Service will be the main source of information. Create a ECS Service in the Resources section and give it the name MyECSService.
First, configure some basic configuration: set the LaunchType to FARGATE, link the Service to the Cluster, set the DesiredCount to 4 running containers, link to the Task Definition and set some percentages just like you did in the previous post.
MyECSService:Type: AWS::ECS::ServiceProperties:LaunchType: FARGATECluster:Ref: "ECSCluster"DesiredCount: 4TaskDefinition:Ref: "MyTaskDefinition"DeploymentConfiguration:MaximumPercent: 100MinimumHealthyPercent: 0Add the network configuration. Link to the containers Security Group and use the subnets of the default VPC.
MyECSService:Type: AWS::ECS::ServiceProperties:...NetworkConfiguration:AwsvpcConfiguration:AssignPublicIp: ENABLEDSecurityGroups:- !GetAtt Alb2FargateContainers.GroupIdSubnets: ['subnet-580b0331','subnet-7102210a','subnet-c40f7b89']Add the Load Balancer. Note that the ContainerName must be identical to the name as defined in the Task Definition. If not, you will receive the error Resource handler returned message: "Invalid request provided: CreateService error: The container MyAWSPlanet does not exist in the task definition. (Service: AmazonECS; Status Code: 400; Error Code: InvalidParameterException; Request ID: ce5b5e53-051c-4687-a9c1-b829124a22b1; Proxy: null)" (RequestToken: 23597687-d1d5-7c9b-9481-5f5b83de2d1f, HandlerErrorCode: InvalidRequest)
MyECSService:Type: AWS::ECS::ServiceDependsOn:- ListenerProperties:...LoadBalancers:- TargetGroupArn:Ref: MyFargateTargetGroupContainerPort: 8080ContainerName: myawsplanetUpdate the stack and verify whether the ECS Service is created with 4 running tasks.

Navigate to the ALB, retrieve the public IP and verify whether the containers can be reached and return their host IP and a welcome message.
$ curl http://FargateAlb-601683219.eu-west-3.elb.amazonaws.com/helloHello AWS! From host: ip-172-31-5-215.eu-west-3.compute.internal/172.31.5.215$ curl http://FargateAlb-601683219.eu-west-3.elb.amazonaws.com/helloHello AWS! From host: ip-172-31-11-146.eu-west-3.compute.internal/172.31.11.146$ curl http://FargateAlb-601683219.eu-west-3.elb.amazonaws.com/helloHello AWS! From host: ip-172-31-28-51.eu-west-3.compute.internal/172.31.28.51$ curl http://FargateAlb-601683219.eu-west-3.elb.amazonaws.com/helloHello AWS! From host: ip-172-31-42-237.eu-west-3.compute.internal/172.31.42.23710. Cleanup
Cleaning up the resources is fairly easy now. Navigate to the Stack and click the Delete button. The progress of deletion can be tracked in the Events tab. This will take some minutes, but the good news is, that no manual deletion of resources must be done. Everything which has been created with the template is automatically removed.
11. Conclusion
You learnt how to create a CloudFormation template which creates an ECS Fargate cluster and runs a Dockerized Spring Boot application. Creating a stack, uploading a template, deleting the stack, etc. are powerfull tools and the complete configuration is under version control. Learning hot to create the template can take some effort. The AWS documentation provides a good resource for this, but besides that, you will find yourself googling for examples. Quite some AWS documentation is provided with examples, but some of them are not. Besides that, it is a great way for managing infrastructure.
Recommend
About Joyk
Aggregate valuable and interesting links.
Joyk means Joy of geeK