

Vue3的7种和Vue2的12种组件通信,值得收藏
source link: https://segmentfault.com/a/1190000040842889
Go to the source link to view the article. You can view the picture content, updated content and better typesetting reading experience. If the link is broken, please click the button below to view the snapshot at that time.
本文原文首发掘金:https://juejin.cn/post/699968...
如有不对的或者遗漏的,欢迎指正,你的一赞一评都是我前行最大的动力,感谢
Vue2.x组件通信12种方式写在后面了,先来 Vue3 的
Vue3 组件通信方式
- props
- $emit
- expose / ref
- $attrs
- v-model
- provide / inject
Vue3 通信使用写法
props
用 props 传数据给子组件有两种方法,如下
方法一,混合写法
// Parent.vue 传送
<child :msg1="msg1" :msg2="msg2"></child>
<script>
import child from "./child.vue"
import { ref, reactive } from "vue"
export default {
    data(){
        return {
            msg1:"这是传级子组件的信息1"
        }
    },
    setup(){
        // 创建一个响应式数据

        // 写法一 适用于基础类型  ref 还有其他用处,下面章节有介绍
        const msg2 = ref("这是传级子组件的信息2")

        // 写法二 适用于复杂类型,如数组、对象
        const msg2 = reactive(["这是传级子组件的信息2"])

        return {
            msg2
        }
    }
}
</script>

// Child.vue 接收
<script>
export default {
  props: ["msg1", "msg2"],// 如果这行不写,下面就接收不到
  setup(props) {
    console.log(props) // { msg1:"这是传给子组件的信息1", msg2:"这是传给子组件的信息2" }
  },
}
</script>
方法二,纯 Vue3 写法
// Parent.vue 传送
<child :msg2="msg2"></child>
<script setup>
    import child from "./child.vue"
    import { ref, reactive } from "vue"
    const msg2 = ref("这是传给子组件的信息2")
    // 或者复杂类型
    const msg2 = reactive(["这是传级子组件的信息2"])
</script>

// Child.vue 接收
<script setup>
    // 不需要引入 直接使用
    // import { defineProps } from "vue"
    const props = defineProps({
        // 写法一
        msg2: String
        // 写法二
        msg2:{
            type:String,
            default:""
        }
    })
    console.log(props) // { msg2:"这是传级子组件的信息2" }
</script>
如果父组件是混合写法,子组件纯 Vue3 写法的话,是接收不到父组件里 data 的属性,只能接收到父组件里 setup 函数里传的属性
如果父组件是纯 Vue3 写法,子组件混合写法,可以通过 props 接收到 data 和 setup 函数里的属性,但是子组件要是在 setup 里接收,同样只能接收到父组件中 setup 函数里的属性,接收不到 data 里的属性
官方也说了,既然用了 3,就不要写 2 了,所以不推荐混合写法。下面的例子,一律只用纯 Vue3 的写法,就不写混合写法了
$emit
// Child.vue 派发
<template>
    // 写法一
    <button @click="emit('myClick')">按钮</buttom>
    // 写法二
    <button @click="handleClick">按钮</buttom>
</template>
<script setup>

    // 方法一 适用于Vue3.2版本 不需要引入
    // import { defineEmits } from "vue"
    // 对应写法一
    const emit = defineEmits(["myClick","myClick2"])
    // 对应写法二
    const handleClick = ()=>{
        emit("myClick", "这是发送给父组件的信息")
    }

    // 方法二 不适用于 Vue3.2版本,该版本 useContext()已废弃
    import { useContext } from "vue"
    const { emit } = useContext()
    const handleClick = ()=>{
        emit("myClick", "这是发送给父组件的信息")
    }
</script>

// Parent.vue 响应
<template>
    <child @myClick="onMyClick"></child>
</template>
<script setup>
    import child from "./child.vue"
    const onMyClick = (msg) => {
        console.log(msg) // 这是父组件收到的信息
    }
</script>
expose / ref
父组件获取子组件的属性或者调用子组件方法
// Child.vue
<script setup>
    // 方法一 不适用于Vue3.2版本,该版本 useContext()已废弃
    import { useContext } from "vue"
    const ctx = useContext()
    // 对外暴露属性方法等都可以
    ctx.expose({
        childName: "这是子组件的属性",
        someMethod(){
            console.log("这是子组件的方法")
        }
    })

    // 方法二 适用于Vue3.2版本, 不需要引入
    // import { defineExpose } from "vue"
    defineExpose({
        childName: "这是子组件的属性",
        someMethod(){
            console.log("这是子组件的方法")
        }
    })
</script>

// Parent.vue  注意 ref="comp"
<template>
    <child ref="comp"></child>
    <button @click="handlerClick">按钮</button>
</template>
<script setup>
    import child from "./child.vue"
    import { ref } from "vue"
    const comp = ref(null)
    const handlerClick = () => {
        console.log(comp.value.childName) // 获取子组件对外暴露的属性
        comp.value.someMethod() // 调用子组件对外暴露的方法
    }
</script>
attrs
attrs:包含父作用域里除 class 和 style 除外的非 props 属性集合
// Parent.vue 传送
<child :msg1="msg1" :msg2="msg2" title="3333"></child>
<script setup>
    import child from "./child.vue"
    import { ref, reactive } from "vue"
    const msg1 = ref("1111")
    const msg2 = ref("2222")
</script>

// Child.vue 接收
<script setup>
    import { defineProps, useContext, useAttrs } from "vue"
    // 3.2版本不需要引入 defineProps,直接用
    const props = defineProps({
        msg1: String
    })
    // 方法一 不适用于 Vue3.2版本,该版本 useContext()已废弃
    const ctx = useContext()
    // 如果没有用 props 接收 msg1 的话就是 { msg1: "1111", msg2:"2222", title: "3333" }
    console.log(ctx.attrs) // { msg2:"2222", title: "3333" }

    // 方法二 适用于 Vue3.2版本
    const attrs = useAttrs()
    console.log(attrs) // { msg2:"2222", title: "3333" }
</script>
v-model
可以支持多个数据双向绑定
// Parent.vue
<child v-model:key="key" v-model:value="value"></child>
<script setup>
    import child from "./child.vue"
    import { ref, reactive } from "vue"
    const key = ref("1111")
    const value = ref("2222")
</script>

// Child.vue
<template>
    <button @click="handlerClick">按钮</button>
</template>
<script setup>

    // 方法一  不适用于 Vue3.2版本,该版本 useContext()已废弃
    import { useContext } from "vue"
    const { emit } = useContext()

    // 方法二 适用于 Vue3.2版本,不需要引入
    // import { defineEmits } from "vue"
    const emit = defineEmits(["key","value"])

    // 用法
    const handlerClick = () => {
        emit("update:key", "新的key")
        emit("update:value", "新的value")
    }
</script>
provide / inject
provide / inject 为依赖注入
provide:可以让我们指定想要提供给后代组件的数据或
inject:在任何后代组件中接收想要添加在这个组件上的数据,不管组件嵌套多深都可以直接拿来用
// Parent.vue
<script setup>
    import { provide } from "vue"
    provide("name", "沐华")
</script>

// Child.vue
<script setup>
    import { inject } from "vue"
    const name = inject("name")
    console.log(name) // 沐华
</script>
// store/index.js
import { createStore } from "vuex"
export default createStore({
state:{ count: 1 },
getters:{
getCount: state => state.count
},
mutations:{
add(state){
state.count++
}
}
})
// main.js
import { createApp } from "vue"
import App from "./App.vue"
import store from "./store"
createApp(App).use(store).mount("#app")
// Page.vue
// 方法一 直接使用
<template>
<div>{{ $store.state.count }}</div>
<button @click="$store.commit('add')">按钮</button>
</template>
// 方法二 获取
<script setup>
import { useStore, computed } from "vuex"
const store = useStore()
console.log(store.state.count) // 1
const count = computed(()=>store.state.count) // 响应式,会随着vuex数据改变而改变
console.log(count) // 1
</script>Vue2.x 组件通信方式
Vue2.x 组件通信共有12种
- props
- $emit / v-on
- .sync
- v-model
- $children / $parent
- $attrs / $listeners
- provide / inject
- EventBus
- $root
父子组件通信可以用:
- props
- $emit / v-on
- $attrs / $listeners
- .sync
- v-model
- $children / $parent
兄弟组件通信可以用:
- EventBus
- $parent
跨层级组件通信可以用:
- provide/inject
- EventBus
- $attrs / $listeners
- $root
Vue2.x 通信使用写法
下面把每一种组件通信方式的写法一一列出
1. props
父组件向子组件传送数据,这应该是最常用的方式了
子组件接收到数据之后,不能直接修改父组件的数据。会报错,所以当父组件重新渲染时,数据会被覆盖。如果子组件内要修改的话推荐使用 computed
// Parent.vue 传送
<template>
    <child :msg="msg"></child>
</template>

// Child.vue 接收
export default {
  // 写法一 用数组接收
  props:['msg'],
  // 写法二 用对象接收,可以限定接收的数据类型、设置默认值、验证等
  props:{
      msg:{
          type:String,
          default:'这是默认数据'
      }
  },
  mounted(){
      console.log(this.msg)
  },
}
2. .sync
可以帮我们实现父组件向子组件传递的数据 的双向绑定,所以子组件接收到数据后可以直接修改,并且会同时修改父组件的数据
// Parent.vue
<template>
    <child :page.sync="page"></child>
</template>
<script>
export default {
    data(){
        return {
            page:1
        }
    }
}

// Child.vue
export default {
    props:["page"],
    computed(){
        // 当我们在子组件里修改 currentPage 时,父组件的 page 也会随之改变
        currentPage {
            get(){
                return this.page
            },
            set(newVal){
                this.$emit("update:page", newVal)
            }
        }
    }
}
</script>
3. v-model
和 .sync 类似,可以实现将父组件传给子组件的数据为双向绑定,子组件通过 $emit 修改父组件的数据
// Parent.vue
<template>
    <child v-model="value"></child>
</template>
<script>
export default {
    data(){
        return {
            value:1
        }
    }
}

// Child.vue
<template>
    <input :value="value" @input="handlerChange">
</template>
export default {
    props:["value"],
    // 可以修改事件名,默认为 input
    model:{
        event:"updateValue"
    },
    methods:{
        handlerChange(e){
            this.$emit("input", e.target.value)
            // 如果有上面的重命名就是这样
            this.$emit("updateValue", e.target.value)
        }
    }
}
</script>
4. ref
ref 如果在普通的DOM元素上,引用指向的就是该DOM元素;
如果在子组件上,引用的指向就是子组件实例,然后父组件就可以通过 ref 主动获取子组件的属性或者调用子组件的方法
// Child.vue
export default {
    data(){
        return {
            name:"沐华"
        }
    },
    methods:{
        someMethod(msg){
            console.log(msg)
        }
    }
}

// Parent.vue
<template>
    <child ref="child"></child>
</template>
<script>
export default {
    mounted(){
        const child = this.$refs.child
        console.log(child.name) // 沐华
        child.someMethod("调用了子组件的方法")
    }
}
</script>
5. $emit / v-on
子组件通过派发事件的方式给父组件数据,或者触发父组件更新等操作
// Child.vue 派发
export default {
  data(){
      return { msg: "这是发给父组件的信息" }
  },
  methods: {
      handleClick(){
          this.$emit("sendMsg",this.msg)
      }
  },
}
// Parent.vue 响应
<template>
    <child v-on:sendMsg="getChildMsg"></child>
    // 或 简写
    <child @sendMsg="getChildMsg"></child>
</template>

export default {
    methods:{
        getChildMsg(msg){
            console.log(msg) // 这是父组件接收到的消息
        }
    }
}
6. $attrs / $listeners
多层嵌套组件传递数据时,如果只是传递数据,而不做中间处理的话就可以用这个,比如父组件向孙子组件传递数据时
$attrs:包含父作用域里除 class 和 style 除外的非 props 属性集合。通过 this.$attrs 获取父作用域中所有符合条件的属性集合,然后还要继续传给子组件内部的其他组件,就可以通过 v-bind="$attrs"
$listeners:包含父作用域里 .native 除外的监听事件集合。如果还要继续传给子组件内部的其他组件,就可以通过 v-on="$linteners"
使用方式是相同的
// Parent.vue
<template>
    <child :name="name" title="1111" ></child>
</template
export default{
    data(){
        return {
            name:"沐华"
        }
    }
}

// Child.vue
<template>
    // 继续传给孙子组件
    <sun-child v-bind="$attrs"></sun-child>
</template>
export default{
    props:["name"], // 这里可以接收,也可以不接收
    mounted(){
        // 如果props接收了name 就是 { title:1111 },否则就是{ name:"沐华", title:1111 }
        console.log(this.$attrs)
    }
}
7. $children / $parent
$children:获取到一个包含所有子组件(不包含孙子组件)的 VueComponent 对象数组,可以直接拿到子组件中所有数据和方法等
$parent:获取到一个父节点的 VueComponent 对象,同样包含父节点中所有数据和方法等
// Parent.vue
export default{
    mounted(){
        this.$children[0].someMethod() // 调用第一个子组件的方法
        this.$children[0].name // 获取第一个子组件中的属性
    }
}

// Child.vue
export default{
    mounted(){
        this.$parent.someMethod() // 调用父组件的方法
        this.$parent.name // 获取父组件中的属性
    }
}
8. provide / inject
provide / inject 为依赖注入,说是不推荐直接用于应用程序代码中,但是在一些插件或组件库里却是被常用,所以我觉得用也没啥,还挺好用的
provide:可以让我们指定想要提供给后代组件的数据或方法
inject:在任何后代组件中接收想要添加在这个组件上的数据或方法,不管组件嵌套多深都可以直接拿来用
要注意的是 provide 和 inject 传递的数据不是响应式的,也就是说用 inject 接收来数据后,provide 里的数据改变了,后代组件中的数据不会改变,除非传入的就是一个可监听的对象
所以建议还是传递一些常量或者方法
// 父组件
export default{
    // 方法一 不能获取 methods 中的方法
    provide:{
        name:"沐华",
        age: this.data中的属性
    },
    // 方法二 不能获取 data 中的属性
    provide(){
        return {
            name:"沐华",
            someMethod:this.someMethod // methods 中的方法
        }
    },
    methods:{
        someMethod(){
            console.log("这是注入的方法")
        }
    }
}

// 后代组件
export default{
    inject:["name","someMethod"],
    mounted(){
        console.log(this.name)
        this.someMethod()
    }
}
9. EventBus
EventBus 是中央事件总线,不管是父子组件,兄弟组件,跨层级组件等都可以使用它完成通信操作
定义方式有三种
// 方法一
// 抽离成一个单独的 js 文件 Bus.js ,然后在需要的地方引入
// Bus.js
import Vue from "vue"
export default new Vue()

// 方法二 直接挂载到全局
// main.js
import Vue from "vue"
Vue.prototype.$bus = new Vue()

// 方法三 注入到 Vue 根对象上
// main.js
import Vue from "vue"
new Vue({
    el:"#app",
    data:{
        Bus: new Vue()
    }
})
使用如下,以方法一按需引入为例
// 在需要向外部发送自定义事件的组件内
<template>
    <button @click="handlerClick">按钮</button>
</template>
import Bus from "./Bus.js"
export default{
    methods:{
        handlerClick(){
            // 自定义事件名 sendMsg
            Bus.$emit("sendMsg", "这是要向外部发送的数据")
        }
    }
}

// 在需要接收外部事件的组件内
import Bus from "./Bus.js"
export default{
    mounted(){
        // 监听事件的触发
        Bus.$on("sendMsg", data => {
            console.log("这是接收到的数据:", data)
        })
    },
    beforeDestroy(){
        // 取消监听
        Bus.$off("sendMsg")
    }
}
10. Vuex
Vuex 是状态管理器,集中式存储管理所有组件的状态。这一块内容过长,如果基础不熟的话可以看这个Vuex,然后大致用法如下
比如创建这样的文件结构
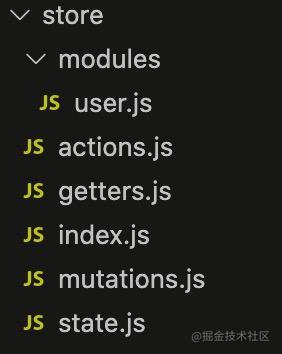
index.js 里内容如下
import Vue from 'vue'
import Vuex from 'vuex'
import getters from './getters'
import actions from './actions'
import mutations from './mutations'
import state from './state'
import user from './modules/user'

Vue.use(Vuex)

const store = new Vuex.Store({
  modules: {
    user
  },
  getters,
  actions,
  mutations,
  state
})
export default store
然后在 main.js 引入
import Vue from "vue"
import store from "./store"
new Vue({
    el:"#app",
    store,
    render: h => h(App)
})
然后在需要的使用组件里
import { mapGetters, mapMutations } from "vuex"
export default{
    computed:{
        // 方式一 然后通过 this.属性名就可以用了
        ...mapGetters(["引入getters.js里属性1","属性2"])
        // 方式二
        ...mapGetters("user", ["user模块里的属性1","属性2"])
    },
    methods:{
        // 方式一 然后通过 this.属性名就可以用了
        ...mapMutations(["引入mutations.js里的方法1","方法2"])
        // 方式二
        ...mapMutations("user",["引入user模块里的方法1","方法2"])
    }
}

// 或者也可以这样获取
this.$store.state.xxx
this.$store.state.user.xxx
11. $root
$root 可以拿到 App.vue 里的数据和方法
12. slot
就是把子组件的数据通过插槽的方式传给父组件使用,然后再插回来
// Child.vue
<template>
    <div>
        <slot :user="user"></slot>
    </div>
</template>
export default{
    data(){
        return {
            user:{ name:"沐华" }
        }
    }
}

// Parent.vue
<template>
    <div>
        <child v-slot="slotProps">
            {{ slotProps.user.name }}
        </child>
    </div>
</template>
写作不易,你的一赞一评,就是我前行的最大动力。
Recommend
About Joyk
Aggregate valuable and interesting links.
Joyk means Joy of geeK