

Build a UWP Document Scanning App - DZone Web Dev
source link: https://dzone.com/articles/build-a-uwp-document-scanning-app-in-webview-conte
Go to the source link to view the article. You can view the picture content, updated content and better typesetting reading experience. If the link is broken, please click the button below to view the snapshot at that time.
Build a UWP Document Scanning App in WebView Context
How to use Dynamic Web TWAIN (DWT), a JavaScript document scanning library, to create a document scanning app with UWP, utilizing UWP’s WebView control.
Join the DZone community and get the full member experience.
Join For FreeThe Universal Windows Platform (UWP) lets us build apps for any Windows device and publish them to the Store. It is the latest technology of Microsoft to create client apps. We can use the new visuals and features of the latest version of Windows in a UWP app.
Dynamic Web TWAIN (DWT) is a JavaScript document scanning library. If we want to use it to create a document scanning app with UWP, we can utilize UWP’s WebView control. A web view control embeds a view into your app that renders web content using the Microsoft Edge Legacy rendering engine.
This solution is a hybrid app. It uses the native UWP controls as well as a web page.
In this article, we are going to create the UWP document scanning app in steps.
Overview of How to Implement Document Scanning With UWP
- Create a new Universal Windows app project
- Copy the Web TWAIN resources folder and demo to the project
- Create a WebView control and load the HTML file
- Override the default behavior when Web TWAIN is detected as not installed
- Use the capabilities provided by the Windows Runtime API
Requirements
- Visual Studio with Windows 10 SDK
- Dynamic Web TWAIN
Create a UWP Document Scanning App
New Universal Windows App Project
Open Visual Studio and create a new Universal Windows app.

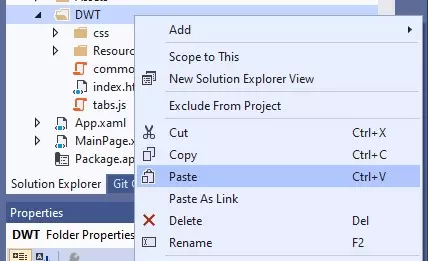
Copy the Web TWAIN Resources Folder and Demo to the Project
- Create a new folder named
DWT. - Download the HTML, CSS, and JavaScript files of a pre-built demo (link) and put them under the
DWTfolder. - Copy the
Resourcesfolder fromC:\Program Files (x86)\Dynamsoft\Dynamic Web TWAIN SDK 17.1\to theDWTfolder. The path may change based on your environment.
Create a WebView Control and Load the HTML File
Modify the
MainPage.xamlfile with the following code:<RelativePanel>
<WebView x:Name="WebView1" RelativePanel.AlignTopWithPanel="True" RelativePanel.AlignLeftWithPanel="True" RelativePanel.AlignRightWithPanel="True" RelativePanel.AlignBottomWithPanel="True" LoadCompleted="WebView1_LoadCompleted"/>
</RelativePanel>
Modify the the
MainPage.xaml.csfile to make WebView navigate to the HTML file when the app starts:public MainPage()
{this.InitializeComponent();
WebView1.Navigate(new Uri("ms-appx-web:///DWT/index.html"));}
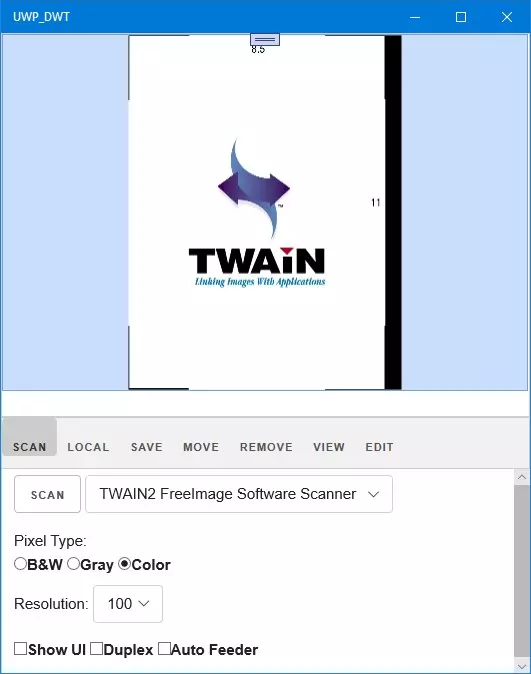
If you have installed Dynamic Web TWAIN, you should be able to scan documents within the WebView.
If you haven’t, you may encounter this dialog.
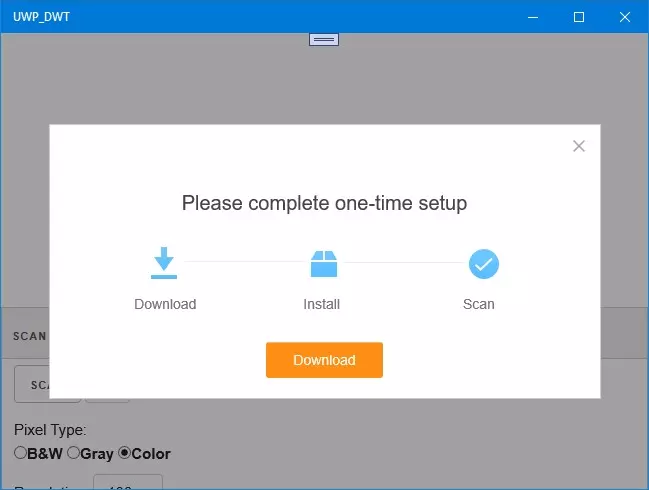
PS: The JavaScript library of Dynamic Web TWAIN needs to interact with a local service to provide the document scanning function. Users have to install the service first to use the scanning app.
Override the Default Behavior When Web TWAIN Is Detected as Not Installed
When Web TWAIN is not detected, it will show the download dialog by default. But it is not possible to download the installer within the WebView. We can modify the default behavior and open the download link using the system’s browser.
The WebView class of UWP provides a way to notify the application from the web page:
Use window.external.notify from the HTML event handler to notify the application using WebView.ScriptNotify.
In the C# file, we add the following code to make the page able to notify the app:
public MainPage()
{this.InitializeComponent();
List<Uri> allowedUris = new List<Uri>(); //newly added
allowedUris.Add(new Uri("ms-appx-web:///DWT/index.html")); //newly addedWebView1.ScriptNotify += WebView1_ScriptNotify; //newly added
WebView1.Navigate(new Uri("ms-appx-web:///DWT/index.html"));}
//newly added
private async void WebView1_ScriptNotify(object sender, NotifyEventArgs e)
{//handles the message
}
Open the dynamsoft.webtwain.install.js file in the Resources folder. Change the following code:
Dynamsoft.OnWebTwainNotFoundOnWindowsCallback = function (ProductName, InstallerUrl, bHTML5, bIE, bSafari, bSSL, strIEVersion) { var _this = Dynamsoft, objUrl = { 'default': InstallerUrl };_this._show_install_dialog(ProductName, objUrl, bHTML5, Dynamsoft.DWT.EnumDWT_PlatformType.enumWindow, bIE, bSafari, bSSL, strIEVersion);
};
To this:
Dynamsoft.OnWebTwainNotFoundOnWindowsCallback = function (ProductName, InstallerUrl, bHTML5, bIE, bSafari, bSSL, strIEVersion) { var response = {};response["info"] = "dynamsoft_service_not_running";
window.external.notify(JSON.stringify(response));
};
The web page will notify the app when it detects that Web TWAIN is not installed. It will pass a JSON string to the app.
In the C# file, we use the following code to ask the user to download and install the service.
private async void WebView1_ScriptNotify(object sender, NotifyEventArgs e)
{var response = JsonConvert.DeserializeObject<Dictionary<string, string>>(e.Value);
string info = response.GetValueOrDefault("info", "");// Respond to the script notification.
if (info == "dynamsoft_service_not_running")
{// Create the message dialog and set its content
var messageDialog = new MessageDialog("Dynamsoft Service is not running. Please download and install it.");
// Add commands and set their callbacks; both buttons use the same callback function instead of inline event handlers
messageDialog.Commands.Add(new UICommand(
"Download",
new UICommandInvokedHandler(this.CommandInvokedHandler)));
messageDialog.Commands.Add(new UICommand(
"Close",
new UICommandInvokedHandler(this.CommandInvokedHandler)));
// Set the command that will be invoked by default
messageDialog.DefaultCommandIndex = 0;
// Set the command to be invoked when escape is pressed
messageDialog.CancelCommandIndex = 1;
// Show the message dialog
await messageDialog.ShowAsync();
}
}
private async void CommandInvokedHandler(IUICommand command)
{ if (command.Label == "Download") {string uriToLaunch = @"https://download.dynamsoft.com/Demo/DWT/DWTResources/dist/DynamsoftServiceSetup.msi";
var uri = new Uri(uriToLaunch);
var success = await Windows.System.Launcher.LaunchUriAsync(uri);
}
}
The dialog that will show if the service is not running:

Use the Capabilities Provided by the Windows Runtime API
As it is in a WebView environment, some of the Web TWAIN’s functions are not available, like the camera add-on (the webcam add-on works as it uses the local service). Since this is a UWP application, we can use UWP’s Windows Runtime API to extend its functions.
Use the Camera API
The Windows.Media.Capture.CameraCaptureUI API provides a simple-to-use camera interface.
private async void CameraButton_Click(object sender, RoutedEventArgs e)
{// Using Windows.Media.Capture.CameraCaptureUI API to capture a photo
CameraCaptureUI dialog = new CameraCaptureUI();
dialog.VideoSettings.AllowTrimming = true;
StorageFile file = await dialog.CaptureFileAsync(CameraCaptureUIMode.Photo);
}
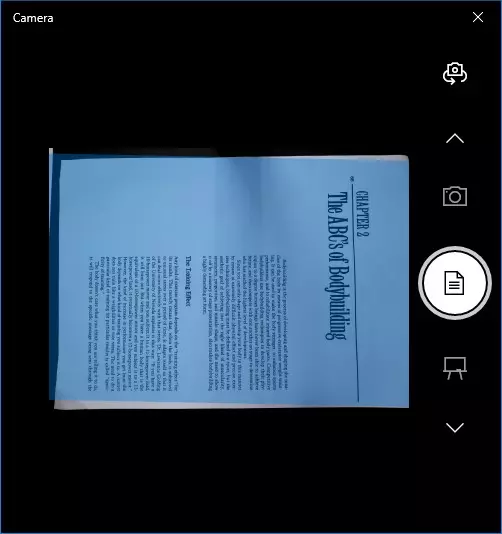
A built-in camera dialog will appear to capture photos. It also supports auto-trimming for document scanning.
After the image is captured, we can send it to the web page using the WebView.InvokeScriptAsync method.
In the C# file:
private async void CameraButton_Click(object sender, RoutedEventArgs e)
{// Using Windows.Media.Capture.CameraCaptureUI API to capture a photo
CameraCaptureUI dialog = new CameraCaptureUI();
dialog.VideoSettings.AllowTrimming = true;
StorageFile file = await dialog.CaptureFileAsync(CameraCaptureUIMode.Photo);
string base64 = await StorageFileToBase64(file); //newly added
await WebView1.InvokeScriptAsync("LoadImageFromBase64", new string[] { base64 }); //newly added}
//https://stackoverflow.com/questions/18553691/metro-getting-the-base64-string-of-a-storagefile
private async Task<string> StorageFileToBase64(StorageFile file)
{string Base64String = "";
if (file != null)
{IRandomAccessStream fileStream = await file.OpenAsync(FileAccessMode.Read);
var reader = new DataReader(fileStream.GetInputStreamAt(0));
await reader.LoadAsync((uint)fileStream.Size);
byte[] byteArray = new byte[fileStream.Size];
reader.ReadBytes(byteArray);
Base64String = Convert.ToBase64String(byteArray);
}
return Base64String;
}
In the HTML file, receive the base64-encoded image:
function LoadImageFromBase64(base64) { if (DWObject) {DWObject.LoadImageFromBase64Binary(
base64,
Dynamsoft.DWT.EnumDWT_ImageType.IT_ALL);
}
}
Use the OCR API
The Windows.Media.Ocr API provides an easy-to-use OCR interface.
Here, we add a function to OCR selected image using this API.
In the HTML file, add a function to get the base64 of the selected image:
function GetSelectedImageInBase64() { if (DWObject) {DWObject.ConvertToBase64(
[DWObject.CurrentImageIndexInBuffer],
Dynamsoft.DWT.EnumDWT_ImageType.IT_PNG,
function (result, indices, type) {var data = result.getData(0, result.getLength());
var response = {};response["info"] = "image_base64";
response["data"] = data;
window.external.notify(JSON.stringify(response));
},
function (errorCode, errorString) {console.log(errorString);
}
);
}
}
In the C# file, call the above method, retrieve the base64-encode image and OCR it:
private async void OCRButton_Click(object sender, RoutedEventArgs e)
{ await WebView1.InvokeScriptAsync("GetSelectedImageInBase64", new string[] { });}
private async void WebView1_ScriptNotify(object sender, NotifyEventArgs e)
{ if (info == "image_base64") { if (response.ContainsKey("data")) { string base64 = response.GetValueOrDefault("data","");OCRImageFromBase64(base64);
}
}
}
private async void OCRImageFromBase64(string base64) {byte[] bytes;
bytes = Convert.FromBase64String(base64);
IBuffer buffer = WindowsRuntimeBufferExtensions.AsBuffer(bytes, 0, bytes.Length);
InMemoryRandomAccessStream inStream = new InMemoryRandomAccessStream();
DataWriter datawriter = new DataWriter(inStream.GetOutputStreamAt(0));
datawriter.WriteBuffer(buffer, 0, buffer.Length);
await datawriter.StoreAsync();
BitmapDecoder decoder = await BitmapDecoder.CreateAsync(inStream);
SoftwareBitmap bitmap = await decoder.GetSoftwareBitmapAsync(BitmapPixelFormat.Bgra8, BitmapAlphaMode.Premultiplied);
OcrEngine ocrEngine = OcrEngine.TryCreateFromUserProfileLanguages();
OcrResult ocrResult = await ocrEngine.RecognizeAsync(bitmap);
ContentDialog contentDialog = new ContentDialog
{Title = "Result:",
Content = ocrResult.Text,
PrimaryButtonText = "Copy to clipboard",
CloseButtonText = "Close"
};
ContentDialogResult result = await contentDialog.ShowAsync();
if (result == ContentDialogResult.Primary)
{DataPackage dataPackage = new DataPackage();
dataPackage.SetText(ocrResult.Text);
Clipboard.SetContent(dataPackage);
}
}
A content dialog will appear with the OCR result. Users can copy the text to the clipboard.

Source Code
Download the project and have a try on your own: https://github.com/xulihang/UWP-Document-Scanner
Recommend
About Joyk
Aggregate valuable and interesting links.
Joyk means Joy of geeK