

Create, Edit, and Delete Arrows Shapes in PDF Files with Ease in WPF
source link: https://www.syncfusion.com/blogs/post/create-edit-and-delete-arrows-shapes-in-pdf-files-with-ease-in-wpf.aspx
Go to the source link to view the article. You can view the picture content, updated content and better typesetting reading experience. If the link is broken, please click the button below to view the snapshot at that time.

Create, Edit, and Delete Arrows Shapes in PDF Files with Ease in WPF
Arrows are significant design elements. They serve as visual cues that guide and direct your users’ attention to related information and action areas. We can use them to connect, direct, or point out information in files. The arrow shapes can be particularly useful when reviewing contents in PDF files.
The Syncfusion WPF PDF Viewer provides easy ways to view, add, remove, and modify arrow shapes in PDF files quickly. It also allows you to draw arrows vertically, horizontally, and diagonally.
In this blog, we will look at the procedures to handle arrow shapes in PDF files using the WPF PDF Viewer.
Getting started
First things first:
- Create a new WPF project and install the WPF PDF Viewer NuGet package.
- Then, include the following code in your XAML page to add the PDF Viewer as a child to the window:
<Window x:Class="PdfViewer.MainWindow"
        xmlns:pdfviewer="clr-namespace:Syncfusion.Windows.PdfViewer;assembly=Syncfusion.PdfViewer.WPF">
    <pdfviewer:PdfViewerControl x:Name="pdfViewer"/>
</Window>
Add arrow shapes from the UI
Using the PdfViewerControl, you can directly add arrow shapes by selecting the Arrow from the shapes in the built-in toolbar.
After choosing the Arrow from the toolbar, click and drag on the page to start creating an arrow. Move the pointer where you want and release it to finish drawing the arrow. Later, you can select and move or resize the arrow to change its location or size.
Enable arrow-shape drawing mode programmatically
If you are using the PdfDocumentView control and need to switch to the arrow-shape drawing mode, then execute the AnnotationCommand with the CommandParameter set to Arrow.
Refer to the following code example to enable arrow-shape drawing mode:
XAML
<Button Command="{Binding ElementName= pdfViewer, Path=AnnotationCommand, Mode= OneWay }" CommandParameter="Arrow"/>C#
private void EnableArrowDrawingMode()
   {
       if (pdfViewer.AnnotationCommand.CanExecute("Arrow"))
          pdfViewer.AnnotationCommand.Execute("Arrow");
   }
Note: To reset the annotation mode, you need to pass the CommandParameter as None.
Remove the arrows
We can easily remove an arrow by selecting and right-clicking the arrow shape. Then, choose the Delete option from the context menu. You can also remove the selected annotation using the DELETE keyboard key.
Customize the properties of arrow shapes
The properties window of the annotation allows us to customize the arrow’s appearance, such as style, color, thickness, and opacity. With this, you can also change the subject and author’s information. To do so, right-click on the arrow shape and choose Properties from the context menu.
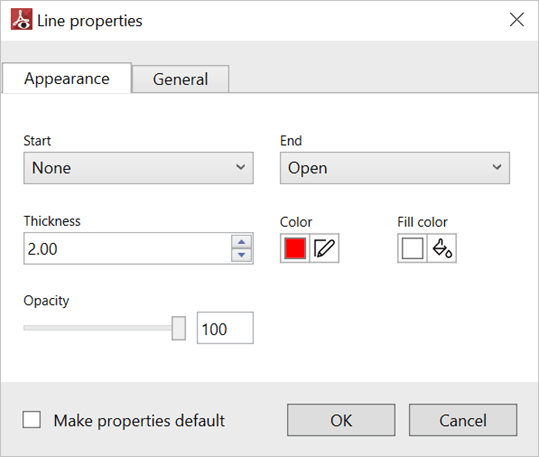 Properties Window
Customize the default appearance
Also, you can customize the default appearance of an arrow using the WPF PDF Viewer’s ArrowAnnotationSettings property.
Refer to the following code example:
private void SetDefaultArrowSettings()
   {
      pdfViewer.ArrowAnnotationSettings.BeginLineStyle = PdfLineEndingStyle.Circle;
      pdfViewer.ArrowAnnotationSettings.EndLineStyle = PdfLineEndingStyle.ClosedArrow;
      pdfViewer.ArrowAnnotationSettings.Opacity = 0.5f;
      pdfViewer.ArrowAnnotationSettings.StrokeColor = Colors.Blue;
      pdfViewer.ArrowAnnotationSettings.Thickness = 4;
}Customize the end styles of arrow shapes
You can also customize the end styles of an arrow. The following end styles are currently supported in the WPF PDF Viewer:
Style Appearance (End Style)Open Closed
Apart from these styles, you can also apply the desired styles to both ends of an arrow, like in the following screenshot.
Custom notes
Add custom notes for the annotation by using the pop-up note associated with the annotation. The pop-up note for the arrow annotation can be opened by selecting and right-clicking on the arrow shape and then choosing Open Pop-up Note from the context menu.
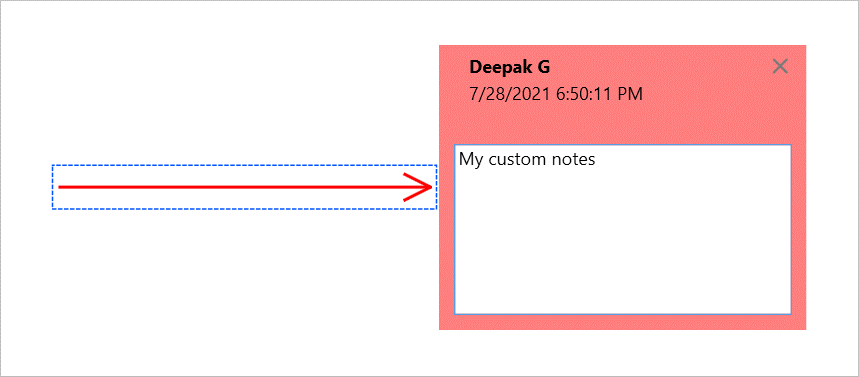 Pop-up Note
Keyboard shortcuts summary
The following shortcut keys can be used with the arrow shape annotations:
- Ctrl + Z: Undo the changes.
- Ctrl + Y: Redo the changes.
- Esc: Deselect the annotation if it is selected; (or) reset the arrow annotation mode; (or) close the properties window or pop-up note if it is open. One of these operations will be performed based on the priority order.
- Up, Down, Right, and Left arrow keys: Move the arrow up, down, right, and left, respectively.
- Delete: Delete the selected annotation.
References
For more information, refer to the arrow shape annotation in the WPF PDF Viewer GitHub demo and documentation.
Conclusion
Thank you for reading this blog. I hope that you enjoyed learning about how to add, remove, and modify arrow shapes in your PDF files using the Syncfusion WPF PDF Viewer. Arrow shapes are a great way to highlight a call to action, lead a visitor’s eye, or show a direction of flow. Try using our PDF Viewer to handle arrows in your application and let us know what you think in the comment section below.
Our PDF Viewer is also available in our Blazor, Flutter, ASP.NET (Core, MVC, Web Forms), JavaScript, Angular, React, Vue, Xamarin, UWP, WinForms, and WPF platforms.
If you are not a customer yet, you can start a 30-day free trial to check out the arrow annotation and other features.
If you wish to send us feedback or would like to submit any questions, you can contact us through our support forum, feedback portal, or Direct-Trac support system. We are always happy to assist you!
Related blogs
Recommend
-
31
AngularJS Smart Table with Add, Edit and Delete Records This is Part II of angularjs smart-table tutorial.This smart-table tutorial help to add, edit and delete records using rest api. I am using angularjs Boot...
-
11
How to Create Listing, Add, Edit and Delete API Using React Axios We will go over how to Create Listing, Add, Edit and Delete API Using React Axios. This tutorial demonstrates how to use Axios React to consume...
-
10
How to Create, Edit, and Delete Folders on Your PS4 By Soham De Published 6 hours ago If your PlayStation 4 home screen is a total me...
-
10
Insert, Edit, Delete Notes in Spreadsheets—SpreadProcessingCheck out this blog post to get an overview of the Notes functionality in SpreadProcessing.One of the new additions to the SpreadProcessing library is support for Notes. Notes...
-
7
Dynamic Add Edit Delete Table Row in jQuery 1846 views 1 year ago jQuery In this article, I will share with you how...
-
12
How to View, Edit, & Delete Version History in Google Sheets By Andrew Carter Published 6 hours ago Want to o...
-
7
You Can Now Edit And Delete Messages On iPhone: Here's How
-
5
Linux essentials: How to create and delete files and directories Learn how to use the mkdir, touch, and rm commands to create fi...
-
10
Apple to allow iPhone users to delete and edit text messages New feature to be released as part of iOS 16's update on Monday
-
5
How To How To Delete, Report, and Edit A TikTok Video ...
About Joyk
Aggregate valuable and interesting links.
Joyk means Joy of geeK