

Kafka成长3:Producer 元数据拉取源码原理(上)
source link: https://my.oschina.net/u/2518090/blog/5273917
Go to the source link to view the article. You can view the picture content, updated content and better typesetting reading experience. If the link is broken, please click the button below to view the snapshot at that time.


上一节我们分析了Producer的核心组件,我们得到了一张关键的组件图。你还记得么?
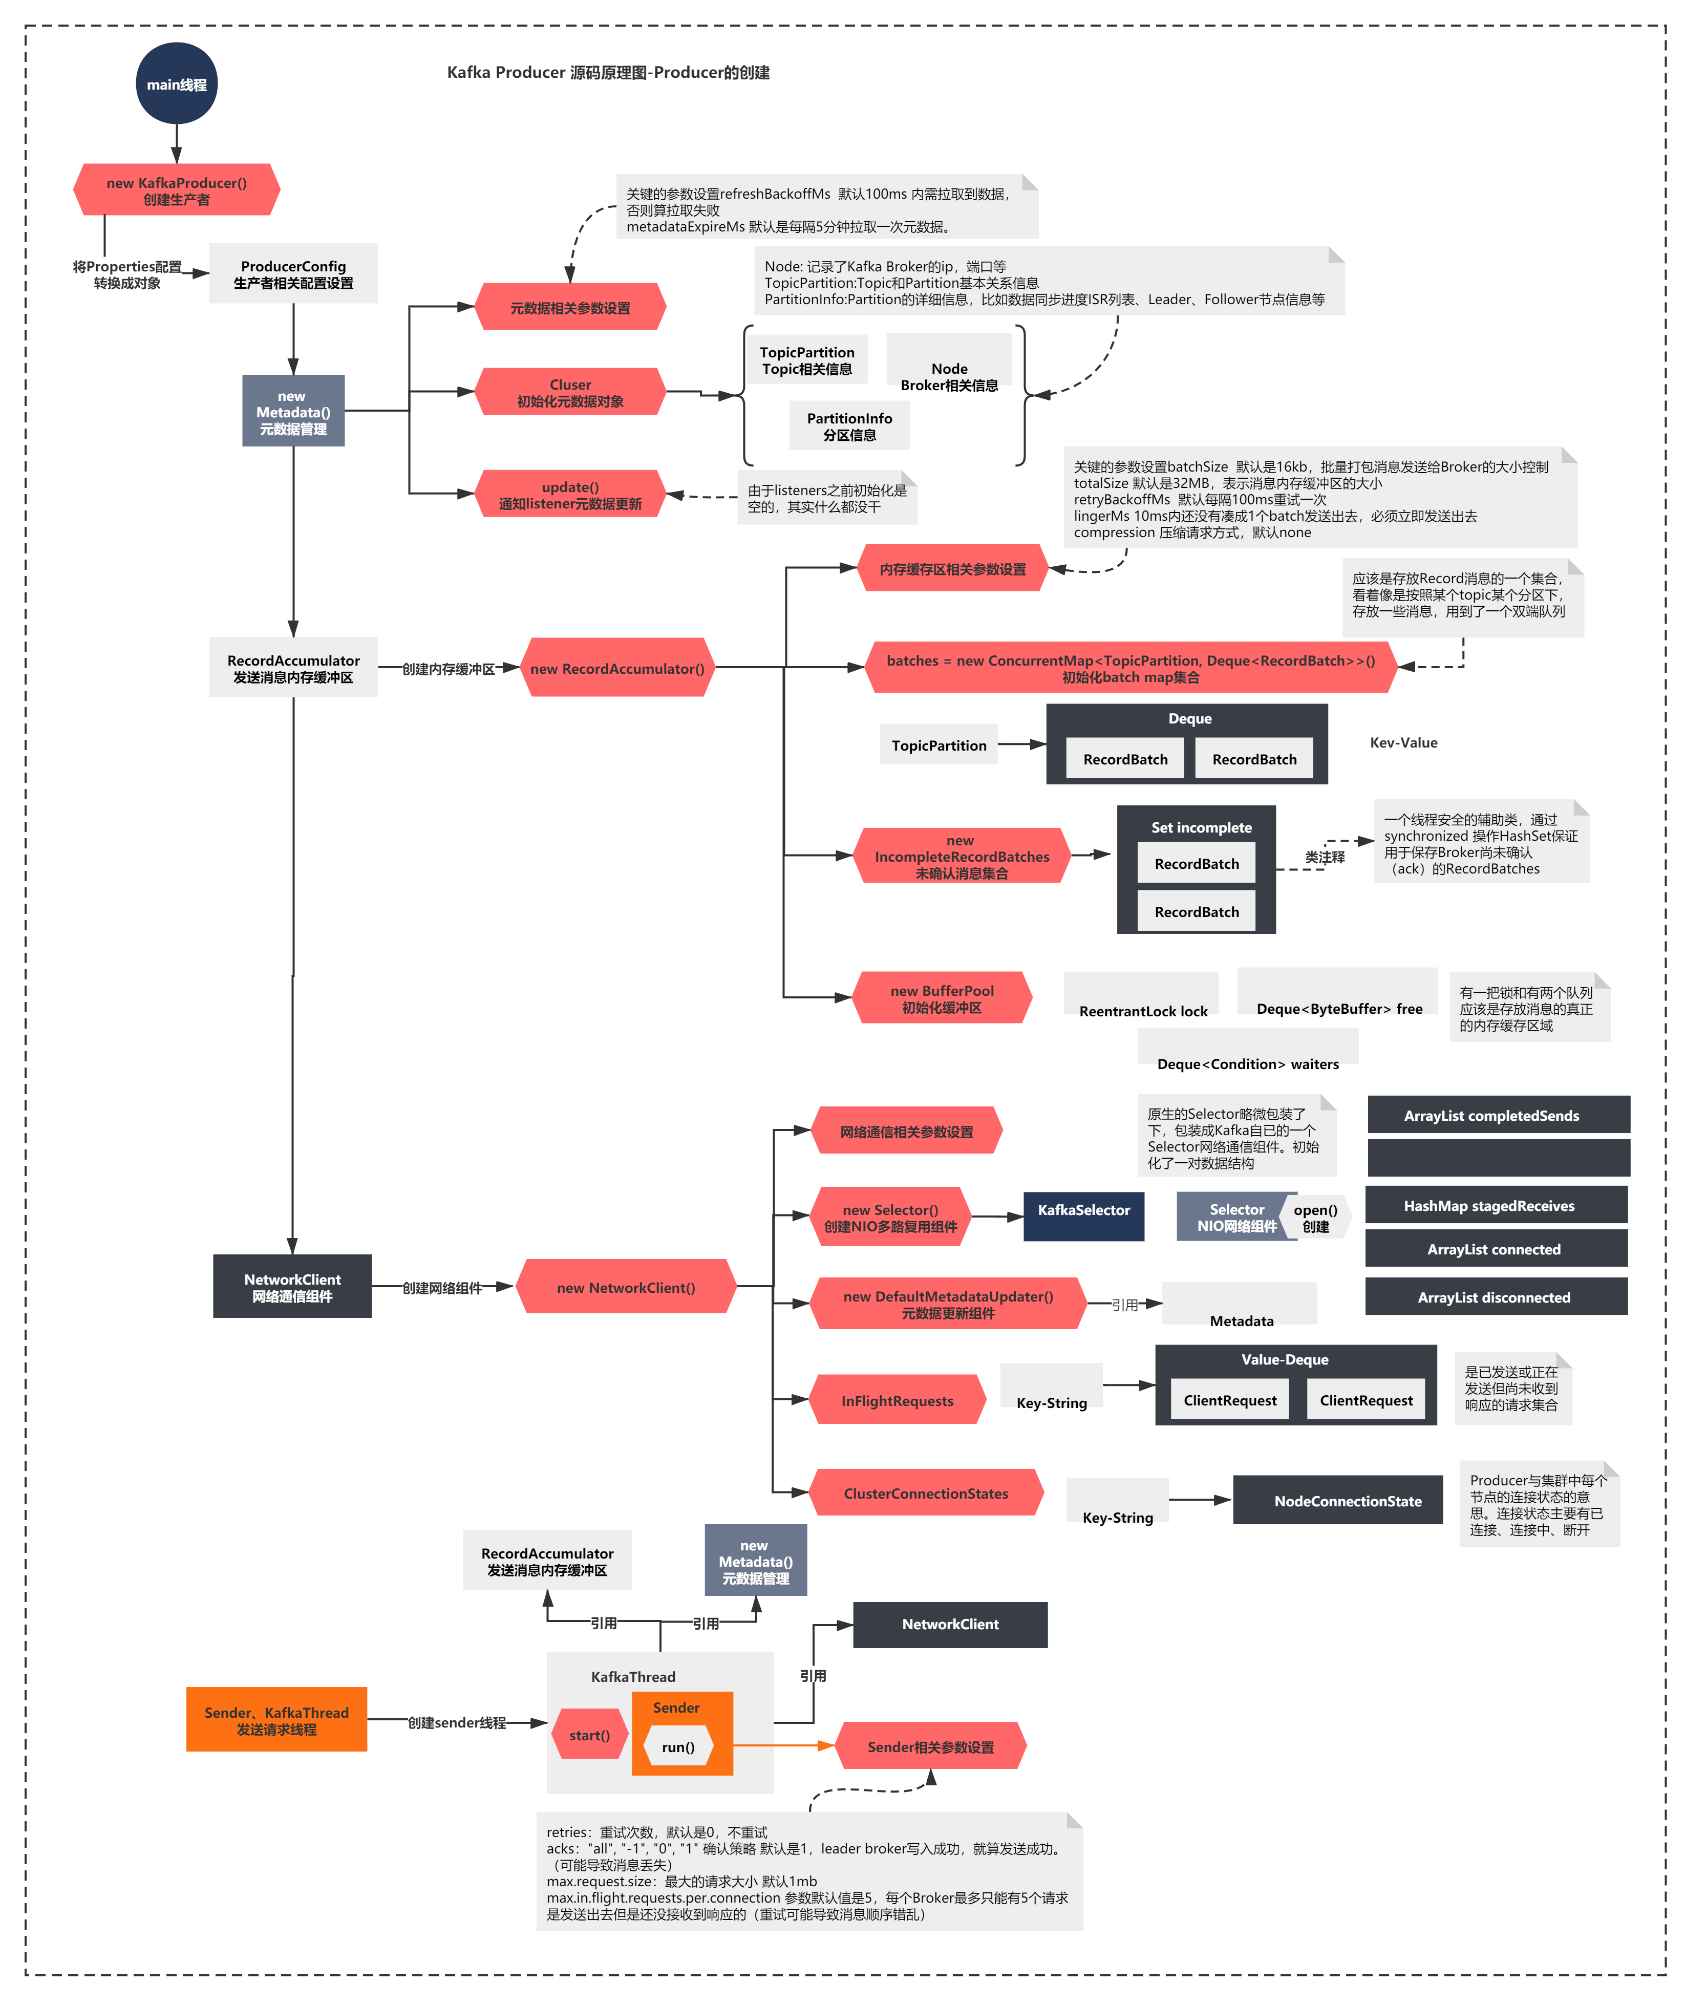
简单概括下上面的图就是:
创建了Metadata组件,内部通过Cluster维护元数据
初始化了发送消息的内存缓冲器RecordAccumulator
创建了NetworkClient,内部最重要的是创建了NIO的Selector组件
启动了一个Sender线程,Sender引用了上面的所有组件,开始执行run方法。
图的最下方可以看到,上一节截止到了run方法的执行,这一节我们首先会看看run方法核心脉络做了什么。接着分析下Producer第一个核心流程:元数据拉取的源码原理。
让我们开始吧!
Sender的run方法在做什么?
这一节我们就继续分析下,sender的run方法开始执行会做什么。
 public void run() {
        log.debug("Starting Kafka producer I/O thread.");

        // main loop, runs until close is called
        while (running) {
            try {
                run(time.milliseconds());
            } catch (Exception e) {
                log.error("Uncaught error in kafka producer I/O thread: ", e);
            }
        }

        log.debug("Beginning shutdown of Kafka producer I/O thread, sending remaining records.");

        // okay we stopped accepting requests but there may still be
        // requests in the accumulator or waiting for acknowledgment,
        // wait until these are completed.
        while (!forceClose && (this.accumulator.hasUnsent() || this.client.inFlightRequestCount() > 0)) {
            try {
                run(time.milliseconds());
            } catch (Exception e) {
                log.error("Uncaught error in kafka producer I/O thread: ", e);
            }
        }
        if (forceClose) {
            // We need to fail all the incomplete batches and wake up the threads waiting on
            // the futures.
            this.accumulator.abortIncompleteBatches();
        }
        try {
            this.client.close();
        } catch (Exception e) {
            log.error("Failed to close network client", e);
        }

        log.debug("Shutdown of Kafka producer I/O thread has completed.");
    }
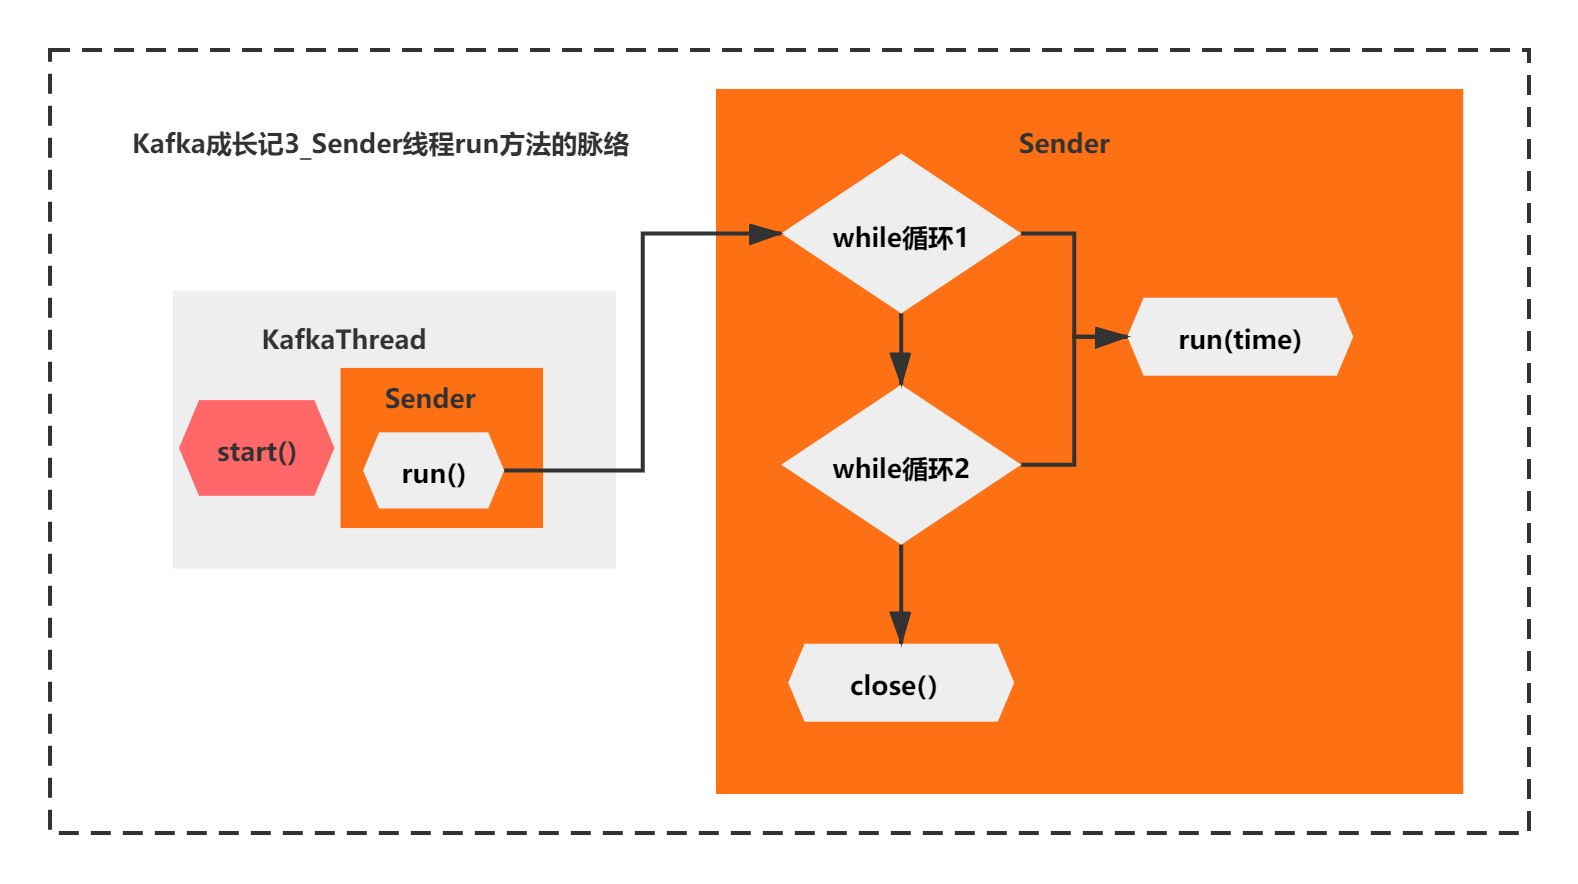
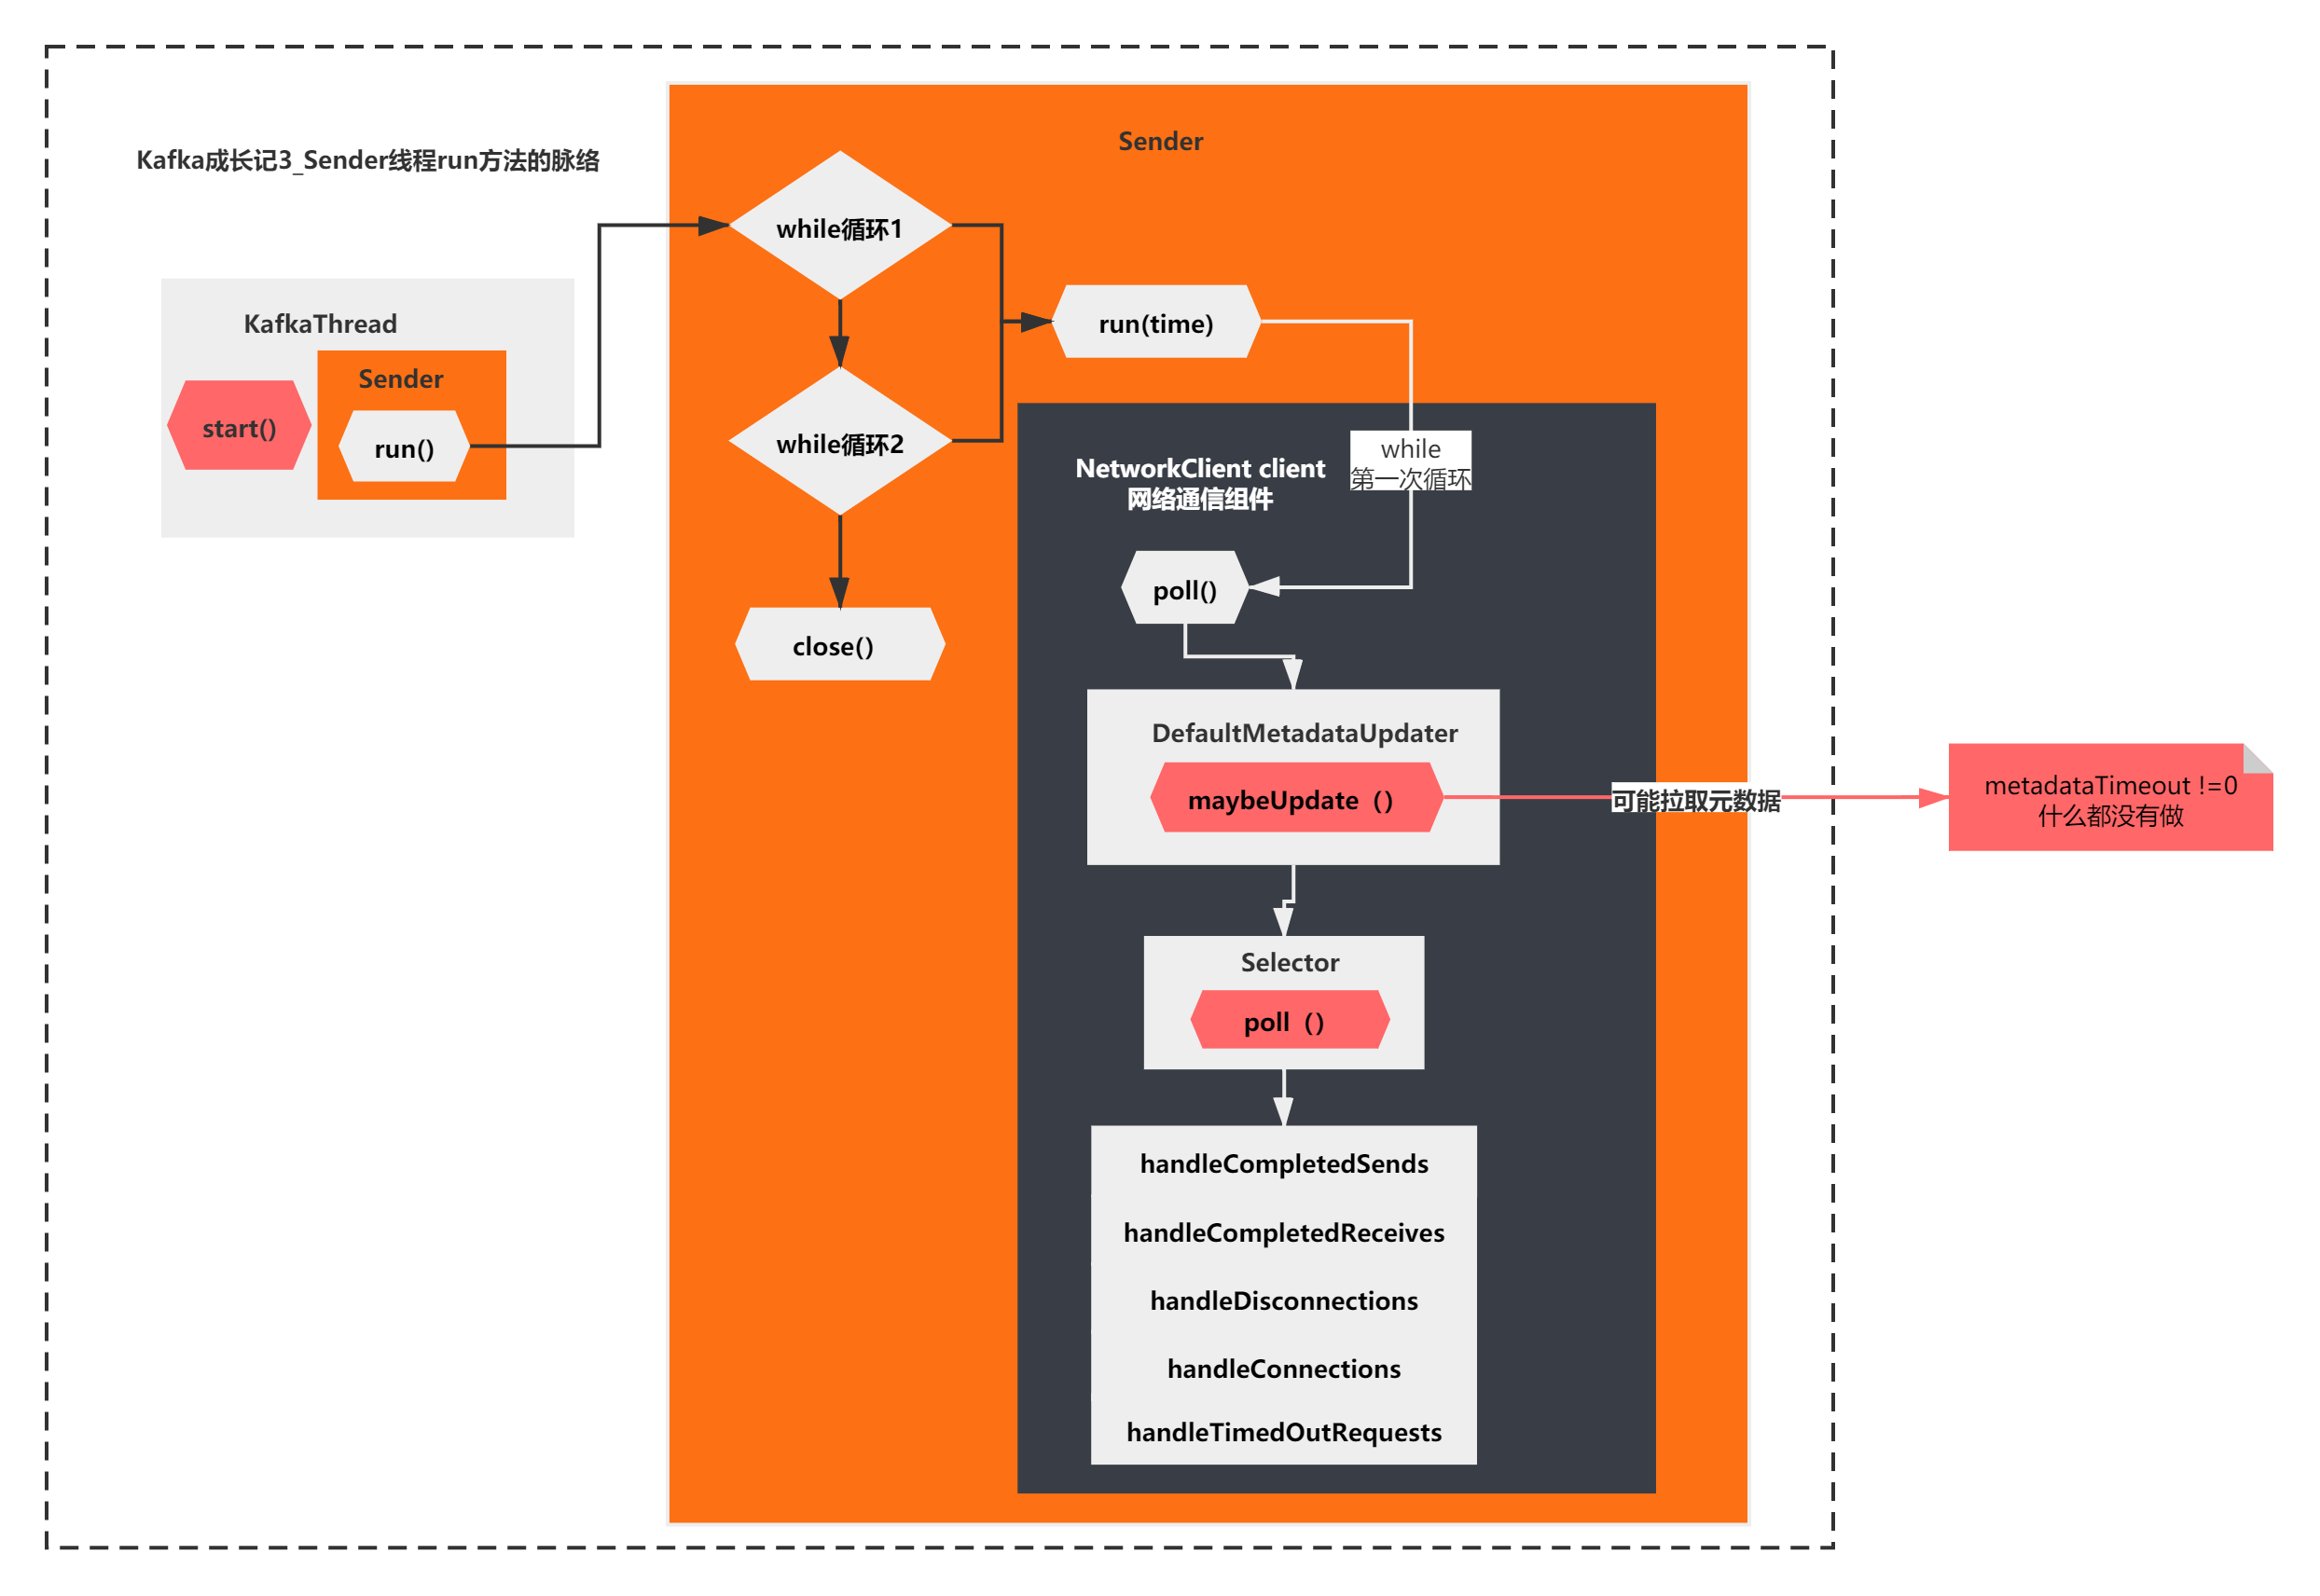
这个run方法的核心脉络很简单。主要就是2个while循环+线程的close,而2个while循环,他们都调用了run(long time)的这个方法。
通过注释你可以看到,第二个while是处理特殊情况的,当第一个while退出后,还有未发送的请求,需要第二个while循环处理完成,才会关闭线程。
整体脉络如下图所示:
接着其实就该看下run方法主要在干什么了?
   /**
     * Run a single iteration of sending
     *
     * @param now
     *            The current POSIX time in milliseconds
     */
    void run(long now) {
        Cluster cluster = metadata.fetch();
        // get the list of partitions with data ready to send
        RecordAccumulator.ReadyCheckResult result = this.accumulator.ready(cluster, now);

        // if there are any partitions whose leaders are not known yet, force metadata update
        if (result.unknownLeadersExist)
            this.metadata.requestUpdate();

        // remove any nodes we aren't ready to send to
        Iterator<Node> iter = result.readyNodes.iterator();
        long notReadyTimeout = Long.MAX_VALUE;
        while (iter.hasNext()) {
            Node node = iter.next();
            if (!this.client.ready(node, now)) {
                iter.remove();
                notReadyTimeout = Math.min(notReadyTimeout, this.client.connectionDelay(node, now));
            }
        }

        // create produce requests
        Map<Integer, List<RecordBatch>> batches = this.accumulator.drain(cluster,
                                                                         result.readyNodes,
                                                                         this.maxRequestSize,
                                                                         now);
        if (guaranteeMessageOrder) {
            // Mute all the partitions drained
            for (List<RecordBatch> batchList : batches.values()) {
                for (RecordBatch batch : batchList)
                    this.accumulator.mutePartition(batch.topicPartition);
            }
        }

        List<RecordBatch> expiredBatches = this.accumulator.abortExpiredBatches(this.requestTimeout, now);
        // update sensors
        for (RecordBatch expiredBatch : expiredBatches)
            this.sensors.recordErrors(expiredBatch.topicPartition.topic(), expiredBatch.recordCount);

        sensors.updateProduceRequestMetrics(batches);
        List<ClientRequest> requests = createProduceRequests(batches, now);
        // If we have any nodes that are ready to send + have sendable data, poll with 0 timeout so this can immediately
        // loop and try sending more data. Otherwise, the timeout is determined by nodes that have partitions with data
        // that isn't yet sendable (e.g. lingering, backing off). Note that this specifically does not include nodes
        // with sendable data that aren't ready to send since they would cause busy looping.
        long pollTimeout = Math.min(result.nextReadyCheckDelayMs, notReadyTimeout);
        if (result.readyNodes.size() > 0) {
            log.trace("Nodes with data ready to send: {}", result.readyNodes);
            log.trace("Created {} produce requests: {}", requests.size(), requests);
            pollTimeout = 0;
        }
        for (ClientRequest request : requests)
            client.send(request, now);

        // if some partitions are already ready to be sent, the select time would be 0;
        // otherwise if some partition already has some data accumulated but not ready yet,
        // the select time will be the time difference between now and its linger expiry time;
        // otherwise the select time will be the time difference between now and the metadata expiry time;
        this.client.poll(pollTimeout, now);
    }
上面的代码,你如果第一次看,你肯定会觉得,这个脉络非常不清晰,不知道重点在哪里。不过还好有些注释,你能大体猜到他在干嘛。
accumulator的ready,networkclient的ready、networkclient的send、networkclient的poll
这些好像是在准备内存区域、准备网络连接的node节点、发送数据、拉取响应结果的意思。
可是如果你猜不到,该怎么办呢?
这时候就可以祭出debug这个杀器了。由于是producer,我们可以在Hellowolrd的这个客户端打断点,一步一步看下。
当你对run方法一步一步打了断点之后你会发现:
accumulator的ready,networkclient的ready、networkclient的send 这些的逻辑几乎都没有执行,全部都是初始化空对象,或者方法内部直接return。
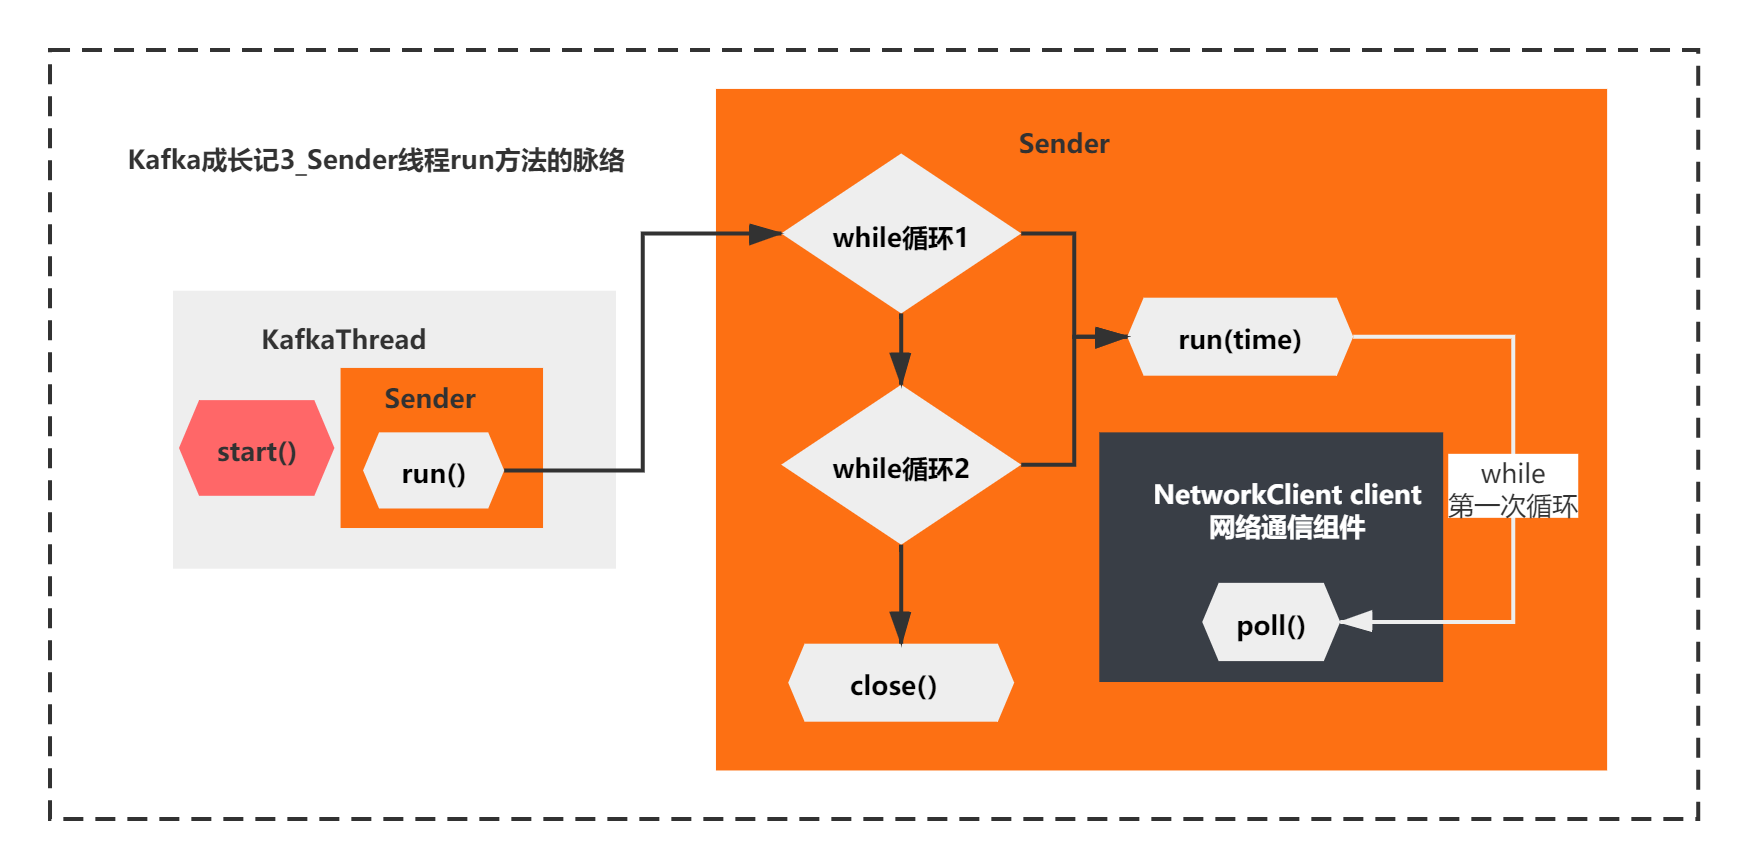
直接一路执行到了client.poll方法。如下图所示:

那么,你可以得出一个结论,while第一次循环这个run方法的核心逻辑,其实只有一句话:
client.poll(pollTimeout, now)
整体脉络如下所示:
看来接下来,这个NetworkClient的poll方法,就是关键中的关键了:
    /**
     * Do actual reads and writes to sockets.
     * 对套接字进行实际读取和写入
     *
     * @param timeout The maximum amount of time to wait (in ms) for responses if there are none immediately,
     *                must be non-negative. The actual timeout will be the minimum of timeout, request timeout and
     *                metadata timeout
     * @param now The current time in milliseconds
     * @return The list of responses received
     */
    @Override
    public List<ClientResponse> poll(long timeout, long now) {
        long metadataTimeout = metadataUpdater.maybeUpdate(now);
        try {
            this.selector.poll(Utils.min(timeout, metadataTimeout, requestTimeoutMs));
        } catch (IOException e) {
            log.error("Unexpected error during I/O", e);
        }

        // process completed actions
        long updatedNow = this.time.milliseconds();
        List<ClientResponse> responses = new ArrayList<>();
        handleCompletedSends(responses, updatedNow);
        handleCompletedReceives(responses, updatedNow);
        handleDisconnections(responses, updatedNow);
        handleConnections();
        handleTimedOutRequests(responses, updatedNow);

        // invoke callbacks
        for (ClientResponse response : responses) {
            if (response.request().hasCallback()) {
                try {
                    response.request().callback().onComplete(response);
                } catch (Exception e) {
                    log.error("Uncaught error in request completion:", e);
                }
            }
        }

        return responses;
    }
这个方法的脉络就清晰多了,通过方法名和注释,我们几乎可以猜出他的一些作用主要有:
1)注释说:对套接字进行实际读取和写入
2)metadataUpdater.maybeUpdate(),你还记得NetworkClient的组件DefaultMetadataUpdater么,方法名意思是可能进行元数据更新。这个好像很关键的样子
3)接着执行了Selector的poll方法,这个是NetworkClient的另一个组件Selector,还记得么?它底层封装了原生的NIO Selector。这个方法应该也比较关键。
4)后续对response执行了一系列的方法,从名字上看, handleCompletedSends 处理完成发送的请求、handleCompletedReceives处理完成接受的请求、handleDisconnections处理断开连接的请求、handleConnections处理连接成功的请求、处理超时的请求handleTimedOutRequests。根据不同情况有不同的处理。
5)最后还有一个response的相关的回调处理,如果注册了回调函数,会执行下。这个应该不是很关键的逻辑
也就是简单的说就是NetworkClient执行poll方法,主要通过selector处理请求的读取和写入,对响应结果做不同的处理而已。
如下图所示:
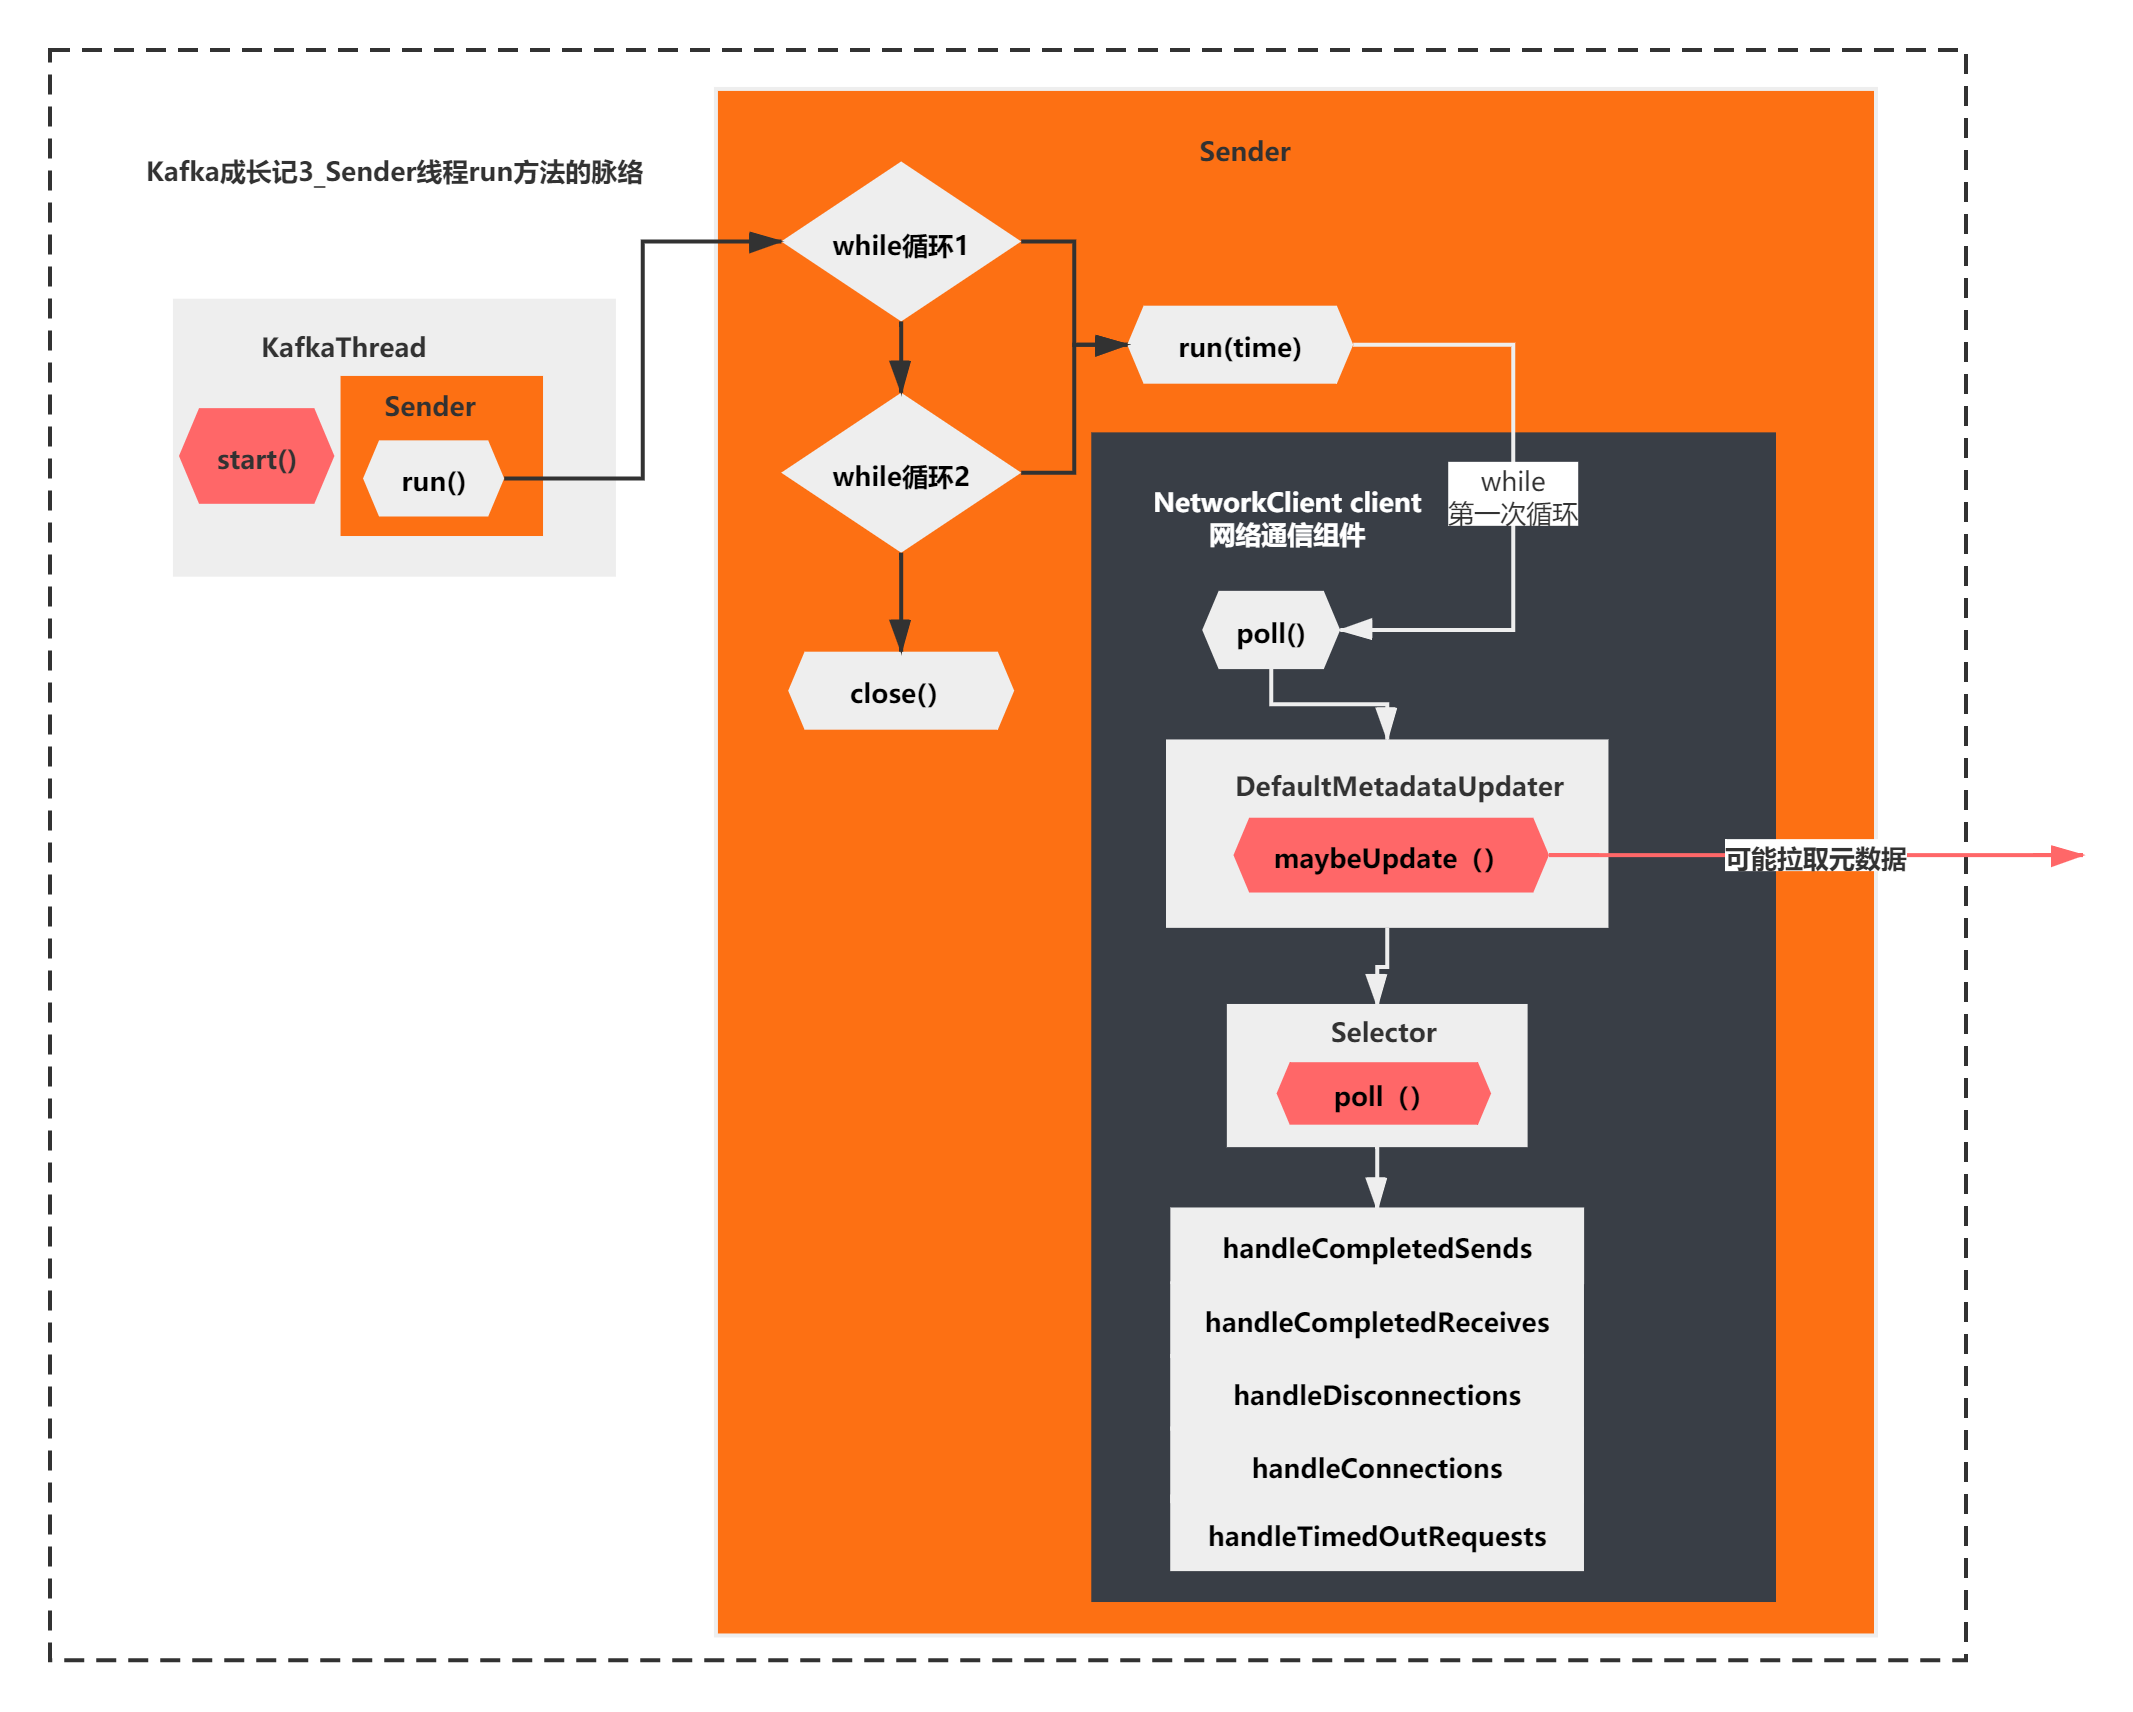
到这里其实我们基本摸清出了run方法主要在做的一件事情了,由于是第一次循环,之前的accumulator的ready,networkclient的ready、networkclient的send 什么都没做,第一次while循环run方法核心执行的是networkclient.poll方法。而poll方法的主要逻辑就是上面图中所示的了。
maybeUpdate可能在在拉取元数据?
刚才我们分析到,poll方法首先执行的是DefaultMetadataUpdater的maybeUpdate方法,它是可能更新的意思。我们来一起看下他的逻辑吧。
        public long maybeUpdate(long now) {
            // should we update our metadata?
            long timeToNextMetadataUpdate = metadata.timeToNextUpdate(now);
            long timeToNextReconnectAttempt = Math.max(this.lastNoNodeAvailableMs + metadata.refreshBackoff() - now, 0);
            long waitForMetadataFetch = this.metadataFetchInProgress ? Integer.MAX_VALUE : 0;
            // if there is no node available to connect, back off refreshing metadata
            long metadataTimeout = Math.max(Math.max(timeToNextMetadataUpdate, timeToNextReconnectAttempt),
                    waitForMetadataFetch);

            if (metadataTimeout == 0) {
                // Beware that the behavior of this method and the computation of timeouts for poll() are
                // highly dependent on the behavior of leastLoadedNode.
                Node node = leastLoadedNode(now);
                maybeUpdate(now, node);
            }

            return metadataTimeout;
        }

   /**
     * The next time to update the cluster info is the maximum of the time the current info will expire and the time the
     * current info can be updated (i.e. backoff time has elapsed); If an update has been request then the expiry time
     * is now
     */
    public synchronized long timeToNextUpdate(long nowMs) {
        long timeToExpire = needUpdate ? 0 : Math.max(this.lastSuccessfulRefreshMs + this.metadataExpireMs - nowMs, 0);
        long timeToAllowUpdate = this.lastRefreshMs + this.refreshBackoffMs - nowMs;
        return Math.max(timeToExpire, timeToAllowUpdate);
    }
原来这里有一个时间的判断,当判断满足才会执行maybeUpdate。
这个时间计算好像比较复杂,但是大体可以看出来,metadataTimeout是根据三个时间综合判断出来的,如果是0才会执行真正的maybeUpdate()。
像这种时候,我们可以直接在metadataTimeout这里打一个断点,看下它的值是如何计算的,比如下图:

你会发现,当第一次执行while循环,执行到poll方法,执行到这个maybeUpdate的时候,决定metadataTimeout的3个值,有两个是0,其中一个是非0,是一个299720的值。最终导致metadataTimeout也是非0,是299720。
也就是说,第一次while循环不会执行maybeUpdate的任何逻辑。
那么接着向下执行 Selector的poll()方法。
   /**
     * Do whatever I/O can be done on each connection without blocking. This includes completing connections, completing
     * disconnections, initiating new sends, or making progress on in-progress sends or receives.
     * 在不阻塞的情况下,在每个连接上做任何可以做的 I/O。这包括完成连接完成、断开连接,启动新的发送,或在进行中的发送或接收请求
     */
    @Override
    public void poll(long timeout) throws IOException {
        if (timeout < 0)
            throw new IllegalArgumentException("timeout should be >= 0");

        clear();

        if (hasStagedReceives() || !immediatelyConnectedKeys.isEmpty())
            timeout = 0;

        /* check ready keys */
        long startSelect = time.nanoseconds();
        //这个方法是NIO底层Selector.select(),会阻塞监听
        int readyKeys = select(timeout);
        long endSelect = time.nanoseconds();
        currentTimeNanos = endSelect;
        this.sensors.selectTime.record(endSelect - startSelect, time.milliseconds());

        //如果监听到有操作的SelectionKeys,也就是readyKeys>0< 会执行一些操作
        if (readyKeys > 0 || !immediatelyConnectedKeys.isEmpty()) {
            pollSelectionKeys(this.nioSelector.selectedKeys(), false);
            pollSelectionKeys(immediatelyConnectedKeys, true);
        }

        addToCompletedReceives();

        long endIo = time.nanoseconds();
        this.sensors.ioTime.record(endIo - endSelect, time.milliseconds());
        maybeCloseOldestConnection();
    }

    private int select(long ms) throws IOException {
        if (ms < 0L)
            throw new IllegalArgumentException("timeout should be >= 0");

        if (ms == 0L)
            return this.nioSelector.selectNow();
        else
            return this.nioSelector.select(ms);
    }
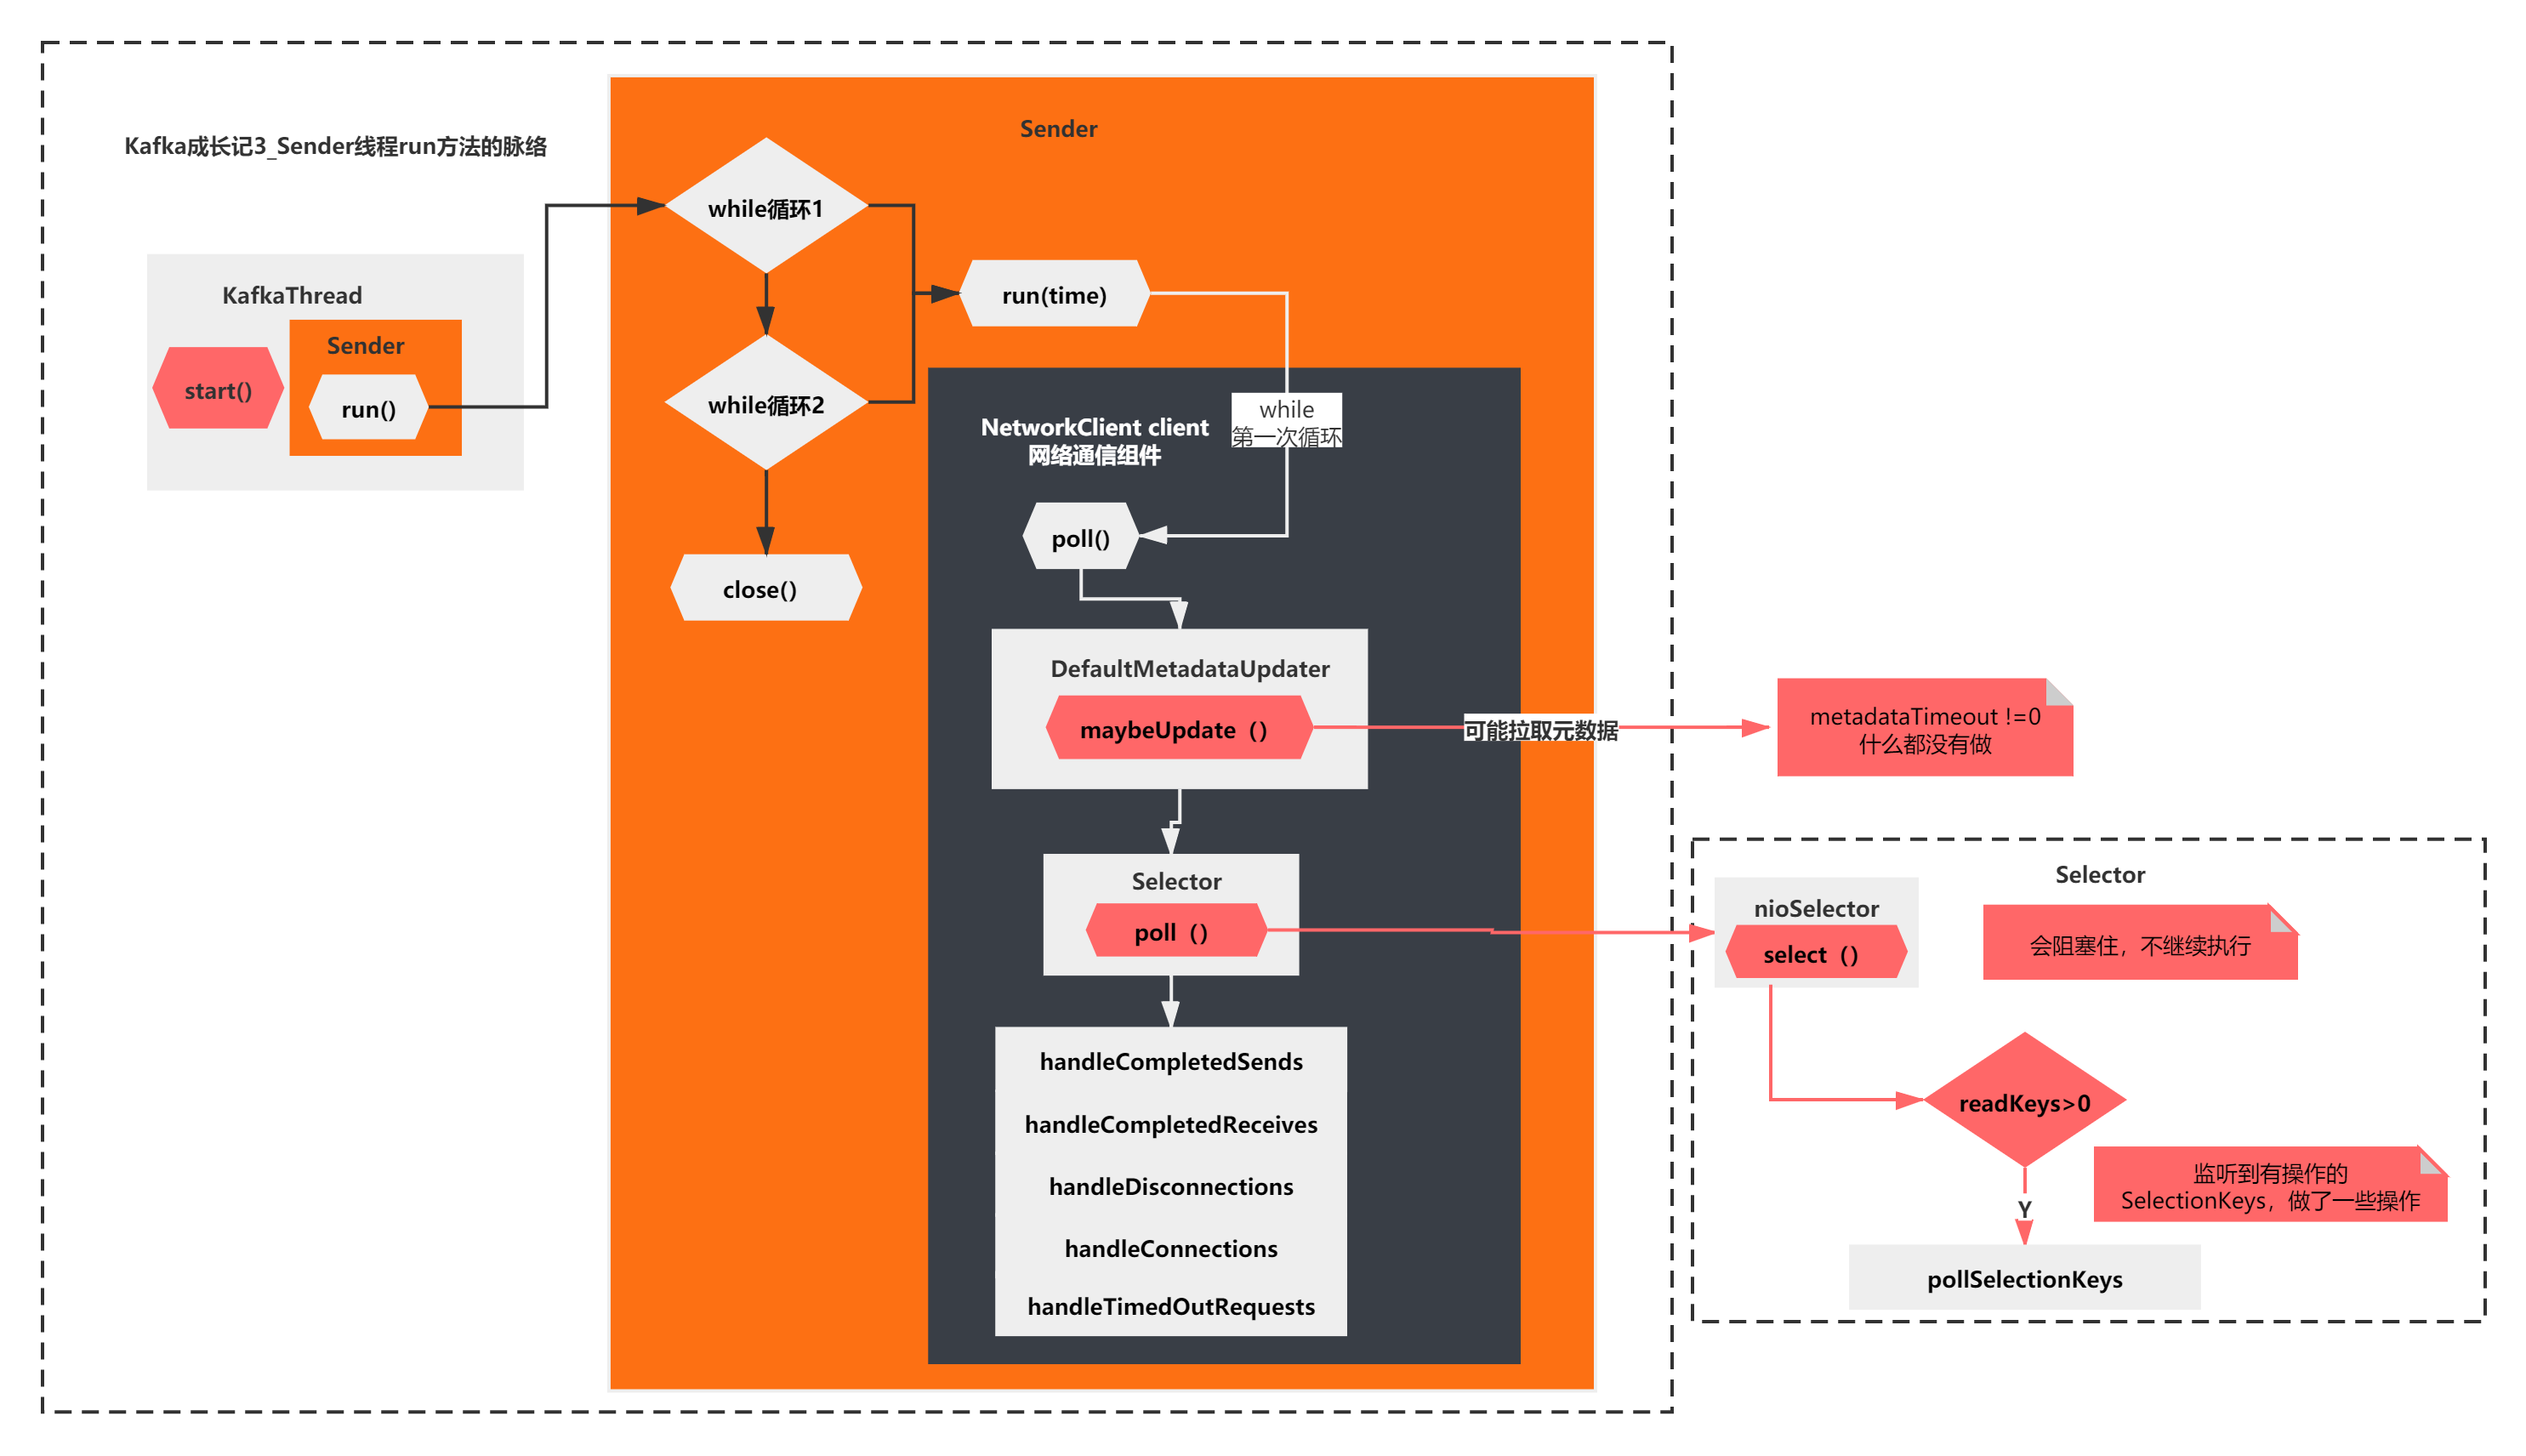
上面的脉络主要是2步:
1)select(timeout): NIO底层selector.select(),会阻塞监听
2)pollSelectionKeys(): 监听到有操作的SelectionKeys,做了一些操作
也就是说,最终,Sender线程的run方法,第一次while循环执行poll方法,最后什么都没干,会被selector.select()阻塞住。
如下图所示:
new KafkaProducer之后
分析完了run方法的执行 ,我们分析的KafkaProducerHelloWorld第一步new KafkaProducer()基本就完成了。
大家经历了一节半的时间,终于分析清楚了KafkaProducer创建的原理。不不知道你对Kafka的Producer是不是有了更深的理解了。
分析了new KafkaProducer()之后呢?
我们继续接着KafkaProducerHelloWorld往下分析,你还记得KafkaProducerHelloWorld的代码么?
public class KafkaProducerHelloWorld {

	public static void main(String[] args) throws Exception {
		//配置Kafka的一些参数
		Properties props = new Properties();
		props.put("bootstrap.servers", "mengfanmao.org:9092");
		props.put("key.serializer", "org.apache.kafka.common.serialization.StringSerializer");
		props.put("value.serializer", "org.apache.kafka.common.serialization.StringSerializer");

		// 创建一个Producer实例
		KafkaProducer<String, String> producer = new KafkaProducer<>(props);

		// 封装一条消息
		ProducerRecord<String, String> record = new ProducerRecord<>(
				"test-topic", "test-key", "test-value");

		// 同步方式发送消息,会阻塞在这里,直到发送完成
		// producer.send(record).get();

		// 异步方式发送消息,不阻塞,设置一个监听回调函数即可
		producer.send(record, new Callback() {
			@Override
			public void onCompletion(RecordMetadata metadata, Exception exception) {
				if(exception == null) {
					System.out.println("消息发送成功");
				} else {
					exception.printStackTrace();
				}
			}
		});

		Thread.sleep(5 * 1000);

		// 退出producer
		producer.close();
	}
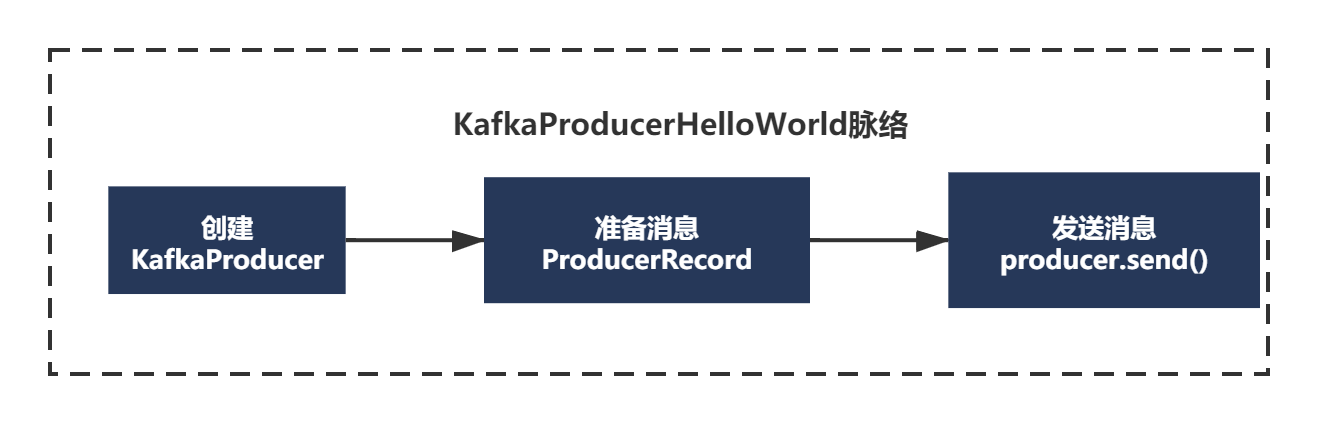
KafkaProducerHelloWorld主要就3步:
1)new KafkaProducer 这个我们已经分析完了,主要分析了配置文件的解析、各个组件是什么、有什么,还有就是刚才分析的run线程第一次循环到底执行了什么。
2) new ProducerRecord 创建待发送的消息
3) producer.send() 发送消息
首先创建待发送的消息:
ProducerRecord<String, String> record = new ProducerRecord<>("test-topic", "test-key", "test-value");

public ProducerRecord(String topic, K key, V value) {
    this(topic, null, null, key, value);
}
    /**
     * Creates a record with a specified timestamp to be sent to a specified topic and partition
     * 创建具有指定时间戳的记录以发送到指定主题和分区
     * @param topic The topic the record will be appended to
     * @param partition The partition to which the record should be sent
     * @param timestamp The timestamp of the record
     * @param key The key that will be included in the record
     * @param value The record contents
     */
    public ProducerRecord(String topic, Integer partition, Long timestamp, K key, V value) {
        if (topic == null)
            throw new IllegalArgumentException("Topic cannot be null");
        if (timestamp != null && timestamp < 0)
            throw new IllegalArgumentException("Invalid timestamp " + timestamp);
        this.topic = topic;
        this.partition = partition;
        this.key = key;
        this.value = value;
        this.timestamp = timestamp;
    }
我们之前提过,Record表示了一条消息的抽象封装。这个ProducerRecord其实就表示了一条消息。
从构造函数的注释可以看出来**,ProducerRecord可以指定往哪个topic,哪一个分区partition,并且消息可以设置一个时间戳。分区和时间戳默认可以不指定**
其实看这块源码,我们主要得到的信息就是这些了,这些都比较简单。就不画图了。
发送消息时的元数据拉取触发
当Producer和Record都创建好了之后,可以用同步或者异步的方式发送消息。
// 同步方式发送消息,会阻塞在这里,直到发送完成
// producer.send(record).get();

// 异步方式发送消息,不阻塞,设置一个监听回调函数即可
producer.send(record, new Callback() {
    @Override
    public void onCompletion(RecordMetadata metadata, Exception exception) {
        if(exception == null) {
            System.out.println("消息发送成功");
        } else {
            exception.printStackTrace();
        }
    }
});

    //同步发送
    @Override
    public Future<RecordMetadata> send(ProducerRecord<K, V> record) {
        return send(record, null);
    }
    //异步发送
    public Future<RecordMetadata> send(ProducerRecord<K, V> record, Callback callback) {
        // intercept the record, which can be potentially modified; this method does not throw exceptions
        ProducerRecord<K, V> interceptedRecord = this.interceptors == null ? record : this.interceptors.onSend(record);
        return doSend(interceptedRecord, callback);
    }
同步和异步的整个发送逻辑如下图所示:

从上图你会发现,但是无论同步发送还是异步底层都会调用同一个方法doSend()。区别就是有没有callBack回调函数而已,他们还都在调用前注册一些拦截器,这里我们抓大放小下,我们重点还是关注doSend方法。
doSend方法如下:
/**
 * Implementation of asynchronously send a record to a topic. Equivalent to <code>send(record, null)</code>.
 * See {@link #send(ProducerRecord, Callback)} for details.
 */
private Future<RecordMetadata> doSend(ProducerRecord<K, V> record, Callback callback) {
    TopicPartition tp = null;
    try {
        // first make sure the metadata for the topic is available
        long waitedOnMetadataMs = waitOnMetadata(record.topic(), this.maxBlockTimeMs);
        long remainingWaitMs = Math.max(0, this.maxBlockTimeMs - waitedOnMetadataMs);
        byte[] serializedKey;
        try {
            serializedKey = keySerializer.serialize(record.topic(), record.key());
        } catch (ClassCastException cce) {
            throw new SerializationException("Can't convert key of class " + record.key().getClass().getName() +
                    " to class " + producerConfig.getClass(ProducerConfig.KEY_SERIALIZER_CLASS_CONFIG).getName() +
                    " specified in key.serializer");
        }
        byte[] serializedValue;
        try {
            serializedValue = valueSerializer.serialize(record.topic(), record.value());
        } catch (ClassCastException cce) {
            throw new SerializationException("Can't convert value of class " + record.value().getClass().getName() +
                    " to class " + producerConfig.getClass(ProducerConfig.VALUE_SERIALIZER_CLASS_CONFIG).getName() +
                    " specified in value.serializer");
        }
        int partition = partition(record, serializedKey, serializedValue, metadata.fetch());
        int serializedSize = Records.LOG_OVERHEAD + Record.recordSize(serializedKey, serializedValue);
        ensureValidRecordSize(serializedSize);
        tp = new TopicPartition(record.topic(), partition);
        long timestamp = record.timestamp() == null ? time.milliseconds() : record.timestamp();
        log.trace("Sending record {} with callback {} to topic {} partition {}", record, callback, record.topic(), partition);
        // producer callback will make sure to call both 'callback' and interceptor callback
        Callback interceptCallback = this.interceptors == null ? callback : new InterceptorCallback<>(callback, this.interceptors, tp);
        RecordAccumulator.RecordAppendResult result = accumulator.append(tp, timestamp, serializedKey, serializedValue, interceptCallback, remainingWaitMs);
        if (result.batchIsFull || result.newBatchCreated) {
            log.trace("Waking up the sender since topic {} partition {} is either full or getting a new batch", record.topic(), partition);
            this.sender.wakeup();
        }
        return result.future;
        // handling exceptions and record the errors;
        // for API exceptions return them in the future,
        // for other exceptions throw directly
    } catch (ApiException e) {
        log.debug("Exception occurred during message send:", e);
        if (callback != null)
            callback.onCompletion(null, e);
        this.errors.record();
        if (this.interceptors != null)
            this.interceptors.onSendError(record, tp, e);
        return new FutureFailure(e);
    } catch (InterruptedException e) {
        this.errors.record();
        if (this.interceptors != null)
            this.interceptors.onSendError(record, tp, e);
        throw new InterruptException(e);
    } catch (BufferExhaustedException e) {
        this.errors.record();
        this.metrics.sensor("buffer-exhausted-records").record();
        if (this.interceptors != null)
            this.interceptors.onSendError(record, tp, e);
        throw e;
    } catch (KafkaException e) {
        this.errors.record();
        if (this.interceptors != null)
            this.interceptors.onSendError(record, tp, e);
        throw e;
    } catch (Exception e) {
        // we notify interceptor about all exceptions, since onSend is called before anything else in this method
        if (this.interceptors != null)
            this.interceptors.onSendError(record, tp, e);
        throw e;
    }
}
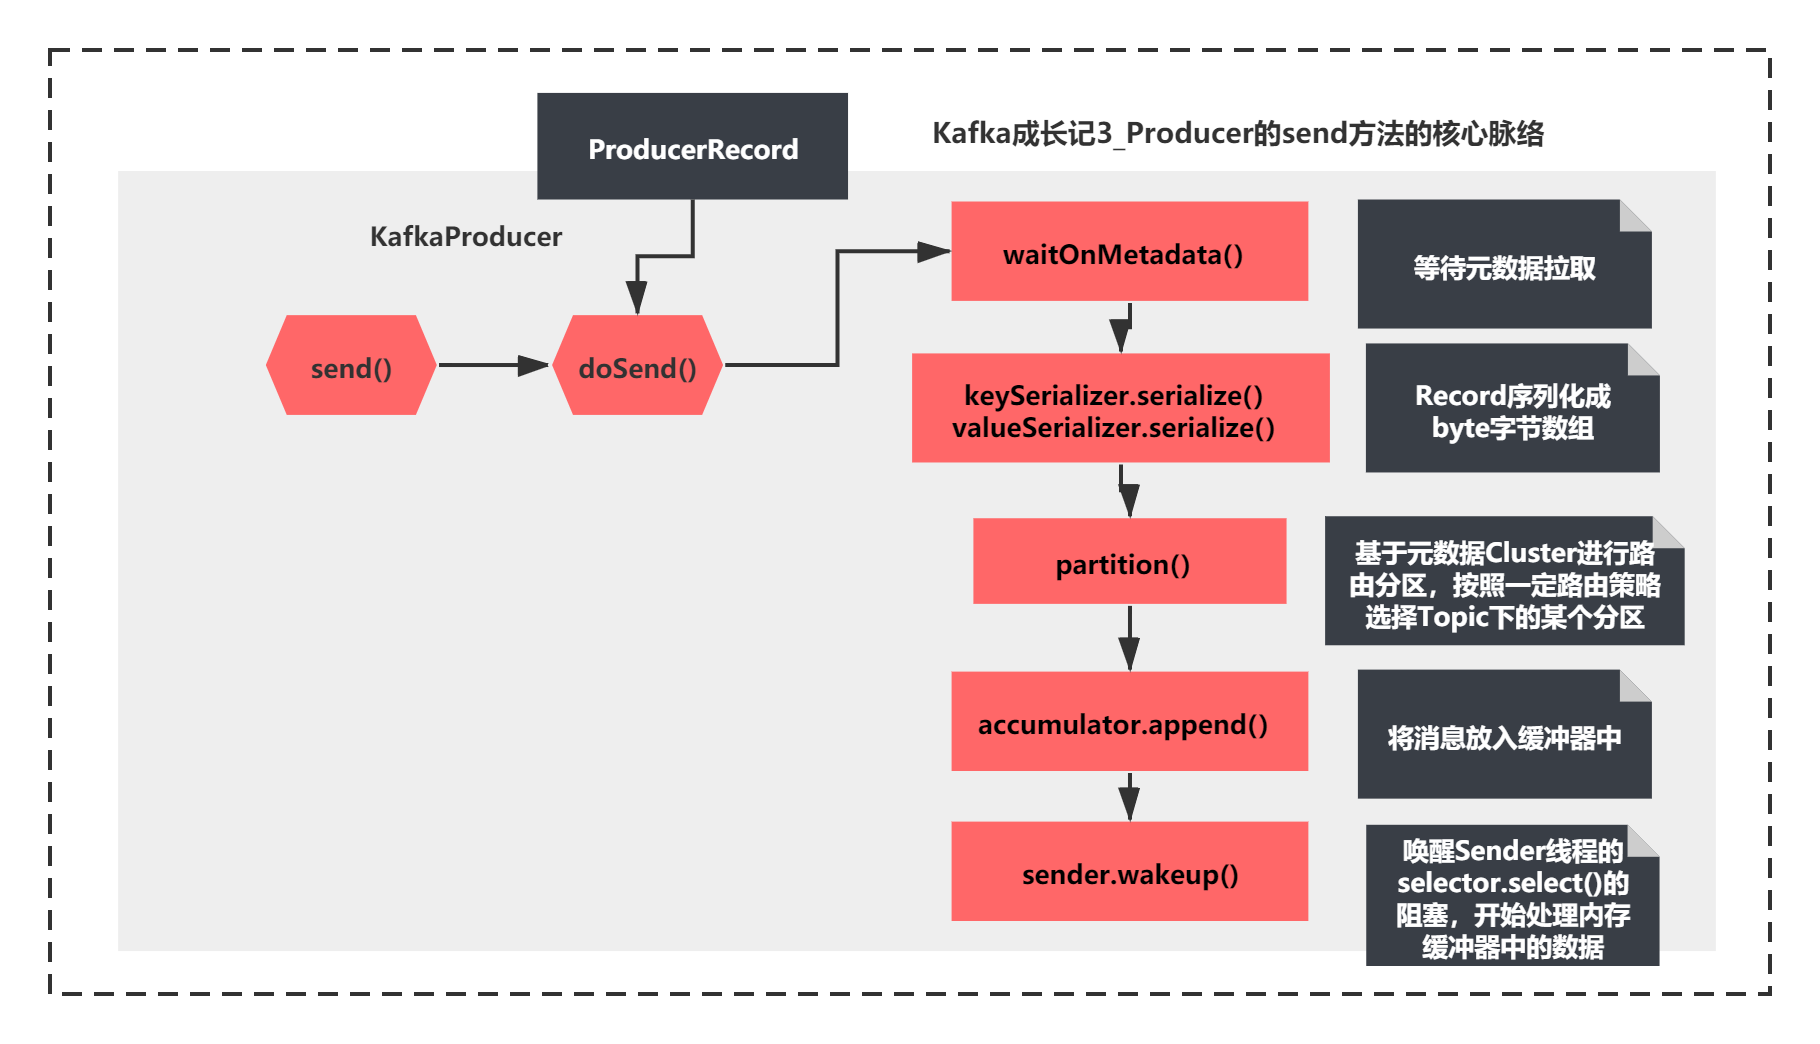
这个方法的脉络虽然比较长,但是脉络还是比较清晰,主要先执行了:
1)waitOnMetadata 应该是等待元数据拉取
2)keySerializer.serialize和valueSerializer.serialize,很明显就是将Record序列化成byte字节数组
3)通过partition进行路由分区,按照一定路由策略选择Topic下的某个分区
4)accumulator.append将消息放入缓冲器中
5)唤醒Sender线程的selector.select()的阻塞,开始处理内存缓冲器中的数据。
用图来表示如下所示:
这两节我们重点分析元数据拉取的这个场景的源码原理。
所以这里我们着重先看下步骤1 ,之后的4步我们之后会分析到的。
waitOnMetadata 如何等待元数据拉取的?
既然send的第一步是执行waitOnMetadata方法,首先看下它的代码:
 /**
     * Wait for cluster metadata including partitions for the given topic to be available.
     * @param topic The topic we want metadata for
     * @param maxWaitMs The maximum time in ms for waiting on the metadata
     * @return The amount of time we waited in ms
     */
    private long waitOnMetadata(String topic, long maxWaitMs) throws InterruptedException {
        // add topic to metadata topic list if it is not there already.
        if (!this.metadata.containsTopic(topic))
            this.metadata.add(topic);

        if (metadata.fetch().partitionsForTopic(topic) != null)
            return 0;

        long begin = time.milliseconds();
        long remainingWaitMs = maxWaitMs;
        while (metadata.fetch().partitionsForTopic(topic) == null) {
            log.trace("Requesting metadata update for topic {}.", topic);
            int version = metadata.requestUpdate();
            sender.wakeup();
            metadata.awaitUpdate(version, remainingWaitMs);
            long elapsed = time.milliseconds() - begin;
            if (elapsed >= maxWaitMs)
                throw new TimeoutException("Failed to update metadata after " + maxWaitMs + " ms.");
            if (metadata.fetch().unauthorizedTopics().contains(topic))
                throw new TopicAuthorizationException(topic);
            remainingWaitMs = maxWaitMs - elapsed;
        }
        return time.milliseconds() - begin;
    }

    /**
     * Get the current cluster info without blocking
     */
    public synchronized Cluster fetch() {
        return this.cluster;
    }

    public synchronized int requestUpdate() {
        this.needUpdate = true;
        return this.version;
    }

    /**
     * Wait for metadata update until the current version is larger than the last version we know of
     */
    public synchronized void awaitUpdate(final int lastVersion, final long maxWaitMs) throws InterruptedException {
        if (maxWaitMs < 0) {
            throw new IllegalArgumentException("Max time to wait for metadata updates should not be < 0 milli seconds");
        }
        long begin = System.currentTimeMillis();
        long remainingWaitMs = maxWaitMs;
        while (this.version <= lastVersion) {
            if (remainingWaitMs != 0)
                wait(remainingWaitMs);
            long elapsed = System.currentTimeMillis() - begin;
            if (elapsed >= maxWaitMs)
                throw new TimeoutException("Failed to update metadata after " + maxWaitMs + " ms.");
            remainingWaitMs = maxWaitMs - elapsed;
        }
    }
这个方法核心就是判断了是否有Cluster元数据信息,如果没有,进行了如下操作:
1)metadata.requestUpdate(); 更新了一个needUpdate标记,这个值会影响之前maybeUpdate的metadataTimeout的计算,可以让metadataTimeout为0
2)sender.wakeup();唤醒之前nioSelector.select()的阻塞,继续执行
3)metadata.awaitUpdate(version, remainingWaitMs); 主要进行了版本比较,如果不是最新版本,调用了Metadata.wait()方法(wait方法是每个Object都会有的方法,一般和notify或者notifyAll组合使用)
整个过程我直接用图给大家表示一下,如下所示:
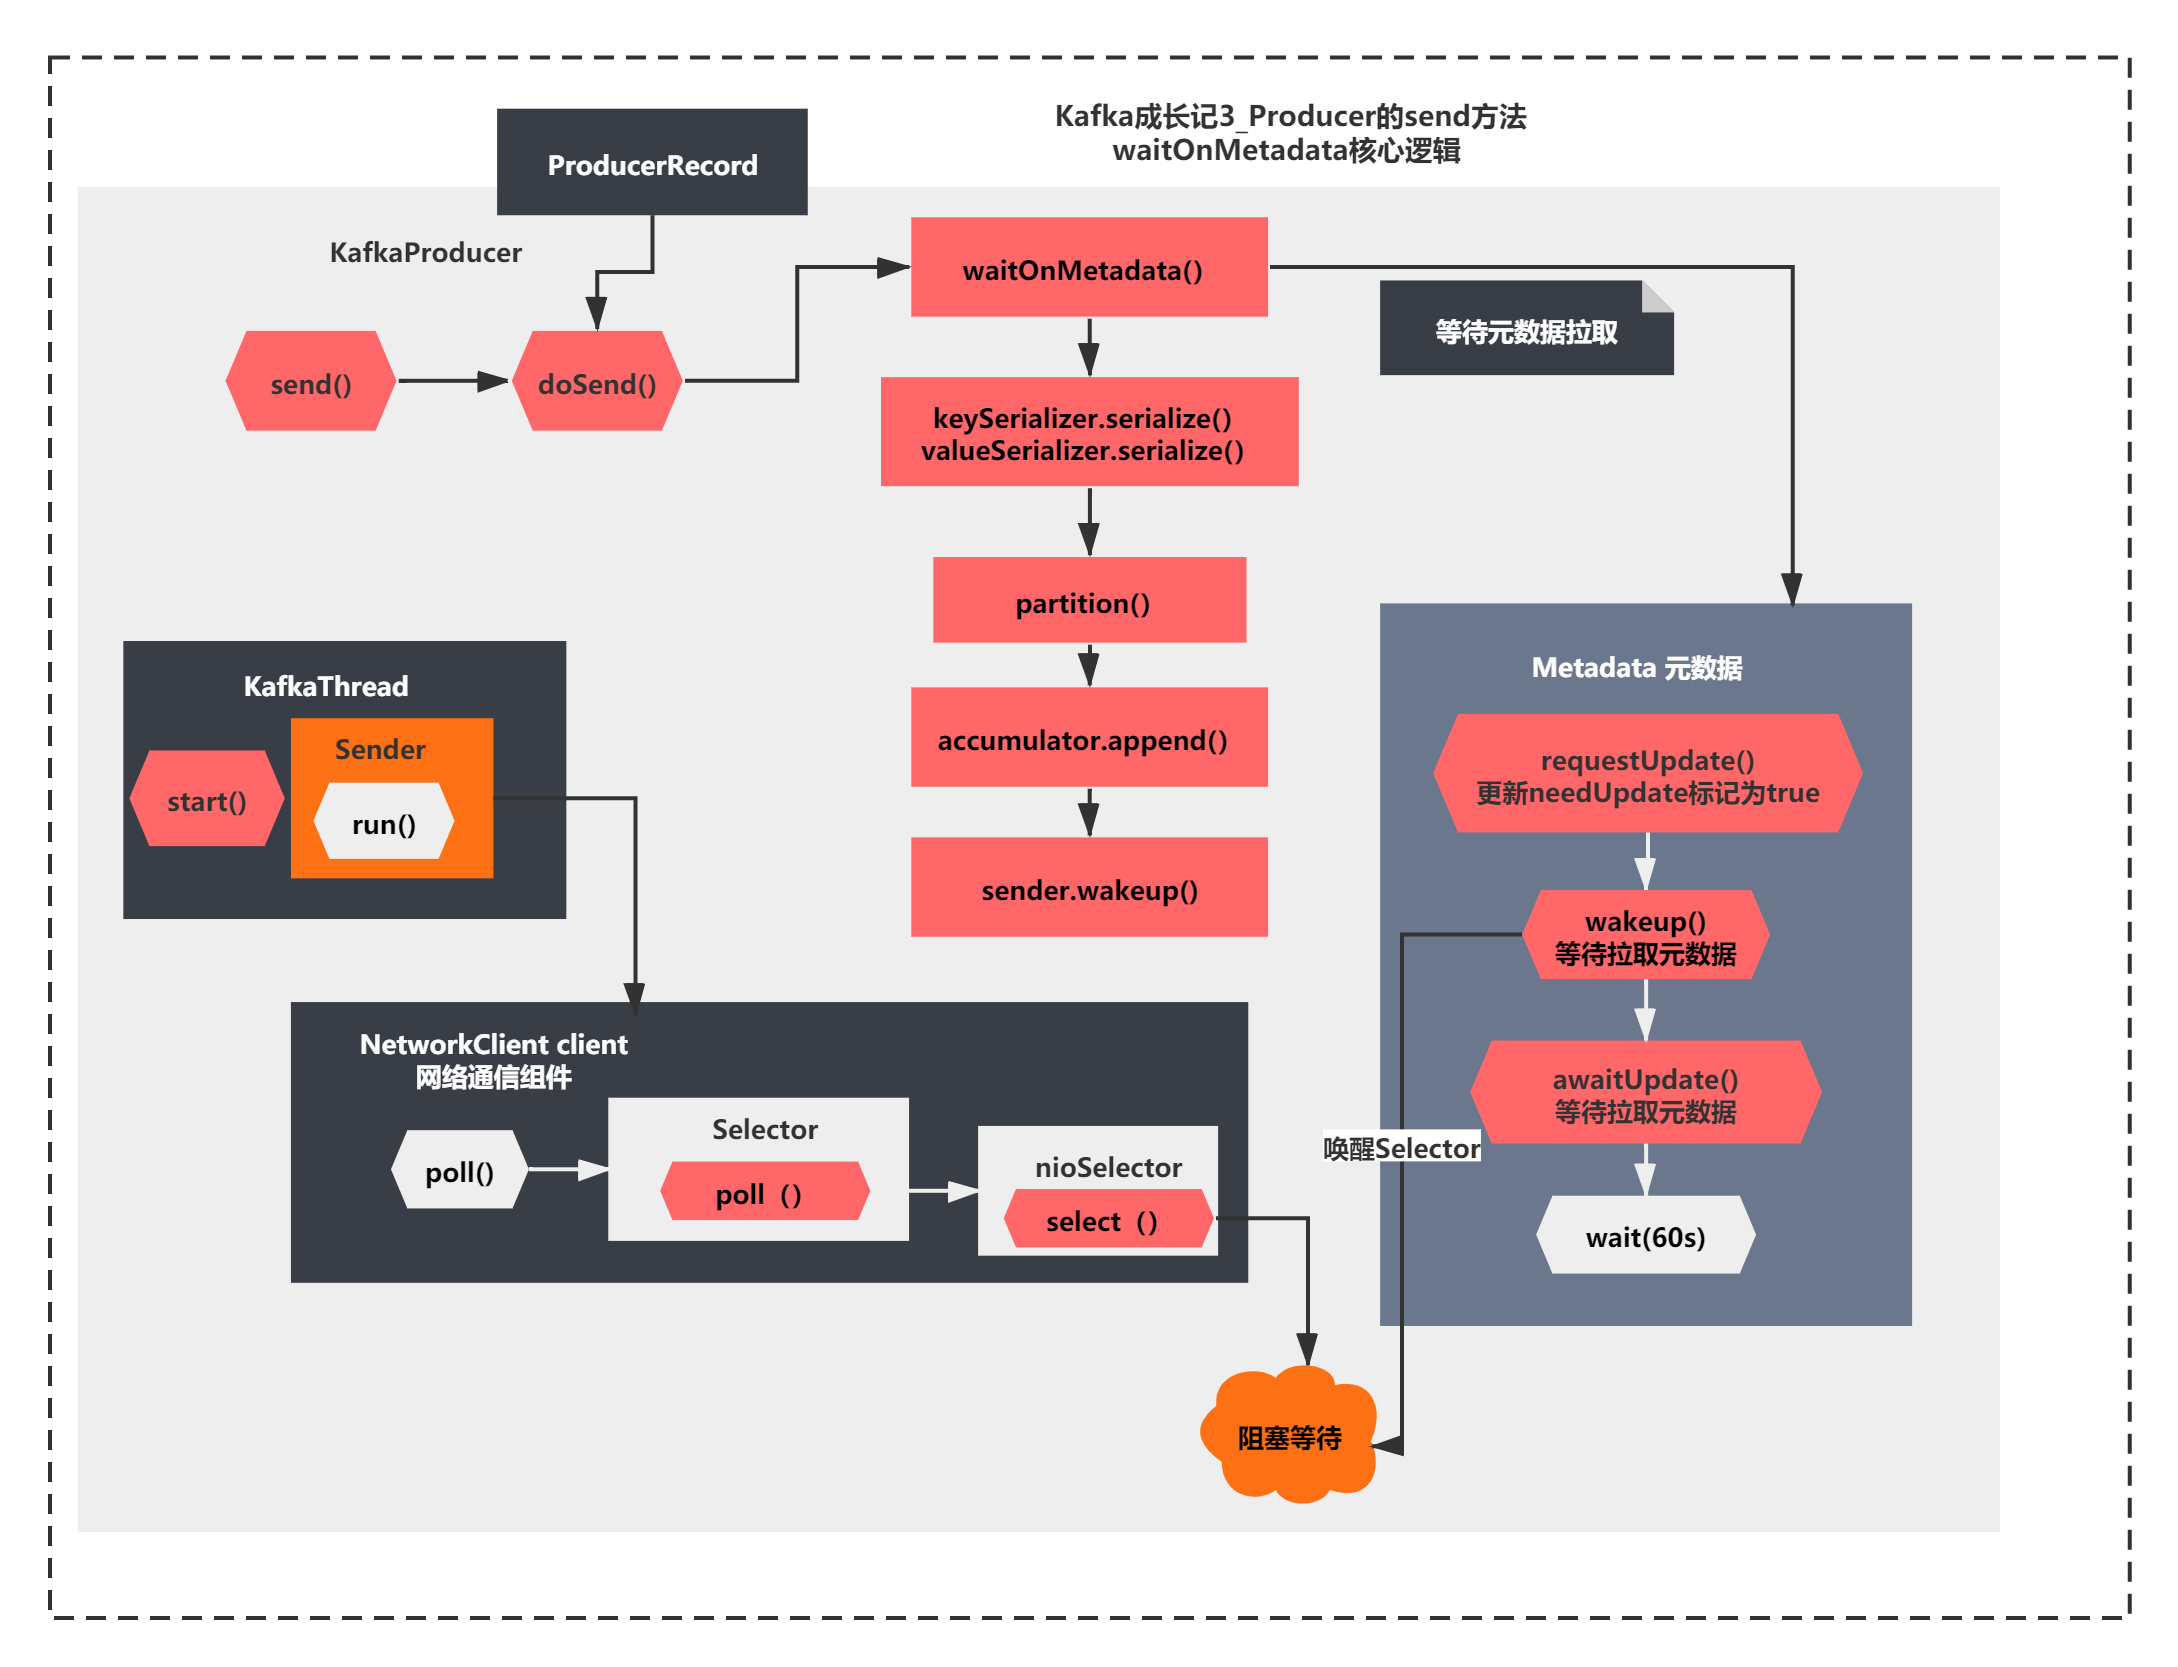
整个图就是今天我们分析的关键结果了,**这里通过两种阻塞和唤醒机制,一个是NIO中Selector的select()和wakeUp(),一个是MetaData对象的wait()和notifyAll()机制。**所以这里要结合之前Sender线程的阻塞逻辑一起来理解。
是不是很有意思一种使用,这里没有用任何线程的join、sleep、wait、park、unpark、notify这些方法。
最后我们简单小结下,这里一节我们主要分析了如下Producer的源码原理:
初始化KafkaProducer时并没有去拉取元数据,但是创建了Selector组件,启动了Sender线程,select阻塞等待请求响应。由于还没有发送任何请求,所以初始化时并没有去真正拉取元数据。
真正拉取元数据是在第一次send方法调用时,会唤醒唤醒Selector之前阻塞的select(),进入第二次while循环,从而发送拉取元数据请求,并且通过Obejct.wait的机制等待60s,等到从Broker拉取元数据成功后,才会继续执行真正的生产消息的请求,否则会报拉取元数据超时异常。
这一节我们只是看到了进行了wait如何等待元数据拉取。
而唤醒Selector的select之后应该会进入第二次while循环
那第二次while循环如何发送请求拉取元数据请求,并且在成功后notifyAll()进行唤醒操作的呢?
让我们下一节继续分析,大家敬请期待! 我们下一节见!
本文由博客一文多发平台 OpenWrite 发布!
Recommend
-
50
Kafka Producer 是负责向 Kafka 服务发送消息的应用程序,该文不讲故事,更多偏重于原理和思考方面,对于 Kafka 没有任何了解的人,可能有点困难和枯燥。 KafkaProducer KafkaProducer 线程安全,支持多个线程共享同...
-
16
Kafka Producer Pipeline for Ruby on Rails In the early fall our infrastructure team...
-
37
我们继续对消息消费流程的源码进行解析。 本文主要针对push模式下的消息拉取流程进行解析。我们重点分析集群消费模式,对于广播模式其实很好理解,每个消费者都需要拉取主题下面的所有消费队列的消息。 在集群消费模式下,同一个消费者组内包含了...
-
15
Akka Stream在用Akka去对接Kafka之前,有必要先简单了解下Akka Stream,它是基于Reactive Stream(Akka是其创立成员之一)的。Akka Stream中,将流的拓扑处理逻辑命名为...
-
9
在《RocketMQ源码分析之RebalanceService》中回答了消费者在第一次启动后是如何来获取消息这个问题,那么在构建PullRequest(消息拉取任务)后,消费者与broker之间是如何交互来完成消息拉取任务?本篇文章就来分析消息拉取流程。...
-
6
Apache KafkaApache Kafka Producer Improvements with the Sticky Partitioner
-
5
Kafka -- 元数据的拉取时机发布于 17 分钟前生产者发消息给Kafka,是需要知道Kafka的ip、端口等节点信息,这些节点信息是元数据的一部分,属于元数据Metadata的Clus...
-
7
前面几篇我们讲了关于 Kafka 的基础架构以及搭建,从这篇开始我们就来源码分析一波。我们这用的 Kafka 版本是 2.7.0,其 Client 端是由 Java 实现,Server 端是由 Scala 来实现的,在使用 Kafka 时,Client 是用户最先接触到的部分,因此,我们从 Client 端开始...
-
7
Kafka消费者消息拉取机制工作中有对Kafka重度使用的项目,其实很早就想写这一篇,但是当时也看到过一些类似的文章以及有一些其他的分享内容,所以一直拖到现在。对Kafka的使用聚焦在消费端,所以详细聊一下Kafka consumer消费过程中是如何拉取数据的。...
-
7
本篇的内容主要是关于docker镜像的。在我们安装好docker之后,要想使用它,第 一步就是要下载一些镜像。本文将依据此流程分析docker中镜像的拉取、存储等相关内容。 docker中几乎所有的操作都是通...
About Joyk
Aggregate valuable and interesting links.
Joyk means Joy of geeK