

Apple 官方异步编程框架:Swift Combine 应用
source link: https://nemocdz.github.io/post/apple-%E5%AE%98%E6%96%B9%E5%BC%82%E6%AD%A5%E7%BC%96%E7%A8%8B%E6%A1%86%E6%9E%B6swift-combine-%E5%BA%94%E7%94%A8/
Go to the source link to view the article. You can view the picture content, updated content and better typesetting reading experience. If the link is broken, please click the button below to view the snapshot at that time.
WWDC19 Session 721 - Combine in Practice
Combine 是 WWDC2019 推出的异步编程框架,在上篇 文章 中,介绍了 Combine 的基本概念。在这篇文章中,着重介绍一些 Combine 的实际应用。
发布者(Publisher)
假设有一个 MagicTrick 类型的 JSON 数据,这个数据的来源是 NotificationCenter,数据会以 Data 的形式放在 Notification 的 UserInfo 中。让我们使用 Combine 的发布者来改造这个数据的发送。
extension Notification.Name{
    static var newTrickDownloaded:Notification.Name {
        return Notification.Name("aa")
    }
}

class MagicTrick:Codable {
    var name:String = ""
}

let trickNamePublisher = NotificationCenter.Publisher(center: .default, name: .newTrickDownloaded)
由于 NotificationCenter 发布者的 Output 类型是 Notification,需要类型转换。
这个操作符可以改变发布者的类型。
let trickNamePublisher = NotificationCenter.Publisher(center: .default, name: .newTrickDownloaded)
    .map{ notification -> Data in
        let userInfo = notification.userInfo
        return userInfo?["data"] as! Data
    }
这时候 Output 变成了 Data 类型,还不能实际使用。要转换成实际类型,可以用 Codable + JSONDecoder 进行解析,解析时可能会抛出错误,就需要使用 try 关键字。
tryMap
这个操作符允许在转换值的闭包内抛出异常。
let trickNamePublisher = NotificationCenter.Publisher(center: .default, name: .newTrickDownloaded)
    .map{ notification -> Data in
        let userInfo = notification.userInfo
        return userInfo?["data"] as! Data
    }.tryMap { data -> MagicTrick in
        let decoder = JSONDecoder()
        return try decoder.decode(MagicTrick.self, from: data)
    }
decode
而 Combine 为 Codable,还提供了便捷的 decode 方法。这个操作符允许传入 Decodable 类型和解码器,将解码器支持的上游数据类型解码,发送给下游订阅者。
let trickNamePublisher = NotificationCenter.Publisher(center: .default, name: .newTrickDownloaded)
    .map{ notification -> Data in
        let userInfo = notification.userInfo
        return userInfo?["data"] as! Data
    }
    .decode(type: MagicTrick.self, decoder: JSONDecoder())
接下来应该处理解码过程出现的错误了,因为每一个发布者需要描述了他们产生或者允许的错误类型,所以 Combine 中提供了各种各样的错误处理的操作符,对错误做出反应或是从错误中恢复并做一些兜底处理。
assertNoFailure
这个操作符可以在你确认上游发布者不会产生错误时使用,会将错误类型转为 Never,但当错误发生时,将会崩溃。
let trickNamePublisher = NotificationCenter.Publisher(center: .default, name: .newTrickDownloaded)
    .map{ notification -> Data in
        let userInfo = notification.userInfo
        return userInfo?["data"] as! Data
    }
    .decode(type: MagicTrick.self, decoder: JSONDecoder())
    .assertNoFailure()
catch
这个操作符允许在上游发布者发生错误时,提供一个默认的发布者替换上游的发布者,发送值给下游的订阅者,以便做默认兜底方案。
let trickNamePublisher = NotificationCenter.Publisher(center: .default, name: .newTrickDownloaded)
    .map{ notification -> Data in
        let userInfo = notification.userInfo
        return userInfo?["data"] as! Data
    }
    .decode(type: MagicTrick.self, decoder: JSONDecoder())
    .catch{ _ in
        return Publishers.Just(MagicTrick())
    }
Just:是一个很简单的发布者,用需要产生的值进行初始化,就会将该值发送一次给下游订阅者并结束。
flatMap
上面的例子在错误发生后,生成一个 Just 的发布者作为上游发布者的替代品,但 Just 发布者只会产生一个值就结束了,整个事件流就会结束。但我们需要的是当错误发生时,catch 只处理这次错误,但不替换上游的发布者,也就是上游可以继续产生值。为了不影响上游,我们需要一个新的发布者,能将上游的值用新的发布者发送给下游,catch 只影响这个新的发布者,这个时候就需要 flatMap 了。
Combine 里的 flatMap 和函数式编程高阶函数里的 flatMap 一样,可以将包装的类型进行转换,在这里包装就是发布者,类型就是发布者的 Input,也就是说在 flatMap 里面可以返回一个新 Input 类型的发布者。
let trickNamePublisher = NotificationCenter.Publisher(center: .default, name: .newTrickDownloaded)
    .map{ notification -> Data in
        let userInfo = notification.userInfo
        return userInfo?["data"] as! Data
    }
    .flatMap{ data in
        return Publishers.Just(data)
            .decode(type: MagicTrick.self, decoder: JSONDecoder())
            .catch{ _ in
                return Publishers.Just(MagicTrick())
        }
    }
上面例子中,每次 NotificationCenter 的产生的值都在 flatMap 里被生成的 Just 的发布者并发送,当错误发生时,catch 只会替换这个 Just 的发布者,而不会影响 flatMap 上游的发布者,这样就能保证 catch 是对每次错误进行处理的了。
valueForKey
当只需要发送上游发布者的某一个属性的值时,可以使用 ValueForKey 操作符,它允许使用 Key Path 指定上游的某一个属性。这个操作符的声明式 API 如下(还有对应多个 Key Path 的):
public func publisher<T>(for keyPath: KeyPath<Self.Output, T>) -> Publishers.ValueForKey<Self, T>
使用例子如下:
let trickNamePublisher = NotificationCenter.Publisher(center: .default, name: .newTrickDownloaded)
    .map{ notification -> Data in
        let userInfo = notification.userInfo
        return userInfo?["data"] as! Data
    }
    .flatMap{ data in
        return Publishers.Just(data)
            .decode(type: MagicTrick.self, decoder: JSONDecoder())
            .catch{ _ in
                return Publishers.Just(MagicTrick())
        }
    }
		.publisher(for: \.name)
当对值的处理完后,我们需要考虑需不需要对发送和接收的调度进行特殊处理。
debounce
这个操作符作用是去抖动,也就是只关心在某一段时间间隔里最后的消息结果,比如间隔为 1 秒,那么这一秒内多次从上游接受的值只有最后一个会发送给下游。
let trickNamePublisher = NotificationCenter.Publisher(center: .default, name: .newTrickDownloaded)
    .map{ notification -> Data in
        let userInfo = notification.userInfo
        return userInfo?["data"] as! Data
    }
    .flatMap{ data in
        return Publishers.Just(data)
            .decode(type: MagicTrick.self, decoder: JSONDecoder())
            .catch{ _ in
                return Publishers.Just(MagicTrick())
        }
    }
    .debounce(for: 0.5, scheduler: RunLoop.main)
receive(on:)
这个操作符作用是指定订阅者使用哪个调度者里接收值,同理还有 subscibe(on:) 用于指定发布者使用哪个调度者发送值。
调度者(Scheduler):定义了什么时候和在哪个上下文中执行,在 Cocoa 框架中,
RunLoop和DispatchQueue已经适配了调度者协议,可以很方便的使用
let trickNamePublisher = NotificationCenter.Publisher(center: .default, name: .newTrickDownloaded)
    .map{ notification -> Data in
        let userInfo = notification.userInfo
        return userInfo?["data"] as! Data
    }
    .flatMap{ data in
        return Publishers.Just(data)
            .decode(type: MagicTrick.self, decoder: JSONDecoder())
            .catch{ _ in
                return Publishers.Just(MagicTrick())
        }
    }
    .receive(on: DispatchQueue.main)
@Published
这个注解是一个属性包装器(Property Wrapper),可以方便地为任何属性生成其对应类型的发布者。这个发布者会在属性值发生变化时发送消息。
属性包装器(Property Wrapper):Swift 5.1 的新特性,可以抽象对属性 Set/Get 方法的通用逻辑。可以在提案中了解更多。
@propertyDelegate public struct Published<Value> : Publisher {
    public typealias Output = Value
    public typealias Failure = Never
    public init(initialValue: Value)
    public func receive<S>(subscriber: S) where Value == S.Input, S : Subscriber, S.Failure == Published<Value>.Failure
    public var value: Value
}
有了这个特性,对已有的代码进行改造接入 Combine 框架就更方便了(截止至 beta2 版本的 Xcode,$ 符号还不能使用):
@Published var foo:String = "test"

let subscription = $foo.sink {
    print("foo is \($0)")
}
这个关键字其实印证了一点,Combine 和 Swift 语言生态的结合其实是很紧密的,也许将来为了 SwiftUI 和 Combine 这种重量级框架更方便使用,Apple 还会接纳更多社区优秀的提案。
Future
Future 是单次执行的发布者,在闭包中主动产生一个值,之后就结束(和 Javascript 的 Promise,Java 的 Future 类似的设计理念)。初始化闭包会返回一个 excutor 闭包,完成同步/异步操作候,通过主动调用 excutor 闭包(Promise 的 fulfill)将值发送给下游,而在 Combine 框架里这个闭包类型的是 Promise 类型,Promise 类型其实是 (Result<Output, Failure>) -> Void 的别名。
extension Publishers {
    final public class Future<Output, Failure> : Publisher where Failure : Error {
        public typealias Promise = (Result<Output, Failure>) -> Void
        public init(_ attemptToFulfill: @escaping (@escaping Publishers.Future<Output, Failure>.Promise) -> Void)
        final public func receive<S>(subscriber: S) where Output == S.Input, Failure == S.Failure, S : Subscriber
    }
}
通过 Future,可以将任何代码适配 Combine 框架,包括现有的同步,异步代码。
let trickNamePublisher = NotificationCenter.Publisher(center: .default, name: .newTrickDownloaded)
    .map{ notification -> Data in
        let userInfo = notification.userInfo
        return userInfo?["data"] as! Data
    }
    .flatMap{ data in
        return Publishers.Future { promise in
            DispatchQueue.main.asyncAfter(deadline: .now() + 0.3) {
                promise(.success(data))
            }
        }
    }
AnyPublisher
当我们使用 Combine 框架里的方法来生成发布者时,发布者的实际类型可能千奇百怪,对外暴露或者想进行复用时,内部的实际类型其实是不需要关心的,只需要关心 Output 和错误的类型就可以了。这个时候,通用类型 AnyPublisher 就登场了。Combine 提供了 eraseToAnyPublisher 方法,可以将各种各样的发布者统一转换为 AnyPublisher。同样的,还有 eraseToAnySubscriber,eraseToAnySubject 。
public struct AnyPublisher<Output, Failure> where Failure : Error {
    @inlinable public init<P>(_ publisher: P) where Output == P.Output, Failure == P.Failure, P : Publisher
    @inlinable public init(_ subscribe: @escaping (AnySubscriber<Output, Failure>) -> Void)
}
建议在最后将发布者转换为 AnyPublisher。
let trickNamePublisher = NotificationCenter.Publisher(center: .default, name: .newTrickDownloaded)
    .map{ notification -> Data in
        let userInfo = notification.userInfo
        return userInfo?["data"] as! Data
    }
    .eraseToAnyPublisher()
发布者有以下的特点
- 用操作符生成每一小部分的发布者,最后组成事件流
- 操作符描述了从当前发布者生成的新发布者
- 值和错误是强类型的,在整个过程中
- 既可以异步产生值,也可以同步产生值
- 可以添加其兼容的订阅者
订阅者(Subscriber)
- 只会接收到一次订阅通知
- 发布者可以产生 0 或多个值,所以订阅者可能收到 0 或多个值
- 最多只会接收到一个完成通知
Assign
这个订阅者提供通过 Key Path 订阅某个类类型对象属性变化的能力。
let trickNamePublisher = NotificationCenter.Publisher(center: .default, name: .newTrickDownloaded)
    .map{ notification -> Data in
        let userInfo = notification.userInfo
        return userInfo?["data"] as! Data
    }
    .flatMap{ data in
        return Publishers.Just(data)
            .decode(type: MagicTrick.self, decoder: JSONDecoder())
            .catch { _ in
                return Publishers.Just(MagicTrick())
            }
    }
    .publisher(for: \.name)

var test = MagicTrick()
trickNamePublisher.assign(to: \.name, on: test)
当接受到通知后,发布者就会改变 test 的 name 属性。
Sinks
这个订阅者提供了一个简单的从上游订阅数据的能力,错误类型采用上游的错误类型,使用一个闭包执行接收到值的行为,非常简单方便。
let trickNamePublisher = ...// 上个例子里的发布者

trickNamePublisher.sink { value in
    print("name is \(value)")
}
Subject
有一些事物,它们同时承担着发布者和订阅者的角色,既可以发送消息,也可以接收消息。在 Combine 中,这类订阅者就是 Subject。它虽然是订阅者,却也有和发布者类似的发送值的能力。这可以让我们在数据流的过程中插入值给下游的订阅者。
Subject 是一个协议,定义了给下游的订阅者发送值的的方法:
public protocol Subject : AnyObject, Publisher {
    func send(_ value: Self.Output)
    func send(completion: Subscribers.Completion<Self.Failure>)
}
而发布者也有对应的方法可以添加 Subject。
extension Publisher {
    public func subscribe<S>(_ subject: S) -> AnyCancellable where S : Subject, Self.Failure == S.Failure, Self.Output == S.Output
}
Subject 有下面两种:
Passthrough
发送订阅操作发生后,上游发送的值才会发送给下游订阅者。
let trickNamePublisher = ...// 上个例子里的发布者

let magicWordsSubject = PassthroughSubject<String,Never>()

trickNamePublisher.subscribe(magicWordsSubject)

magicWordsSubject.sink { value in
    print("name is \(value)")
}

magicWordsSubject.send("magic!")
CurrentValue
在订阅时,会将上游发布者发送的值中最新一个发送给下游订阅者,之后和正常一样进行发送值。
SwiftUI 中的发布者
在今年发布的重磅框架 SwiftUI 中,底层的数据流也运用了 Combine 框架。SwiftUI 内部已经拥有订阅者,只需要开发者提供发布者用于描述你的数据在何时,如何变化,剩下的更新操作都有框架内部完成。
BindableObject
对自定义的数据类型适配,只需要遵循 BindableObject 协议,提供发布者具体类型,并提供一个 didChange 的发布者实例用于在数据改变时能发送消息。
public protocol BindableObject : AnyObject, DynamicViewProperty, Identifiable, _BindableObjectViewProperty {
    associatedtype PublisherType : Publisher where Self.PublisherType.Failure == Never
    var didChange: Self.PublisherType { get }
}
举个例子,当 model 被 set 的时候,就会触发属性观察的 didSet,里面调用了 didChange 发布者进行通知的发送(没有发送具体的值),这个通知会触发 SwiftUI 内部的 UI 更新流程(类似 React 的 setState),更多具体细节可以在 Session 226 - Data Flow Through SwiftUI 中找到。
class WizardModel: BindableObject {
    var trick: MagicTrick? { didSet { didChange.send() }  }
    let didChange = PassthroughSubject<Void, Never>()
}

struct TrickView: View {
    @ObjectBinding var model: WizardModel
    var body: some View {
        Text(model.trick?.name ?? "")
    }
}
Cancellation
Cancellation 是内置在 Combine 里的一个协议:
public protocol Cancellable {
    func cancel()
}
里面只定义了一个 cancel 方法,用于提前结束结束订阅。Combine 里还定义了 AnyCancellable,这个类会在 deinit 时自动执行 cancel 方法。
final public class AnyCancellable : Cancellable {
    public init(_ cancel: @escaping () -> Void)
    public init<C>(_ canceller: C) where C : Cancellable
    final public func cancel()
}
复杂的例子
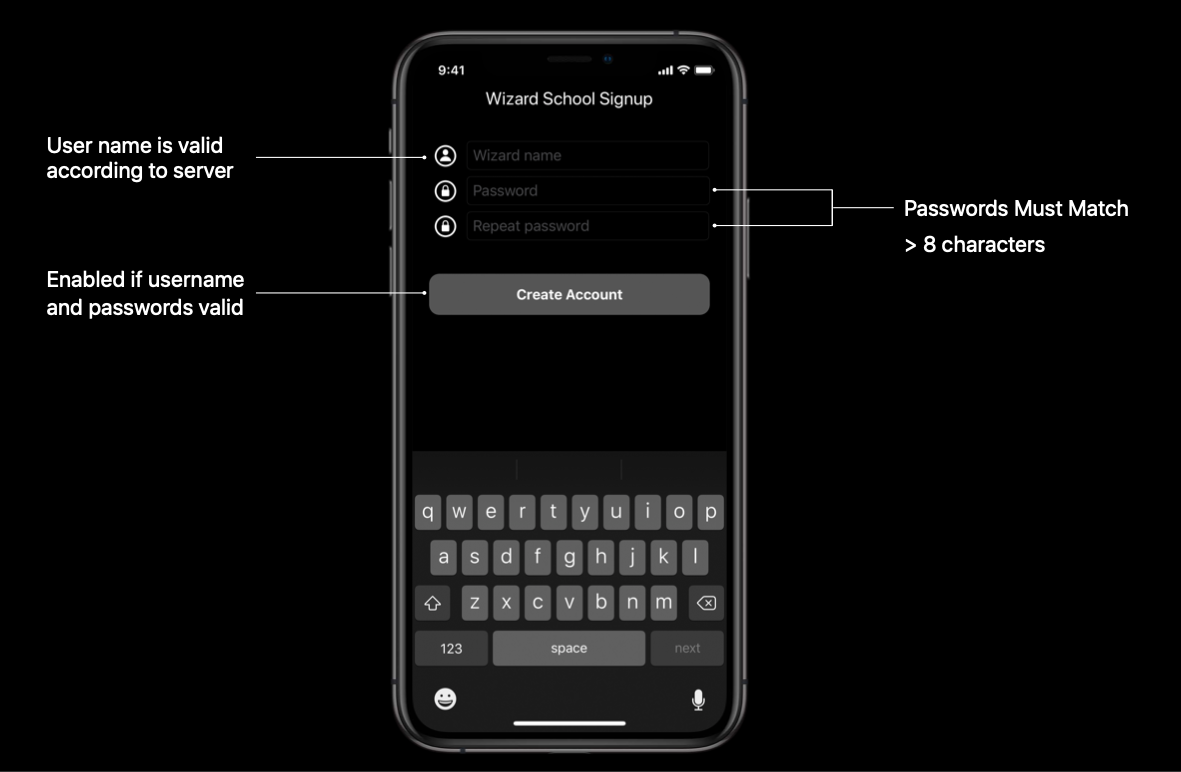
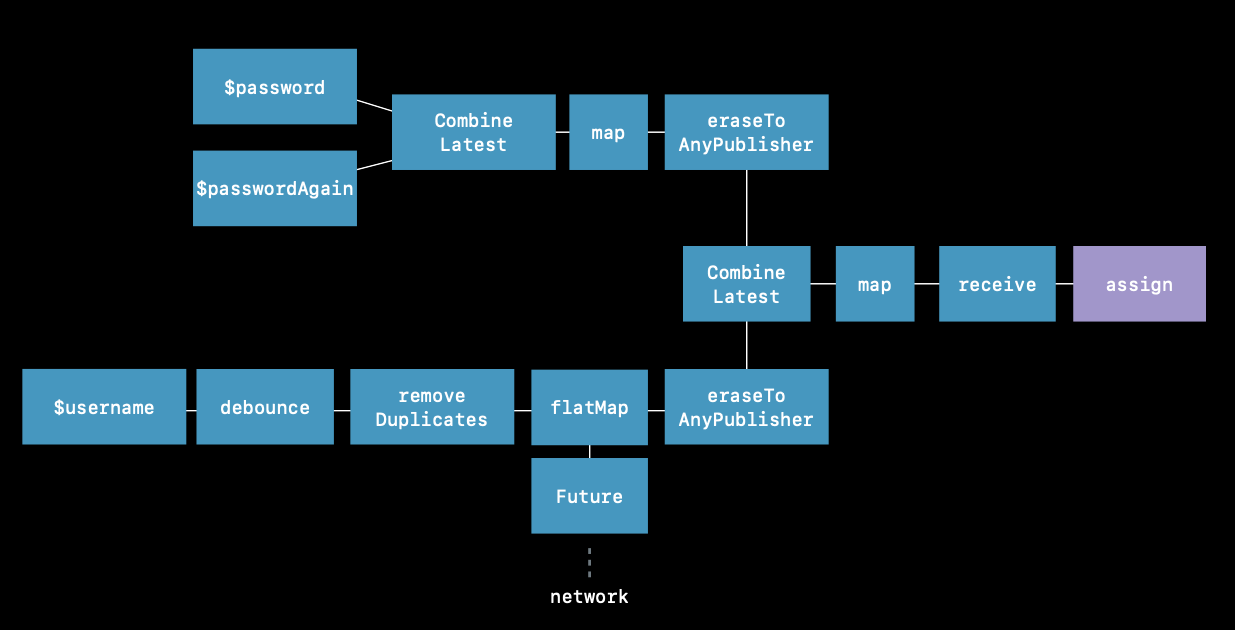
假设有一个登录界面,里面需要输入用户名和密码,用户名需要经过服务器的检验,密码需要超过 8 个字符且需要和重复密码匹配。用户名和密码都符合要求时,下面的按钮状态将变成可点击状态。用 Combine 来完成这个例子吧!
// 用注解给属性添加发布者
@Published var password: String = ""
@Published var passwordAgain: String = ""

var valiatedPassword: AnyPublisher<String?, Never> {
  	// 合并密码和重复密码发布者,当其中一个产生值时检查密码是否符合要求
    return Publishers.CombineLatest($password, $passwordAgain) { password, passwordAgain in
        guard password == passwordAgain, password.count > 8 else {
            return nil
        }
        return password
    }
  	// 可以判断密码是不是太简单,比如 12345678
    .map { $0 == "password1" ? nil : $0}
  	// 转换为 AnyPublisher
    .eraseToAnyPublisher()
}

@Published var username: String = ""

// 提交给服务器判断用户名是否合法,网络请求等异步行为
func usernameAvailable(_ username:String, completion:((Bool) -> ())) {
   // ...
}

var validatedUsername: AnyPublisher<String?, Never> {
  	// 限制产生值的频率
    return $username.debounce(for: 0.5, scheduler: RunLoop.main)
  			// 去重,重复的不需要再次检验
        .removeDuplicates()
  			// 转换成新的发布者
        .flatMap { username in
           	// 使用 Future 适配已有的异步操作
            return Publishers.Future { promise in
                usernameAvailable(username) { available in
                    promise(.success(available ? username : nil))
                }
            }
        }
  			// 转换为 AnyPublisher
        .eraseToAnyPublisher()
}

var validatedCredentials: AnyPublisher<(String,String)?,Never> {
  	// 合并检验密码和检验用户名发布者,均有合理值时发送
    return Publishers.CombineLatest(validatedUsername, valiatedPassword) { username, password -> (String, String)? in
        guard let a = username, let b = password else {
            return nil
        }
        return (a, b)
    }
    .eraseToAnyPublisher()
}

var signupButton:UIButton!

// 检查是否有合理的值
var signupButtonStream = validatedCredentials.map{ $0 != nil }
																						// 指定接收的调度者
                                            .receive(on: RunLoop.main)
																						// 使用 KVO Assign 订阅者改变 UI 状态
                                            .assign(to: \.isEnabled, on: signupButton)
总的来说,就是使用组合,将各种小的功能组合成完整的数据流。
Apple 官方对接入 Combine 给了以下一些建议:
- 使用多个自定义发布者将小部分的事情组合起来
- 逐步适配,一点点改造
- 在属性中优先使用 @Published 注解
- 使用 Future 将多个异步回调或者发布者组合起来
Use Combine Toady
Combine 清晰,易用,还有着苹果爸爸承诺对 Cocoa 框架 buff 加持,为什么不马上试试呢?
Recommend
About Joyk
Aggregate valuable and interesting links.
Joyk means Joy of geeK