

Vite 开发插件如何生成 .d.ts 类型声明文件
source link: https://segmentfault.com/a/1190000040127796
Go to the source link to view the article. You can view the picture content, updated content and better typesetting reading experience. If the link is broken, please click the button below to view the snapshot at that time.
Vite 开发插件如何生成 .d.ts 类型声明文件
随着 Vue3 生态的不断扩展与日渐成熟,Vue3 已从最开始的尝鲜阶段步入到投入生产项目中。随之而来的还有开发脚手架的更新换代,全新的 Vite 脚手架,基于 esbuild 利用 go 语言的性能优势,相较 Webpack 有着不在一个量级的性能优势,打包方面基于 Rollup 拓展,继承了轻量化和明朗的插件 Api 的优点。
什么,你还不知道?你该抓紧了。
废话不多说,开始进入的正题。
本文重点讲述如何生成类型声明文件,因此项目创建部分只一些简单描述。
通过官方提供的模版快速搭建一个简单的项目:
yarn create @vitejs/app my-vue-app --template vue-ts随后更名 src/main.ts 为 src/index.ts 并修改其内容:
export { default as App } from './App.vue'不要在意 App 这个名字,我们只是假设我们写了一个组件,并且作为插件导出。
接着调整 vite.config.ts 的配置为库模式打包:
import { resolve } from 'path'
import { defineConfig } from 'vite'
import vue from '@vitejs/plugin-vue'

export default defineConfig({
  build: {
    lib: {
      entry: resolve(__dirname, 'src/index.ts'),
      name: 'Plugin',
      formats: ['es'],
      fileName: 'index'
    }
  },
  plugins: [vue()]
})
至此,一个简单的插件项目就完成了。
生成类型声明文件
以前在开发 Rollup 插件时,我们主要借助 rollup-plugin-typescript2 这个插件来实现根据源码生成 .d.ts 声明文件。
但是该插件存在几个问题,一是无法解析 .vue 文件,二是在 Vite + Vue3 的环境下,存在不兼容性(三是 Vite 内部支持 typescript,该插件存在很大部分的重复功能),说白了就是不太靠谱。
当然,也有人在 issue 中提出希望 Vite 内部支持在库模式打包时导出声明文件,但 Vite 官方表示不希望因此增加维护的负担和结构的复杂性。
因此在 Vite 开发中,我们要想一些其他办法来生成声明文件。
本文介绍的生成方式还是依赖一些现成的库,然后通过一些编程脚本以达到目的,毕竟从打包原理开始讲,那篇幅可能不太够。
安装生成声明文件用到的库:
yarn add ts-morph -D其实 .vue 文件想要生成类型声明文件的核心点在于把 <script> 部分的内容提取出来进行解析,当明白了这个原理后,其实很多东西就很简单了。
新建 scripts/build-types.js 后开始编写我们的脚本。
const path = require('path')
const fs = require('fs')
const glob = require('fast-glob')
const { Project } = require('ts-morph')
const { parse, compileScript } = require('@vue/compiler-sfc')

let index = 1

main()

async function main() {
  // 这部分内容具体可以查阅 ts-morph 的文档
  // 这里仅需要知道这是用来处理 ts 文件并生成类型声明文件即可
  const project = new Project({
    compilerOptions: {
      declaration: true,
      emitDeclarationOnly: true,
      noEmitOnError: true,
      allowJs: true, // 如果想兼容 js 语法需要加上
      outDir: 'dist' // 可以设置自定义的打包文件夹,如 'types'
    },
    tsConfigFilePath: path.resolve(__dirname, '../tsconfig.json'),
    skipAddingFilesFromTsConfig: true
  })

  // 获取 src 下的 .vue 和 .ts 文件
  const files = await glob(['src/**/*.ts', 'src/**/*.vue'])
  const sourceFiles = []

  await Promise.all(
    files.map(async file => {
      if (/\.vue$/.test(file)) {
        // 对于 vue 文件,借助 @vue/compiler-sfc 的 parse 进行解析
        const sfc = parse(await fs.promises.readFile(file, 'utf-8'))
        // 提取出 script 中的内容
        const { script, scriptSetup } = sfc.descriptor

        if (script || scriptSetup) {
          let content = ''
          let isTs = false

          if (script && script.content) {
            content += script.content

            if (script.lang === 'ts') isTs = true
          }

          if (scriptSetup) {
            const compiled = compileScript(sfc.descriptor, {
              id: `${index++}`
            })

            content += compiled.content

            if (scriptSetup.lang === 'ts') isTs = true
          }

          sourceFiles.push(
            // 创建一个同路径的同名 ts/js 的映射文件
            project.createSourceFile(file + (isTs ? '.ts' : '.js'), content)
          )
        }
      } else {
        // 如果是 ts 文件则直接添加即可
        sourceFiles.push(project.addSourceFileAtPath(file))
      }
    })
  )

  const diagnostics = project.getPreEmitDiagnostics()

  // 输出解析过程中的错误信息
  console.log(project.formatDiagnosticsWithColorAndContext(diagnostics))

  project.emitToMemory()

  // 随后将解析完的文件写道打包路径
  for (const sourceFile of sourceFiles) {
    const emitOutput = sourceFile.getEmitOutput()

    for (const outputFile of emitOutput.getOutputFiles()) {
      const filePath = outputFile.getFilePath()

      await fs.promises.mkdir(path.dirname(filePath), { recursive: true })
      await fs.promises.writeFile(filePath, outputFile.getText(), 'utf8')
    }
  }
}
在 package.json 添加一个打包类型文件的命令:
{
  "scripts": {
    "build:types": "node scripts/build-types.js"
  }
}
在项目根路径下,执行以下命令:
yarn run build:types大功告成,可以看到 dist 目录下已经有了 index.d.ts、App.vue.d.ts 等类型声明文件。
Vite 插件
其实,在 Vite 打包的过程中,@vitejs/plugin-vue 插件会将 .vue 文件编译并拆分成三个部分,包括模版,脚本和样式;我们只需要拿到编译后的脚本部分的内容,通过上面的方法,甚至不需要自己编译文件,就可以轻松生成类型声明文件。
创建 plugins/dts.ts,开始撸代码:
import { resolve, dirname } from 'path'
import fs from 'fs/promises'
import { createFilter } from '@rollup/pluginutils'
import { normalizePath } from 'vite'
import { Project } from 'ts-morph'

import type { Plugin } from 'vite'
import type { SourceFile } from 'ts-morph'

export default (): Plugin => {
  const filter = createFilter(['**/*.vue', '**/*.ts'], 'node_modules/**')
  const sourceFiles: SourceFile[] = []

  const project = new Project({
    compilerOptions: {
      declaration: true,
      emitDeclarationOnly: true,
      noEmitOnError: true,
      allowJs: true, // 如果想兼容 js 语法需要加上
      outDir: 'dist' // 可以设置自定义的打包文件夹,如 'types'
    },
    tsConfigFilePath: resolve(__dirname, '../tsconfig.json'),
    skipAddingFilesFromTsConfig: true
  })

  let root: string

  return {
    name: 'gen-dts',
    apply: 'build',
    enforce: 'pre', // 需要在 pre 才能正确拿到 ts 的 script 部分
    configResolved(config) {
      root = config.root
    },
    transform(code, id) {
      if (!code || !filter(id)) return null

      // 拆分后的文件 id 具有一些特征,可以用正则的方式来捕获
      if (/\.vue(\?.*type=script.*)$/.test(id)) {
        const filePath = resolve(root, normalizePath(id.split('?')[0]))

        sourceFiles.push(
          project.createSourceFile(filePath + (/lang.ts/.test(id) ? '.ts' : '.js'), code)
        )
      } else if (/\.ts$/.test(id)) {
        const filePath = resolve(root, normalizePath(id))

        sourceFiles.push(project.addSourceFileAtPath(filePath))
      }
    },
    async generateBundle() {
      const diagnostics = project.getPreEmitDiagnostics()

      // 输出解析过程中的错误信息
      console.log(project.formatDiagnosticsWithColorAndContext(diagnostics))

      project.emitToMemory()

      // 随后将解析完的文件写道打包路径
      for (const sourceFile of sourceFiles) {
        const emitOutput = sourceFile.getEmitOutput()

        for (const outputFile of emitOutput.getOutputFiles()) {
          const filePath = outputFile.getFilePath()

          await fs.mkdir(dirname(filePath), { recursive: true })
          await fs.writeFile(filePath, outputFile.getText(), 'utf8')
        }
      }
    }
  }
}
如此轻松,一个简单的 dts 插件就完成了。
我们只需要在 vite.config.ts 中引用插件:
import { resolve } from 'path'
import { defineConfig } from 'vite'
import vue from '@vitejs/plugin-vue'
import dts from './plugins/dts'

export default defineConfig({
  build: {
    lib: {
      entry: resolve(__dirname, 'src/index.ts'),
      name: 'Plugin',
      formats: ['es'],
      fileName: 'index'
    }
  },
  plugins: [vue(), dts()]
})
然后执行原来的命令,就可以看到打包和生成类型声明文件一气呵成了:
yarn run build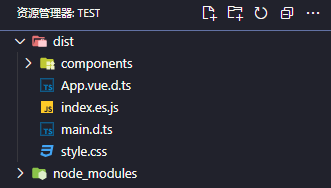
当然了,上述插件只包含了最基础的功能,笔者自己写了一个涵盖功能更加广泛的插件,源码已放在 github 上,同时 npm 也进行了发布。
yarn add vite-plugin-dts -D欢迎大家进行使用和反馈,如果觉得这对你有所帮助,还请点赞、收藏,和赏一颗⭐。
插件地址:https://github.com/qmhc/vite-...
最后偷偷安利一下自己撸的 Vue3 组件库,目前主要给公司项目使用中:vexip-ui
Recommend
About Joyk
Aggregate valuable and interesting links.
Joyk means Joy of geeK