

从源码剖析Go语言基于信号抢占式调度
source link: https://www.luozhiyun.com/archives/485
Go to the source link to view the article. You can view the picture content, updated content and better typesetting reading experience. If the link is broken, please click the button below to view the snapshot at that time.
从源码剖析Go语言基于信号抢占式调度
转载请声明出处哦~,本篇文章发布于luozhiyun的博客:https://www.luozhiyun.com/archives/485
本文使用的go的源码15.7
这一次来讲讲Go的基于信号式抢占式调度。
在 Go 的 1.14 版本之前抢占试调度都是基于协作的,需要自己主动的让出执行,但是这样是无法处理一些无法被抢占的边缘情况。例如:for 循环或者垃圾回收长时间占用线程,这些问题中的一部分直到 1.14 才被基于信号的抢占式调度解决。
下面我们通过一个例子来验证一下1.14 版本和 1.13 版本之间的抢占差异:
package main

import (
    "fmt"
    "os"
    "runtime"
    "runtime/trace"
    "sync"
)

func main() {
    runtime.GOMAXPROCS(1)
    f, _ := os.Create("trace.output")
    defer f.Close()
    _ = trace.Start(f)
    defer trace.Stop()
    var wg sync.WaitGroup
    for i := 0; i < 30; i++ {
        wg.Add(1)
        go func() {
            defer wg.Done()
            t := 0
            for i:=0;i<1e8;i++ {
                t+=2
            }
            fmt.Println("total:", t)
        }()
    }
    wg.Wait()
}
这个例子中会通过 go trace 来进行执行过程的调用跟踪。在代码中指定 runtime.GOMAXPROCS(1)设置最大的可同时使用的 CPU 核数为1,只用一个 P(处理器),这样就确保是单处理器的场景。然后调用一个 for 循环开启 10 个 goroutines 来执行 func 函数,这是一个纯计算且耗时的函数,防止 goroutines 空闲让出执行。
下面我们编译程序分析 trace 输出:
$ go build -gcflags "-N -l" main.go
-N表示禁用优化
-l禁用内联

$ ./main
然后我们获取到 trace.output 文件后进行可视化展示:
$ go tool trace -http=":6060" ./trace.outputGo1.13 trace 分析
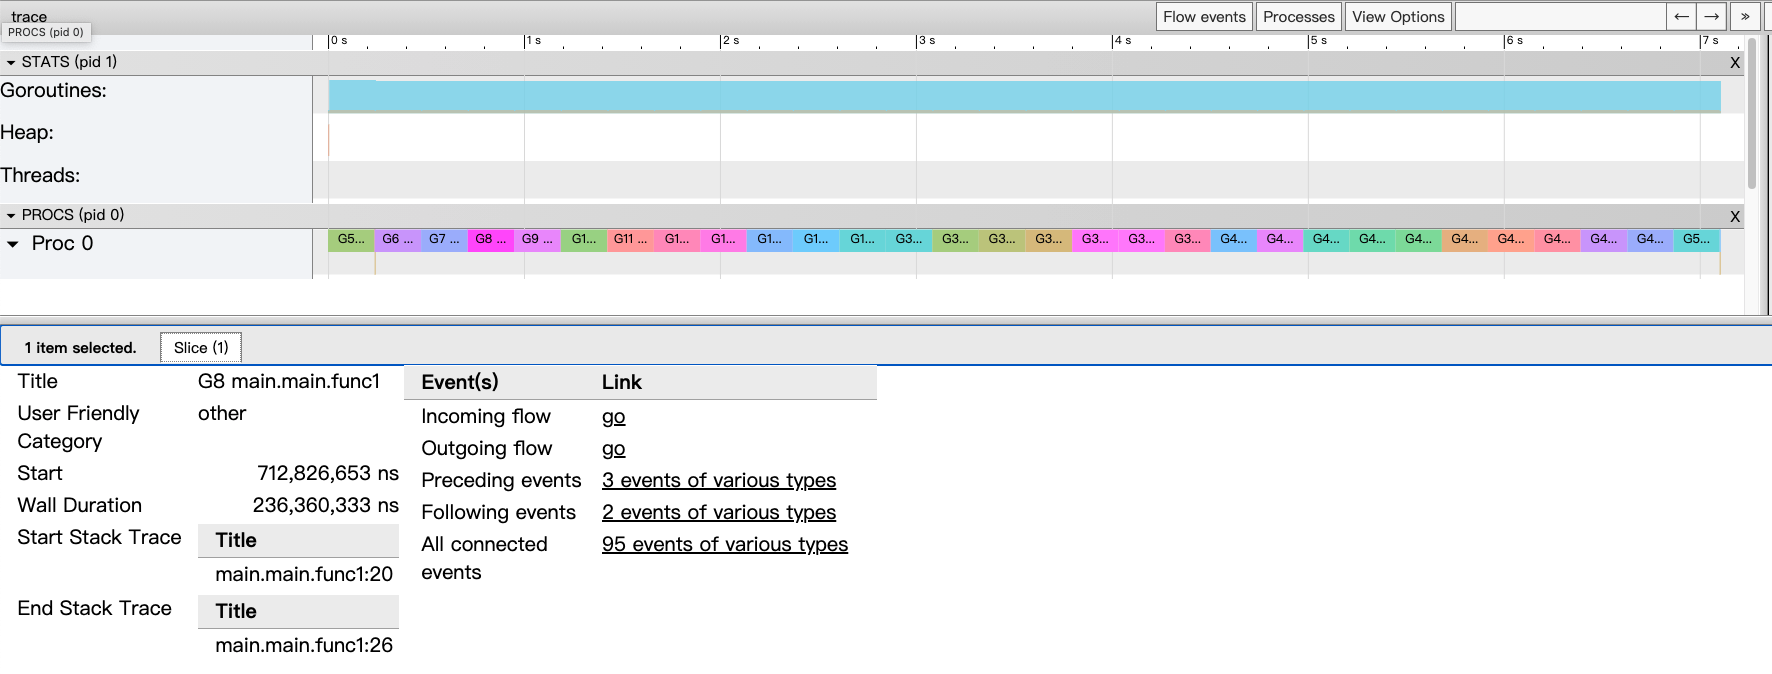
从上面的这个图可以看出:
- 因为我们限定了只有一个 P,所以在 PROCS 这一栏里面只有一个 Proc0;
- 我们在 for 循环里面启动了 30 个 goroutines ,所以我们可以数一下 Proc0 里面的颜色框框,刚好30 个;
- 30 个 goroutines 在 Proc0 里面是串行执行的,一个执行完再执行另一个,没有进行抢占;
- 随便点击一个 goroutines 的详情栏可以看到 Wall Duration 为 0.23s 左右,表示这个 goroutines 持续执行了 0.23s,总共 30 个 goroutines 执行时间是 7s 左右;
- 切入调用栈 Start Stack Trace 是 main.main.func1:20,在代码上面是 func 函数执行头:
go func(); - 切走调用栈 End Stack Trace 是 main.main.func1:26,在代码上是 func 函数最后执行打印:
fmt.Println("total:", t);
从上面的 trace 分析可以知道,Go 的协作式调度对 calcSum 函数是毫无作用的,一旦执行开始,只能等执行结束。每个 goroutine 耗费了 0.23s 这么长的时间,也无法抢占它的执行权。
Go 1.14 以上 trace 分析
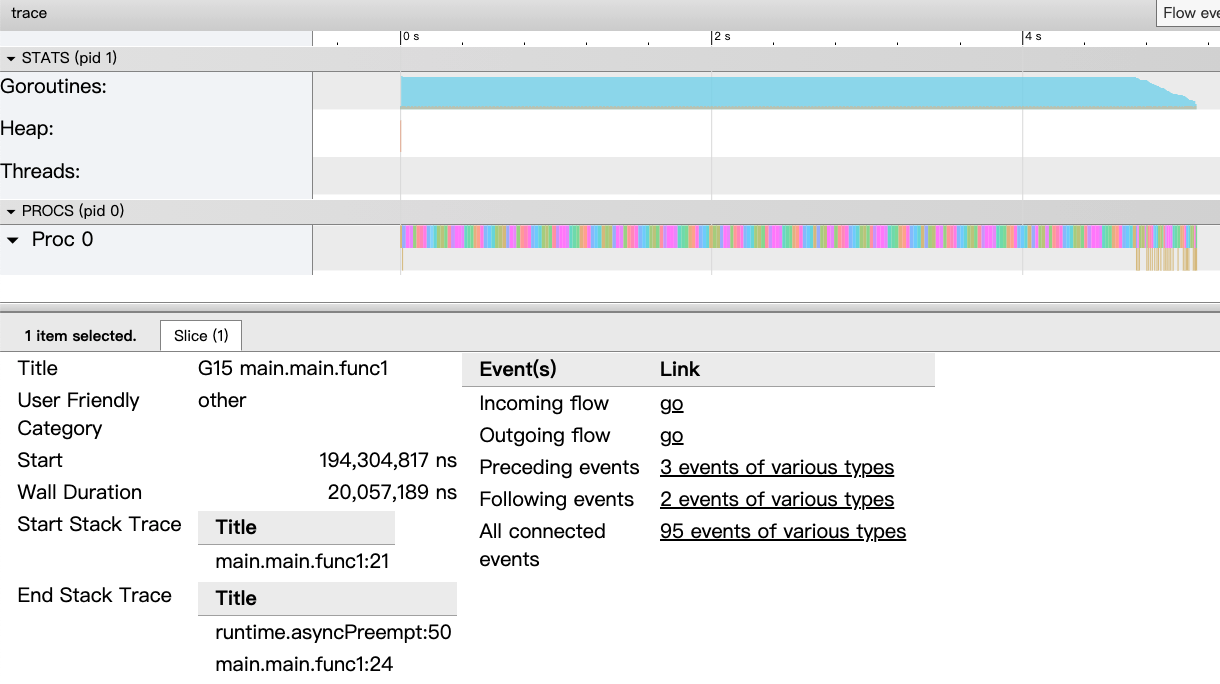
在 Go 1.14 之后引入了基于信号的抢占式调度,从上面的图可以看到 Proc0 这一栏中密密麻麻都是 goroutines 在切换时的调用情况,不会再出现 goroutines 一旦执行开始,只能等执行结束这种情况。
上面跑动的时间是 4s 左右这个情况可以忽略,因为我是在两台配置不同的机器上跑的(主要是我嫌麻烦要找两台一样的机器)。
下面我们拉近了看一下明细情况:

通过这个明细可以看出:
- 这个 goroutine 运行了 0.025s 就让出执行了;
- 切入调用栈 Start Stack Trace 是 main.main.func1:21,和上面一样;
- 切走调用栈 End Stack Trace 是 runtime.asyncPreempt:50 ,这个函数是收到抢占信号时执行的函数,从这个地方也能明确的知道,被异步抢占了;
抢占信号的安装
runtime/signal_unix.go
程序启动时,在runtime.sighandler中注册 SIGURG 信号的处理函数runtime.doSigPreempt。
initsig
func initsig(preinit bool) {
    // 预初始化
    if !preinit {
        signalsOK = true
    }
    //遍历信号数组
    for i := uint32(0); i < _NSIG; i++ {
        t := &sigtable[i]
        //略过信号:SIGKILL、SIGSTOP、SIGTSTP、SIGCONT、SIGTTIN、SIGTTOU
        if t.flags == 0 || t.flags&_SigDefault != 0 {
            continue
        }
        ...
        setsig(i, funcPC(sighandler))
    }
}
在 initsig 函数里面会遍历所有的信号量,然后调用 setsig 函数进行注册。我们可以查看 sigtable 这个全局变量看看有什么信息:
var sigtable = [...]sigTabT{
    /* 0 */ {0, "SIGNONE: no trap"},
    /* 1 */ {_SigNotify + _SigKill, "SIGHUP: terminal line hangup"},
    /* 2 */ {_SigNotify + _SigKill, "SIGINT: interrupt"},
    /* 3 */ {_SigNotify + _SigThrow, "SIGQUIT: quit"},
    /* 4 */ {_SigThrow + _SigUnblock, "SIGILL: illegal instruction"},
    /* 5 */ {_SigThrow + _SigUnblock, "SIGTRAP: trace trap"},
    /* 6 */ {_SigNotify + _SigThrow, "SIGABRT: abort"},
    /* 7 */ {_SigPanic + _SigUnblock, "SIGBUS: bus error"},
    /* 8 */ {_SigPanic + _SigUnblock, "SIGFPE: floating-point exception"},
    /* 9 */ {0, "SIGKILL: kill"},
    /* 10 */ {_SigNotify, "SIGUSR1: user-defined signal 1"},
    /* 11 */ {_SigPanic + _SigUnblock, "SIGSEGV: segmentation violation"},
    /* 12 */ {_SigNotify, "SIGUSR2: user-defined signal 2"},
    /* 13 */ {_SigNotify, "SIGPIPE: write to broken pipe"},
    /* 14 */ {_SigNotify, "SIGALRM: alarm clock"},
    /* 15 */ {_SigNotify + _SigKill, "SIGTERM: termination"},
    /* 16 */ {_SigThrow + _SigUnblock, "SIGSTKFLT: stack fault"},
    /* 17 */ {_SigNotify + _SigUnblock + _SigIgn, "SIGCHLD: child status has changed"},
    /* 18 */ {_SigNotify + _SigDefault + _SigIgn, "SIGCONT: continue"},
    /* 19 */ {0, "SIGSTOP: stop, unblockable"},
    /* 20 */ {_SigNotify + _SigDefault + _SigIgn, "SIGTSTP: keyboard stop"},
    /* 21 */ {_SigNotify + _SigDefault + _SigIgn, "SIGTTIN: background read from tty"},
    /* 22 */ {_SigNotify + _SigDefault + _SigIgn, "SIGTTOU: background write to tty"},

    /* 23 */ {_SigNotify + _SigIgn, "SIGURG: urgent condition on socket"},
    /* 24 */ {_SigNotify, "SIGXCPU: cpu limit exceeded"},
    /* 25 */ {_SigNotify, "SIGXFSZ: file size limit exceeded"},
    /* 26 */ {_SigNotify, "SIGVTALRM: virtual alarm clock"},
    /* 27 */ {_SigNotify + _SigUnblock, "SIGPROF: profiling alarm clock"},
    /* 28 */ {_SigNotify + _SigIgn, "SIGWINCH: window size change"},
    /* 29 */ {_SigNotify, "SIGIO: i/o now possible"},
    /* 30 */ {_SigNotify, "SIGPWR: power failure restart"},
    /* 31 */ {_SigThrow, "SIGSYS: bad system call"},
    /* 32 */ {_SigSetStack + _SigUnblock, "signal 32"}, /* SIGCANCEL; see issue 6997 */
    /* 33 */ {_SigSetStack + _SigUnblock, "signal 33"}, /* SIGSETXID; see issues 3871, 9400, 12498 */
    ...
}
具体的信号含义可以看这个介绍:Unix信号 https://zh.wikipedia.org/wiki/Unix%E4%BF%A1%E5%8F%B7。需要注意的是,抢占信号在这里是 _SigNotify + _SigIgn 如下:
{_SigNotify + _SigIgn, "SIGURG: urgent condition on socket"}下面我们看一下 setsig 函数,这个函数是在 runtime/os_linux.go文件里面:
setsig
func setsig(i uint32, fn uintptr) {
    var sa sigactiont
    sa.sa_flags = _SA_SIGINFO | _SA_ONSTACK | _SA_RESTORER | _SA_RESTART
    sigfillset(&sa.sa_mask)
    ...
    if fn == funcPC(sighandler) {
        // CGO 相关
        if iscgo {
            fn = funcPC(cgoSigtramp)
        } else {
            // 替换为调用 sigtramp
            fn = funcPC(sigtramp)
        }
    }
    sa.sa_handler = fn
    sigaction(i, &sa, nil)
}
这里需要注意的是,当 fn 等于 sighandler 的时候,调用的函数会被替换成 sigtramp。sigaction 函数在 Linux 下会调用系统调用函数 sys_signal 以及 sys_rt_sigaction 实现安装信号。
执行抢占信号
到了这里是信号发生的时候进行信号的处理,原本应该是在发送抢占信号之后,但是这里我先顺着安装信号往下先讲了。大家可以跳到发送抢占信号后再回来。
上面分析可以看到当 fn 等于 sighandler 的时候,调用的函数会被替换成 sigtramp,sigtramp是汇编实现,下面我们看看。
src/runtime/sys_linux_amd64.s:
TEXT runtime·sigtramp<ABIInternal>(SB),NOSPLIT,$72
    ...
    // We don't save mxcsr or the x87 control word because sigtrampgo doesn't
    // modify them.

    MOVQ    DX, ctx-56(SP)
    MOVQ    SI, info-64(SP)
    MOVQ    DI, signum-72(SP)
    MOVQ    $runtime·sigtrampgo(SB), AX
    CALL AX

    ...
RET这里会被调用说明信号已经发送响应了,runtime·sigtramp会进行信号的处理。runtime·sigtramp会继续调用 runtime·sigtrampgo 。
这个函数在 runtime/signal_unix.go文件中:
sigtrampgo&sighandler
func sigtrampgo(sig uint32, info *siginfo, ctx unsafe.Pointer) {
    if sigfwdgo(sig, info, ctx) {
        return
    }
    c := &sigctxt{info, ctx}
    g := sigFetchG(c)
    ...
    sighandler(sig, info, ctx, g)
    setg(g)
    if setStack {
        restoreGsignalStack(&gsignalStack)
    }
}

func sighandler(sig uint32, info *siginfo, ctxt unsafe.Pointer, gp *g) {
    _g_ := getg()
    c := &sigctxt{info, ctxt}
    ...
  // 如果是一个抢占信号
    if sig == sigPreempt && debug.asyncpreemptoff == 0 {
        // 处理抢占信号
        doSigPreempt(gp, c)
    }

    ...
}
sighandler 方法里面做了很多其他信号的处理工作,我们只关心抢占部分的代码,这里最终会通过 doSigPreempt 方法执行抢占。
这个函数在 runtime/signal_unix.go文件中:
doSigPreempt
func doSigPreempt(gp *g, ctxt *sigctxt) {
    // 检查此 G 是否要被抢占并且可以安全地抢占
    if wantAsyncPreempt(gp) {
        // 检查是否能安全的进行抢占
        if ok, newpc := isAsyncSafePoint(gp, ctxt.sigpc(), ctxt.sigsp(), ctxt.siglr()); ok {
            // 修改寄存器,并执行抢占调用
            ctxt.pushCall(funcPC(asyncPreempt), newpc)
        }
    }

    // 更新一下抢占相关字段
    atomic.Xadd(&gp.m.preemptGen, 1)
    atomic.Store(&gp.m.signalPending, 0)
}
函数会处理抢占信号,获取当前的 SP 和 PC 寄存器并调用 ctxt.pushCall修改寄存器,并调用 runtime/preempt.go 的 asyncPreempt 函数。
// 保存用户态寄存器后调用asyncPreempt2
func asyncPreempt()
asyncPreempt 的汇编代码在 src/runtime/preempt_amd64.s中,该函数会保存用户态寄存器后调用 runtime/preempt.go 的 asyncPreempt2 函数中:
asyncPreempt2
func asyncPreempt2() {
    gp := getg()
    gp.asyncSafePoint = true
    // 该 G 是否可以被抢占
    if gp.preemptStop {
        mcall(preemptPark)
    } else {
        // 让 G 放弃当前在 M 上的执行权利,将 G 放入全局队列等待后续调度
        mcall(gopreempt_m)
    }
    gp.asyncSafePoint = false
}
该函数会获取当前 G ,然后判断 G 的 preemptStop 值,preemptStop 会在调用 runtime/preempt.go的 suspendG 函数的时候将 _Grunning 状态的 Goroutine 标记成可以被抢占 gp.preemptStop = true,表示该 G 可以被抢占。
下面我们看一下执行抢占任务会调用的 runtime/proc.go的 preemptPark函数:
preemptPark
func preemptPark(gp *g) {

    status := readgstatus(gp)
    if status&^_Gscan != _Grunning {
        dumpgstatus(gp)
        throw("bad g status")
    }
    gp.waitreason = waitReasonPreempted
    casGToPreemptScan(gp, _Grunning, _Gscan|_Gpreempted)
    // 使当前 m 放弃 g,让出线程
    dropg()
    // 修改当前 Goroutine 的状态到 _Gpreempted
    casfrom_Gscanstatus(gp, _Gscan|_Gpreempted, _Gpreempted)
    // 并继续执行调度
    schedule()
}
preemptPark 会修改当前 Goroutine 的状态到 _Gpreempted ,调用 dropg 让出线程,最后调用 schedule 函数继续执行其他 Goroutine 的任务循环调度。
gopreempt_m
gopreempt_m 方法比起抢占更像是主动让权,然后重新加入到执行队列中等待调度。
func gopreempt_m(gp *g) {
    goschedImpl(gp)
}

func goschedImpl(gp *g) {
    status := readgstatus(gp)
    ...
  // 更新状态为 _Grunnable
    casgstatus(gp, _Grunning, _Grunnable)
  // 使当前 m 放弃 g,让出线程
    dropg()
    lock(&sched.lock)
  // 重新加入到全局执行队列中
    globrunqput(gp)
    unlock(&sched.lock)
    // 并继续执行调度
    schedule()
}
抢占信号发送
抢占信号的发送是由 preemptM 进行的。
这个函数在runtime/signal_unix.go文件中:
preemptM
const sigPreempt = _SIGURG

func preemptM(mp *m) {
    ...
    if atomic.Cas(&mp.signalPending, 0, 1) {

        // preemptM 向 M 发送抢占请求。
        // 接收到该请求后,如果正在运行的 G 或 P 被标记为抢占,并且 Goroutine 处于异步安全点,
        // 它将抢占 Goroutine。
        signalM(mp, sigPreempt)
    }
}
preemptM 这个函数会调用 signalM 将在初始化的安装的 _SIGURG 信号发送到指定的 M 上。
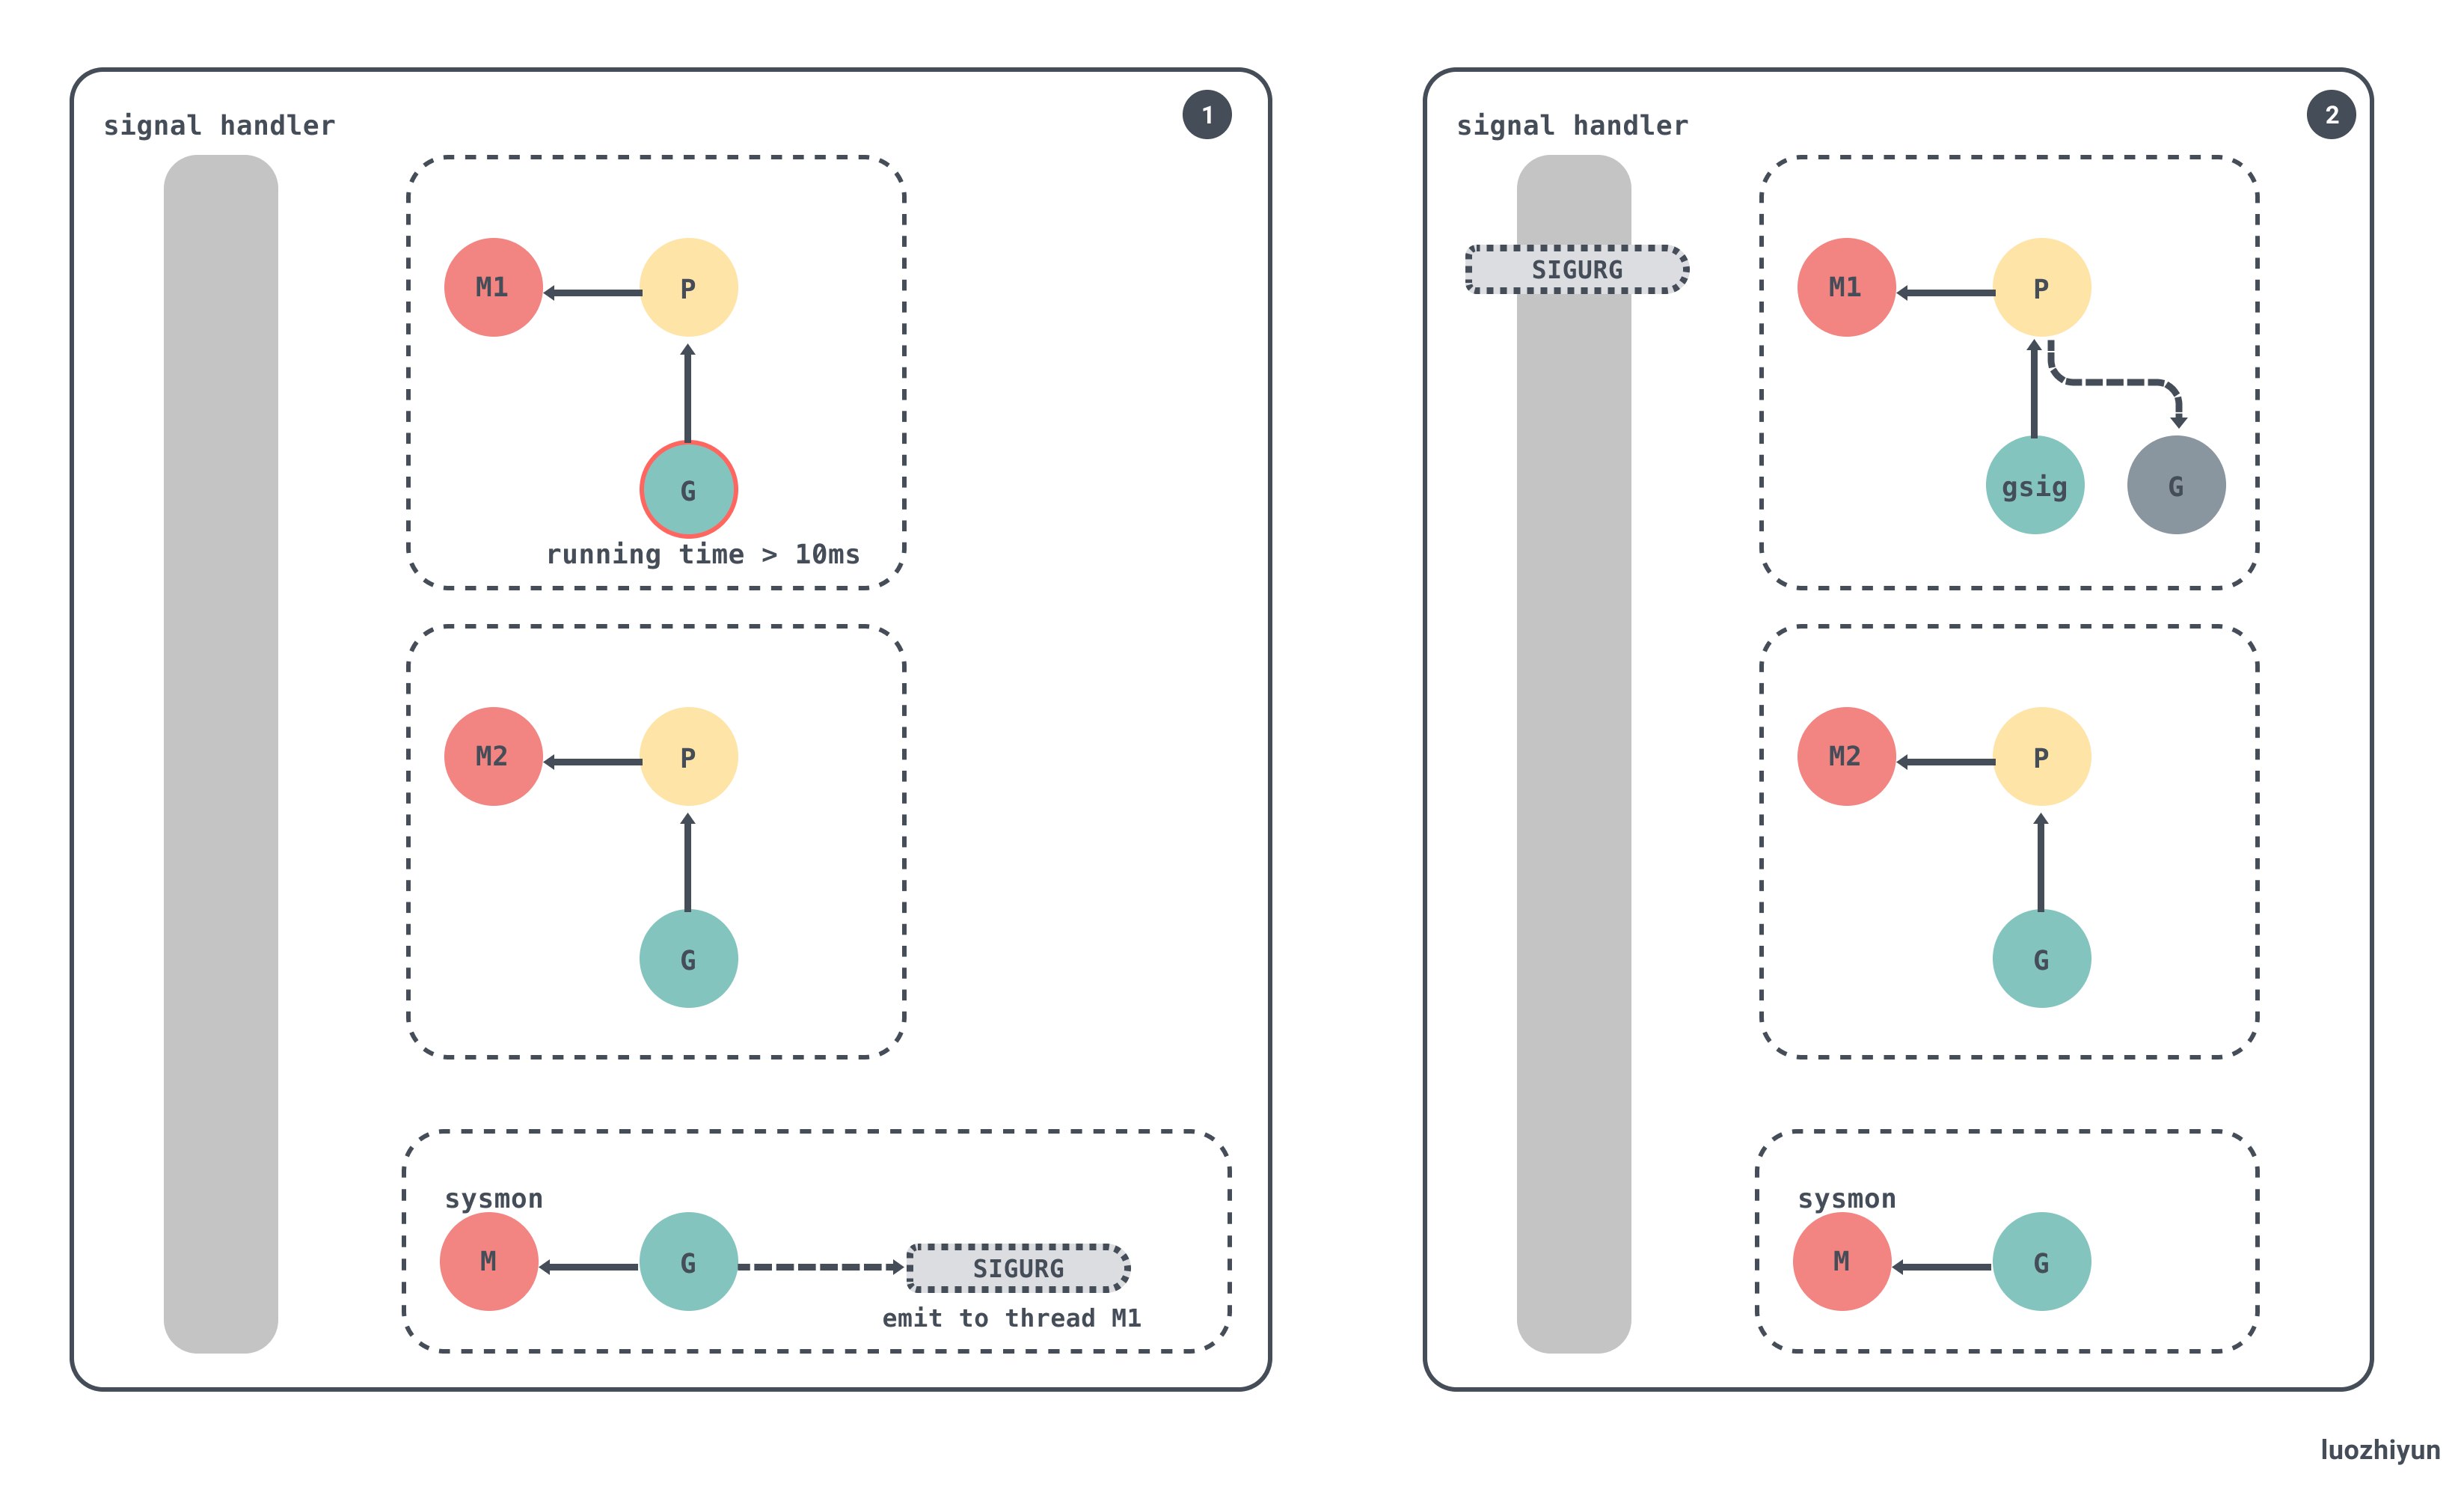
使用 preemptM 发送抢占信号的地方主要有下面几个:
- Go 后台监控 runtime.sysmon 检测超时发送抢占信号;
- Go GC 栈扫描发送抢占信号;
- Go GC STW 的时候调用 preemptall 抢占所有 P,让其暂停;
Go 后台监控执行抢占
系统监控 runtime.sysmon 会在循环中调用 runtime.retake抢占处于运行或者系统调用中的处理器,该函数会遍历运行时的全局处理器。
系统监控通过在循环中抢占主要是为了避免 G 占用 M 的时间过长造成饥饿。
runtime.retake主要分为两部分:
- 调用 preemptone 抢占当前处理器;
-
调用 handoffp 让出处理器的使用权;
抢占当前处理器
func retake(now int64) uint32 {
    n := 0

    lock(&allpLock)
    // 遍历 allp 数组
    for i := 0; i < len(allp); i++ {
        _p_ := allp[i]
        if _p_ == nil {
            continue
        }
        pd := &_p_.sysmontick
        s := _p_.status
        sysretake := false
        if s == _Prunning || s == _Psyscall {
            // 调度次数
            t := int64(_p_.schedtick)
            if int64(pd.schedtick) != t {
                pd.schedtick = uint32(t)
                // 处理器上次调度时间
                pd.schedwhen = now
            // 抢占 G 的执行,如果上一次触发调度的时间已经过去了 10ms
            } else if pd.schedwhen+forcePreemptNS <= now {
                preemptone(_p_)
                sysretake = true
            }
        }
        ...
    }
    unlock(&allpLock)
    return uint32(n)
}
这一过程会获取当前 P 的状态,如果处于 _Prunning 或者 _Psyscall 状态时,并且上一次触发调度的时间已经过去了 10ms,那么会调用 preemptone 进行抢占信号的发送,preemptone 在上面我们已经讲过了,这里就不再复述。
调用 handoffp 让出处理器的使用权
func retake(now int64) uint32 {
    n := 0
    lock(&allpLock)
    // 遍历 allp 数组
    for i := 0; i < len(allp); i++ {
        _p_ := allp[i]
        if _p_ == nil {
            continue
        }
        pd := &_p_.sysmontick
        s := _p_.status
        sysretake := false
        ...
        if s == _Psyscall {
            // 系统调用的次数
            t := int64(_p_.syscalltick)
            if !sysretake && int64(pd.syscalltick) != t {
                pd.syscalltick = uint32(t)
                // 系统调用的时间
                pd.syscallwhen = now
                continue
            }
            if runqempty(_p_) && atomic.Load(&sched.nmspinning)+atomic.Load(&sched.npidle) > 0 && pd.syscallwhen+10*1000*1000 > now {
                continue
            }
            unlock(&allpLock)
            incidlelocked(-1)
            if atomic.Cas(&_p_.status, s, _Pidle) {
                n++
                _p_.syscalltick++
                // 让出处理器的使用权
                handoffp(_p_)
            }
            incidlelocked(1)
            lock(&allpLock)
        }
    }
    unlock(&allpLock)
    return uint32(n)
}
这一过程会判断 P 的状态如果处于 _Psyscall 状态时,会进行一个判断,有一个不满足则调用 handoffp 让出 P 的使用权:
runqempty(_p_):判断 P 的任务队列是否为空;atomic.Load(&sched.nmspinning)+atomic.Load(&sched.npidle):nmspinning 表示正在窃取 G 的数量,npidle 表示空闲 P 的数量,判断是否存在空闲 P 和正在进行调度窃取 G 的 P;pd.syscallwhen+10*1000*1000 > now:判断是否系统调用时间超过了 10ms ;
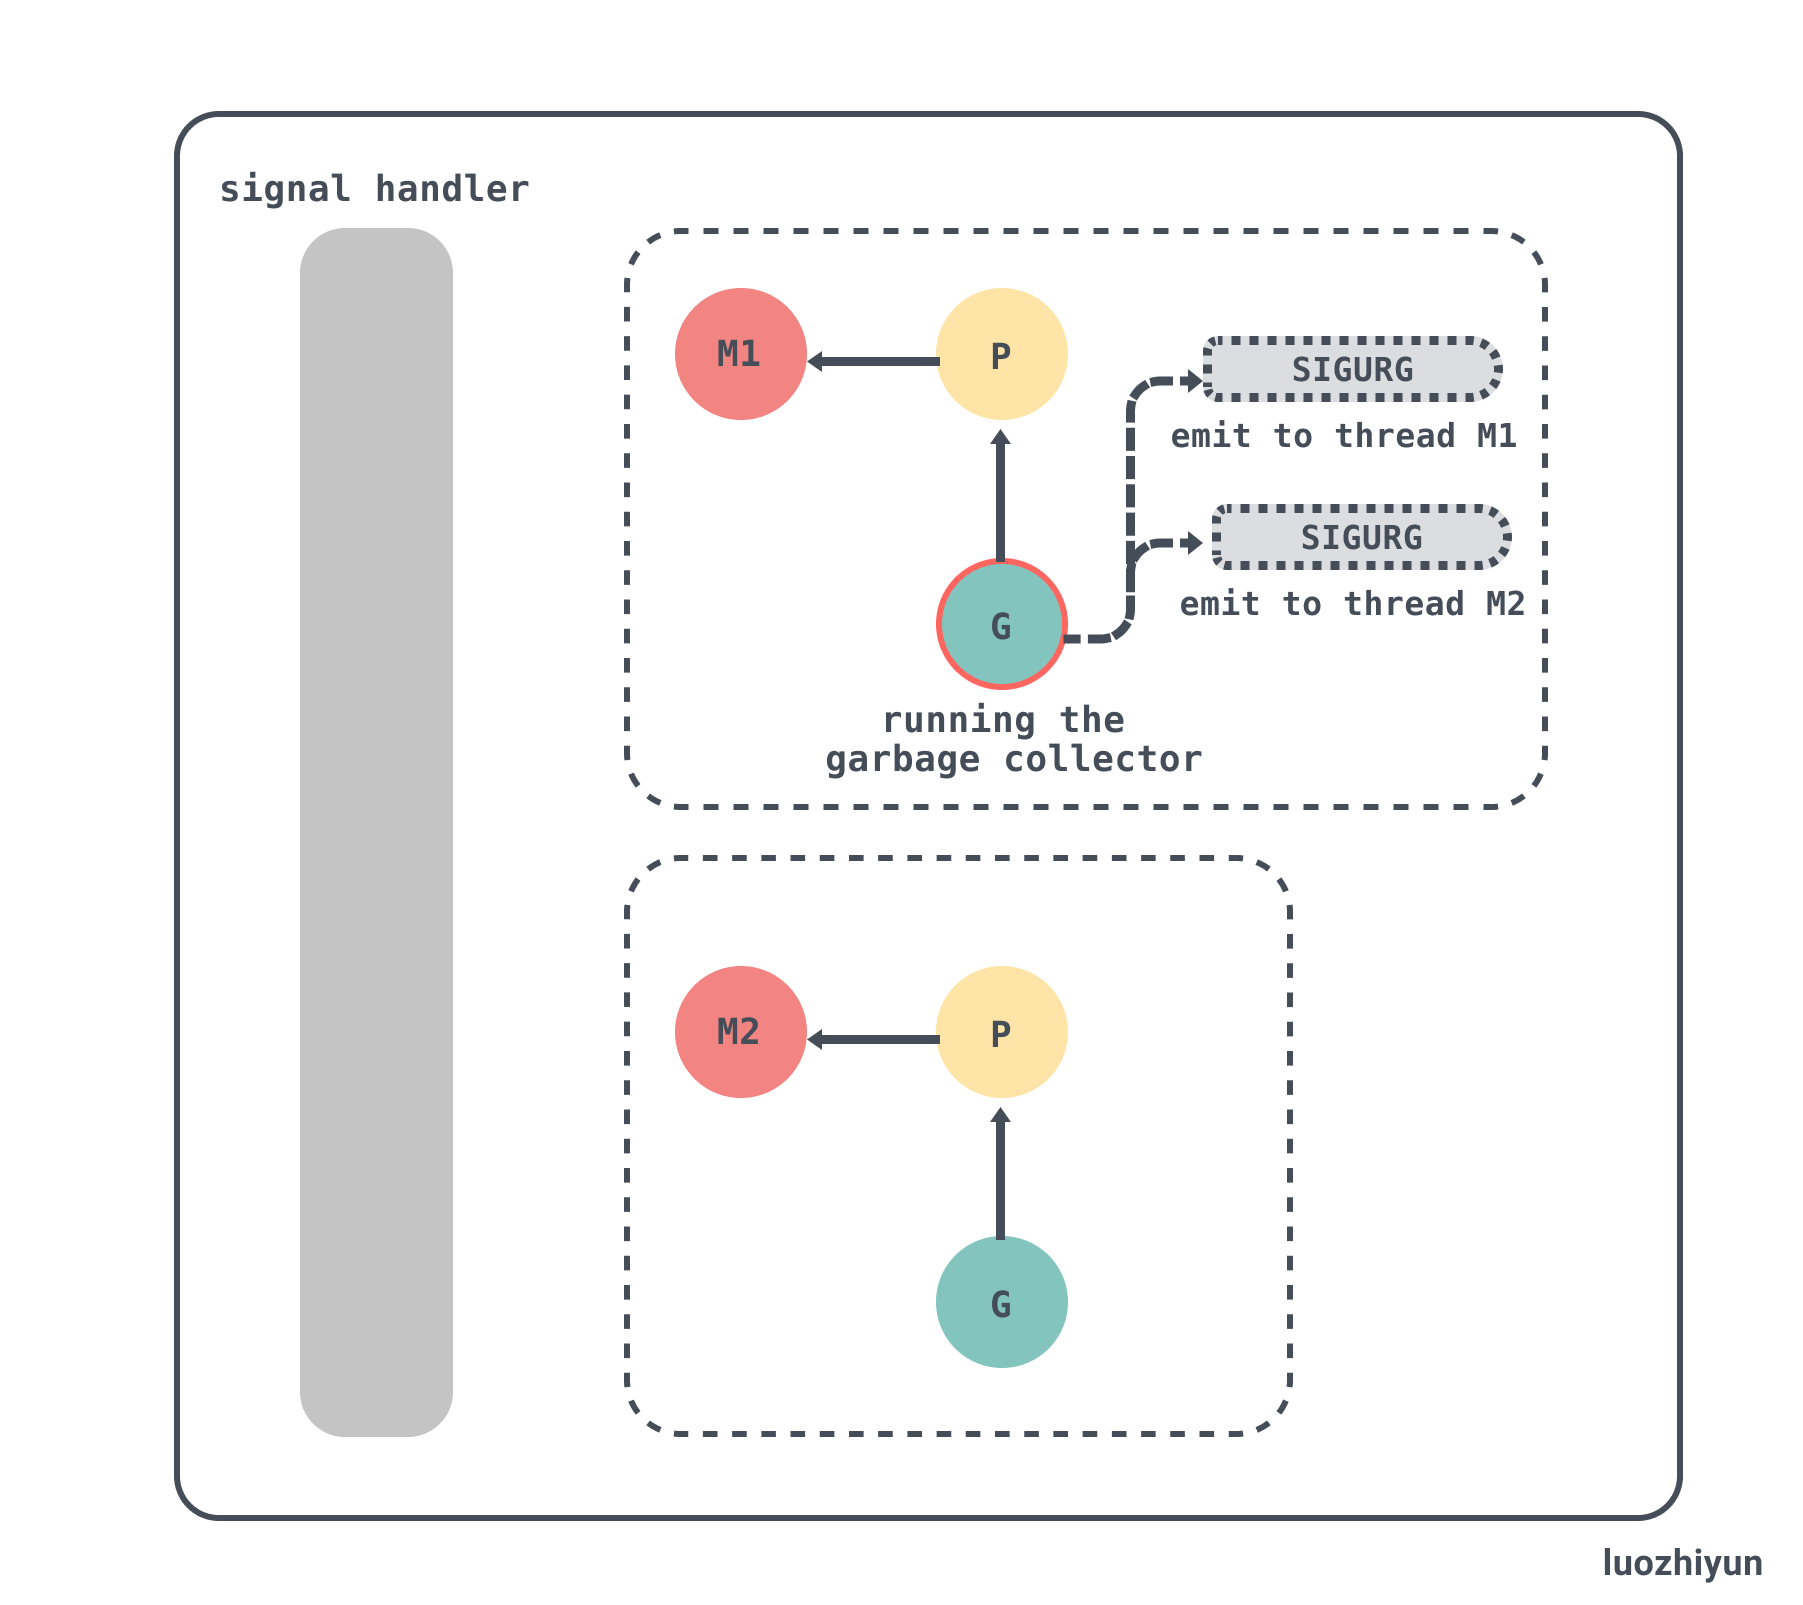
Go GC 栈扫描发送抢占信号
GC 相关的内容可以看这篇:《Go语言GC实现原理及源码分析 https://www.luozhiyun.com/archives/475》。Go 在 GC 时对 GC Root 进行标记的时候会扫描 G 的栈,扫描之前会调用 suspendG 挂起 G 的执行才进行扫描,扫描完毕之后再次调用 resumeG 恢复执行。
该函数在:runtime/mgcmark.go:
markroot
func markroot(gcw *gcWork, i uint32) {
    ...
    switch {
    ...
    // 扫描各个 G 的栈
    default:
        // 获取需要扫描的 G
        var gp *g
        if baseStacks <= i && i < end {
            gp = allgs[i-baseStacks]
        } else {
            throw("markroot: bad index")
        }
        ...
        // 转交给g0进行扫描
        systemstack(func() {
            ...
            // 挂起 G,让对应的 G 停止运行
            stopped := suspendG(gp)
            if stopped.dead {
                gp.gcscandone = true
                return
            }
            if gp.gcscandone {
                throw("g already scanned")
            }
            // 扫描g的栈
            scanstack(gp, gcw)
            gp.gcscandone = true
            // 恢复该 G 的执行
            resumeG(stopped)
        })
    }
}
markroot 在扫描栈之前会切换到 G0 转交给g0进行扫描,然后调用 suspendG 会判断 G 的运行状态,如果该 G 处于 运行状态 _Grunning,那么会设置 preemptStop 为 true 并发送抢占信号。
该函数在:runtime/preempt.go:
suspendG
func suspendG(gp *g) suspendGState {
    ...
    const yieldDelay = 10 * 1000

    var nextPreemptM int64
    for i := 0; ; i++ {
        switch s := readgstatus(gp); s {
        ...
        case _Grunning:
            if gp.preemptStop && gp.preempt && gp.stackguard0 == stackPreempt && asyncM == gp.m && atomic.Load(&asyncM.preemptGen) == asyncGen {
                break
            }
            if !castogscanstatus(gp, _Grunning, _Gscanrunning) {
                break
            }
            // 设置抢占字段
            gp.preemptStop = true
            gp.preempt = true
            gp.stackguard0 = stackPreempt

            asyncM2 := gp.m
            asyncGen2 := atomic.Load(&asyncM2.preemptGen)
            // asyncM 与 asyncGen 标记的是循环里 上次抢占的信息,用来校验不能重复抢占
            needAsync := asyncM != asyncM2 || asyncGen != asyncGen2
            asyncM = asyncM2
            asyncGen = asyncGen2

            casfrom_Gscanstatus(gp, _Gscanrunning, _Grunning)

            if preemptMSupported && debug.asyncpreemptoff == 0 && needAsync {
                now := nanotime()
                // 限制抢占的频率
                if now >= nextPreemptM {
                    nextPreemptM = now + yieldDelay/2
                    // 执行抢占信号发送
                    preemptM(asyncM)
                }
            }
        }
        ...
    }
}
对于 suspendG 函数我只截取出了 G 在 _Grunning 状态下的处理情况。该状态下会将 preemptStop 设置为 true,也是唯一一个地方设置为 true 的地方。preemptStop 和抢占信号的执行有关,忘记的同学可以翻到上面的 asyncPreempt2 函数中。
Go GC StopTheWorld 抢占所有 P
Go GC STW 是通过 stopTheWorldWithSema 函数来执行的,该函数在 runtime/proc.go:
stopTheWorldWithSema
func stopTheWorldWithSema() {
    _g_ := getg()

    lock(&sched.lock)
    sched.stopwait = gomaxprocs
    // 标记 gcwaiting,调度时看见此标记会进入等待
    atomic.Store(&sched.gcwaiting, 1)
    // 发送抢占信号
    preemptall()
    // 暂停当前 P
    _g_.m.p.ptr().status = _Pgcstop // Pgcstop is only diagnostic.
    ...
    wait := sched.stopwait > 0
    unlock(&sched.lock)
    if wait {
        for {
            //  等待 100 us
            if notetsleep(&sched.stopnote, 100*1000) {
                noteclear(&sched.stopnote)
                break
            }
            // 再次进行发送抢占信号
            preemptall()
        }
    }
    ...
}
stopTheWorldWithSema 函数会调用 preemptall 对所有的 P 发送抢占信号。
preemptall 函数的文件位置在 runtime/proc.go:
preemptall
func preemptall() bool {
   res := false
   // 遍历所有的 P
   for _, _p_ := range allp {
      if _p_.status != _Prunning {
         continue
      }
      // 对正在运行的 P 发送抢占信号
      if preemptone(_p_) {
         res = true
      }
   }
   return res
}
preemptall 调用的 preemptone 会将 P 对应的 M 中正在执行的 G 并标记为正在执行抢占;最后会调用 preemptM 向 M 发送抢占信号。
该函数的文件位置在 runtime/proc.go:
preemptone
func preemptone(_p_ *p) bool {
    // 获取 P 对应的 M
    mp := _p_.m.ptr()
    if mp == nil || mp == getg().m {
        return false
    }
    // 获取 M 正在执行的 G
    gp := mp.curg
    if gp == nil || gp == mp.g0 {
        return false
    }
    // 将 G 标记为抢占
    gp.preempt = true

    // 在栈扩张的时候会检测是否被抢占
    gp.stackguard0 = stackPreempt

    // 请求该 P 的异步抢占
    if preemptMSupported && debug.asyncpreemptoff == 0 {
        _p_.preempt = true
        preemptM(mp)
    }
    return true
}
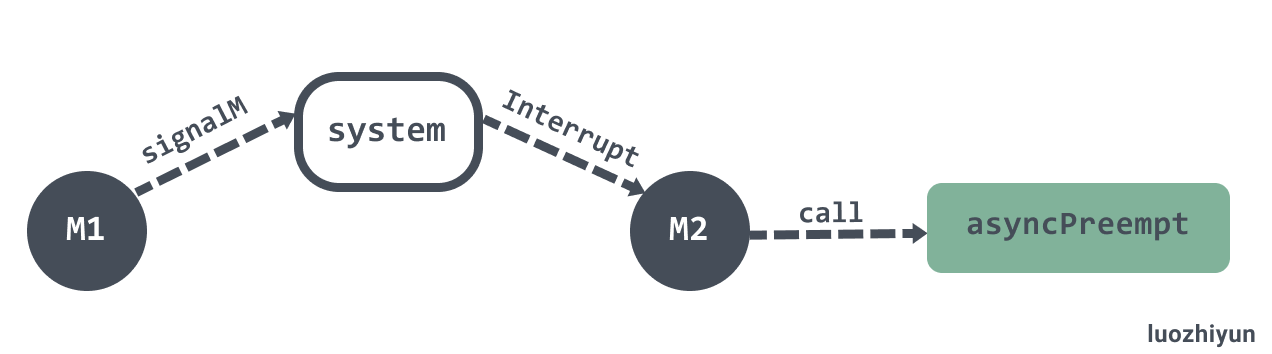
到这里,我们完整的看了一下基于信号的抢占调度过程。总结一下具体的逻辑:
- 程序启动时,在注册
_SIGURG信号的处理函数runtime.doSigPreempt; - 此时有一个 M1 通过 signalM 函数向 M2 发送中断信号
_SIGURG; - M2 收到信号,操作系统中断其执行代码,并切换到信号处理函数
runtime.doSigPreempt; - M2 调用
runtime.asyncPreempt修改执行的上下文,重新进入调度循环进而调度其他 G;
Reference
Linux用户抢占和内核抢占详解 https://blog.csdn.net/gatieme/article/details/51872618
Go: Asynchronous Preemption https://medium.com/a-journey-with-go/go-asynchronous-preemption-b5194227371c
Unix信号 https://zh.wikipedia.org/wiki/Unix%E4%BF%A1%E5%8F%B7
Linux信号(signal)机制 http://gityuan.com/2015/12/20/signal/
Golang 大杀器之跟踪剖析 trace https://juejin.cn/post/6844903887757901831
详解Go语言调度循环源码实现 https://www.luozhiyun.com/archives/448
信号处理机制 https://golang.design/under-the-hood/zh-cn/part2runtime/ch06sched/signal/#662–

Recommend
About Joyk
Aggregate valuable and interesting links.
Joyk means Joy of geeK