

搭建一个 Git 服务器
source link: https://blog.ruo-chen.wang/2020/08/git-server.html
Go to the source link to view the article. You can view the picture content, updated content and better typesetting reading experience. If the link is broken, please click the button below to view the snapshot at that time.
本篇将记录我使用 gitweb 和 nginx 搭建带有网页界面和 HTTP clone 的 Git 服务器的过程。
Git 服务器Permalink
首先设置能使用 SSH 访问的 Git 服务器,参考 Pro Git 中的说明。先在服务器上添加 git 用户
sudo useradd -m /srv/git git
sudo passwd git
然后导入本地的 SSH key(需要在 /etc/ssh/sshd_config 中设置
PasswordAuthentication yes)
ssh-copy-id -i ~/.ssh/id_rsa git@<IP address>
为了安全禁用 shell 登录
sudo chsh git -s $(which git-shell)
GitWebPermalink
Ubuntu 中的 git 包已经包含了 gitweb 需要的一些静态文件,在 /usr/share/gitweb
里面。还需安装的是 highlight 和 fcgiwrap。
sudo apt install highlight fcgiwrap
在 /etc/gitweb.conf 中设置 gitweb,其它配置选项可在 man gitweb.conf
中查看。
# path to git projects (<project>.git)
$projectroot = "/srv/git";

# directory to use for temp files
$git_temp = "/tmp";

# html text to include at home page
$home_text = "/srv/git/indextext.html";

# stylesheet to use
#@stylesheets = ("static/gitweb.css");

# javascript code for gitweb
#$javascript = "static/gitweb.js";

# logo to use
#$logo = "static/git-logo.png";

# the 'favicon'
#$favicon = "static/git-favicon.png";

# git-diff-tree(1) options to use for generated patches
#@diff_opts = ("-M");
@diff_opts = ();

# 不显示 owner
$omit_owner = 1;

# 只显示 bare repo 中有 "git-daemon-export-ok" 这个文件的仓库
$export_ok = "git-daemon-export-ok";

# 语法高亮(需要 highlight 包)
$feature{'highlight'}{'default'} = [1];
向 /srv/git/indextext.html 中写入需要在主页中额外添加的文字
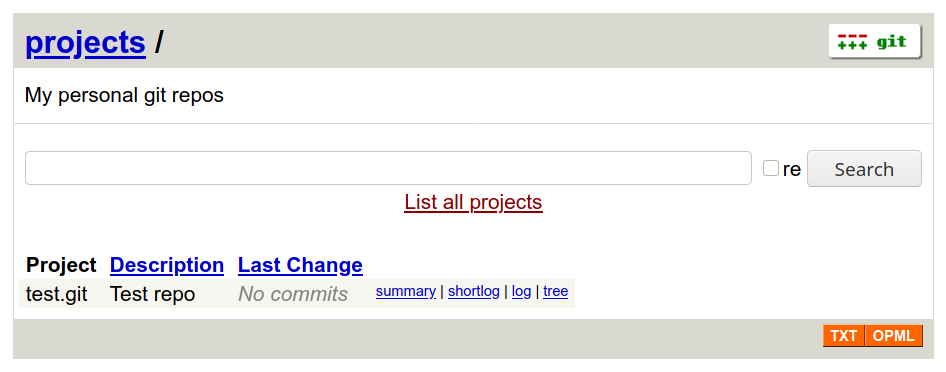
echo 'My personal git repos' | sudo tee /srv/git/indextext.html
添加一个新的 nginx server block
# /etc/nginx/sites-available/git

server {
    server_name git.example.com;
    location /gitweb.cgi {
        root /usr/share/gitweb;
        gzip off;
        include fastcgi_params;
        fastcgi_param SCRIPT_NAME $uri;
        fastcgi_param GITWEB_CONFIG /etc/gitweb.conf;
        fastcgi_pass unix:/var/run/fcgiwrap.socket;
    }
    location / {
        root /usr/share/gitweb;
        index gitweb.cgi;
    }
}
最后 enable 并获取一个 SSL 证书
sudo ln -sf /etc/nginx/sites-{available,enabled}/git
sudo certbot --nginx
sudo systemctl restart nginx
HTTP clonePermalink
目的是允许任何人使用 git clone https://git.example.com/clone/NAME 对 gitweb 中显示的仓库进行 clone,为此使用 git-http-backend。在
/etc/nginx/sites-available/git 的 server 块中加入
location ~ /clone(/.*) {
    client_max_body_size 0;
    include /etc/nginx/fastcgi_params;
    fastcgi_param SCRIPT_FILENAME /usr/lib/git-core/git-http-backend;
    fastcgi_param GIT_PROJECT_ROOT /srv/git;
    fastcgi_param PATH_INFO $1;
    fastcgi_pass unix:/var/run/fcgiwrap.socket;
}
git-http-backend 会检查 bare repo 中是否有 git-daemon-export-ok 这个文件,如果没有则不允许 clone,这正好是 gitweb 配置中表示「公有仓库」使用的文件。如果想对所有的仓库都允许 clone,则可以添加一个 fastcgi param:
fastcgi_param GIT_HTTP_EXPORT_ALL "";
这个 HTTP clone 只是一个只读的 clone,如果想要 push 还需使用 SSH。
结果Permalink
创建一个测试仓库并标记为公开,再添加一个说明
cd
git init --bare test.git
touch test.git/git-daemon-export-ok
echo 'Test repo' > test.git/description
网页效果如下
Clone:
$ git clone https://git.example.com/clone/test
Cloning into 'test'...
warning: You appear to have cloned an empty repository.

$ ls -a test
.git
Recommend
About Joyk
Aggregate valuable and interesting links.
Joyk means Joy of geeK