

MirkoPC - a full-featured Raspberry Pi desktop computer
source link: https://www.jeffgeerling.com/blog/2021/mirkopc-full-featured-raspberry-pi-desktop-computer
Go to the source link to view the article. You can view the picture content, updated content and better typesetting reading experience. If the link is broken, please click the button below to view the snapshot at that time.

The MirkoPC is so far the closest thing to a full-fledged Raspberry Pi desktop computer:
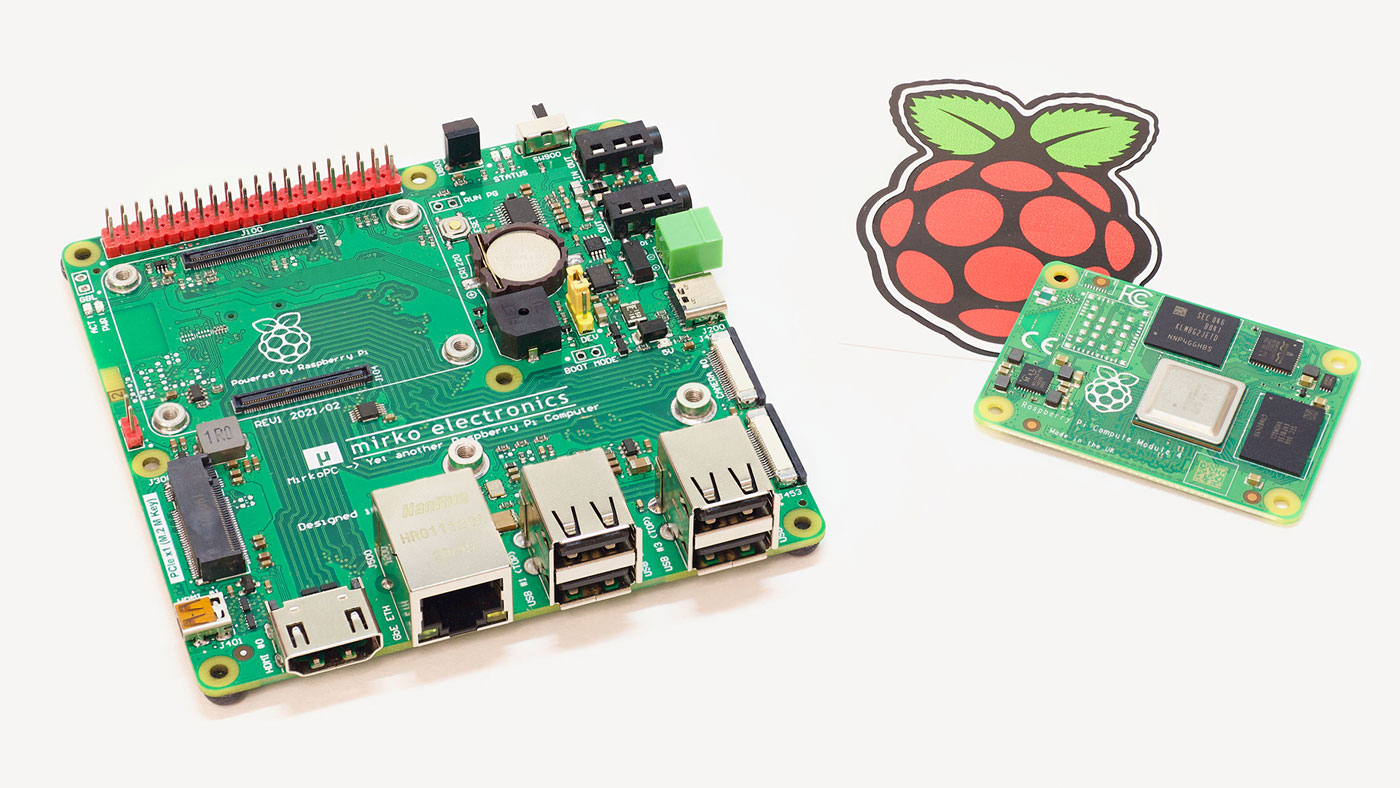
Based on the Compute Module 4, it has a full-size M.2 M-key slot, allowing the Pi to boot from reliable and fast NVMe SSD storage, a built-in headphone amp and line out, 4 USB 2.0 ports, gigabit Ethernet, two HDMI ports, and a number of other neat little features.
Video
I also have a video review of this board here:
I'm tracking the MirkoPC and dozens of other CM4 projects on this page: Compute Module 4 Boards and Projects.
Hardware Overview
The MirkoPC has a full assortment of connectivity you'd expect from a modern Raspberry Pi, along with a few extra bits, including:
- M.2 2242/2280 M-key socket (PCIe x1 Gen 2.0)
- MicroSD card slot (for 'Lite' compute modules without eMMC)
- 1 Gbps Ethernet
- 4x USB 2.0
- 28-pin GPIO header (compatible with Pi HATs)
- 2x HDMI outputs (1x full-size, 1x micro)
- 2x MIPI CSI-2 camera interfaces (22-pin FFC)
- 2x MIPI DSI display interfaces (22-pin FFC)
- 32-bit/384 kHz stereo line out
- 128 mW headphone output
- RTC clock with battery backup
- Temperature sensor
- IR receiver
- 5V fan header
- 3 kHz buzzer
- Reset switch
- USB-C or 2-pin terminal block power supply
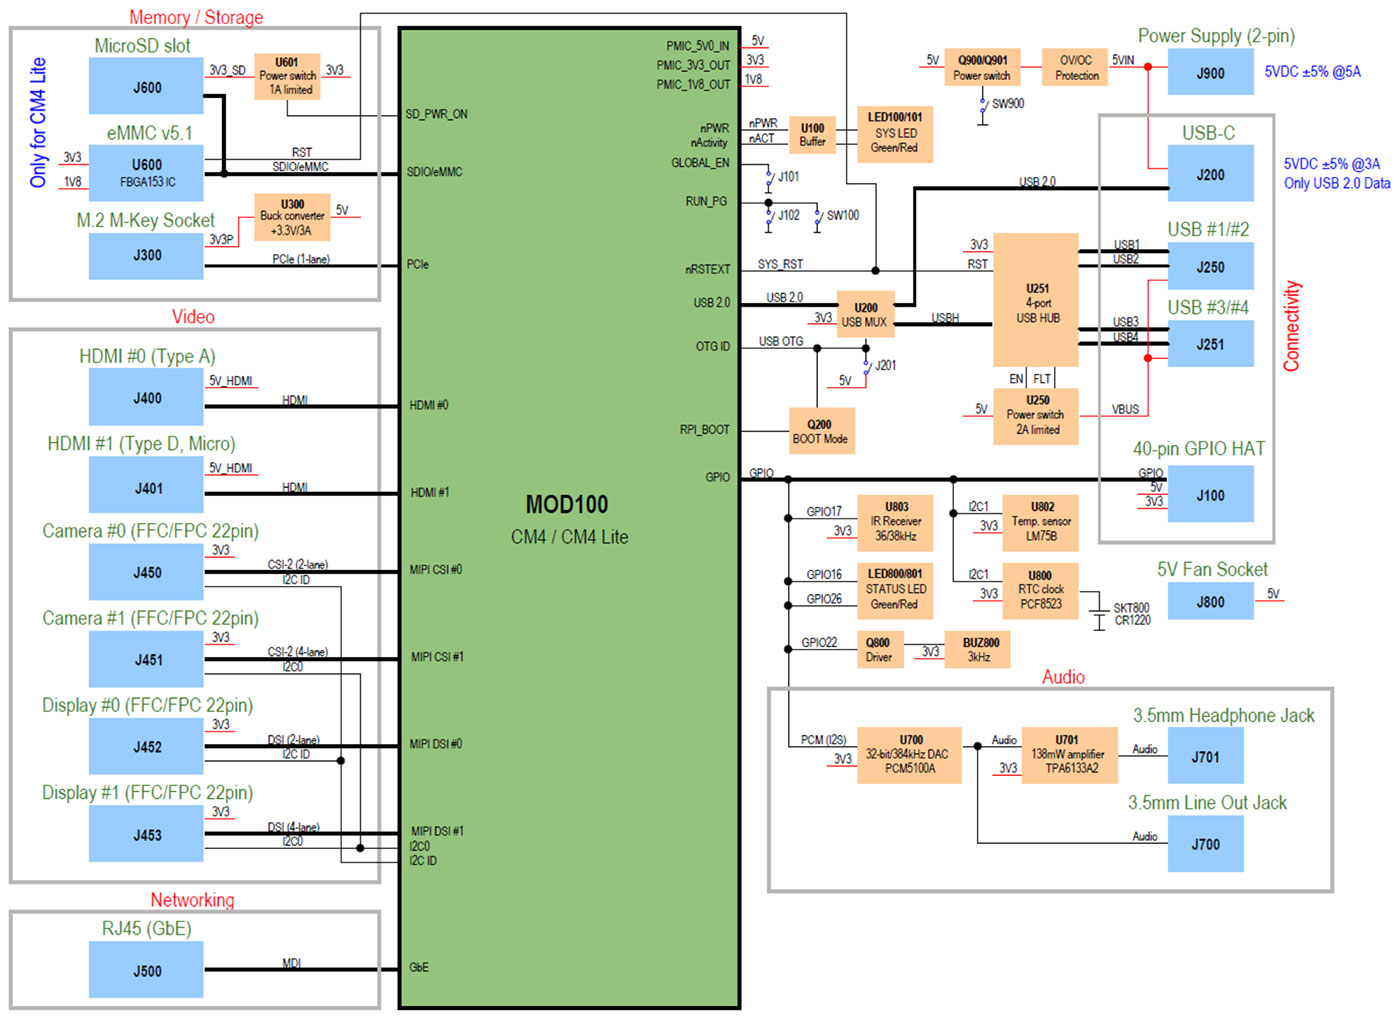
And in the MirkoPC documentation, an entire block diagram with all the relevant part numbers is included:
Getting Things to Work
Some things, like NVMe SSDs, are pretty easy to use—you install the SSD, and it works. And you can even boot off NVMe SSDs on the Raspberry Pi now.
But as with many other things in Pi-land, to get parts like the built-in buzzer, RTC, or IR port to work, you have to edit the Raspberry Pi's configuration and reboot—and sometimes do even more things like install or uninstall extra packages.
To get the built-in RTC to work with Pi OS, I had to do a number of things:
- I had to set the 'I2C' interface to 'Enabled' in the Pi Configuration (e.g.
sudo raspi-config). I had to add the following to the bottom of
/boot/config.txtand reboot:# RTC dtoverlay=i2c-rtc,pcf8523I had to remove the 'fake hardware clock' that Pi OS ships with:
sudo apt-get uninstall -y fake-hwclocksudo update-rc.d -f fake-hwclock removesudo nano /lib/udev/hwclock-set(and remove the/run/systemd/systemsection).
- Finally, I could write the current date and time to the hardware clock with
sudo hwclock -w.
High-quality audio
Enabling the high-quality line and headphone outputs also requires a similar effort:
I had to remove the following default line from
/boot/config.txt:dtparam=audio=onThen I enabled i2s and the hifiberry-dac appropriate for the audio chipset on the MirkoPC inside
/boot/config.txt, and rebooted:# I2S DAC dtparam=i2s=on dtoverlay=hifiberry-dac dtdebug=1I confirmed the DAC was working correctly by running
sudo aplay -l.- I played back music using
mplayer(e.g.mplayer file.mp3).
I should note that by default, using my pair of Audio Technica over-the-ear headphones, I was glad to not have them on my ears when I did this the first time—the default volume was something like 88%, and that would've probably ruptured my eardrums!
I turned the volume down to a more pleasant 4% using the / key and was able to enjoy a few songs through the MirkoPC. The audio circuit on it sounds great, and I could not hear any discernible background noise—which is better than I can say for many devices!
Designed by Mirek, in Poland
What I think impressed me the most about this board—and others like it that I've since discovered—is the fact that it was conceived, designed, and built by one person, Mirek, in Poland!
I am amazed how much one person can do with electronics design today. Building custom PCBs to hold a tiny computer that's more powerful than the computer I owned 10 years ago—with more functionality to boot!—can be done in the matter of weeks by one individual with the proper tools.
And those tools are progressively getting less expensive, opening up more advanced electronics design to a much larger group of people than ever before.
And yet, we still seem to be (as a society) moving towards locked-down platforms and proprietary standards in many areas.
There are definite tradeoffs with the MirkoPC and others like it (e.g. with RISC-V computers, they are often a bit slower and even less widely-used/supported than even ARM boards like the Pi), but using more open designs and building on top of open source solutions feels like a better way to keep advancing our industry forward and creating new opportunities.
Conclusion
I got a little philosophical there, but bringing it back to the MirkoPC, it's not a perfect board. The power circuit on it is designed for 5V 3A power input, but if you couple the Pi CM4 (which likes to have at least 10W of power available at peak) with a fast modern NVMe SSD like a WD_black (which can use up to 10W peak), the 15W available through the MirkoPC's power connector is not adequate, and I was able to make some writes error out when pushing the Pi to it's extremes.
Also, the MicroSD card slot on the back (which is in the middle of the board) is in an awkward location, making it hard to plug and unplug cards for 'Lite' CM4 models that don't have built-in eMMC.
I'm hopeful Mirek can work through some of these issues in a 2nd revision to the board, and you can follow his progress on Hackaday or his MirkoPC GitHub project.
Recommend
About Joyk
Aggregate valuable and interesting links.
Joyk means Joy of geeK