

SpringCloud 2020版本教程1:使用nacos作为注册中心和配置中心
source link: https://www.fangzhipeng.com/springcloud/2021/04/02/sc-2020-nacos.html
Go to the source link to view the article. You can view the picture content, updated content and better typesetting reading experience. If the link is broken, please click the button below to view the snapshot at that time.
使用nacos作为注册中心和配置中心
本次教程旨在为读者提供2020版本的最佳实践方案,使用我认为最容易学习的组件,可能很多组件有很多替代方案,在这里不依依讲述。本次教程使用的组件如下:
- 注册中心:nacos,替代方案eureka、consul、zookeeper
- 配置中心: nacos ,替代方案sc config、consul config
- 服务调用:feign,替代方案:resttempate
- 熔断:sentinel、,替代方案:Resilience4j
- 熔断监控:sentinel dashboard
- 负载均衡:sc loadbalancer
- 网关:spring cloud gateway
- 链路:spring cloud sleuth+zipkin,替代方案:skywalking等。
本次教程总体架构如下:
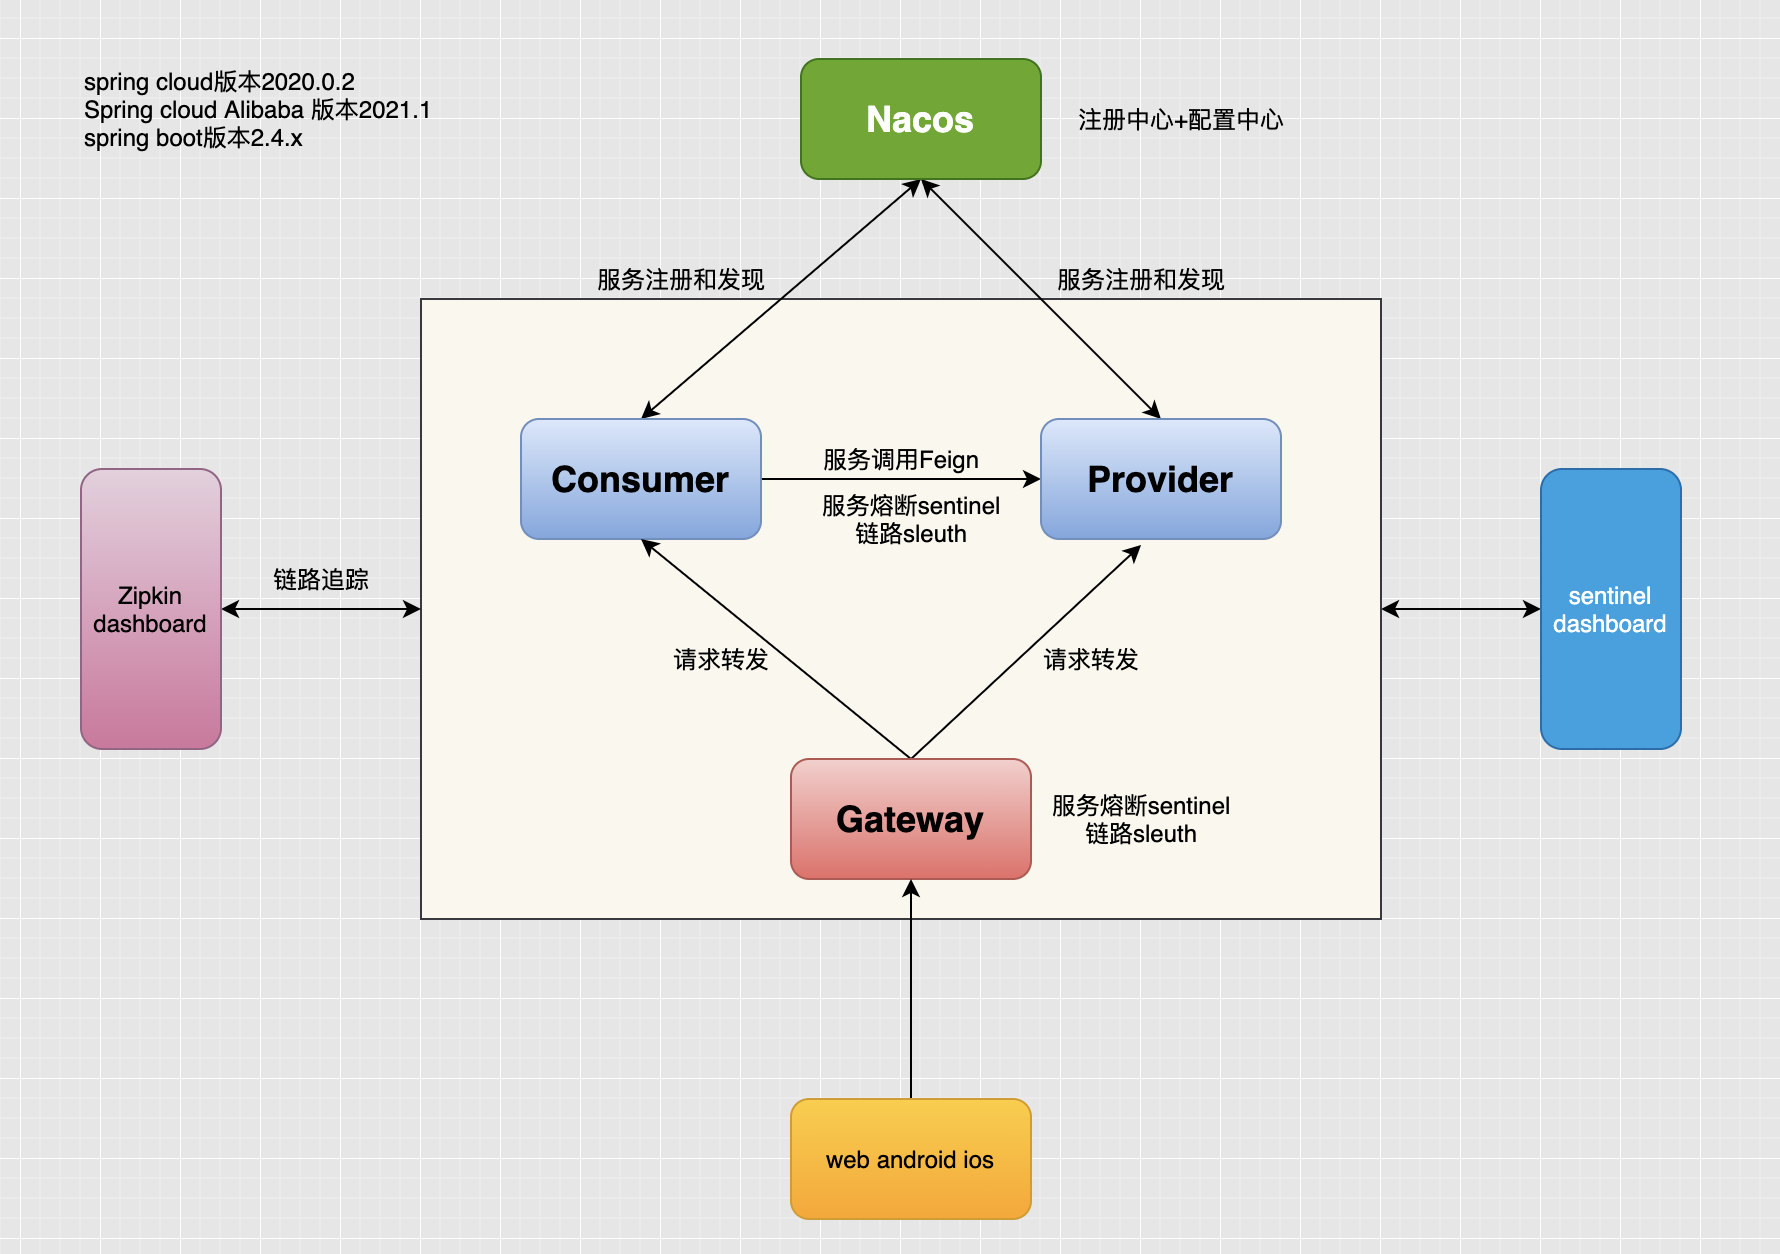
使用nacos作为注册中心
下载nacos,并启动
Nacos 致力于帮助您发现、配置和管理微服务。Nacos 提供了一组简单易用的特性集,帮助您快速实现动态服务发现、服务配置、服务元数据及流量管理。下载地址https://github.com/alibaba/nacos/releases,下载最新版的2.0版本。
下载完成后,解压,在解压后的文件的/bin目录下,windows系统点击startup.cmd就可以启动nacos。linux或mac执行以下命令启动nacos。
sh startup.sh -m standalone
登陆页面:http://localhost:8848/nacos/,登陆用户nacos,登陆密码为nacos。
本小节工单案例包括2个,一个服务提供者provider 、服务消费者consumer。
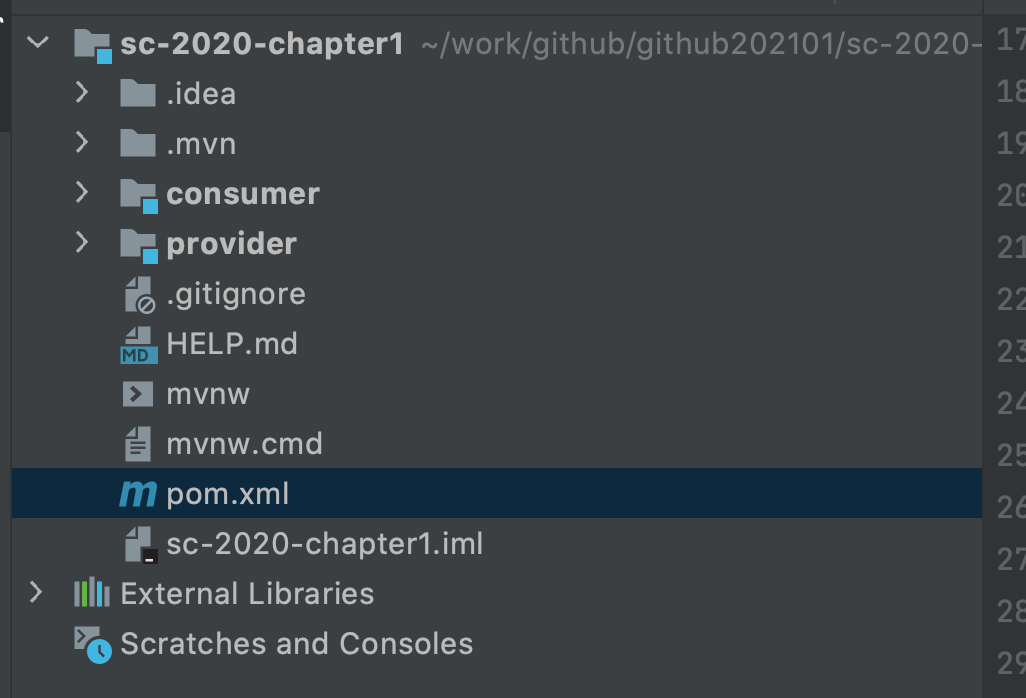
在父pom文件引入相关的依赖,如下:
     <properties>
        <java.version>1.8</java.version>
        <spring-boot.version>2.4.4</spring-boot.version>
        <spring-cloud.version>2020.0.2</spring-cloud.version>
        <spring-cloud-alibaba.version>2020.0.RC1</spring-cloud-alibaba.version>
    </properties>


 <dependencyManagement>
        <dependencies>
            <!-- spring boot 依赖 -->
            <dependency>
                <groupId>org.springframework.boot</groupId>
                <artifactId>spring-boot-dependencies</artifactId>
                <version>${spring-boot.version}</version>
                <type>pom</type>
                <scope>import</scope>
            </dependency>
            <!-- spring cloud 依赖 -->
            <dependency>
                <groupId>org.springframework.cloud</groupId>
                <artifactId>spring-cloud-dependencies</artifactId>
                <version>${spring-cloud.version}</version>
                <type>pom</type>
                <scope>import</scope>
            </dependency>
            <!-- spring cloud alibaba 依赖 -->
            <dependency>
                <groupId>com.alibaba.cloud</groupId>
                <artifactId>spring-cloud-alibaba-dependencies</artifactId>
                <version>${spring-cloud-alibaba.version}</version>
                <type>pom</type>
                <scope>import</scope>
            </dependency>
        </dependencies>
    </dependencyManagement>
服务提供者provider
在provider的pom文件引入依赖:
      <dependency>
            <groupId>org.springframework.boot</groupId>
            <artifactId>spring-boot-starter-web</artifactId>
        </dependency>

        <dependency>
            <groupId>com.alibaba.cloud</groupId>
            <artifactId>spring-cloud-starter-alibaba-nacos-discovery</artifactId>
        </dependency>
配置文件application.yml:
server:
  port: 8762

spring:
  application:
    name: provider

  cloud:
    nacos:
      discovery:
        server-addr: 127.0.0.1:8848
写一个接口:
@SpringBootApplication
@RestController
@EnableDiscoveryClient
public class ProviderApplication {

    public static void main(String[] args) {
        SpringApplication.run(ProviderApplication.class, args);
    }


    @Value("${server.port}")
    String port;

    @GetMapping("/hi")
    public String hi(@RequestParam(value = "name", defaultValue = "forezp",required = false) String name) {
        return "hello " + name + ", i'm provider ,my port:" + port;

    }
}
服务消费者consumer
在pom文件引入以下依赖:
        <dependency>
            <groupId>org.springframework.boot</groupId>
            <artifactId>spring-boot-starter-web</artifactId>
        </dependency>

        <dependency>
            <groupId>com.alibaba.cloud</groupId>
            <artifactId>spring-cloud-starter-alibaba-nacos-discovery</artifactId>
        </dependency>

        <dependency>
            <groupId>org.springframework.cloud</groupId>
            <artifactId>spring-cloud-starter-openfeign</artifactId>
        </dependency>


        <dependency>
            <groupId>org.springframework.cloud</groupId>
            <artifactId>spring-cloud-starter-loadbalancer</artifactId>
        </dependency>
需要注意的是引入openfeign,必须要引入loadbalancer,否则无法启动。
配置文件:
server:
  port: 8763

spring:
  application:
    name: consumer

  cloud:
    nacos:
      discovery:
        server-addr: 127.0.0.1:8848
在工程的启动文件开启FeignClient的功能:
@SpringBootApplication
@EnableDiscoveryClient
@EnableFeignClients
public class ConsumerApplication {


    public static void main(String[] args) {
        SpringApplication.run(ConsumerApplication.class, args);
    }

}
写一个FeignClient,去调用provider服务的接口:
@FeignClient(value = "provider" )
public interface ProviderClient {

    @GetMapping("/hi")
    String hi(@RequestParam(value = "name", defaultValue = "forezp", required = false) String name);
}
写一个接口,让consumer去调用provider服务的接口:
@RestController
public class ConsumerController {

    @Autowired
    ProviderClient providerClient;

    @GetMapping("/hi-feign")
    public String hiFeign(){
        return providerClient.hi("feign");
    }
}
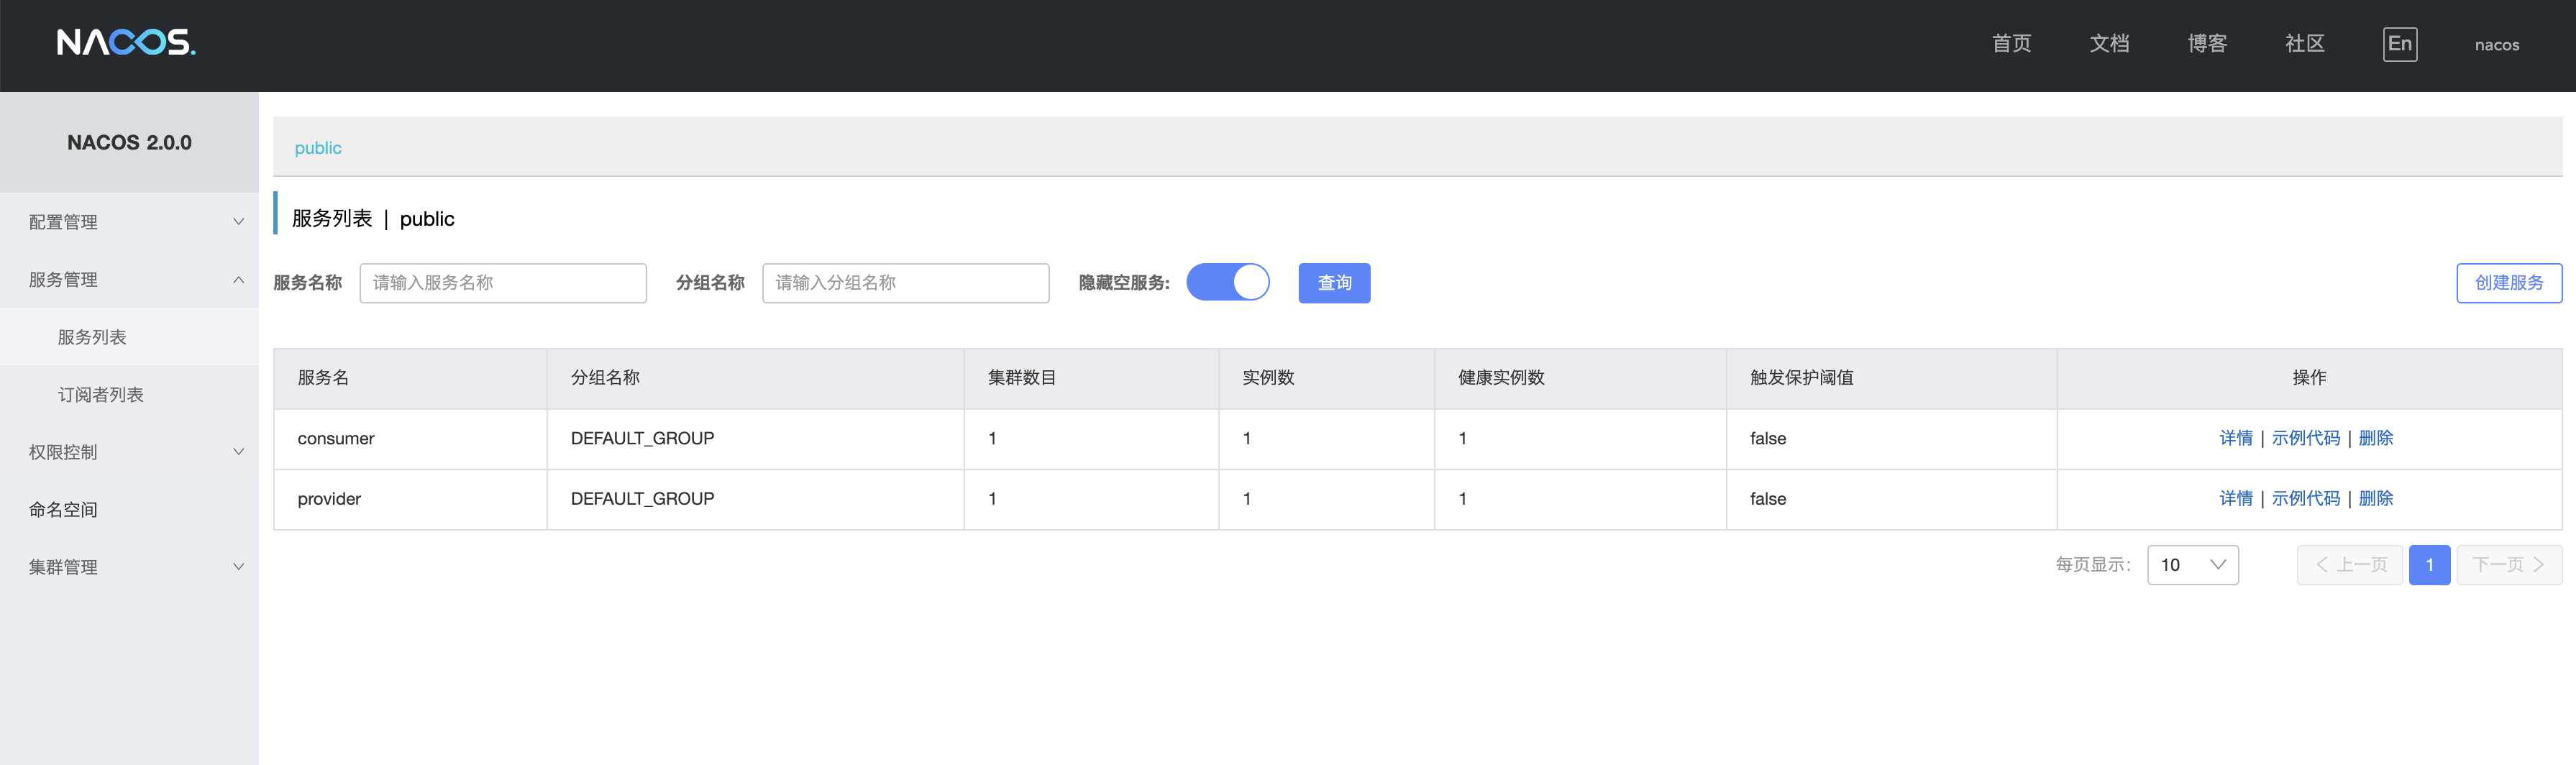
启动两个工程,在nacos页面查看,可见2个服务都已经注册成功:
在浏览器上输入http://localhost:8763/hi-feign,浏览器返回响应:
hello feign, i'm provider ,my port:8762
可见浏览器的请求成功调用了consumer服务的接口,consumer服务也成功地通过feign成功的调用了provider服务的接口。
使用sc loadbanlancer作为负载均衡
其实feign使用了spring cloud loadbanlancer作为负载均衡器。 可以通过修改provider的端口,再在本地启动一个新的provider服务,那么本地有2个provider 服务,端口分别为8761 和8762。在浏览器上多次调用http://localhost:8763/hi-feign,浏览器会交替显示:
hello feign, i'm provider ,my port:8762

hello feign, i'm provider ,my port:8761
使用nacos作为配置中心
在此教程中不讲述,请参考:https://www.fangzhipeng.com/springcloud/2019/05/30/sc-nacos-discovery.html
https://github.com/forezp/SpringCloudLearning/tree/master/sc-2020-chapter1
本文为原创文章,转载请标明出处。
本文链接:https://www.fangzhipeng.com/springcloud/2021/04/02/sc-2020-nacos.html
本文出自方志朋的博客
Recommend
About Joyk
Aggregate valuable and interesting links.
Joyk means Joy of geeK