

Documentation for V-Drum Explorer
source link: https://jskeet.github.io/DemoCode/Drums/
Go to the source link to view the article. You can view the picture content, updated content and better typesetting reading experience. If the link is broken, please click the button below to view the snapshot at that time.

Documentation for V-Drum Explorer
All source code is in the Drums directory of the GitHub repo.
This is not a MIDI sequencer or anything similar; it’s purely for fetching and manipulating information from Roland V-Drum kits.
I’m very grateful to Roland for providing the TD-17 MIDI implementation document which has been absolutely vital in writing this code.
Feedback is very welcome - it’s still early days, but please email [email protected] or file an issue to let me know how you get on with this.
Note: this user guide is accurate to 1.0.0-alpha05; it needs updating for 1.0.0-alpha06+, with new screenshots etc.
Requirements
- Windows 8.1 or Windows 10
- .NET 4.7.2 or later
- To be genuinely useful, a Roland TD-17, TD-27 or TD-50 V-Drums drum kit, turned on and connected via USB (see later for details)
Installation
Download: Windows Installer
As of 1.0.0-alpha02, there’s a Windows installer. Download the latest installer above, or from the releases on GitHub. If you use GitHub, you’ll need to expand the “Assets” part of the given release. If you’d prefer not to run the installer, there’s a zip file as well.
The application that’s installed is called “V-Drum Explorer”; if you’re using the zip file, you want to run VDrumExplorer.Wpf.exe.
If Windows SmartScreen gives a warning, click on “More Info”, check that it is signed by me (“Jonathan Skeet”) and then choose the option to run it.
Important notes for drum kit connection
The USB Driver Mode must be “vendor” for the V-Drum Explorer to detect it. The “generic” USB mode is the factory default, so you’ll need to change this (which includes a drum kit reboot) before starting the Explorer.
Additionally, in MIDI settings, the “Receive Exclusive” option must be set to “On”.
Usage
There are four windows in the application:
When the application is launched, the Module Loader will be shown.
Module Loader
This window should be left open; closing it will close all other windows. It also contains the log which can be saved to disk and then included when filing an issue

The log will include diagnostics as the application attempts to detect a drum module. In the screenshot above, it’s detected my TD-17. If no known module is detected, the second row of buttons will be disabled.
“Offline” functionality (no drum module required)
Even without a drum module, you can still load and save files, and edit the data.
Click on “Load file” to load a file. The application will detect whether it contains data for a whole module or a single kit, or instrument audio, and display the appropriate window, as described later. A sample file (td17.vdrum) is provided with the application. (If you run the Windows installer, the file is installed in ‘Program Files (x86)\VDrumExplorer’ - I know that’s a little odd as it isn’t a binary, but it simplifies things while I’m learning about Windows installers and WiX.)
Click on “Save log file” to simply save the contents of the log (as displayed in the Module Loader) to a text file. This is primarily to make it easy to report issues. Note that this single log is used for all logging, including for log entries created by other windows.
“Live” functionality (drum module on and connected via USB)
If a module is detected, you can load data from it with the two buttons in the second row:
- Load the complete data for a module with the “Load all data” button
- Load a single kit by entering the kit number and clicking “Load single”
When loading a single kit, the value in the “Kit number” textbox should be an integer between 1 and 100. (If other modules are ever supported, this range may vary.)
Loading a single kit is reasonably quick - a few seconds - but loading the complete module data takes about three minutes for the TD-17, and longer for the TD-27 or TD-50. You’ll see a progress dialog like this:
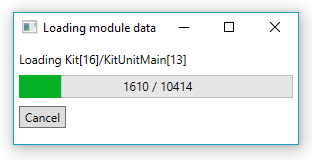
You can cancel at any time, but I strongly recommend that if you wait until the complete module data has loaded, you then save it to a file so you can load that next time.
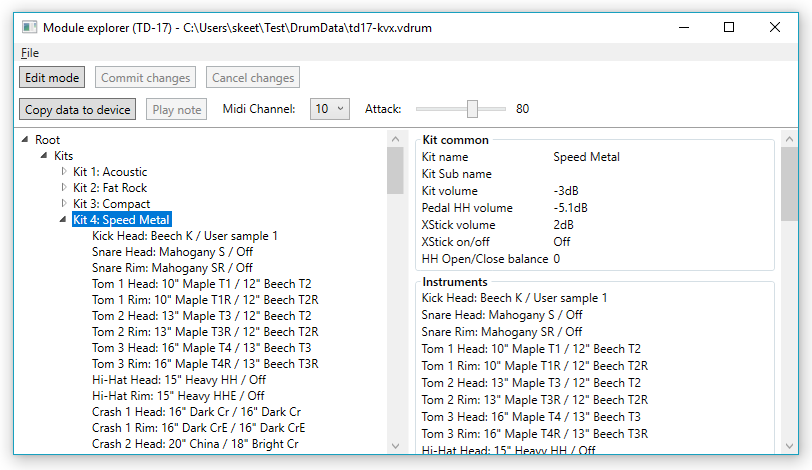
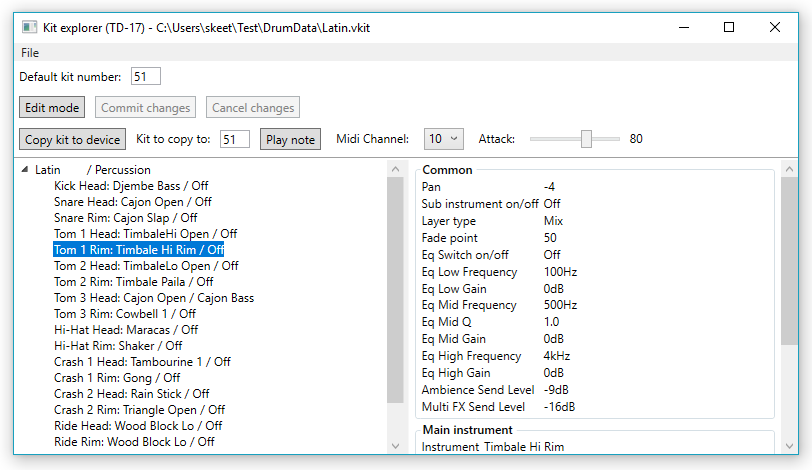
Module Explorer
The Module Explorer allows you to view and edit almost all the data in a module. (There are some aspects that aren’t available, such as sample data.)
Information is presented in a tree view, with details of the currently selected tree node in a panel on the right hand side. Initially, the explorer is in read-only mode.
If no drum module was detected when the application was loaded, or if the module isn’t the same as the source of the data being shown in the explorer (e.g. you have a TD-17 but you’re exploring TD-50 data), the second row of buttons will not be present.
Edit mode
Click “edit mode” to enable editing. You stay in edit mode even if you change tree nodes, so you can edit multiple aspects at a time.
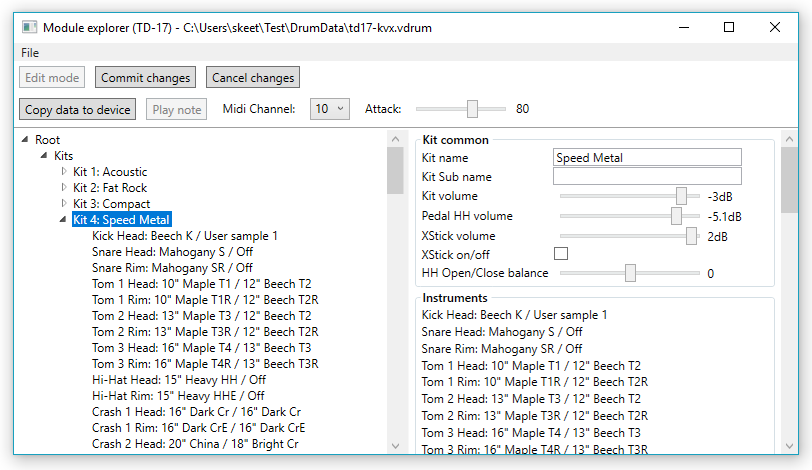
It’s important to understand that when you’re in edit mode, you’re only editing the data in memory. Nothing is automatically saved to a file, or copied to the physical drum module. Those actions have to be taken explicitly.
To leave edit mode, you can click on either “Commit changes” or “Cancel changes”. (This still only makes a difference to the data in memory.) If you click on “Cancel changes,” all the changes you made in edit mode are reverted. If you click on “Commit changes” you’ll see the changes you made in read-only mode.
Playing a note
When a drum module is connected and an instrument is selected, the “Play note” button is enabled. This is intended to provide a convenient way of experimenting with the settings you’re editing, but its functionality is fairly crude: it just tells the module to play the selected instrument, as specified in the MIDI settings for the kit.
Use the “attack” slider to simulate hitting the drum hard or softly.
In particular:
- If you have made any changes to the kit but not copied them to the device, you won’t hear the results of the changes.
- If the currently selected kit on the physical device isn’t the same as the one you’ve made changes to, you’ll hear the “wrong” instrument.
If you don’t hear anything, check the MIDI channel used by your module. The application defaults to 10, which is the default channel for the TD-17.
Copying data to the device
The “Copy data to device” button will copy all the information from the currently selected tree node and all child nodes, onto the device. This can be very quick if you’re copying a single instrument; copying a whole kit takes a bit longer. Copying the entire module data (from “Root” downwards) will take a very long time.
Note that in edit mode, the data copied is what you currently see, including any changes you’ve made.
Kit context options
Right-clicking on a the root node of a kit within the tree will open a context menu like this:
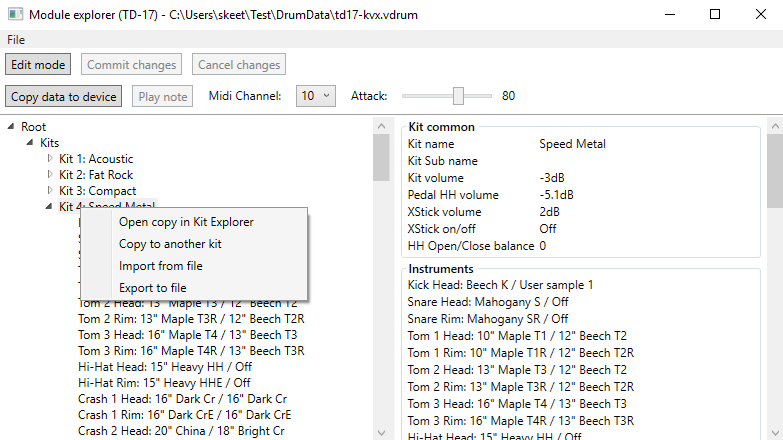
This currently provides four options:
- Create an independent copy of the kit in memory, and open it in Kit Explorer
- Copy the kit to another slot in the module (overwriting the current kit there)
- Import data from a .vkit file (overwriting the data in the current kit)
- Export the current kit data to a .vkit file
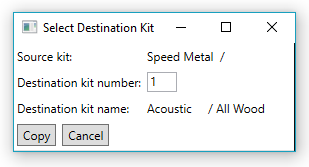
For the second of these options, a dialog box opens asking you which kit you would like to copy the selected one to:
Saving to disk
The File/Save menu item allows you to save the whole module data to a .vdrum file, which can be opened later in Module Loader.
Kit Explorer
Kit Explorer works very similarly to Module Explorer, except it operates on a single kit instead of the data for a whole module.
Copying the kit to the device
The “Copy kit to device” button will copy the kit data to the kit specified in the textbox. (This must be a valid kit number for your module.) In Kit Explorer, the whole kit data is always copied, rather than just information from the selected tree node.
A kit file has a “default kit number” which is used to populate this textbox on loading. This number starts off as the original kit that was taken from the module, but can be modified with the “Default kit number” textbox. Typically you’d want to set it to the number that you most often use on the device for that kit.
Saving to disk
The File/Save menu item allows you to save the kit to a .vkit file, which can be opened later in Module Loader.
Instrument Audio Explorer
Playing an instrument within the Kit Explorer or Module Explorer requires you to have the module connected, with the right instrument on the currently selected kit. That makes it hard to edit a kit on the move, unless you know exactly what each instrument sounds like.
V-Drum Explorer allows you to record all the instruments from your module via the audio connection to your computer, save the data to a file, then load the file again later to allow you to play each instrument without the module being present.
Recording instruments
To take advantage of this functionality, first you need to record the audio data. Start V-Drum Explorer with the module connected and turned on, then click on “Record instruments” in the Module Loader.
The instrument recording dialog will be displayed:
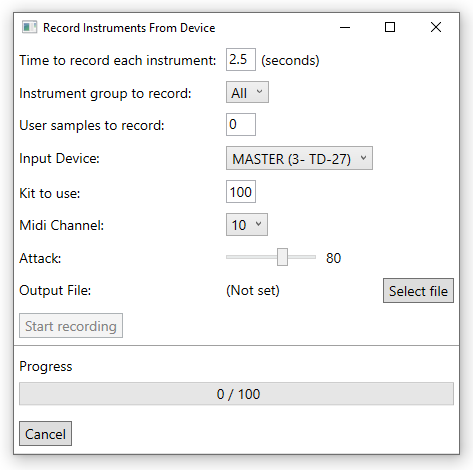
Before recording, there are some things to check:
- Make sure your USB audio output is set appropriately. The default setting on the TD-17 is very quiet, for example. In the TD-17, on the module, press the Setup button, select the USB option, and set the “USB Output Gain” option. I had success with a setting of +20dB.
- Optionally select an instrument group to record, or leave it at the
default “All” to record all instruments. If you only want to record
user samples, select the “Off” instrument group. (That contains a
single instrument called “Off”, but at that point you’re not wasting
much time recording silence.)
- Currently there’s no way of recording “just some” instrument groups; it’s either all or a single group. Please give me feedback if this limitation causes you any practical difficulties.
- Select how many user samples you wish to record. There’s no point in recording more samples than are populated on your module, but the explorer can’t determine how many there are. Also, you may not wish to record the samples anyway.
- Select the relevant audio device in the dialog, if a suitable one
isn’t picked by default.
- For the TD-17, the audio device is likely to be of the form “IN (3- TD-17)”.
- For the TD-27 (and I suspect the TD-50), each trigger can be recorded separately. Either record the KICK input, or MASTER. Note that the pad to record is KICK regardless of which instrument group is being recorded, as all samples are played through the kick trigger.
- Make sure your module has the same kit selected as is shown in the
dialog box. You can edit this; I’d recommend using a “user” kit that
is still untouched, for two reasons:
- It won’t have any MultiFX etc applied to it, so you’ll get a fairly vanilla recording.
- If the explorer crashes while recording, you won’t have lost any useful data. (See notes below for what the process involves.)
- Choose a file to save the data to. Note that the files can be quite large (e.g. around 75MB for a TD-17 with 7 user samples and the default 2.5s recording duration) so make sure there is enough disk space wherever you’re saving to.
- Make sure the MIDI channel is correct for your kit. (This is the same channel used to play instruments in the Module Explorer and Kit Explorer, so that’s an easy way to test it.)
- Optionally change the recording duration per instrument and the attack with which each instrument is struck. The defaults should be fine in most cases.
Once you’re ready, click “Start recording”. Importantly, you need to leave the drum set alone at this point: if you change settings on the module, or strike the pads, you could end up with undesirable results.
Note: Recording all the samples takes a long time, particularly on the TD-50 with over 400 instruments or the TD-27 with over 750! As well as the recording time itself, there’s a little overhead while the instrument is changed etc. So on a TD-50, recording 2.5s of audio per instrument could take over 20 minutes. Please be patient! (The progress bar will show you how it’s doing, of course.)
The process works as follows:
- Load the data for instrument 1 (the kick drum) from the kit, so it can be restored later.
- For each available instrument:
- Silence the module (to stop the previous instrument sound)
- Change the assigned instrument for instrument 1 on the module
- Start recording in memory
- Play the note
- Stop recording after the configured duration
- Save the file containing all the audio captures
- Restore the original data, including if an error occurs
The last part about data restoration can fail in some situations - for example if you disconnect the USB cable while recording. For this reason, I recommend backing up the kit first if you’ve made any modifications to it, or (preferably) using a kit you haven’t modified.
When recording is complete, the dialog will close automatically.
Opening the Instrument Audio Explorer
In order to open the Instrument Audio Explorer, click on “Load File” in the Module Loader and open a previously-saved audio recording .vaudio file. This will open up the Instrument Audio Explorer:
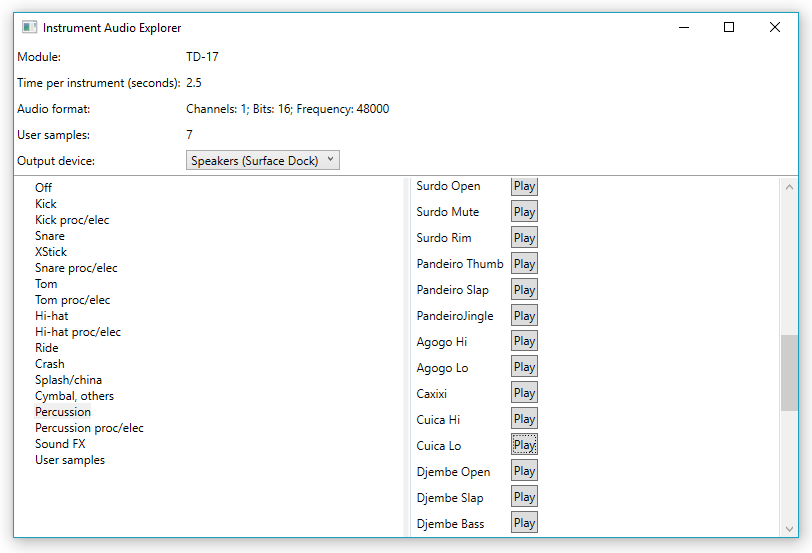
Select an output device from the drop-down (“Speakers (Surface Dock)” in the screenshot above) and then click on one of the instrument groups on the left hand side. The recorded instruments will be shown on the right hand side, with Play buttons. Clicking on a Play button will play the recorded sample from the file.
Note that you can have an Instrument Audio Explorer window open at the same time as a Kit Explorer or Module Explorer window, and this is the recommended approach if you’re trying to work out which instruments to include in a new kit.
Quality note: When developing the feature, some recordings ended up being cut off when playing back. This is definitely a problem with the recording side rather than the playback side. I believe I’ve fixed it, but I can’t be sure. It’s most noticeable on percussion and sound FX instruments. If you run into this problem, please let me know ([email protected]) - you may well find that just re-recording the file fixes it, but I’d like to know anyway. (And apologies in advance.)
Further work
- Selective instrument recording, and possibly audio format selection
- Change kit (and back) when recording instruments
- Make the Instrument Audio Explorer prettier (do we really need so many Play buttons?)
- An icon!
- Cleaner user interface for loading or copying a single kit (the textbox is ugly)
- Defaults for TD-50 instruments (e.g. size for cymbals)
- UI options, e.g. whether to use sliders
- Load/save/overlay masked instrument settings
- (Internal) Consider generating/writing C# code from schema to have a cleaner model
Version history
Version 1.0.0-alpha07 (2020-08-22)
- Added non-crashing validation while loading data
- Fix MFX default values
- Populate schema for AE-10 Chorus, Reverb and MFX
- Fixes to TD-50 schema (fixes #120)
- Highly experimental support for the Aerophone Mini (AE-01)
(The Aerophone Mini doesn’t have a MIDI implementation document, so this is all based on observed values after modifying the configuration using the app. There’s all kinds of oddness that I haven’t tried to address yet. I’ve no idea what happens if you try to set things that should be read-only, like the version number. Custom fingering is only present for “fingering 1” because the UI for it is basically not there yet. But hey, it’s a start…)
Version 1.0.0-alpha06 (2020-08-11)
This is the first version with a complete new user interface implementation. While much of it looks the same as previous versions, it’s all changed under the hood - which means there may well be some bugs lurking. On the other hand, there are plenty of new features too:
- Better instrument recording and a cleaner Instrument Explorer interface.
- Early support for the Aerophone AE-10. Yes, I realize the Aerophone isn’t a drum kit, but it uses the same protocol for configuration (at least largely). There are various known issues with this at the moment, particularly around the Chorus/Reverb/MFX schema being very, very incomplete.
- “Schema Explorer” allowing you to inspect the containers and fields for any supported instrument.
- Many updates to schema aspects which were inaccurate in previous releases.
Version 1.0.0-alpha05 (2020-05-24)
- Fixed issue 97 where the presence of multiple MIDI devices unnecessarily aborted module detection.
There are some known schema issues in the TD-27 schema which are addressed in the new codebase but not here (as keeping track of things in both places is really tricky).
This is likely to be the last release of the “old” code, as the “new” code is approaching feature parity.
Version 1.0.0-alpha04 (2020-03-28)
- Fixed incorrect schema data (mostly in multifx, but also one TD-27 midi field, and TD-27 output assignments)
- Progress dialog when copying data to the module
- Top-level small containers moved to a “Setup” node under the root for simpler copying
Version 1.0.0-alpha03 (2020-03-01)
- Initial support for TD-27
- Change MIDI library choice (hopefully invisible to most users)
- Fix stack overflow error on some changes
- Fix tempo sync switch not reflecting in UI
- Select the first output device as a reasonable default in Instrument Audio Explorer
- Attempt to find a reasonable default input device in instrument recording dialog
Version 1.0.0-alpha02 (2019-10-03)
- Ability to record instrument sounds and then open the Instrument Audio Explorer
- Windows installer
- Moved “Open copy in Kit Explorer” to context menu
- Added “Copy kit” feature (in context menu)
- Added “Import kit from file” feature (in context menu)
- Added “Export kit to file” feature (in context menu)
Version 1.0.0-alpha01 (2019-09-27)
- Publish .NET Core 3.0 version
- Change away from 0.x to be consistent with my general thoughts on versioning
- Log the version number on startup
- Code is now signed with a personal certificate
- Remember file that was loaded, and split save/save-as functionality
- Remember overlaid containers within an edit session (e.g. switching between multi-fx options, don’t forget everything on each switch)
- Default cymbal sizes with the instrument is changed (TD-17 only for now)
- Better default values in overlays
- Add exception logging if something goes wrong when writing to the device
- Fix the Ride vedit overlay for the TD-50
- Introduce a “default kit number” in kit files, and allow it to be edited
- Improve display of the root node in Kit Explorer (no more “Kit 1”)
- The use of sliders for numeric fields
Version 0.1, 2019-09-15
Initial release after private testing
Recommend
-
31
I do not really have any spare time. (Toddler, job, very demanding cat, lots of LEGO to tidy up.) If I did, I like to imagine that I’d come up with something like this to do with it.
-
6
V-Drum Explorer Blazor DemoLoading...
-
11
Best drum sets TechnoBuffalo 2021 Studies show that playing the drums is a great workout of the brain, and it reduces stress and anxiety. For some, it may just be noise pollution! Choosing the right drum set can be a...
-
11
5 Best Drum Seats of 2021 Bestseller No. 1 Donner Drum Throne Set, Height... Hi...
-
10
-
3
Jul 27, 2021 8 min read Drum Synthesis in JavaScript
-
6
@ashutoshmishraAshutosh MishraFront-End Developer and Blogger at ClearprogrammerHey Everyone 👋, first things first, this project is part of the JavaSc...
-
6
Hang Massive - Once Again - 2011 ( hang drum duo ) ( HD )52,822,993 viewsDec 29, 2011 Join Our 10 Yea...
-
20
Beating the drum of your product strategy tune by Megan Murphy BY Eira Hayward ON OCTOBER 18, 2021...
-
8
(a or not b)'s DRUM MACHINE v.1.0 NoiseCraft New Share...
About Joyk
Aggregate valuable and interesting links.
Joyk means Joy of geeK