

How To Get a User's Location with the Geolocator Plugin in Flutter
source link: https://www.digitalocean.com/community/tutorials/flutter-geolocator-plugin
Go to the source link to view the article. You can view the picture content, updated content and better typesetting reading experience. If the link is broken, please click the button below to view the snapshot at that time.
Introduction
Geolocation is the process of identifying a user’s current physical location when they are interacting with your application.
There is a geolocator package and a geocoding package for Flutter that can be used for geolocation.
In this article, you will create an example Flutter app that uses the geolocator and geocoding packages to determine the location of a user.
Prerequisites
To complete this tutorial, you will need:
- To download and install Flutter.
- To download and install Android Studio.
flutter doctorwill also recommend:FlutterandDartplugins installed for Android Studio.Flutterextension installed for Visual Studio Code.
Note: On macOS, it is also possible to use Homebrew to install Flutter and Android Studio:
brew install flutter
brew cask install android-studio
When installing Android Studio on macOS, you may need to allow system software from “Intel Corporation Apps” and agree to Android licenses.
This tutorial was verified with Flutter v1.22.2, Android SDK v30.0.2, and Android Studio v4.1. The code in this tutorial has been updated to support geolocator 6+ and geocoding 1+.
Step 1 — Setting Up the Project
Once you have your environment set up for Flutter, you can run the following to create a new application:
flutter create flutter_geolocator_example
Navigate to the new project directory:
cd flutter_geolocator_example
Using flutter create will produce a demo application that will display the amount of times a button is clicked.
Open pubspec.yaml in your code editor and add the following plugins:
dependencies:
  flutter:
    sdk: flutter

  geocoding: ^1.0.5
  geolocator: ^6.1.1
Note: You will need to make sure that your Android project uses AndroidX for this. If you have created a Flutter application after version 1.7, this comes by default. If not, follow this guide: AndroidX Migration.
You will then need to add permissions to both Android and iOS by editing ios/Runner/Info.plist and android/app/src/main/AndroidManifest.xml.
iOS Permissions
Open Info.plist in your code editor and add NSLocationWhenInUseUsageDescription, NSLocationAlwaysUsageDescription, and NSLocationAlwaysAndWhenInUseUsageDescription:
Starting with iOS and the Info.plist, add the following key/value pairs and customize them to your liking:
<key>NSLocationWhenInUseUsageDescription</key>
<string>This app needs access to location when open.</string>

<key>NSLocationAlwaysUsageDescription</key>
<string>This app needs access to location when in the background.</string>

<key>NSLocationAlwaysAndWhenInUseUsageDescription</key>
<string>This app needs access to location when open and in the background.</string>
If you do not intend to support iOS applications older than iOS 10 and you do not want to get user location when the application is not in use, you can forego the addition of NSLocationAlwaysUsageDescription and NSLocationAlwaysAndWhenInUseUsageDescription.
Android Permissions
Open AndroidManifest.xml in your code editor and add one of the following.
ACCESS_FINE_LOCATION:
<uses-permission android:name="android.permission.ACCESS_FINE_LOCATION" />Or ACCESS_COARSE_LOCATION:
<uses-permission android:name="android.permission.ACCESS_COARSE_LOCATION" />ACCESS_FINE_LOCATION is the most precise, whereas ACCESS_COARSE_LOCATION gives results equal to about a city block.
With this setup complete, you can create the widget that will trigger and display the user’s current location.
Step 2 — Scaffolding the Project
Next, you will need to update the main.dart file and create a new home_page.dart file.
Open main.dart in your code editor and import home_page.dart and change the home from MyHomePage to HomePage:
import 'package:flutter/material.dart';
import 'home_page.dart';

void main() {
  runApp(MyApp());
}

class MyApp extends StatelessWidget {
  @override
  Widget build(BuildContext context) {
    return MaterialApp(
      title: 'Flutter Demo',
      theme: ThemeData(
        primarySwatch: Colors.blue,
        visualDensity: VisualDensity.adaptivePlatformDensity,
      ),
      home: HomePage(),
    );
  }
}
Then, create a new home_page.dart file and add the following code:
import 'package:flutter/material.dart';

class HomePage extends StatefulWidget {
  @override
  _HomePageState createState() => _HomePageState();
}

class _HomePageState extends State<HomePage> {
  @override
  Widget build(BuildContext context) {
    return Scaffold(
      appBar: AppBar(
        title: Text("Location"),
      ),
      body: Center(
        child: Column(
          mainAxisAlignment: MainAxisAlignment.center,
          children: <Widget>[
            FlatButton(
              child: Text("Get location"),
              onPressed: () {
                // Get location here
              },
            ),
          ],
        ),
      ),
    );
  }
}
This will create a button with the message "Get location".
Step 3 — Getting the Latitude and Longitude
The next step is adding the geolocation functionality.
You can accomplish that by creating an instance of Geolocator and calling getCurrentPosition. This should ask the user whether they are interested in using the Location feature, and if so, get the current location as a Position.
Revisit home_page.dart and add _getCurrentLocation():
import 'package:flutter/material.dart';
import 'package:geolocator/geolocator.dart';

class HomePage extends StatefulWidget {
  @override
  _HomePageState createState() => _HomePageState();
}

class _HomePageState extends State<HomePage> {
  Position _currentPosition;

  @override
  Widget build(BuildContext context) {
    return Scaffold(
      appBar: AppBar(
        title: Text("Location"),
      ),
      body: Center(
        child: Column(
          mainAxisAlignment: MainAxisAlignment.center,
          children: <Widget>[
            if (_currentPosition != null) Text(
              "LAT: ${_currentPosition.latitude}, LNG: ${_currentPosition.longitude}"
            ),
            FlatButton(
              child: Text("Get location"),
              onPressed: () {
                _getCurrentLocation();
              },
            ),
          ],
        ),
      ),
    );
  }

  _getCurrentLocation() {
    Geolocator
      .getCurrentPosition(desiredAccuracy: LocationAccuracy.best, forceAndroidLocationManager: true)
      .then((Position position) {
        setState(() {
          _currentPosition = position;
        });
      }).catchError((e) {
        print(e);
      });
  }
}
Compile your code and have it run in an emulator:
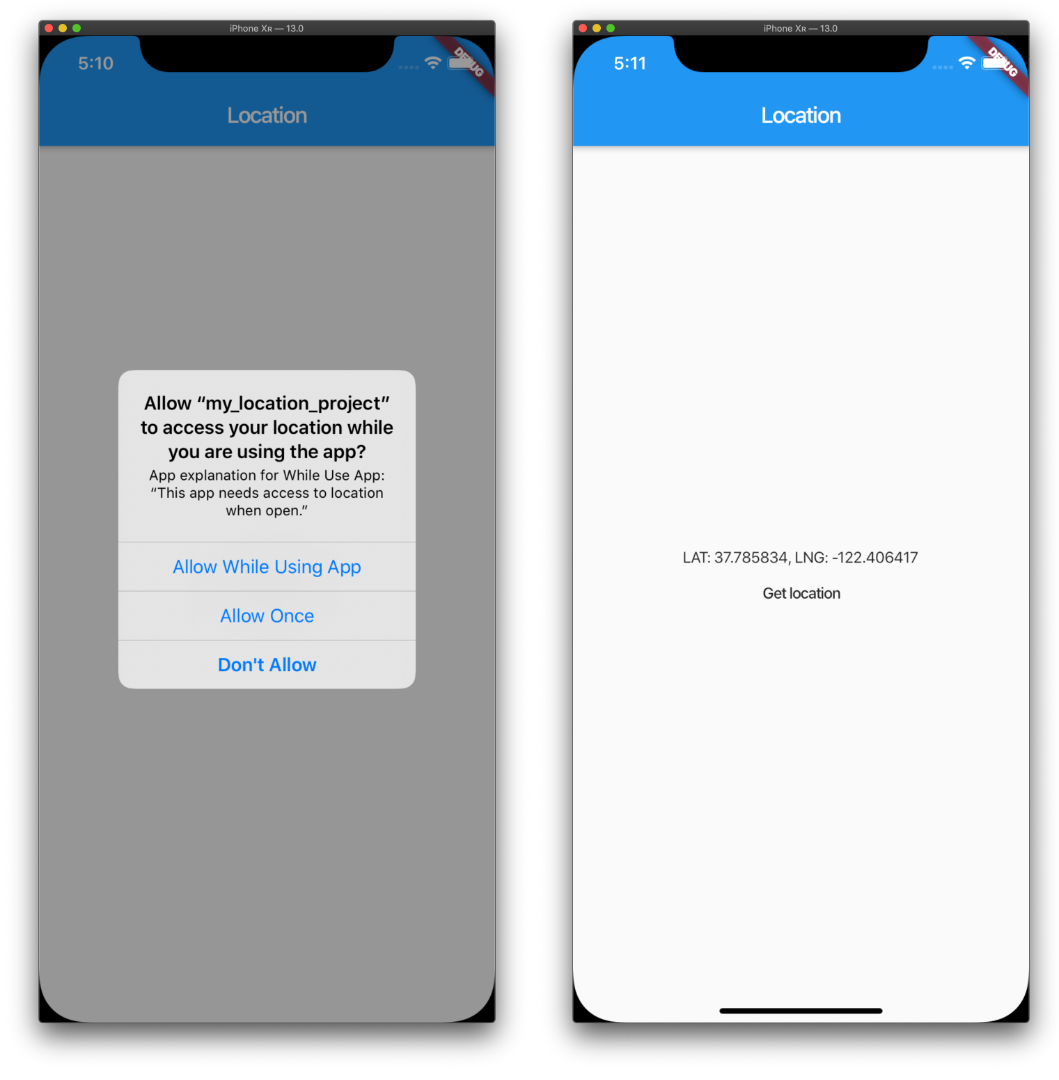
When you interact with the Get location button, you may initially see a prompt requesting access to your app. Once you allow access to your location, the latitude and longitude of your current location will appear on screen.
Step 4 — Converting Latitude and Longitude to a Human-readable Address
The next step is converting the coordinates to display an address.
Passing latitude and longitude coordinates to placemarkFromCoordinates will return a Placemark. Placemark contains information like locality, postalCode, and country.
Revisit home_page.dart and add _getAddressFromLatLng_():
import 'package:flutter/material.dart';
import 'package:geocoding/geocoding.dart';
import 'package:geolocator/geolocator.dart';

class HomePage extends StatefulWidget {
  @override
  _HomePageState createState() => _HomePageState();
}

class _HomePageState extends State<HomePage> {
  Position _currentPosition;
  String _currentAddress;

  @override
  Widget build(BuildContext context) {
    return Scaffold(
      appBar: AppBar(
        title: Text("Location"),
      ),
      body: Center(
        child: Column(
          mainAxisAlignment: MainAxisAlignment.center,
          children: <Widget>[
            if (_currentAddress != null) Text(
              _currentAddress
            ),
            FlatButton(
              child: Text("Get location"),
              onPressed: () {
                _getCurrentLocation();
              },
            ),
          ],
        ),
      ),
    );
  }

  _getCurrentLocation() {
    Geolocator
      .getCurrentPosition(desiredAccuracy: LocationAccuracy.best, forceAndroidLocationManager: true)
      .then((Position position) {
        setState(() {
          _currentPosition = position;
          _getAddressFromLatLng();
        });
      }).catchError((e) {
        print(e);
      });
  }

  _getAddressFromLatLng() async {
    try {
      List<Placemark> placemarks = await placemarkFromCoordinates(
        _currentPosition.latitude,
        _currentPosition.longitude
      );

      Placemark place = placemarks[0];

      setState(() {
        _currentAddress = "${place.locality}, ${place.postalCode}, ${place.country}";
      });
    } catch (e) {
      print(e);
    }
  }
}
Compile your code and have it run in an emulator:

When you interact with the Get location button, you may initially see a prompt requesting access to your app. Once you allow access to your location, your locality, postalCode, and county will be displayed on the screen.
Conclusion
In this tutorial, you used geolocator and geocoding packages in a Flutter application.
If you’d like to learn more about Flutter, check out our Flutter topic page for exercises and programming projects.
Recommend
About Joyk
Aggregate valuable and interesting links.
Joyk means Joy of geeK