

简单主机网络隔离方案
source link: http://blog.7rule.com/2021/03/05/underlay-container-network.html
Go to the source link to view the article. You can view the picture content, updated content and better typesetting reading experience. If the link is broken, please click the button below to view the snapshot at that time.

如果想隔离主机中进程的网络环境,可以使用network namespace(后面简称ns)来做。隔离方法很多种,本文介绍几种简单的可行方案。
实验环境准备
实验环境使用腾讯云上的两台cvm主机,两台机器在同一vpc同一子网下(underlay网络),这样两台机器天然内网互通。
cvm-1:
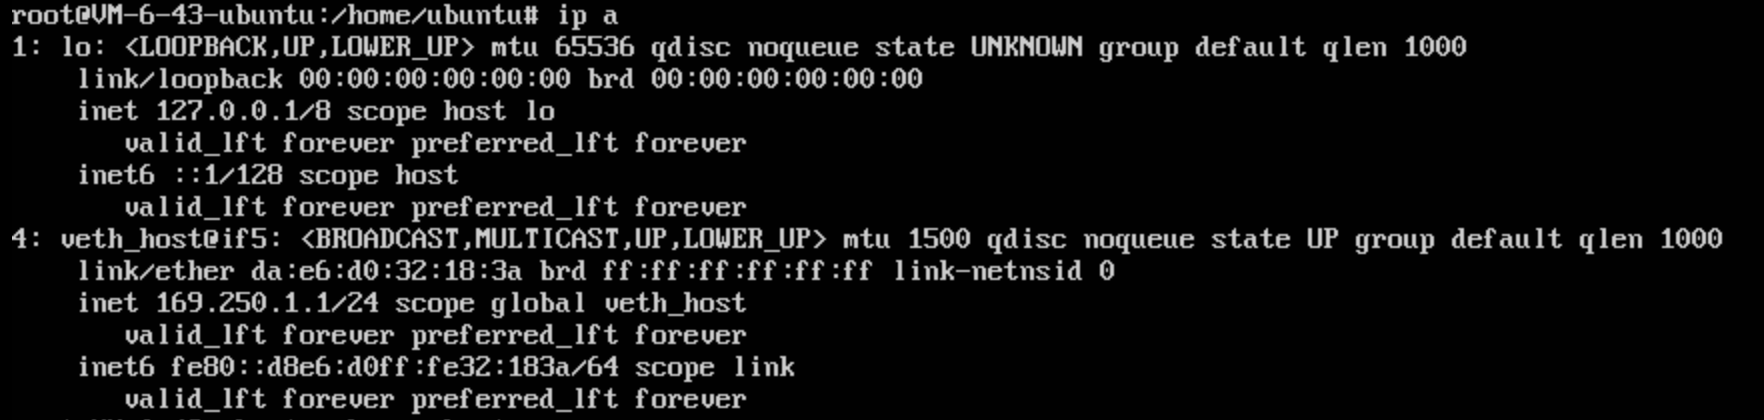
ubuntu@VM-6-43-ubuntu:~$ ip a
1: lo: <LOOPBACK,UP,LOWER_UP> mtu 65536 qdisc noqueue state UNKNOWN group default qlen 1000
    link/loopback 00:00:00:00:00:00 brd 00:00:00:00:00:00
    inet 127.0.0.1/8 scope host lo
       valid_lft forever preferred_lft forever
    inet6 ::1/128 scope host
       valid_lft forever preferred_lft forever
3: eth0: <BROADCAST,MULTICAST,UP,LOWER_UP> mtu 1500 qdisc fq_codel state UP group default qlen 1000
    link/ether 52:54:00:9c:e7:91 brd ff:ff:ff:ff:ff:ff
    inet 10.0.6.43/24 brd 10.0.6.255 scope global eth0
       valid_lft forever preferred_lft forever
    inet6 fe80::5054:ff:fe9c:e791/64 scope link
       valid_lft forever preferred_lft forever
cvm-2:
ubuntu@VM-6-46-ubuntu:~$ ip a
1: lo: <LOOPBACK,UP,LOWER_UP> mtu 65536 qdisc noqueue state UNKNOWN group default qlen 1000
    link/loopback 00:00:00:00:00:00 brd 00:00:00:00:00:00
    inet 127.0.0.1/8 scope host lo
       valid_lft forever preferred_lft forever
    inet6 ::1/128 scope host
       valid_lft forever preferred_lft forever
3: eth0: <BROADCAST,MULTICAST,UP,LOWER_UP> mtu 1500 qdisc fq_codel state UP group default qlen 1000
    link/ether 52:54:00:75:e7:ca brd ff:ff:ff:ff:ff:ff
    inet 10.0.6.46/24 brd 10.0.6.255 scope global eth0
       valid_lft forever preferred_lft forever
    inet6 fe80::5054:ff:fe75:e7ca/64 scope link
       valid_lft forever preferred_lft forever
我们之后的配置都在cvm-1上操作进行,使用cvm-2测试网络连通性。
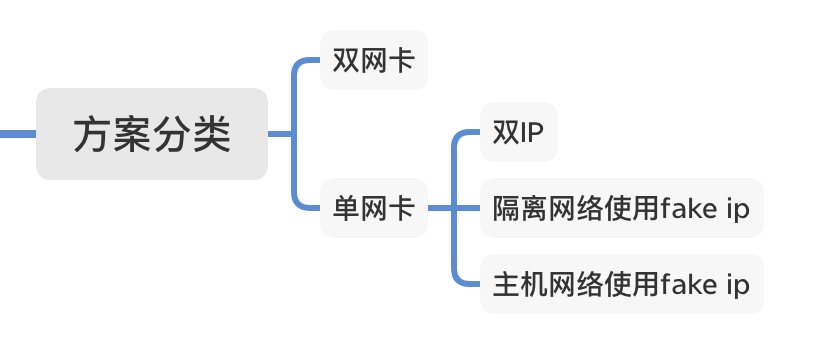
方案概览:
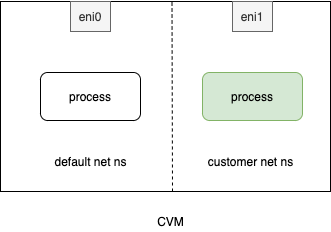
设置方法:
#!/bin/bash

myns=blue

ip net add $myns
ip link set eth1 netns $myns
ip net exec $myns ip link set eth1 name eth0

ip net exec $myns ip addr add 10.0.6.14/24 dev eth0
ip net exec $myns ip link set eth0 up

ip net exec $myns ip route add default via 10.0.6.1 dev eth0
设置后机器上的网络情况为:
root@VM-6-43-ubuntu:/home/ubuntu# ip a
1: lo: <LOOPBACK,UP,LOWER_UP> mtu 65536 qdisc noqueue state UNKNOWN group default qlen 1000
    link/loopback 00:00:00:00:00:00 brd 00:00:00:00:00:00
    inet 127.0.0.1/8 scope host lo
       valid_lft forever preferred_lft forever
    inet6 ::1/128 scope host
       valid_lft forever preferred_lft forever
3: eth0: <BROADCAST,MULTICAST,UP,LOWER_UP> mtu 1500 qdisc fq_codel state UP group default qlen 1000
    link/ether 52:54:00:9c:e7:91 brd ff:ff:ff:ff:ff:ff
    inet 10.0.6.43/24 brd 10.0.6.255 scope global eth0
       valid_lft forever preferred_lft forever
    inet6 fe80::5054:ff:fe9c:e791/64 scope link
       valid_lft forever preferred_lft forever
root@VM-6-43-ubuntu:/home/ubuntu# ip net exec blue ip a
1: lo: <LOOPBACK> mtu 65536 qdisc noop state DOWN group default qlen 1000
    link/loopback 00:00:00:00:00:00 brd 00:00:00:00:00:00
4: eth0: <BROADCAST,MULTICAST,UP,LOWER_UP> mtu 1500 qdisc fq_codel state UP group default qlen 1000
    link/ether 20:90:6f:a4:6b:7e brd ff:ff:ff:ff:ff:ff
    inet 10.0.6.14/24 scope global eth0
       valid_lft forever preferred_lft forever
    inet6 fe80::2290:6fff:fea4:6b7e/64 scope link
       valid_lft forever preferred_lft forever
和另一台cvm测试网络连通性:
//隔离环境连通另外一台cvm
root@VM-6-43-ubuntu:/home/ubuntu# ip net exec blue ping 10.0.6.46 -c 3PING 10.0.6.46 (10.0.6.46) 56(84) bytes of data.
64 bytes from 10.0.6.46: icmp_seq=1 ttl=64 time=0.145 ms
64 bytes from 10.0.6.46: icmp_seq=2 ttl=64 time=0.168 ms
64 bytes from 10.0.6.46: icmp_seq=3 ttl=64 time=0.204 ms

--- 10.0.6.46 ping statistics ---
3 packets transmitted, 3 received, 0% packet loss, time 2037ms
rtt min/avg/max/mdev = 0.145/0.172/0.204/0.026 ms

//另一台cvm连通隔离环境
ubuntu@VM-6-46-ubuntu:~$ ping 10.0.6.14 -c 3
PING 10.0.6.14 (10.0.6.14) 56(84) bytes of data.
64 bytes from 10.0.6.14: icmp_seq=1 ttl=64 time=0.172 ms
64 bytes from 10.0.6.14: icmp_seq=2 ttl=64 time=0.178 ms
64 bytes from 10.0.6.14: icmp_seq=3 ttl=64 time=0.174 ms

--- 10.0.6.14 ping statistics ---
3 packets transmitted, 3 received, 0% packet loss, time 2040ms
rtt min/avg/max/mdev = 0.172/0.174/0.178/0.015 ms
方案概览:
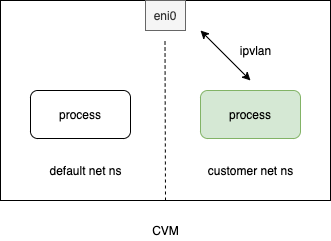
本方案创建一个虚拟网卡,使用ipvlan的L2模式,设置方法如下:
#!/bin/bash

myns=blue
tmpName=ipv1

ip net add $myns
ip link add link eth0 name $tmpName type ipvlan mode l2
ip link set $tmpName netns $myns
ip net exec $myns ip link set $tmpName name eth0
ip net exec $myns ip addr add 10.0.6.22/24 dev eth0
ip net exec $myns ip link set eth0 up

ip net exec $myns ip route add default via 10.0.6.1 dev eth0
设置后隔离环境网络情况为:
root@VM-6-43-ubuntu:/home/ubuntu# ip net exec blue ip a
1: lo: <LOOPBACK> mtu 65536 qdisc noop state DOWN group default qlen 1000
    link/loopback 00:00:00:00:00:00 brd 00:00:00:00:00:00
4: eth0@if3: <BROADCAST,MULTICAST,UP,LOWER_UP> mtu 1500 qdisc noqueue state UNKNOWN group default qlen 1000
    link/ether 52:54:00:9c:e7:91 brd ff:ff:ff:ff:ff:ff
    inet 10.0.6.22/24 scope global eth0
       valid_lft forever preferred_lft forever
    inet6 fe80::5254:0:19c:e791/64 scope link
       valid_lft forever preferred_lft forever
和另一台cvm测试网络连通性:
//隔离环境连通另外一台cvm
root@VM-6-43-ubuntu:/home/ubuntu# ip net exec blue ping 10.0.6.46 -c 3PING 10.0.6.46 (10.0.6.46) 56(84) bytes of data.
64 bytes from 10.0.6.46: icmp_seq=1 ttl=64 time=0.297 ms
64 bytes from 10.0.6.46: icmp_seq=2 ttl=64 time=0.204 ms
64 bytes from 10.0.6.46: icmp_seq=3 ttl=64 time=0.183 ms

--- 10.0.6.46 ping statistics ---
3 packets transmitted, 3 received, 0% packet loss, time 2033ms
rtt min/avg/max/mdev = 0.183/0.228/0.297/0.049 ms

//另一台cvm连通隔离环境
ubuntu@VM-6-46-ubuntu:~$ ping 10.0.6.22 -c 3
PING 10.0.6.22 (10.0.6.22) 56(84) bytes of data.
64 bytes from 10.0.6.22: icmp_seq=1 ttl=64 time=0.164 ms
64 bytes from 10.0.6.22: icmp_seq=2 ttl=64 time=0.169 ms
64 bytes from 10.0.6.22: icmp_seq=3 ttl=64 time=0.175 ms

--- 10.0.6.22 ping statistics ---
3 packets transmitted, 3 received, 0% packet loss, time 2039ms
rtt min/avg/max/mdev = 0.164/0.169/0.175/0.011 ms
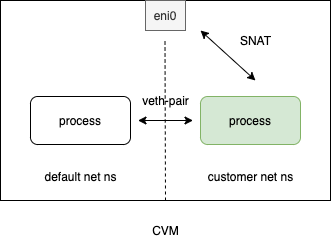
单IP – 隔离网络使用fake ip
方案概览:
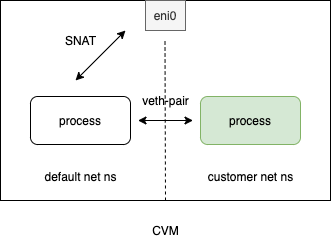
设置方法如下:
#!/bin/bash

myns=blue

ip net add $myns
ip link add veth0 type veth peer name veth_host

ip link set veth0 netns $myns
ip net exec $myns ip link set veth0 name eth0
ip net exec $myns ip addr add 169.250.1.2/24 dev eth0
ip net exec $myns ip link set eth0 up
ip net exec $myns ip route add default via 169.250.1.1 dev eth0

ip link set veth_host up
ip addr add 169.250.1.1/24 dev veth_host

iptables -t nat -A POSTROUTING -s 169.250.1.2  -o eth0 -j MASQUERADE
sysctl -w net.ipv4.ip_forward=1
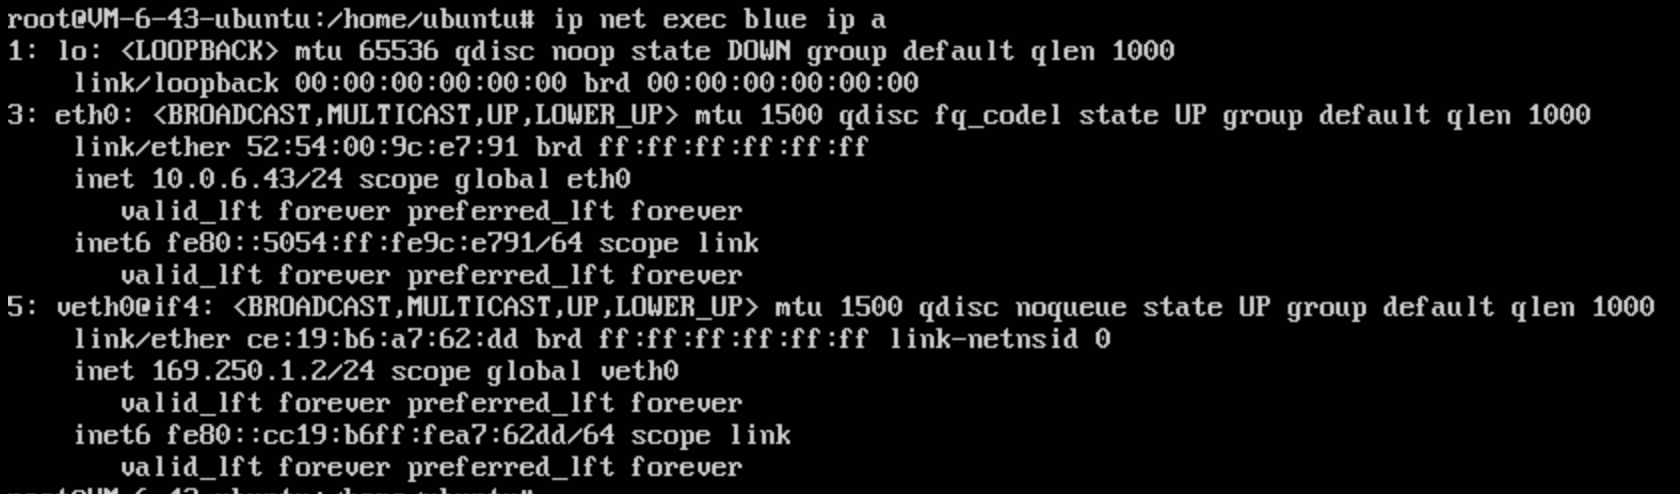
设置后主机环境网络情况为:
root@VM-6-43-ubuntu:/home/ubuntu# ip a
1: lo: <LOOPBACK,UP,LOWER_UP> mtu 65536 qdisc noqueue state UNKNOWN group default qlen 1000
    link/loopback 00:00:00:00:00:00 brd 00:00:00:00:00:00
    inet 127.0.0.1/8 scope host lo
       valid_lft forever preferred_lft forever
    inet6 ::1/128 scope host
       valid_lft forever preferred_lft forever
3: eth0: <BROADCAST,MULTICAST,UP,LOWER_UP> mtu 1500 qdisc fq_codel state UP group default qlen 1000
    link/ether 52:54:00:9c:e7:91 brd ff:ff:ff:ff:ff:ff
    inet 10.0.6.43/24 brd 10.0.6.255 scope global eth0
       valid_lft forever preferred_lft forever
    inet6 fe80::5054:ff:fe9c:e791/64 scope link
       valid_lft forever preferred_lft forever
4: veth_host@if5: <BROADCAST,MULTICAST,UP,LOWER_UP> mtu 1500 qdisc noqueue state UP group default qlen 1000
    link/ether 9a:c1:6d:de:de:b7 brd ff:ff:ff:ff:ff:ff link-netnsid 0
    inet 169.250.1.1/24 scope global veth_host
       valid_lft forever preferred_lft forever
    inet6 fe80::98c1:6dff:fede:deb7/64 scope link
       valid_lft forever preferred_lft forever
设置后隔离环境网络情况为:
root@VM-6-43-ubuntu:/home/ubuntu# ip net exec blue ip a
1: lo: <LOOPBACK> mtu 65536 qdisc noop state DOWN group default qlen 1000
    link/loopback 00:00:00:00:00:00 brd 00:00:00:00:00:00
5: eth0@if4: <BROADCAST,MULTICAST,UP,LOWER_UP> mtu 1500 qdisc noqueue state UP group default qlen 1000
    link/ether 16:8d:05:d9:34:44 brd ff:ff:ff:ff:ff:ff link-netnsid 0
    inet 169.250.1.2/24 scope global eth0
       valid_lft forever preferred_lft forever
    inet6 fe80::148d:5ff:fed9:3444/64 scope link
       valid_lft forever preferred_lft forever
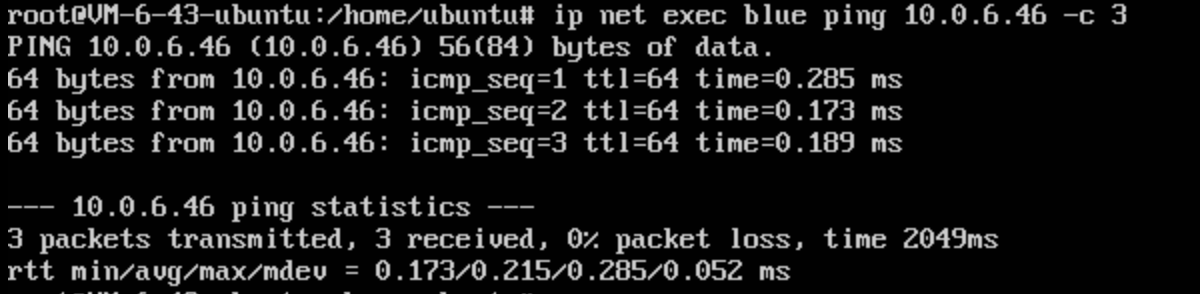
和另一台cvm测试网络连通性:
//隔离环境连通另外一台cvm
root@VM-6-43-ubuntu:/home/ubuntu# ip net exec blue ping 10.0.6.46 -c 3PING 10.0.6.46 (10.0.6.46) 56(84) bytes of data.
64 bytes from 10.0.6.46: icmp_seq=1 ttl=63 time=0.323 ms
64 bytes from 10.0.6.46: icmp_seq=2 ttl=63 time=0.201 ms
64 bytes from 10.0.6.46: icmp_seq=3 ttl=63 time=0.238 ms

--- 10.0.6.46 ping statistics ---
3 packets transmitted, 3 received, 0% packet loss, time 2036ms
rtt min/avg/max/mdev = 0.201/0.254/0.323/0.051 ms
本方案从外部cvm访问隔离网络中服务需要配置DNAT。
单IP – 主机网络使用fake ip
方案概览:
设置方法如下:
#!/bin/bash

myns=blue

ip net add $myns
ip link add veth0 type veth peer name veth_host

ip link set veth0 netns $myns
ip link set eth0 netns $myns

ip net exec $myns ip addr add 169.250.1.2/24 dev veth0
ip net exec $myns ip link set veth0 up

ip net exec $myns ip addr add 10.0.6.43/24 dev eth0
ip net exec $myns ip link set eth0 up

ip net exec $myns ip route add default via 10.0.6.1 dev eth0

ip link set veth_host up
ip addr add 169.250.1.1/24 dev veth_host

ip route add default via 169.250.1.2 dev veth_host

ip net exec $myns iptables -t nat -A POSTROUTING -s 169.250.1.1 -o eth0 -j MASQUERADE
ip net exec $myns sysctl -w net.ipv4.ip_forward=1
这里设置后之前通过ssh登录到主机环境会断开无法登录,需要使用cvm提供的vnc方式登录。
设置后主机环境网络情况为:
设置后隔离环境网络情况为:
和另一台cvm测试网络连通性:
隔离环境连通另外一台cvm:
//另一台cvm连通隔离环境
ubuntu@VM-6-46-ubuntu:~$ ping 10.0.6.43 -c 3
PING 10.0.6.43 (10.0.6.43) 56(84) bytes of data.
64 bytes from 10.0.6.43: icmp_seq=1 ttl=64 time=0.188 ms
64 bytes from 10.0.6.43: icmp_seq=2 ttl=64 time=0.190 ms
64 bytes from 10.0.6.43: icmp_seq=3 ttl=64 time=0.183 ms

--- 10.0.6.43 ping statistics ---
3 packets transmitted, 3 received, 0% packet loss, time 2049ms
rtt min/avg/max/mdev = 0.183/0.187/0.190/0.003 ms
本方案从外部cvm访问主机网络中服务需要配置DNAT。
网络隔离通常用于容器服务,上面是自己基于underlay网络做的一些实践,如有错误,还请指出,感谢阅读!
Recommend
-
88
访问的文章审核中... - FreeBuf网络安全行业门户 user 形状结合 怀...
-
73
各种规模的公司快速采用云服务,可以带来许多商业利益,尤其是提高灵活性和降低IT基础架构成本。但是,随着IT环境在性质上变得更加异构和地理分布,许多组织看到他们的安全攻击面呈指数级增长。随着越来越多的企业采用一体化架构风格的应...
-
15
紧接着前几天的事: 之后,决定买一台整机玩玩。 而现在,主机终...
-
9
榨干小主机,all in one家庭软路由方案 篇二:【日五晚俺】iKuai软路由接入家庭网络 ...
-
5
Skip to content @sskaje WireGuard 海外多主机方案
-
7
Skip to content @sskaje
-
7
跨网攻击:突破物理隔离网络攻击技术简介 作者:郭峰 2022-11-10 12:17:02 跨网攻击再一次印证网络安全是相对的不是绝对的。网络窃密与反窃密技术始终在动态中发展、在博弈中消长。上述几种新型跨网攻击技术的出现...
-
5
首页技术宅LinuxCyberPanel Linux主机面板-支持 OpenLiteSpeed 简单、快...
-
7
聊聊 SaaS 多租户系统数据隔离实现方案 作者:不才陈某 2023-06-07 13:50:00 不同角色只能看到不同数据,部门经理只能看到自己部门的数据,小组长只能看到自己小组的数据,这些实现逻辑套路都可以模仿多租户插件的...
-
13
V2EX › NAS 有没有主机和硬盘分开的 NAS 方案?
About Joyk
Aggregate valuable and interesting links.
Joyk means Joy of geeK