

What Can A $30 USB Spectrum Analyser Do For Me?
source link: https://hackaday.com/2021/03/08/what-can-a-30-usb-spectrum-analyser-do-for-me/
Go to the source link to view the article. You can view the picture content, updated content and better typesetting reading experience. If the link is broken, please click the button below to view the snapshot at that time.
What Can A $30 USB Spectrum Analyser Do For Me?
As mildly exotic silicon has become cheaper and the ingenuity of hardware hackers has been unleashed upon it, it’s inevitable that some once-unattainably expensive instruments will appear as cheap modules from China. The LTDZ spectrum analyser on the bench today covers 35 MHz to 4.4 GHz, and has a USB interface and tracking source. It has been available from all the usual outlets for a while now either as a bare PCB or in a metal box about the size of a pack of cards.
We’ve already taken a look at the $50 VNA, and this time it’s the turn of the $30 spectrum analyser, in the form of a little device that I succumbed to while browsing Banggood.
I ordered one, along with an attenuator and RF bridge for SWR measurements, and after the usual wait for postage my anonymous grey package arrived and it was time to give it a look and consider its usefulness. It’s a design derived from one published in Germany’s Funkamateur (“amateur radio”) magazine early in the last decade, and unscrewing the end plate to slide out the board from its extruded enclosure we can see what makes it tick.
How Much RF Test Equipment Hardware Does $30 Get you?
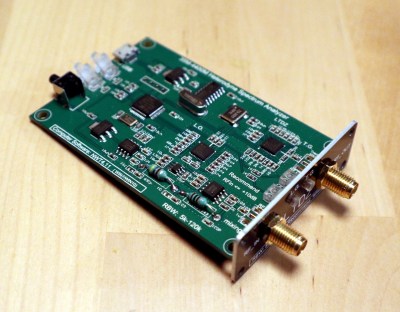 Its operation is surprisingly simple, in effect a very wideband radio receiver and signal source that can sequentially check signal levels across its range under the control of a microcomputer. On the board is an STM32F103 microcontroller that drives a pair of ADF4351 PLL frequency synthesisers for tracking and receive local oscillator respectively, an IAM-81008 receive mixer, and an AD8307 logarithmic amplifier to measure the received level. It’s reported as having a receive bandwidth in the region of 150 kHz, but I lack the instrumentation to measure that. On the rear edge of the board is a micro-USB socket, a couple of LEDs, and a “Key” switch to enable the tracking oscillator, and on the front are a pair of SMA sockets for RF input and output.
If you buy one of these you will almost certainly be offered a download from the vendor. In my case I couldn’t find a Linux version, and tried the NWT4000 software which worked with my spectrum analyser despite claims to the contrary. To respect his wishes we’ll not put a link to his website here, but if you use his software of whatever version on one of these units we would like to request that you do not trouble him for support. Happily the [DL4JAL] software isn’t the only game in town, with both VMA Simple Spectrum Analyser and SNA Sharp being readily available alternatives. They are however both Windows-only, and the former requires a paid activation key for long-term use.
When You Have A Spectrum Analyser, Everything Is An RF Source
Once I had my device plugged in and detected by the software, it was time to calibrate it. This process simply generates a record of the device’s performance while directly reading its tracking generator, allowing the software to create a flat baseline. Calibration involves running a scan first with tracking source connected to the input through an attenuator, then directly. Once this has been done it is then possible to read a flat line across the frequency range without any test devices connected. To my shame, it took me a while to realise that pressing the “Key” button was necessary to enable the tracking generator.
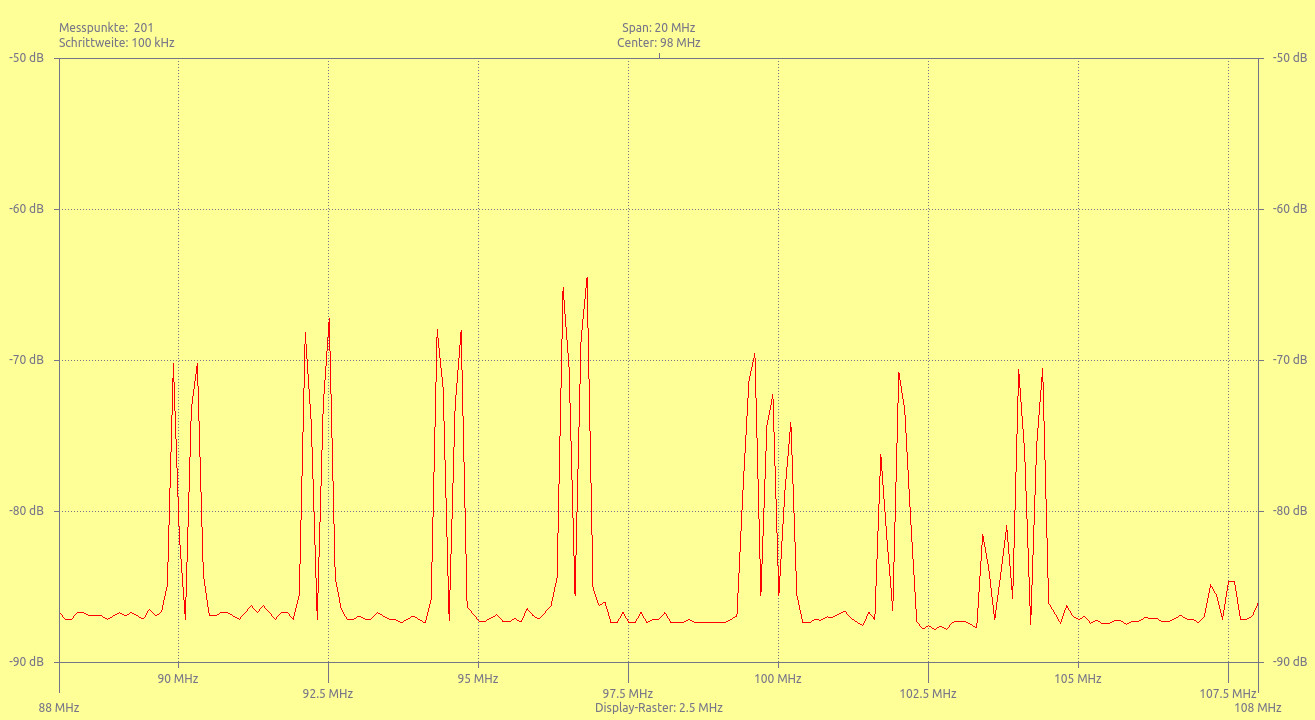
So, I have a spectrum analyser here on my bench, what next? Of course the first thing was to plug in an antenna and take a look at the off-air spectrum. I could home in on the FM band and see all the local stations that you’d find in a small British town, and I could see the TV multiplex transmissions, the home WiFi, and my mobile phone when I made a call. Having a new toy sends you scurrying around the house in search of radio sources, so I can confirm that variously a UHF remote, a DECT handset, and my Baofeng handheld radio all produce satisfying spikes on the graph.

It’s all very well to have a spectrum analyser to look at the pretty spikes, but it’s time to do something useful. The most obvious thing to try would be to characterise an antenna using the RF bridge, but sadly with most of my radio stuff in storage I don’t have a suitably narrow-band antenna to measure.
Instead I can check the spectral purity of my Baofeng transceiver, and for that all I need is the attenuator. The procedure is simple enough, connect the Baofeng’s antenna output through the attenuator to the spectrum analyser input, and take a spectrum reading. My back-of-the-envelope reckoning tells me that with the transmit power on the 100 mW “low” setting, the 20dB attenuator should be enough to reduce the level so as not to harm the analyser, and its input resistor should be capable of taking 100 mW for a short time. Setting it up in this way and pressing the transmit button, I could instantly see why there is some concern about the filtering on these cheaper radios. It has quite a few spurious spikes in the space between the 435 MHz fundamental and the first harmonic, then particularly strong subsequent harmonics. You get what you pay for in a transmitter.
So for $30, I seem to have picked up a useful little instrument that’s more than a toy and that can do some useful RF tasks on my bench. The $30 price tag makes itself felt though in that it has nowhere near the sensitivity and selectivity of its more expensive brethren, and its 35 MHz lower limit is too high for investigating noise emissions. Meanwhile the software has some availability issues over which we sympathise with its author, and we can’t help wishing that it had an open-source option available. For $30, it was worth it, but for much more I’d have to ask myself whether I would think the same. Perhaps for the lower frequencies in particular, a TinySA might be a better purchase.
Recommend
About Joyk
Aggregate valuable and interesting links.
Joyk means Joy of geeK