

HTTP/2 Server Push with JBoss undertow – And how to monitor things | Jeroen van...
source link: https://vanwilgenburg.wordpress.com/2015/12/28/http2-server-push-with-jboss-undertow-and-how-to-monitor-things/
Go to the source link to view the article. You can view the picture content, updated content and better typesetting reading experience. If the link is broken, please click the button below to view the snapshot at that time.

With HTTP/2 it’s possible to deliver data at a client before the client even asks for the data. This will significantly improve latency and perceived download speed. Last hack day at JPoint we spent some time with HTTP/2 server push. I will show you how to get it running on your machine and show some tools to monitor/prove all this goodness.
Hack Day at JPoint
The original plan was to split up into two teams. Team 1: Vincent with Netty. Netty appeared to be too much manual work and there weren’t enough hours in the day to get it running. Team 2: Mischa and me. We started with Jetty. All the examples looked easy, there was a demo project and lots of slides on Slideshare that said it was easy. I gave up after a few hours staring at : “org.eclipse.jetty.server.Request cannot be cast to org.eclipse.jetty.server.Request” Yes, terrible class loading problems. Mischa was more persistent and is probably still trying to get it running with some nasty class loading and reflection hacks.
JBoss isn’t the first product to pick when you’re suffering class loading problems, even when you’re warned by colleagues to not do it. But I did it anyway and JBoss really surprised me and saved the day.
The proof of concept
To prove that HTTP/2 push is working we create an application that loads a timestamp (as a String) from a server. The server immediately pushes another timestamp to the client and the client ‘claims’ the push 5 seconds later. The two timestamps should be very close to each other when server push is working.
JBoss Undertow
I never heard of Undertow but it was quite easy to set up and get the basic stuff running. We start undertow by using a main method. It’s probably possible to package things in a war and deploy it, but for this article a main will suffice.
All the sources are on http2-undertow, but I will discuss the steps on how to get it running on your machine.
First create a basic Maven project and add the following :
<dependency><groupId>io.undertow</groupId><artifactId>undertow-core</artifactId><version>1.3.9.Final</version></dependency><dependency><groupId>io.undertow</groupId><artifactId>undertow-servlet</artifactId><version>1.3.9.Final</version></dependency><dependency><groupId>org.mortbay.jetty.alpn</groupId><artifactId>alpn-boot</artifactId><version>8.1.2.v20141202</version><scope>runtime</scope></dependency>Someone already created an HTTP/2 server example, we will adapt Http2Server.java.
Create a Servlet named MyServlet with the following content :
public class MyServlet extends HttpServlet {// Mapped to https://localhost:8443/hello-world/api/hello@Overrideprotected void doGet(final HttpServletRequest req, final HttpServletResponse resp) throws ServletException, IOException {HttpServletRequestImpl r = (HttpServletRequestImpl) req;HttpServerExchange exchange = r.getExchange();exchange.getConnection().pushResource("/hello-world/api/again", Methods.GET, exchange.getRequestHeaders());PrintWriter writer = resp.getWriter();writer.write("Hello, World! @ " + Instant.now().toString() + "\n");writer.close();}}Add MyServlet to Http2Server by adding the following lines to the servletBuilder (and fix the errors with HelloWorldServlet) :
.addServlets(servlet("HelloWorldServlet", MyServlet.class).addInitParam("message", "Hello World").addMapping("/api/hello"), servlet("HelloWorldServlet2", MyServlet2.class).addInitParam("message", "Hello World").addMapping("/api/again")This servlet will print ‘Hello, World!’ with a timestamp and pushes the content of /hello-world/api/again to the client (the client did not ask for this url, but we’re pretty sure it will). It’s literally pushed into the client’s web browser.
In the lines above we also added MyServlet2, the code for this servlet is :
public class MyServlet2 extends HttpServlet {// Mapped to https://localhost:8443/hello-world/api/again@Overrideprotected void doGet(final HttpServletRequest req, final HttpServletResponse resp) throws ServletException, IOException {PrintWriter writer = resp.getWriter();writer.write("This was alreay pushed @ " + Instant.now().toString() + "\n");writer.close();}}This servlet will also print a timetamp.
You might have noticed there is a Jetty dependency for ALPN included. ALPN is a TLS extension that is used with HTTP/2. To start the server with this extension you have to provide a bootclasspath parameter. This parameter is located in the pom.xml. You can start the server with :
mvn package exec:exec
Visit https://localhost:8443/hello-world/index.html to confirm your server is running.
Serving static files with undertow
To serve static files (like index.html, style sheets and images) add the following method to the servletBuilder :
.setResourceManager(new FileResourceManager(new File(“src/main/webapp”), 1024))
Courtesy of http://www.mastertheboss.com/jboss-web/jbosswebserver/undertow-web-server-tutorial
Keystores and ALPN
I could dedicate a whole blog to this subject. But for now you can just copy the truststore files from the undertow-http2-servlet example. Note that this isn’t secure, so don’t let me catch you running these certificates in production!
Just keep in mind that browsers don’t do HTTP/2 without SSL, which is a good thing, but makes it a little harder to do quick demo projects.
Chrome net internals
Chrome has a nice feature to check whether server push is working and I’m not cheating with some javascripts. Enter chrome://net-internals in the url bar and select HTTP/2 from the dropdown on the top left.
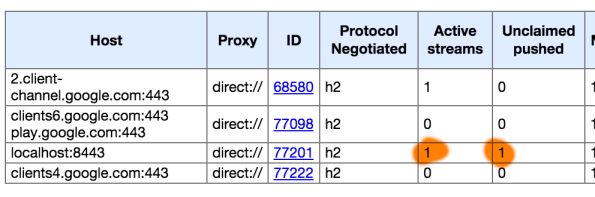
You will see a table with some columns, the important ones are ‘Unclaimed pushes’, ‘Pushed’ and ‘Pushed and Claimed’.
Have a tab with this page in the background and in a new tab visit https://localhost:8443/hello-world/index.html
You can ignore any exceptions with certificates (you might have to add an exception). Of course you should get the certificate stuff right in production.
Immediately after clicking the button switch to the net-internals tab and you will see changes in the columns. The net internals page updates about every 5 seconds, so set the delays a bit higher while testing otherwise you won’t see the updates. In the image below the unclaimed pushes and active streams are highlighted in orange.
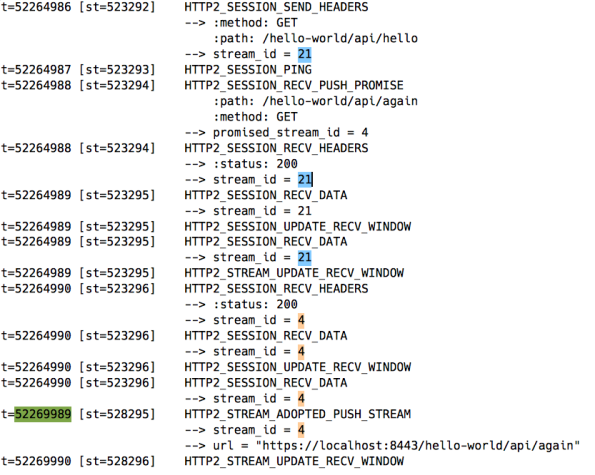
Now click on the ID of the session for localhost:8443 and click the ID again in the next page. Now go to the previous tab and click the button again, you will see a lot of things happen in the net-internals tab (like ‘HTTP2_SESSION_RECV_PUSH_PROMISE’)
I rebuilt a screenshot from the events right before the push of the button. t is the timestamp of the event and each stream is given its own color. As you can the HTTP2_SESSION_RECV_PUSH_PROMISE is sent within a few milliseconds. The actual ‘claim’ happend 5 seconds later (the timestamp highlighted in green) with the HTTP2_STREAM_ADOPTED_PUSH_STREAM.
Conclusion
I hope this gave you a good idea of the power of HTTP/2 server push. Any questions/comments/improvements are appreciated! Thanks for reading.
Sources
http://undertow.io/blog/2015/03/25/Server-Push.html
https://github.com/jiggy/goober
https://github.com/jvwilge/http2-undertow
Recommend
About Joyk
Aggregate valuable and interesting links.
Joyk means Joy of geeK