

源码剖析 Spring 循环依赖
source link: https://www.diguage.com/post/spring-circular-dependence/
Go to the source link to view the article. You can view the picture content, updated content and better typesetting reading experience. If the link is broken, please click the button below to view the snapshot at that time.
源码剖析 Spring 循环依赖
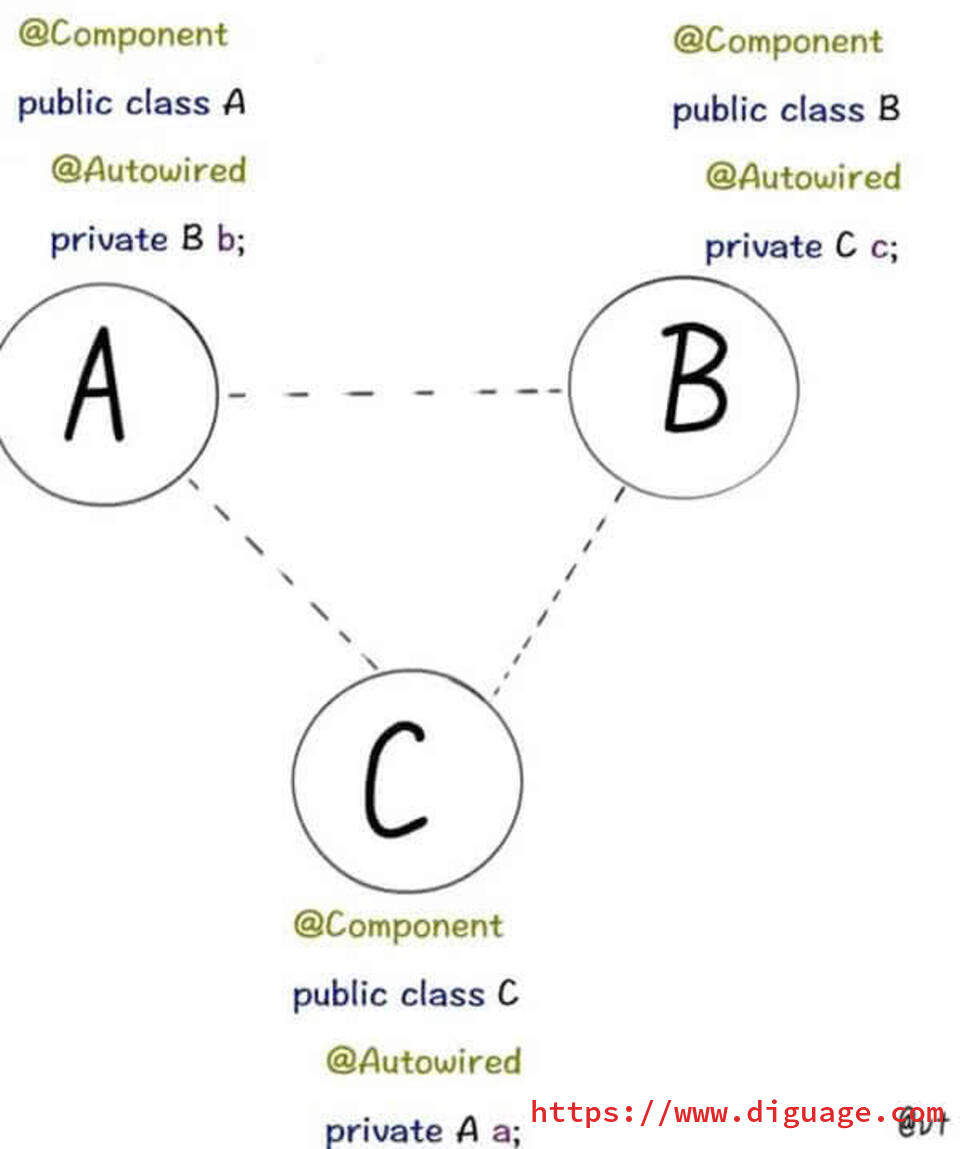
循环依赖在编程中是一个常见问题(当然,这并不是最佳实践)。并且,Spring 如何解决循环依赖这个问题在面试中也经常见。下面,D瓜哥就从源码的层面深入剖析一下这个问题。
先展示一下示例程序:
package com.diguage.truman.context;

import org.apache.commons.logging.Log;
import org.apache.commons.logging.LogFactory;
import org.junit.jupiter.api.Test;
import org.springframework.beans.factory.annotation.Autowired;
import org.springframework.context.annotation.AnnotationConfigApplicationContext;
import org.springframework.context.annotation.Configuration;
import org.springframework.context.annotation.Import;
import org.springframework.context.annotation.ImportSelector;
import org.springframework.core.type.AnnotationMetadata;
import org.springframework.stereotype.Component;

/**
 * @author D瓜哥, https://www.diguage.com/
 * @since 2020-05-24 13:02
 */
public class CircularDependenceSingletonTest {
  public static final Log log = LogFactory.getLog(CircularDependenceSingletonTest.class);

  @Test
  public void test() {
    AnnotationConfigApplicationContext applicationContext
        = new AnnotationConfigApplicationContext();
    applicationContext.register(Config.class);
    applicationContext.refresh();

    log.info(applicationContext.getBean(A.class));
    log.info(applicationContext.getBean(B.class));
    log.info(applicationContext.getBean(C.class));

    log.info("-A--------");
    A a = applicationContext.getBean(A.class);
    log.info(a);
    log.info(a.b);
    log.info("-B--------");
    B b = applicationContext.getBean(B.class);
    log.info(b);
    log.info(b.c);
    log.info("-C--------");
    C c = applicationContext.getBean(C.class);
    log.info(c);
    log.info(c.a);
  }

  @Configuration
  @Import(AbcImportSelector.class)
  public static class Config {
  }

  public static class AbcImportSelector implements ImportSelector {
    @Override
    public String[] selectImports(AnnotationMetadata importingClassMetadata) {
      return new String[]{
          A.class.getName(),
          B.class.getName(),
          C.class.getName()};
    }
  }


  @Component
  public static class A {
    @Autowired
    B b;
  }

  @Component
  public static class B {
    @Autowired
    C c;
  }

  @Component
  public static class C {
    @Autowired
    A a;
  }
}
上述示例代码中的循环依赖情况如下:
D瓜哥在 深入剖析 Spring 核心数据结构:BeanFactory 中,概要性地对 BeanFactory 的属性做了一一说明。
而其中的“三级缓存”属性,则是解决循环依赖问题的关键所在:
-
Map<String, Object> singletonObjects = new ConcurrentHashMap<>(256):Bean 名称到单例 Bean 的映射,用于存放完全初始化好的 Bean。可以理解成,这就是所谓的容器。这是一级缓存。 -
Map<String, Object> earlySingletonObjects = new HashMap<>(16):Bean 到“未成熟”单例 Bean 的映射。该 Bean 对象只是被创建出来,但是还没有注入依赖。在容器解决循环依赖时,用于存储中间状态。这是二级缓存。 -
Map<String, ObjectFactory<?>> singletonFactories = new HashMap<>(16):Bean 名称到 Bean 的 ObjectFactory 对象的映射,存放 Bean 工厂对象。在容器解决循环依赖时,用于存储中间状态。这是三级缓存。
Bean 的获取过程就类似计算机缓存的作用过程:先从一级获取,失败再从二级、三级里面获取。在 org.springframework.beans.factory.support.DefaultSingletonBeanRegistry#getSingleton(java.lang.String, boolean) 方法中,可以明确看到整个过程:
org.springframework.beans.factory.support.DefaultSingletonBeanRegistry#getSingleton(beanName, allowEarlyReference)/**
* Return the (raw) singleton object registered under the given name.
* <p>Checks already instantiated singletons and also allows for an early
* reference to a currently created singleton (resolving a circular reference).
* @param beanName the name of the bean to look for
* @param allowEarlyReference whether early references should be created or not
* @return the registered singleton object, or {@code null} if none found
*/
@Nullable
protected Object getSingleton(String beanName, boolean allowEarlyReference) {
Object singletonObject = this.singletonObjects.get(beanName);
if (singletonObject == null && isSingletonCurrentlyInCreation(beanName)) {
synchronized (this.singletonObjects) {
singletonObject = this.earlySingletonObjects.get(beanName);
if (singletonObject == null && allowEarlyReference) {
ObjectFactory<?> singletonFactory = this.singletonFactories.get(beanName);
if (singletonFactory != null) {
singletonObject = singletonFactory.getObject();
this.earlySingletonObjects.put(beanName, singletonObject);
this.singletonFactories.remove(beanName);
}
}
}
}
return singletonObject;
}Bean 创建过程
D瓜哥在 Spring Bean 生命周期概述 中专门讨论过 Bean 的生命周期函数。Bean 的实例创建和依赖注入是分开来处理的。具体到 Spring 的内部函数调用,有可以描述成如下:
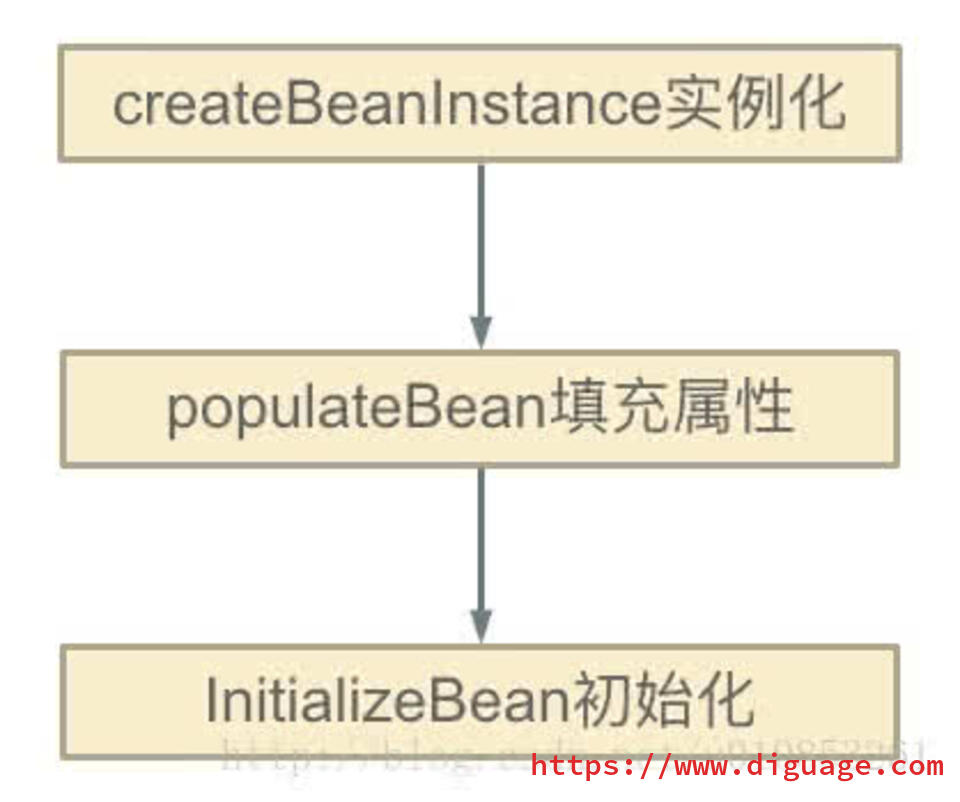
在 org.springframework.beans.factory.support.AbstractAutowireCapableBeanFactory#doCreateBean 方法中,能明确看到三个方法的调用过程。在这个方法上打上断点,开始调试。
org.springframework.beans.factory.support.AbstractAutowireCapableBeanFactory#doCreateBean// Instantiate the bean.
BeanWrapper instanceWrapper = null;
if (mbd.isSingleton()) {
instanceWrapper = this.factoryBeanInstanceCache.remove(beanName);
}
if (instanceWrapper == null) {
// 这个方法里面完成了对象创建,仅仅是对象
// 执行完整个方法,可以看看控制台的变化
/**
* 创建 bean 实例,并将实例包裹在 BeanWrapper 实现类对象中返回。
* createBeanInstance中包含三种创建 bean 实例的方式:
* 1. 通过工厂方法创建 bean 实例
* 2. 通过构造方法自动注入(autowire by constructor)的方式创建 bean 实例
* 3. 通过无参构造方法方法创建 bean 实例
*
* 若 bean 的配置信息中配置了 lookup-method 和 replace-method,则会使用 CGLIB
* 增强 bean 实例。关于lookup-method和replace-method后面再说。
*/
instanceWrapper = createBeanInstance(beanName, mbd, args);
}
Object bean = instanceWrapper.getWrappedInstance();关于 createBeanInstance 方法,已经在上面的注释中增加了响应说明,这里就不再贴代码了。
接着上面的代码,往下看,看如何完成注入的:
org.springframework.beans.factory.support.AbstractAutowireCapableBeanFactory#doCreateBeanObject bean = instanceWrapper.getWrappedInstance();
Class<?> beanType = instanceWrapper.getWrappedClass();
if (beanType != NullBean.class) {
mbd.resolvedTargetType = beanType;
}
// Allow post-processors to modify the merged bean definition.
synchronized (mbd.postProcessingLock) {
if (!mbd.postProcessed) {
try {
applyMergedBeanDefinitionPostProcessors(mbd, beanType, beanName);
}
catch (Throwable ex) {
throw new BeanCreationException(mbd.getResourceDescription(), beanName,
"Post-processing of merged bean definition failed", ex);
}
mbd.postProcessed = true;
}
}
// Eagerly cache singletons to be able to resolve circular references
// even when triggered by lifecycle interfaces like BeanFactoryAware.
boolean earlySingletonExposure = (mbd.isSingleton() && this.allowCircularReferences &&
isSingletonCurrentlyInCreation(beanName));
if (earlySingletonExposure) {
if (logger.isTraceEnabled()) {
logger.trace("Eagerly caching bean '" + beanName +
"' to allow for resolving potential circular references");
}
addSingletonFactory(beanName, () -> getEarlyBeanReference(beanName, mbd, bean));
}
// Initialize the bean instance.
Object exposedObject = bean;
try {
// 设置属性,非常重要 FIXME
populateBean(beanName, mbd, instanceWrapper);addSingletonFactory
先来看看 addSingletonFactory 方法:
org.springframework.beans.factory.support.DefaultSingletonBeanRegistry#addSingletonFactory/**
* Add the given singleton factory for building the specified singleton
* if necessary.
* <p>To be called for eager registration of singletons, e.g. to be able to
* resolve circular references.
* @param beanName the name of the bean
* @param singletonFactory the factory for the singleton object
*/
protected void addSingletonFactory(String beanName, ObjectFactory<?> singletonFactory) {
Assert.notNull(singletonFactory, "Singleton factory must not be null");
synchronized (this.singletonObjects) {
if (!this.singletonObjects.containsKey(beanName)) {
this.singletonFactories.put(beanName, singletonFactory);
this.earlySingletonObjects.remove(beanName);
this.registeredSingletons.add(beanName);
}
}
}从这里可以明显看出,代码符合我们上面注释中的描述: singletonFactory 变量被放入到 singletonFactories 变量中了。
populateBean
再来看看 populateBean
org.springframework.beans.factory.support.AbstractAutowireCapableBeanFactory#populateBean/**
* Populate the bean instance in the given BeanWrapper with the property values
* from the bean definition.
* @param beanName the name of the bean
* @param mbd the bean definition for the bean
* @param bw the BeanWrapper with bean instance
*/
@SuppressWarnings("deprecation") // for postProcessPropertyValues
protected void populateBean(String beanName, RootBeanDefinition mbd, @Nullable BeanWrapper bw) {
// 省略 N 行代码……
boolean hasInstAwareBpps = hasInstantiationAwareBeanPostProcessors();
boolean needsDepCheck = (mbd.getDependencyCheck() != AbstractBeanDefinition.DEPENDENCY_CHECK_NONE);
PropertyDescriptor[] filteredPds = null;
if (hasInstAwareBpps) {
if (pvs == null) {
pvs = mbd.getPropertyValues();
}
for (InstantiationAwareBeanPostProcessor bp : getBeanPostProcessorCache().instantiationAware) {
// 从这里开始注入依赖,
// 如果 bp 是 CommonAnnotationBeanPostProcessor 或 AutowiredAnnotationBeanPostProcessor 就执行注入
PropertyValues pvsToUse = bp.postProcessProperties(pvs, bw.getWrappedInstance(), beanName);
if (pvsToUse == null) {
if (filteredPds == null) {
filteredPds = filterPropertyDescriptorsForDependencyCheck(bw, mbd.allowCaching);
}
pvsToUse = bp.postProcessPropertyValues(pvs, filteredPds, bw.getWrappedInstance(), beanName);
if (pvsToUse == null) {
return;
}
}
pvs = pvsToUse;
}
}
if (needsDepCheck) {
if (filteredPds == null) {
filteredPds = filterPropertyDescriptorsForDependencyCheck(bw, mbd.allowCaching);
}
checkDependencies(beanName, mbd, filteredPds, pvs);
}
if (pvs != null) {
applyPropertyValues(beanName, mbd, bw, pvs);
}
}在 Spring Bean 生命周期概述 中对 Bean 的生命周期做了概要的介绍。这里就体现出来 CommonAnnotationBeanPostProcessor 和 AutowiredAnnotationBeanPostProcessor 的作用。上面我们用的是 @Autowired 注解。所以,这里使用 AutowiredAnnotationBeanPostProcessor 来处理。
依赖注入的调用链
查找依赖的调用链很繁琐,中间有牵涉到 Bean 创建的过程,这里只列出调用过程中的主要方法列表,需要请根据自己需要来单步调试。
完成依赖注入的调用链如下:
-
org.springframework.beans.factory.support.AbstractAutowireCapableBeanFactory#populateBean -
org.springframework.beans.factory.annotation.AutowiredAnnotationBeanPostProcessor#postProcessProperties -
org.springframework.beans.factory.annotation.InjectionMetadata#inject -
org.springframework.beans.factory.annotation.AutowiredAnnotationBeanPostProcessor.AutowiredFieldElement#inject -
org.springframework.beans.factory.support.DefaultListableBeanFactory#resolveDependency -
org.springframework.beans.factory.support.DefaultListableBeanFactory#doResolveDependency -
org.springframework.beans.factory.config.DependencyDescriptor#resolveCandidate -
org.springframework.beans.factory.support.AbstractBeanFactory#getBean(java.lang.String) -
org.springframework.beans.factory.annotation.InjectionMetadata#inject— 最后,还是在这里完成注入。
在 org.springframework.beans.factory.support.DefaultSingletonBeanRegistry#getSingleton(String, ObjectFactory<?>) 方法中,可以看到 Spring 在获得 Bean 实例后的处理过程:
org.springframework.beans.factory.support.DefaultSingletonBeanRegistry#getSingleton(String, ObjectFactory<?>)/**
* Return the (raw) singleton object registered under the given name,
* creating and registering a new one if none registered yet.
* @param beanName the name of the bean
* @param singletonFactory the ObjectFactory to lazily create the singleton
* with, if necessary
* @return the registered singleton object
*/
public Object getSingleton(String beanName, ObjectFactory<?> singletonFactory) {
Assert.notNull(beanName, "Bean name must not be null");
synchronized (this.singletonObjects) {
Object singletonObject = this.singletonObjects.get(beanName);
if (singletonObject == null) {
if (this.singletonsCurrentlyInDestruction) {
throw new BeanCreationNotAllowedException(beanName,
"Singleton bean creation not allowed while singletons of this factory are in destruction " +
"(Do not request a bean from a BeanFactory in a destroy method implementation!)");
}
if (logger.isDebugEnabled()) {
logger.debug("Creating shared instance of singleton bean '" + beanName + "'");
}
beforeSingletonCreation(beanName);
boolean newSingleton = false;
boolean recordSuppressedExceptions = (this.suppressedExceptions == null);
if (recordSuppressedExceptions) {
this.suppressedExceptions = new LinkedHashSet<>();
}
try {
singletonObject = singletonFactory.getObject();
newSingleton = true;
}
catch (IllegalStateException ex) {
// Has the singleton object implicitly appeared in the meantime ->
// if yes, proceed with it since the exception indicates that state.
singletonObject = this.singletonObjects.get(beanName);
if (singletonObject == null) {
throw ex;
}
}
catch (BeanCreationException ex) {
if (recordSuppressedExceptions) {
for (Exception suppressedException : this.suppressedExceptions) {
ex.addRelatedCause(suppressedException);
}
}
throw ex;
}
finally {
if (recordSuppressedExceptions) {
this.suppressedExceptions = null;
}
afterSingletonCreation(beanName);
}
if (newSingleton) {
// 创建完 Bean 后,将其加入到容器中
addSingleton(beanName, singletonObject);
}
}
return singletonObject;
}
}加入容器的操作也很简单:
org.springframework.beans.factory.support.DefaultSingletonBeanRegistry#addSingleton/**
* Add the given singleton object to the singleton cache of this factory.
* <p>To be called for eager registration of singletons.
* @param beanName the name of the bean
* @param singletonObject the singleton object
*/
protected void addSingleton(String beanName, Object singletonObject) {
synchronized (this.singletonObjects) {
this.singletonObjects.put(beanName, singletonObject);
this.singletonFactories.remove(beanName);
this.earlySingletonObjects.remove(beanName);
this.registeredSingletons.add(beanName);
}
}这里,假设 A → B 和 B → A 两层循环依赖来说明问题
-
通过
applicationContext.getBean(A.class)方法,委托给AbstractBeanFactory#doGetBean方法来尝试获取 Bean;获取不到则开始创建;-
Bean 是调用
instanceWrapper = createBeanInstance(beanName, mbd, args);方法创建出来了实例,然后又通过addSingletonFactory(beanName, () → getEarlyBeanReference(beanName, mbd, bean));将已经创建的实例封装到一个ObjectFactory<?> singletonFactory匿名类中,放入到三级缓存中。 -
在
populateBean(beanName, mbd, instanceWrapper);方法,通过CommonAnnotationBeanPostProcessor和AutowiredAnnotationBeanPostProcessor的postProcessProperties查找依赖,完成注入。-
查找依赖时,就会通过调用
getBean(beanName)获取 BeanB。此时,还没有 BeanB,则会从这里的第二步开始执行,创建实例,封装后加入到三级缓存singletonFactories中,调用populateBean(beanName, mbd, instanceWrapper);方法,通过CommonAnnotationBeanPostProcessor和AutowiredAnnotationBeanPostProcessor的postProcessProperties查找依赖,完成注入。依赖注入的过程,请看 依赖注入的调用链 小节。 -
到这里,就要查找 Bean
A了,一二三级缓存依次来查找(DefaultSingletonBeanRegistry#getSingleton(beanName, allowEarlyReference)),在三级缓存中,找到了对应的ObjectFactory<?> singletonFactory实例,然后调用getObject()方法,获得A的实例,将其加入到二级缓存中,将三级中的相关内容清理掉。从这里也可以看出,通过AbstractBeanFactory#doGetBean方法获得的 Bean 不一定是完全初始化好的 Bean,有可能是一个未完成初始化的实例对象。 -
获得
A的实例后,就可以完成 BeanB的初始化,调用DefaultSingletonBeanRegistry#addSingleton方法,将其加入一级缓存singletonObjects中,也就是容器中。(由于 BeanB可以直接完成依赖注入,则它不会从三级缓存跳到二级缓存。最后的三级缓存在调用addSingleton方法时,直接被清理掉了。)
-
-
到这里就可以获取 Bean
B了,然后完成A的依赖注入。
-
-
最后,通过调用
DefaultSingletonBeanRegistry#addSingleton方法,将 BeanA加入到一级缓存singletonObjects中,也就是容器中。所有的初始化工作就完成了。
需要注意的是,有两种情况,Spring 是没办法完成循环注入的:
-
构造函数注入 — 这种要求在实例之前创建好依赖的实例,但是明显无法完成,所以不能解决循环依赖。
-
PROTOTYPE类型的 Bean 相互依赖 — 刚刚看到,上面的三级缓存变量都是为SINGLETON类型的 Bean 准备的。PROTOTYPE类型的 Bean 在检查到循环依赖时,就直接抛异常了。
Recommend
About Joyk
Aggregate valuable and interesting links.
Joyk means Joy of geeK