
6

使用Gitea+Drone打造自己的CI/CD系统
source link: https://jiajunhuang.com/articles/2020_01_01-use_gitea_with_drone.md.html
Go to the source link to view the article. You can view the picture content, updated content and better typesetting reading experience. If the link is broken, please click the button below to view the snapshot at that time.

使用Gitea+Drone打造自己的CI/CD系统
有些代码我放本地了,因此搭建了一个Gitea,再加上家里有个老机器,闲着也是闲着,就搭建一个Drone CI来跑测试。
首先可以直接安装:
$ sudo pacman -S gitea
配置好数据库等即可,此外还可以使用Docker托管。首先要在Gitea上创建一个Application,详情看这里
然后搭建Drone:
#!/bin/bash

export DRONE_GITEA_CLIENT_ID="gitea上生成的Client ID"
export DRONE_GITEA_CLIENT_SECRET="gitea上生成的Client Secret"
export DRONE_GITEA_SERVER="http://192.168.1.2(总之是gitea的地址,自行替换)"
export DRONE_RPC_SECRET="<RPC Secret,用来和下面runner通信的>"
export DRONE_SERVER_HOST="<Drone自己的地址,可以是内网地址,也可以是域名>"
export DRONE_SERVER_PROTO="http或者https"

docker run \
  --volume=/var/lib/drone:/data/docker/drone \
  --env=DRONE_AGENTS_ENABLED=true \
  --env=DRONE_GITEA_SERVER=${DRONE_GITEA_SERVER} \
  --env=DRONE_GITEA_CLIENT_ID=${DRONE_GITEA_CLIENT_ID} \
  --env=DRONE_GITEA_CLIENT_SECRET=${DRONE_GITEA_CLIENT_SECRET} \
  --env=DRONE_RPC_SECRET=${DRONE_RPC_SECRET} \
  --env=DRONE_SERVER_HOST=${DRONE_SERVER_HOST} \
  --env=DRONE_SERVER_PROTO=${DRONE_SERVER_PROTO} \
  --publish=8089:80 \
  --restart=always \
  --detach=true \
  --name=drone \
  drone/drone:1
#!/bin/bash

docker run -d \
  -v /var/run/docker.sock:/var/run/docker.sock \
  -e DRONE_RPC_PROTO=<上面填的DRONE_SERVER_PROTO> \
  -e DRONE_RPC_HOST=<上面填的DRONE_SERVER_HOST> \
  -e DRONE_RPC_SECRET=<上面填的Drone RPC Secret> \
  -e DRONE_RUNNER_CAPACITY=2 \
  -e DRONE_RUNNER_NAME=${HOSTNAME} \
  --restart always \
  --name runner \
  drone/drone-runner-docker:1
由于我使用的是Go,因此我还搭建了一个 goproxy 来加速下载:
#!/bin/bash

docker run -d --name goproxy -p 8899:8081 -v /data/docker/goproxy:/go goproxy/goproxy -proxy https://goproxy.io -exclude "<gitea的域名或地址>"
接下来定义一个 .drone.yml 就好:
---
kind: pipeline
type: docker
name: default

steps:
- name: migrate
  image: migrate/migrate:20200101
  commands:
    - sleep 120
    - /migrate -path=migrations -database="mysql://root:@(database:3306)/test" up

- name: build
  image: newapi-ci:20200101
  environment:
    GOPROXY: http://192.168.1.2:8899
    DEBUG: true
    REDISURL: "redis://:@cache:6379/1"
    DATABASEURL: "root:@(database:3306)/test?parseTime=true&loc=Local"
  commands:
    - protoc -I proto/ api/api.proto --go_out=plugins=grpc:proto/
    - go vet ./...
    - go test ./...
    - go build -tags=jsoniter

- name: slack
  image: plugins/slack:20200101
  settings:
    webhook: <Slack webhook地址>
    link_names: true
    channel: ci
    template: >
      {{#success build.status}}
        build {{build.number}} {{build.link}} succeeded. Good job.
      {{else}}
        build {{build.number}} {{build.link}} failed. Fix me please.
      {{/success}}
  when:
    status: [ success, failure ]

services:
  - name: cache
    image: redis:5
  - name: database
    image: mysql:5.7
    ports:
    - 3306
    environment:
      MYSQL_ALLOW_EMPTY_PASSWORD: "yes"
      MYSQL_DATABASE: "test"
注意几点:
- image尽量自己加个tag,来加速访问,否则docker默认拉取
latest这个tag的镜像,太难等了 - 自己搭建一个goproxy加速访问,或者使用
https://goproxy.io也行,但肯定是磁盘快啦 - 使用 service 来起跑测试用的数据库时,不要用 mariadb,因为这货默认监听 127.0.0.1
- 使用 service 来起跑测试用的服务时,注意要sleep等待一下,参考上面的
sleep 120,因为我的是机械硬盘,所以要等比较久 - slack 提醒最好成功和失败都加上
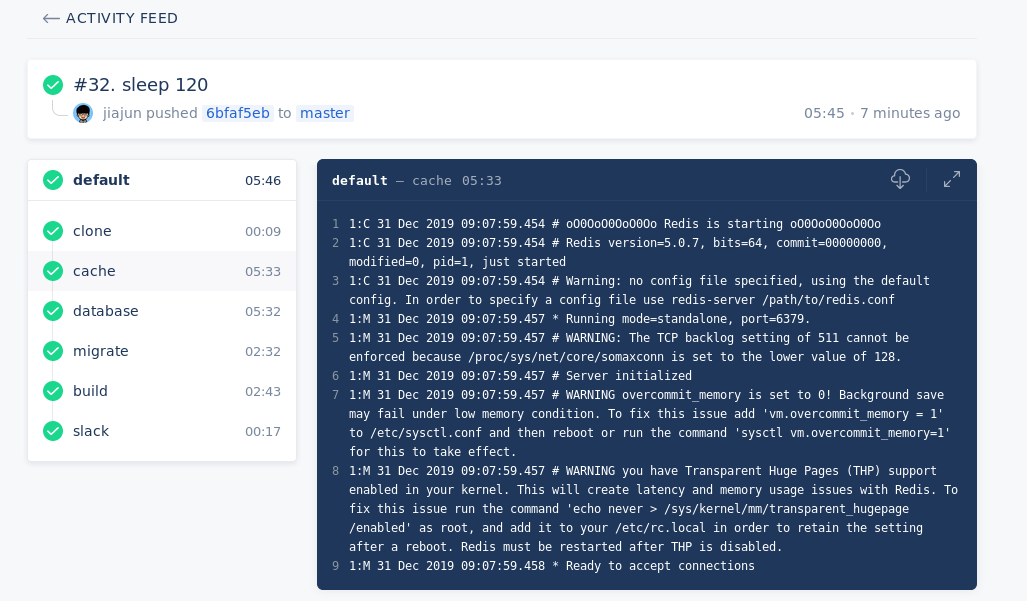
最后来看一张效果图:

关注公众号,获得及时更新
远程工作一周有感
Matebook X Pro 2019安装Debian 10
Recommend
About Joyk
Aggregate valuable and interesting links.
Joyk means Joy of geeK