

Setting Up A Multi Node Cluster In Hadoop 2.X
source link: https://www.edureka.co/blog/setting-up-a-multi-node-cluster-in-hadoop-2-x/
Go to the source link to view the article. You can view the picture content, updated content and better typesetting reading experience. If the link is broken, please click the button below to view the snapshot at that time.
Multi Node Cluster in Hadoop 2.x
From our previous blog in Hadoop Tutorial Series, we learnt how to setup aHadoop Single Node Cluster. Now, I will show how to set up a Hadoop Multi Node Cluster. A Multi Node Cluster in Hadoop contains two or more DataNodes in a distributed Hadoop environment. This is practically used in organizations to store and analyze their Petabytes and Exabytes of data. Learning to set up a multi node cluster gears you closer to your much needed Hadoop certification.
Here, we are taking two machines – master and slave. On both the machines, a Datanode will be running.
Let us start with the setup of Multi Node Cluster in Hadoop.
Prerequisites
- Cent OS 6.5
- Hadoop-2.7.3
- JAVA 8
Setup of Multi Node Cluster in Hadoop
We have two machines (master and slave) with IP:
Master IP: 192.168.56.102
Slave IP: 192.168.56.103
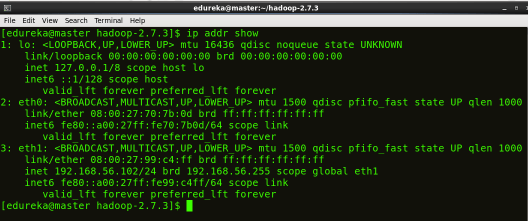
STEP 1: Check the IP address of all machines.
Command: ip addr show (you can use the ifconfig command as well)

STEP 2: Disable the firewall restrictions.
Command: service iptables stop
Command: sudo chkconfig iptables off

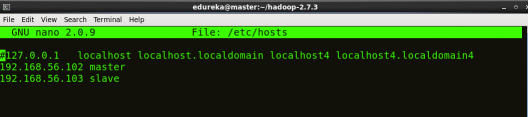
STEP 3: Open hosts file to add master and data node with their respective IP addresses.
Command: sudo nano /etc/hosts
Same properties will be displayed in the master and slave hosts files.

STEP 4: Restart the sshd service.
Command: service sshd restart

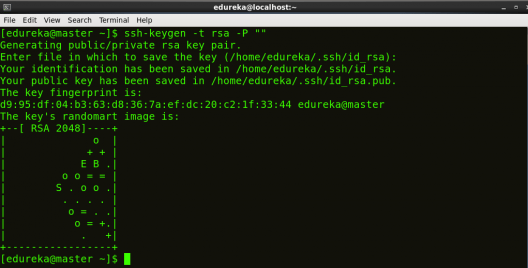
STEP 5: Create the SSH Key in the master node. (Press enter button when it asks you to enter a filename to save the key).
Command: ssh-keygen -t rsa -P “”
STEP 6: Copy the generated ssh key to master node’s authorized keys.
Command: cat $HOME/.ssh/id_rsa.pub >> $HOME/.ssh/authorized_keys

STEP 7: Copy the master node’s ssh key to slave’s authorized keys.
Command: ssh-copy-id -i $HOME/.ssh/id_rsa.pub edureka@slave


STEP 8: Click here to download the Java 8 Package. Save this file in your home directory.
STEP 9: Extract the Java Tar File on all nodes.
Command: tar -xvf jdk-8u101-linux-i586.tar.gz

STEP 10: Download the Hadoop 2.7.3 Package on all nodes.
Command: wget https://archive.apache.org/dist/hadoop/core/hadoop-2.7.3/hadoop-2.7.3.tar.gz

STEP 11: Extract the Hadoop tar File on all nodes.
Command: tar -xvf hadoop-2.7.3.tar.gz

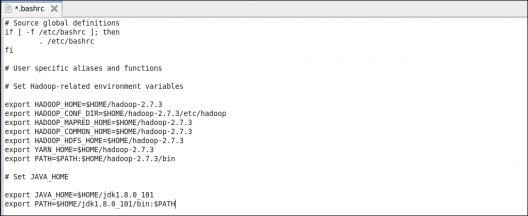
STEP 12: Add the Hadoop and Java paths in the bash file (.bashrc) on all nodes.
Open. bashrc file. Now, add Hadoop and Java Path as shown below:
Command: sudo gedit .bashrc

Then, save the bash file and close it.
For applying all these changes to the current Terminal, execute the source command.
Command: source .bashrc

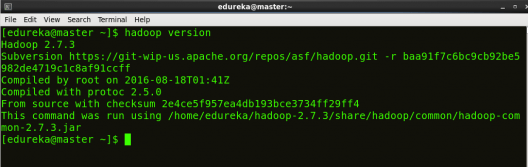
To make sure that Java and Hadoop have been properly installed on your system and can be accessed through the Terminal, execute the java -version and hadoop version commands.
Command: java -version

Command: hadoop version
Now edit the configuration files in hadoop-2.7.3/etc/hadoop directory.
STEP 13: Create masters file and edit as follows in both master and slave machines as below:
Command: sudo gedit masters

STEP 14: Edit slaves file in master machine as follows:
Command: sudo gedit /home/edureka/hadoop-2.7.3/etc/hadoop/slaves

STEP 15: Edit slaves file in slave machine as follows:
Command: sudo gedit /home/edureka/hadoop-2.7.3/etc/hadoop/slaves

STEP 16: Edit core-site.xml on both master and slave machines as follows:
Command: sudo gedit /home/edureka/hadoop-2.7.3/etc/hadoop/core-site.xml

<?xml version="1.0" encoding="UTF-8"?><?xml-stylesheet type="text/xsl" href="configuration.xsl"?><configuration><property><name>fs.default.name</name><value>hdfs://master:9000</value></property></configuration>STEP 7: Edit hdfs-site.xml on master as follows:
Command: sudo gedit /home/edureka/hadoop-2.7.3/etc/hadoop/hdfs-site.xml

<?xml version="1.0" encoding="UTF-8"?><?xml-stylesheet type="text/xsl" href="configuration.xsl"?><configuration><property><name>dfs.replication</name><value>2</value></property><property><name>dfs.permissions</name><value>false</value></property><property><name>dfs.namenode.name.dir</name><value>/home/edureka/hadoop-2.7.3/namenode</value></property><property><name>dfs.datanode.data.dir</name><value>/home/edureka/hadoop-2.7.3/datanode</value></property></configuration>STEP 18: Edit hdfs-site.xml on slave machine as follows:
Command: sudo gedit /home/edureka/hadoop-2.7.3/etc/hadoop/hdfs-site.xml
<?xml version="1.0" encoding="UTF-8"?><?xml-stylesheet type="text/xsl" href="configuration.xsl"?><configuration><property><name>dfs.replication</name><value>2</value></property><property><name>dfs.permissions</name><value>false</value></property><property><name>dfs.datanode.data.dir</name><value>/home/edureka/hadoop-2.7.3/datanode</value></property></configuration>STEP 19: Copy mapred-site from the template in configuration folder and the edit mapred-site.xml on both master and slave machines as follows:
Command: cp mapred-site.xml.template mapred-site.xml
Command: sudo gedit /home/edureka/hadoop-2.7.3/etc/hadoop/mapred-site.xml


<?xml version="1.0" encoding="UTF-8"?><?xml-stylesheet type="text/xsl" href="configuration.xsl"?><configuration><property><name>mapreduce.framework.name</name><value>yarn</value></property></configuration>STEP 20: Edit yarn-site.xml on both master and slave machines as follows:
Command: sudo gedit /home/edureka/hadoop-2.7.3/etc/hadoop/yarn-site.xml

<?xml version="1.0" encoding="UTF-8"?><?xml-stylesheet type="text/xsl" href="configuration.xsl"?><configuration><property><name>yarn.nodemanager.aux-services</name><value>mapreduce_shuffle</value></property><property><name>yarn.nodemanager.auxservices.mapreduce.shuffle.class</name><value>org.apache.hadoop.mapred.ShuffleHandler</value></property></configuration>STEP 21: Format the namenode (Only on master machine).
Command: hadoop namenode -format

STEP 22: Start all daemons (Only on master machine).
Command: ./sbin/start-all.sh

STEP 23: Check all the daemons running on both master and slave machines.
Command: jps
On master

On slave

At last, open the browser and go to master:50070/dfshealth.html on your master machine, this will give you the NameNode interface. Scroll down and see for the number of live nodes, if its 2, you have successfully setup a multi node Hadoop cluster. In case, it’s not 2, you might have missed out any of the steps which I have mentioned above. But no need to worry, you can go back and verify all the configurations again to find the issues and then correct them.
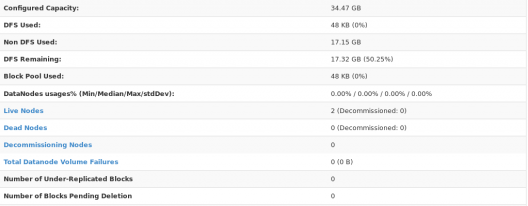
Here, we have only 2 DataNodes. If you want, you can add more DataNodes according to your needs, refer our blog on Commissioning and Decommissioning Nodes in a Hadoop Cluster.
I hope you would have successfully installed a Hadoop Multi Node Cluster. If you are facing any problem, you can comment below, we will be replying shortly. In our next blog of Hadoop Tutorial Series, you will learn some important HDFS commands and you can start playing with Hadoop.
Now that you have understood how to install Hadoop Multi Node Cluster, check out the Hadoop training by Edureka, a trusted online learning company with a network of more than 250,000 satisfied learners spread across the globe. The Edureka Big Data Hadoop Certification Training course helps learners become expert in HDFS, Yarn, MapReduce, Pig, Hive, HBase, Oozie, Flume and Sqoop using real-time use cases on Retail, Social Media, Aviation, Tourism, Finance domain.
Recommend
About Joyk
Aggregate valuable and interesting links.
Joyk means Joy of geeK