

First Steps in SQLDeveloper Data Modeler
source link: https://mikesmithers.wordpress.com/2018/05/30/first-steps-in-sqldeveloper-data-modeler/
Go to the source link to view the article. You can view the picture content, updated content and better typesetting reading experience. If the link is broken, please click the button below to view the snapshot at that time.
First Steps in SQLDeveloper Data Modeler
It’s true, Oracle are giving away free stuff. “Oracle ?”, I hear you say, “as in Larry’s Database Emporium and Cloud base ?” The very same.
It’s been going on for quite a while and includes relatively hidden gems such as SQLDeveloper Data Modeler.
There is some confusion around this particular tool for a couple of reasons.
When it was first released (sometime around 2009 as I recall), Data Modeler was an additional cost option. However, that didn’t last long.
At present (and for a number of years now), it is available either as a completely standalone tool, or as a fully integrated component of the SQLDeveloper IDE.
Either way, it costs exactly the same as the SQLDeveloper IDE – i.e. nothing.
I can tell you like the price, want to take it for a spin ?
I’m going to focus here on using the integrated version of Data Modeler. This is because
- I want to use it for small-scale modelling of the type you might expect to find when using an Agile Methodology
- I’m a developer and don’t want to leave the comfort of my IDE if I don’t need to
What I’m going to cover is :
- Viewing a Table Relationship Diagram (TRD) for an existing database table
- Creating a Logical Data Model and Entity Relationship Diagram (ERD)
- Generating a physical model from a logical model
- Generating DDL from a Physical Model (including some scripting tweaks to suit your needs)
- Using a Reporting Schema and pre-canned SQLDeveloper Reports to explore your models
Disclaimer
This post is about introducing the features of Data Modeler in the hope that you may find them useful.
It’s not intended as a paragon of data modelling virtue.
Come to that, it’s not intended as a definitive guide on how to use this tool. I’m no expert with Data Modeler (as you are about to find out). Fortunately, there are people out there who are.
If, after reading this, you want to explore further, then you could do worse than checking out words of Data Modeler wisdom from :
Let’s get started…
The Model Tab
Say I’m connected to the database as HR and I’m looking at the DEPARTMENTS table.
I’d really like to see a TRD for this table.
The bad news is that the data model originally created when building the application fell into disuse long ago and is now hopelessly outdated.
The good news is that I’m using a recent version of SQLDeveloper ( 18.1, since you ask), so I just need to navigate to the DEPARTMENTS table in the tree, hit the Model Tab and wait a few seconds…

That’s Data Modeler doing it’s thing – in this case, reading information from the Data Dictionary and building the resulting diagram on the fly.
Note that, you may wait some time for the tab to initialize and then be greeted with an apparently empty space. I’ve found that this is especially true when looking at Fact tables in a star-schema.
The tables are there, just not where you can see them.
If you want to explore the diagram, tweak the layout, or even just export it to a file, you can click on the Copy to Data Modeler button :
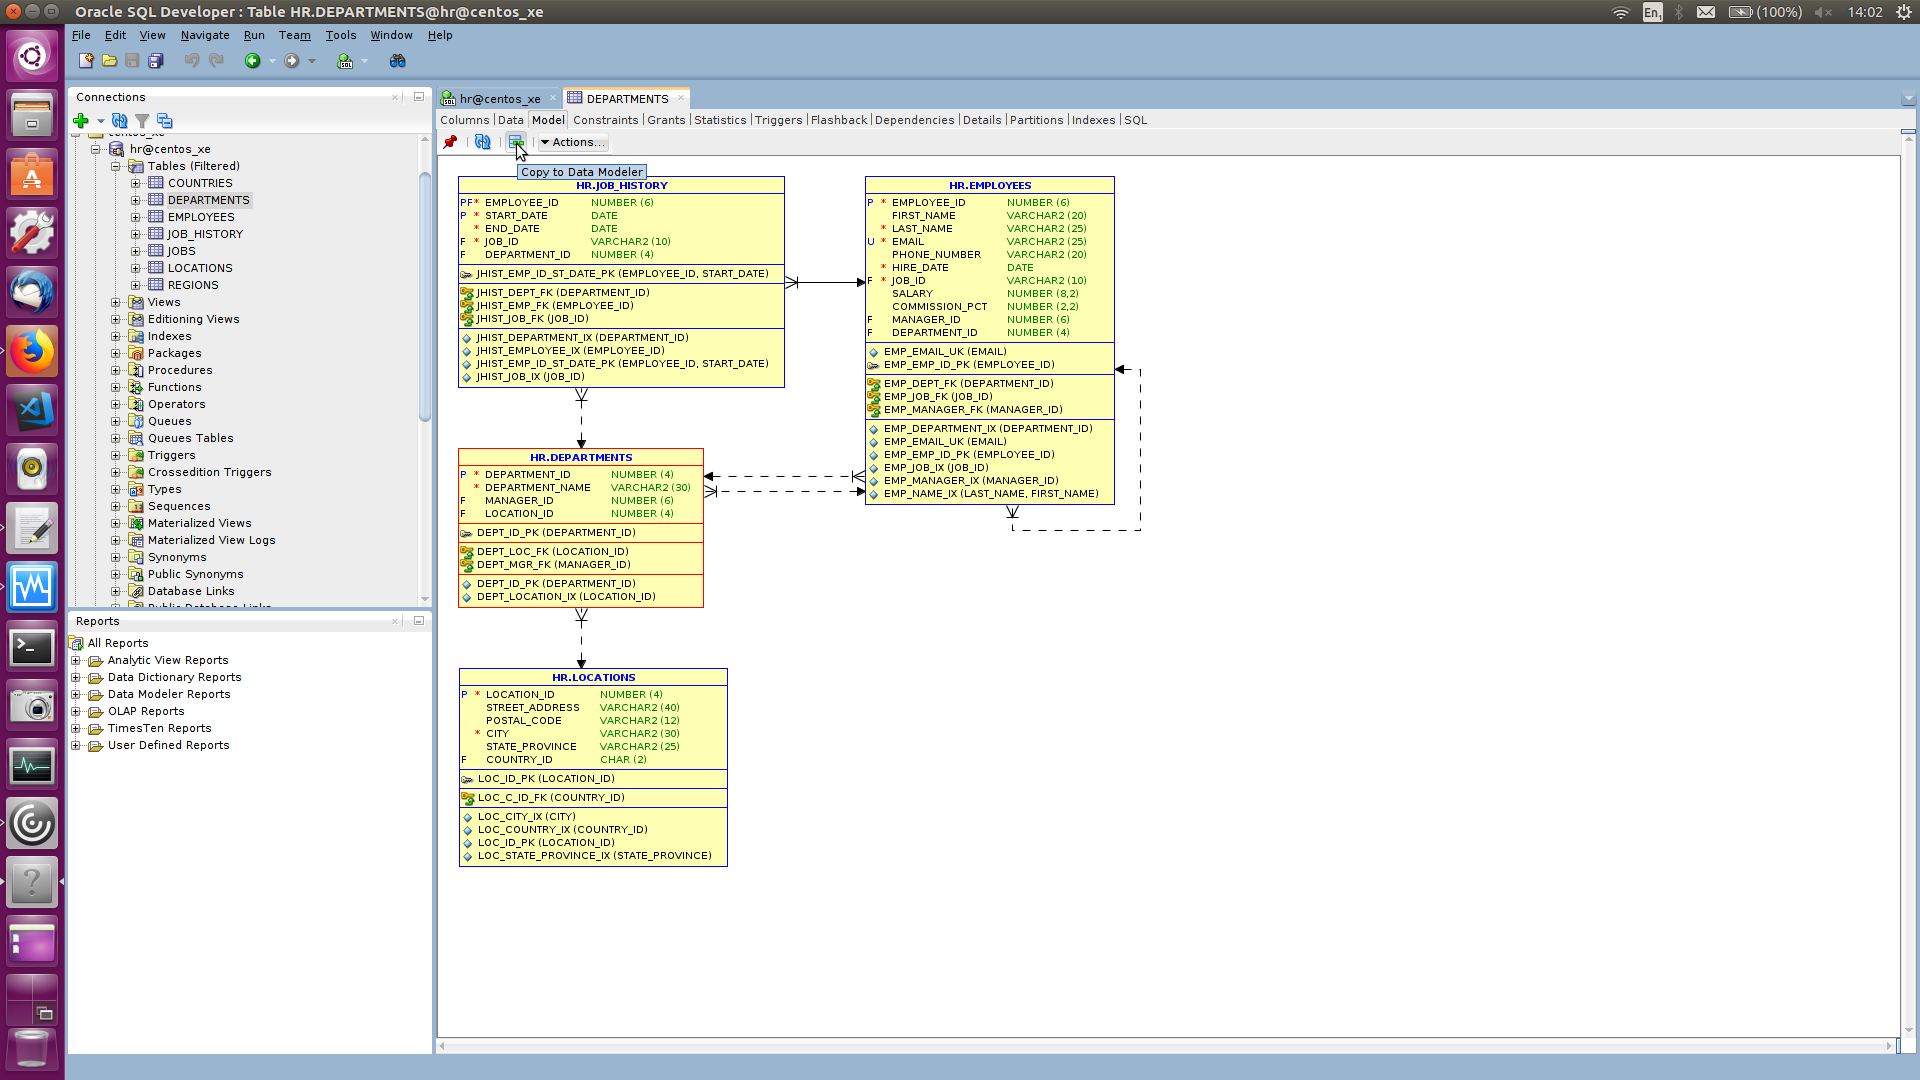
Incidentally, if you do have a diagram where nothing is visible, you should now be able to use the Fit Screen button to make sure you can see everything.

You should then be able to drag objects around and amend the layout to suit your purposes.
Once you’re finished, if you’d like to save the diagram into a separate file, you can use the right-click menu and select Print Diagram :

Whilst it’s extremely useful to be able to generate an accurate and up-to-date TRD from the Data Dictionary, where Data Modeler comes into it’s own is when you want to …er…create a Data Model.
Creating a Data Model for a new Application
The traditional approach to Data Modelling was to create a full sized, complete model before moving on to write the rest of the application. The extended timelines for this approach may not be practical if you are following one of the Agile development methodologies. However, having a properly designed data model is rather important for an Application running on the Oracle platform.
We can go some way to squaring this circle by creating models for sub-sections of the application in one sprint for the developers to code against in the next sprint.
This is the context in which I imagine the modelling that follows to be taking place.
In this case, I’m using my trusty World Cup Wallchart application as the example. This is a “new” application rather than being an enhancement to an existing one.
The Entities I’ve identified at this point are :
- A COMPETITION is an international football competition, such as the World Cup or the Copa America
- A TOURNAMENT is an instance of a COMPETITION (e.g. Russia 2018 is a World Cup Finals Tournament).
- A TEAM is a competitior in international football and may compete in one or more TOURNAMENTs, such as Brazil in all World Cups or England (briefly) in some
Right, let’s get cracking then, starting with…
The Logical Model
The first challenge is to choose the correct Data Modeler sub-menu to open to start creating our model. There are three separate entries in the IDE – in the File menu, the View menu, and the Tools menu.
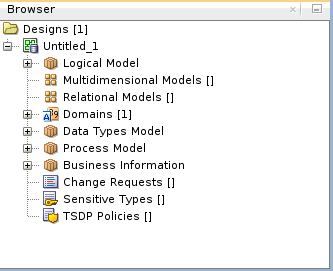
In this case, we want to open the Data Modeler Browser tree using View/Data Modeler/Browser

…which opens the browser in the left-hand pane.
Note – You can find Jeff Smith’s useful guide to the Integrated Data Modeler menus here.
If we expand the Untitled_1 node we can see some items which may be of interest…
We can now right-click the Logical Model node and select Show from the pop-up menu and we can see that a Diagram area, together with a widget toolbar appears…
We need to use the toolbar widgets to create our model objects.
The toolbar looks like this :
The widgets are :
- Select
- New Entity
- New View
- New M:N Relation
- New 1:N Relation
- New 1:N Relation Identifying
- New Type Substitution
- New Arc
- Add Foreign Key to Arc
- Remove Foreign Key from Arc
- New Note
- New Picture
- Delete
- Engineer to Relational Model
- Zoom in
- Zoom Out
- Fit Screen
- Default Size
- Search
For now, we’re going to click on New Entity and then click in the diagram area, which presents us with :
Our first Entity is COMPETITION. We specify this in the Name field in the General Tab.
Next we select Attributes section of the Entity Properties so that we can start specifying the COMPETITION attributes.
To add an attribute, simply click the green plus button in the Attributes toolbar that appears and then fill in the details.
In this case, I’m adding a column called COMP_CID which is a VARCHAR with a maximum length of 25 characters.
The value in this column will uniquely identify an instance of a COMPETITION so I’ve ticked the Primary UID box.
I’ve also selected the Comments in RDBMS Tab and added a comment for what will ultimately become a column in the finished database table.
Finally, I’ve hit the Apply button and can now see this :
If we now navigate to the Unique Identifiers section we can see that a Primary Key has been created for us
Once we’ve returned to Attributes and added a few more, the finishing touch for this entity is to navigate to the Comments in RDBMS section.
This time, we’re entering comments for what will ultimately be the database table :
Once we’re finished, we can now see our finished entity in the diagram :
Having added the other Entities, our model now looks like this :
We can now save the design by going to the File menu and clicking Data Modeler/Save.
We need to save the design as a file with a .dmd extension.
Notice that once you’ve saved the file, the name of the Untitled_1 node in the Data Modeler browser changes to the base name of the file you’ve just created.
Notice also that at no point have we been connected to the database during the creation of our model.
In fact, it’s quite possible to progress from a Logical Model to a Physical model and even generate the DDL required to implement it without connecting to a database at any point.
However, SQLDeveloper does offer some useful Data Modeler reports which we can take advantage of if we decide to create a Reporting Schema.
Using a Reporting Schema
To start with, we need to create the Reporting Schema, in this case, DM_REPORT_REPOS :
set verify offaccept passwd prompt 'Password for DM_REPORT_REPOS : ' hidecreate user dm_report_repos identified by &passwd/alter user dm_report_repos default tablespace users/alter user dm_report_repos quota unlimited on users/Now we need to edit and run the Reporting_Schema_Permissions.sql script, which is located in the datamodeler\datamodeler\reports folder.
In my case, runninig on an Ubuntu client with SQLDeveloper installed in /opt/sqldeveloper181, the path to this script is :
/opt/sqldeveloper181/sqldeveloper/sqldeveloper/extensions/oracle.datamodeler/reports/Reporting_Schema_Permissions.sqlBefore running the script, we need to edit the file to replace and with desired values:
- is the schema to hold the reporting repository (DM_REPORT_REPOS in this example)
- is a directory on the database server
Incidentally, I’ve also created a new directory on the Operating System so that when the script creates the directory object in the database, it will be pointing to an existing directory on the OS :
sudo su oraclemkdir /u01/app/oracle/dm_reportsWith my changes, the script now looks like this :
CREATE OR REPLACE DIRECTORY OSDDM_REPORTS_DIR AS '/u01/app/oracle/dm_reports';GRANT READ, WRITE ON DIRECTORY OSDDM_REPORTS_DIR TO dm_report_repos;GRANT CREATE SESSION TO dm_report_repos;GRANT RESOURCE TO dm_report_repos;GRANT CREATE TABLE TO dm_report_repos;GRANT CREATE SEQUENCE TO dm_report_repos;GRANT CREATE VIEW TO dm_report_repos;GRANT CREATE PROCEDURE TO dm_report_repos;Once we’ve created the Repository schema and added a connection for it in SQLDeveloper, we can then report on our model.
In order to do this, we first need to export our model into the repository.
So, go to the File Menu and select Data Modeler/Export/To Reporting Schema.
You should be rewarded with :

Select the DM_REPORT_REPOS connection and hit OK. You should eventually get :

If the Reports Tree is not already visible, open it by selecting on View/Reports.
If you now expand the Data Modeler Reports node, you’ll see a number of pre-built reports available.
For example, I can see which of my Logical entities are missing relationships :
It’s probably worth remembering that, after you’ve made changes to your data model, you will need to export it again to the reporting repository for those changes to be reflected in the reports.
Anyway, it’s clear that we need to finish off our Logical model with some relations.
First, we create a 1:N relationship between COMPETITION and TOURNAMENT by clicking on the 1:N widget then clicking in the COMPETITION entity and then in the TOURNAMENT ENTITY.
Once the line appears on the diagram we can then name the relationship :
If we now go into the TOURNAMENTS entity properties, we can see that the COMP_CID column has been added automatically :
We can now also add it to the TOURNAMENTS existing Unique Key :
One final point to note is that, although it’s not yet apparent, we are going to have a Surrogate Key for TOURNAMENT :
Finally, we’re going to add a Many-to-Many ( M:N relationship) between TEAM and TOURNAMENT, which leaves our logical model looking like this :
Let’s see how smart Data Modeler is when we move on to…
Engineering a Relational Model from the Logical Model
With the Logical Model Diagram displayed, if we hit the Engineer to Relational Model button in the toolbar we’ll get this window :
Now hit the Engineer button and you should now see :
The main thing that jumps out when looking at this are :
- the layout could do with some work
- Tournament has had TOURNAMENT_ID column generated which is now it’s Primary Key
- a join table – tourn_team_mm – has been generated to resolve the many-to-many relationship
Using options on the right-click menu, or even just dragging objects around, you can adjust the diagram to be more to your liking.
In this case I’ve used the Layout/Resize Objects to Visible option as well so that we can see everything for each table :
Before we can turn this into physical database objects, we probably want to do a bit of tweaking…
Refining the Relational Model
Templates
First of all, we want to make some changes to our table and column names.
By convention, Entity names in a Logical model are singular, but once they become tables, they become plural.
This may not be a convention you necessarily feel obliged to follow, but it does give me the chance to demonstrate one method of changing this in the Data Modeler.
The other thing we want to do is to change column names which include a table name( e.g. the TOURNAMENT_ID column in the TOURNAMENT table), to use an abbreviation instead.
To do this, we first need to edit the template used to generate names for these objects.
In the Data Modeler Tree, right-click the Design and select Properties.
Expand the tree in the left-hand side of the pop-up window and you should get to the Templates :
Using the Add Variable buttons we can amend these templates to look something like this :
I’ve also specified abbreviations for each of the tables. For example :
In order to implement our improved object naming we need to right-click the relational model and then click Apply Naming Standards to Keys and Constraints

Hit OK and…
So, the TOURNAMENT_ID column has now been renamed to TOURN_ID. However, there are still some things that I’ll need to change manually ( probably because I haven’t figured out the proper way to do it).
Bear with me, I’ll be back in a minute…
Right, that’s better…
Now, let’s sort out those table names.
Transformation Scripts
First off, I’d like to make all of my table names uppercase.
One way of doing this, as described by Heli, is to use a pre-supplied transformation script.
To do this, go to the Tools menu and select Data Modeler/Design Rules and Transformations/Transformations.
Then simply select the appropriate script – in this case – Tables to upper case – Rhino and hit Apply.
The table names should now show in uppercase on this diagram.
I also wanted to pluralize the names ( e.g. COMPETITIONS rather than COMPETITION).
Whilst there are a number of ways to do this, we’re going to do a little light hacking to produce our own Transformation script to accomplish this.
So, back to the menu and select Tools/Data Modeler/Design Rules and Transformations/Transformations.
If I hit the Green Plus button, I can then add a script of my own.
Now, I know that my model contains table names which can all be pluralized simply by adding an “S”. I also know that this will not make any of the table names too long ( i.e. over 30 characters).
This makes the script fairly simple.
tables = model.getTableSet().toArray();for (var t = 0; t<tables.length;t++){table = tables[t];name = table.getName()+"S"table.setName(name);table.setDirty(true);}I’ve named the script Append upper case ‘S’ to table names. I’ve also specified the object as relational and the engine as Oracle Nashorn.
Finally, I hit Save :

Now hit the Apply button and…

Table DDL Transformation Script
We’re almost ready to generate the DDL scripts to translate our Relational Model into a Physical one.
As I’m planning to use Editions in this application so I need to make sure that each table has an Editioning View created.
So, once more unto the Tools/Data Modeler/Design Rules and Transformations menu and this time we select Table DDL Transformation Scripts.
If we then navigate to the After Create scripts for the Journal Tables, we come across a script that we can plaigarise…

We need to create a new Script Set by clicking the Green Plus button, filling out some details and then, in the After Create section, adding the following code :
var ddl;var lname;//Editions Based Redefinition View suffixebrSuf = "#EBR";prompt = model.getAppView().getSettings().isIncludePromptInDDL();useSchema = model.getAppView().getSettings().isIncludeSchemaInDDL();if(model.getStorageDesign().isOpen()){if(useSchema){lname = tableProxy.getLongName();}else{lname = tableProxy.getName();}}else{if(useSchema){lname = table.getLongName();}else{lname = table.getName();}}if(prompt){ddl= "PROMPT Creating Editioning View for '"+lname+"';\n";}else{ddl = "";}ddl = ddl + "create or replace editioning view "+lname+ebrSuf+" as select * from "+lname+";\n"ddlStatementsList.add(new java.lang.String(ddl));Finally, Save the new Script.

Now, we can test our script on a single table ( in this case COMPETITIONS), by clicking the Test button :

Generating DDL from a Relational Model
Let’s find out if our Relational Model is ready to go out into the big wide world.
With the Relational Model Diagram in focus, hit the Generate DDL toolbar button.

Now click Generate Button.
Go to Include Table DDL scripts tab and select our script from the drop-down and ensure all tables are checked

Click OK and…

We can see that Data Modeler has found a couple of errors. Taking a closer look at the script it’s generated we can find the culprits :

The easiest way to fix this is to edit the script directly before hitting Save.
At last, we have a script containing the DDL statements required to deploy our relational model to a real database.
Conclusion
I realise that this has not been so much a stroll through the well-kept garden as a hack through the undergrowth of Data Modeler in it’s integrated form.
Hopefully though, it’s enough for you to consider exploring further.
After all, a well-designed relational data model is the bedrock of a good Oracle Database Application and this is the tool that could well help you achieve this…and at minimal cost.
Recommend
About Joyk
Aggregate valuable and interesting links.
Joyk means Joy of geeK