

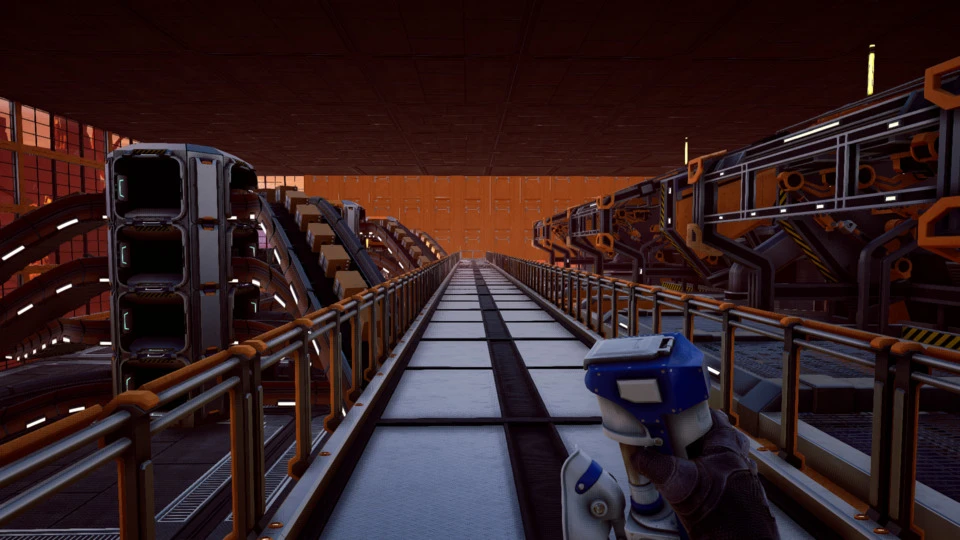
A Satisfactory Way of Building
source link: https://aphyr.com/posts/351-a-satisfactory-way-of-building
Go to the source link to view the article. You can view the picture content, updated content and better typesetting reading experience. If the link is broken, please click the button below to view the snapshot at that time.
A Satisfactory Way of Building
With apologies, as usual, to Christopher Alexander.
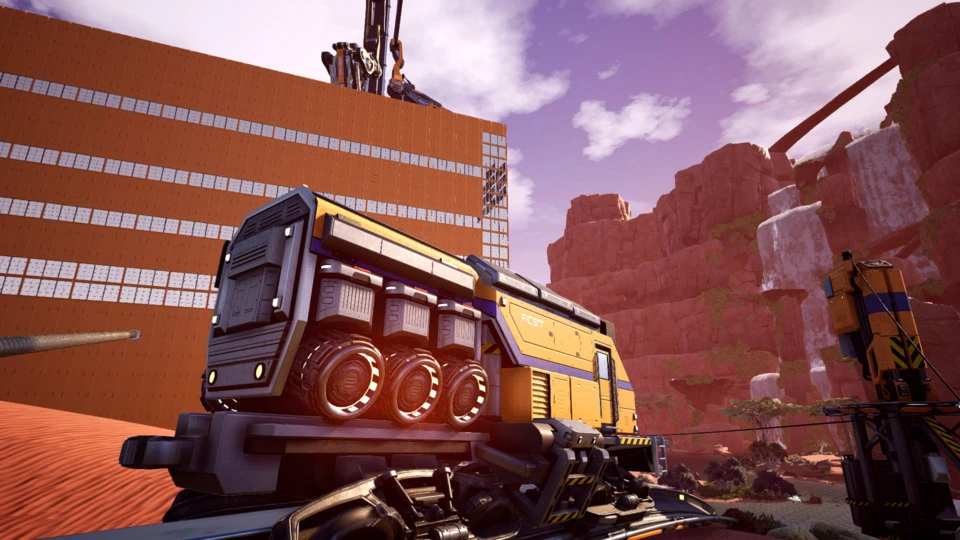
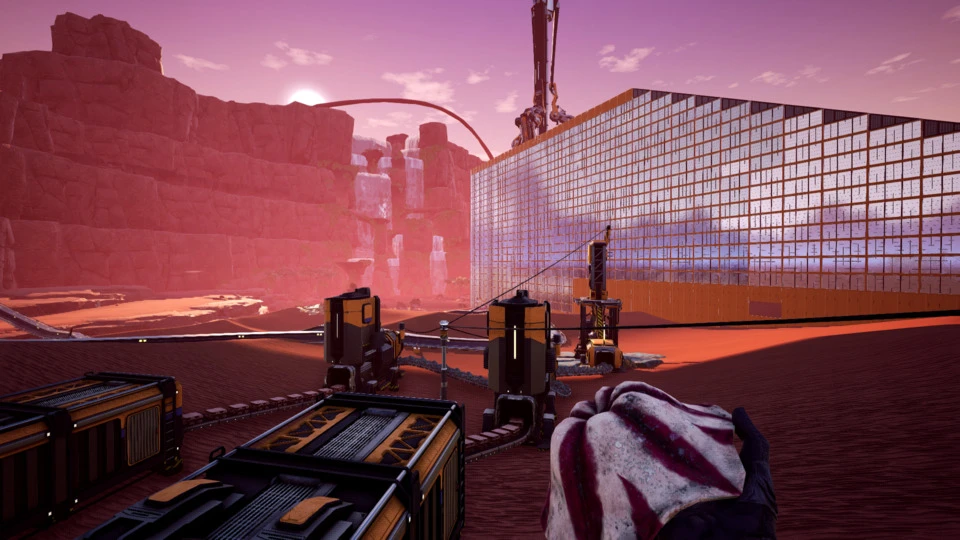
Satisfactory is a first-person factory construction game. COVID-19 has given me license to spend FAR too much time playing it, and I’d like to share a few thoughts that I hope might prove useful, or at least interesting.
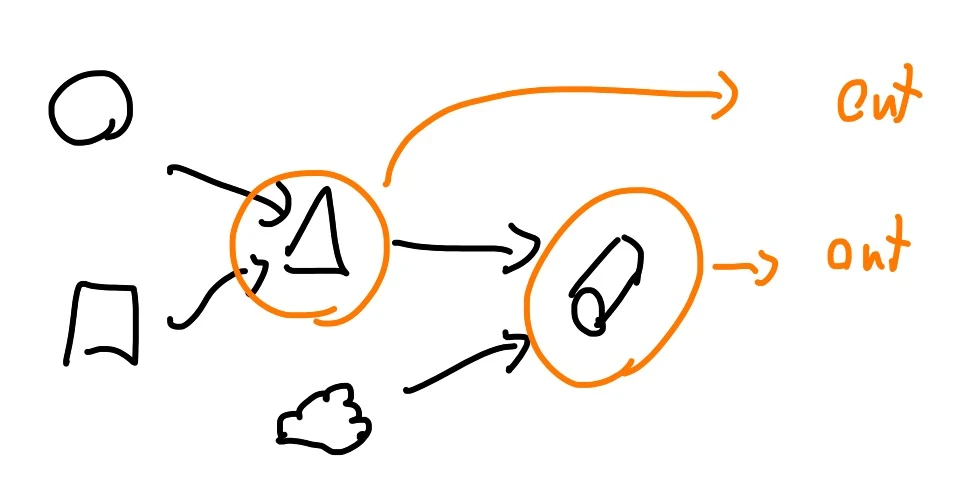
This is a pattern language: a grammar which generates buildings. Each of the patterns identifies forces present in a particular context, and resolves them by describing a particular kind of place, in which an arrangement of structures can resolve those forces. The patterns are described in relationship to each other: each helps to organize, to refine, or to flesh out, others. Using these patterns together helps generate a series of buildings which work together.
This is only one possible language for Satisfactory—if you’ve played the game for a while, you’ve undoubtedly started to create your own. I encourage you to share them!
Fundamental Dynamics
Many of the constraints one would assume shape the design of a real factory, or even other factory sims, are absent or muted in Satisfactory. The game has no time limits, no quotas other than what you accept for yourself, and what consumables one needs (fuel, ammunition, filters) are readily fulfilled by small production lines. Resource nodes (e.g. iron ore) are inexhaustible. Waiting long enough guarantees you’ll have enough parts. Factories generally require little supervision or active control. Space constraints are mainly enforced through aesthetic preferences: it is always possible to escape the limitations of local terrain, trees, rocks, etc by building a suitably large flat plane above them. Resources can be transported arbitrarily long distances without loss or power, via belts.
Instead of viewing Satisfactory in these terms, I think of the game in terms of three main constraints:
- Unlocked technology
- Player time
The tech tree is self-explanatory: solutions to problems can only use buildings and tools which we have researched. These constraints shape what kind of structures and strategies we use in factory design. The time constraint is critical, though: as players, we want to spend our time well. (I claim, having played this game for more than two hundred hours). Satisfactory isn’t a game about factories–it is a game about building factories. The desire to save time creates new goals:
- Automation
- Production rates
- Observability
- Expandability
- Flexibility
We automate things because building them by hand is time consuming. Once automated, we want higher production rates in order to build more sophisticated things, fulfill required power production, or satisfy whatever goals we set for ourselves. Improving production rates is the foundation of a key gameplay loop: observing current behavior, expanding production lines to create more, and redesigning or reconnecting lines in new ways. The knowledge that this loop is coming pushes players to lay out new factories, and adopt general strategies, which facilitate observation, expansion, and refactoring.
Unlike Factorio, Satisfactory never automates factory construction. Every machine and foundation is placed by hand. This forces players to make early choices with these constraints carefully in mind, because there is a linear (and generally large) time cost associated with rebuilding a production line. One cannot simply “move an assembly line three meters to the left”.
The final constraint, lag, is a technical one: simulating all these moving parts is expensive. Satisfactory gets slower the more buildings one makes, but making lots of buildings is (at least for many) how the game is meant to be played. Centralized production lines, while efficient and observable, cause the game to become unpleasant, then unplayable. Mitigating lag means spreading out production, because regions of the map which are farther away can be updated less frequently.
With these dynamics in mind, I have specific suggestions for one way you can play Satisfactory.
Factories
How big should our factories be? What should they create? How should they be connected? These questions govern the overall shape of a map, and also influence the designs of each factory individually.
Factories Far Apart
Factories which are too close together create lag and make the game less pleasant to play. They are also more difficult to expand without running in to each other. Therefore: separate factories by a fair distance to reduce the impact of lag. You’ll need to spread out across a good chunk of the map in order to take advantage of diverse resource nodes anyway; spread your factories across this range.
Factories Near Raw Materials
Carrying raw materials long distances is time-consuming, and generally requires more belts than sending refined products. Instead, situate each factory close to the raw materials (e.g. ore, water) it consumes in bulk. Where there are many resource types, aim for the center of a cluster, or where one resource type dominates, site your factory closer to that resource to reduce the number of long-distance belts or pipes required.
Factories With Goals
Factories which produce many things rarely do those things efficiently. They devote more space to routing parts around pieces of the factory which do not use those parts. They are difficult to observe and balance. Their scope makes it difficult expand or redesign later. To reduce these problems, devote each factory to a single part, or a small set of parts with tightly related supply chains.
Shoulders of Giants
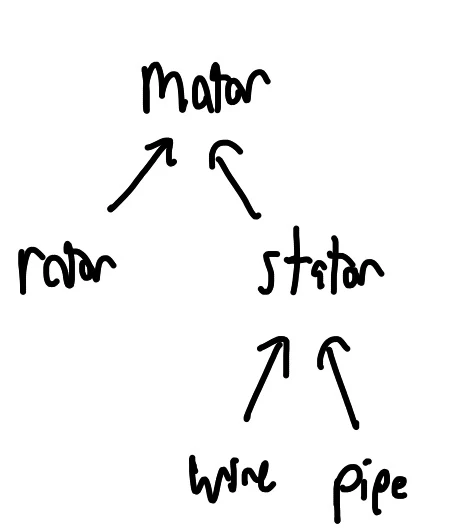
With the exception of high-volume parts (e.g. screws, rods, plates, beams, pipes, quickwire), building the entire production chain for a part is time-consuming, and requires careful balancing each time it is done. At the same time, having a single Screw Factory which sends screws to every other factory requires significant investment in transport links which is cost-prohibitive. Therefore, build high-volume parts from scratch locally, and draw low-volume parts (e.g. motors, heavy frames, control rods) from a dedicated factory for that part.
Factory Connections
Having defined the rough distribution, purpose, and relationships between factories, we turn to the movement of material, power, and players between them.
Backpressure
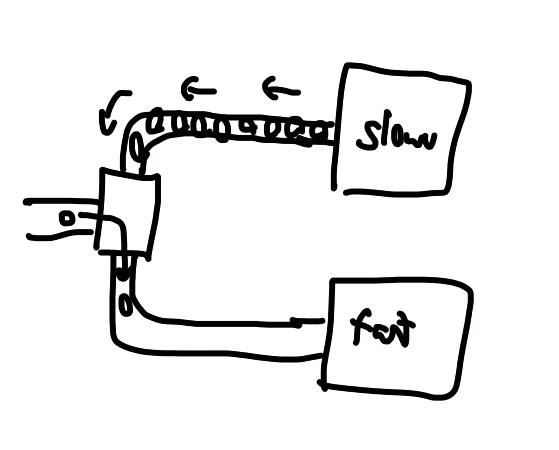
Each factory, and each connection between factories, should offer backpressure: when flow downstream decreases, flow decreases upstream as well. Backpressure is important because it allows upstream producers to reallocate resources to other needs more efficiently: if two factories consume motors, but one has more motors than it needs, the other factory can receive its excess, and produce faster. Wherever possible, design for backpressure. There are specific cases in which backpressure is undesirable; we address these later.
Immiscible Materials
Backpressure can backfire. One such scenario is when materials are mixed: a single belt to a smelter alternates, say, coal and iron, or a single truck or traincar carries two types of materials. Careful use of smart splitters can make this work, but one runs the risk of starvation and deadlock: a factory consumes slightly more coal, fills up on iron, but the next item in the belt is iron, requires operator intervention to resolve. As another scenario, imagine a single train which carries part A from source to sink, then part B from a different source to a different sink. This works so long as sinks empty the freight car, but if any parts from A are left over, some A could wind up in B’s sink, and jam up the works.
Therefore, establish a physically separate channel (belt, train, etc.) for each type of material. If materials are not separated (e.g. Shopping Malls, Sushi Belt), use Load Shedding to prevent jams.
Load Shedding
Where materials are mixed together, a deficit of one item can cause production lines to stall, with rippling effects throughout your factory network. Therefore, wherever materials are mixed, perform load shedding, rather than backpressure: find a way to consume, discard, redirect, or permanently store excess materials of any type. This defeats backpressure: avoid load shedding where efficiency matters. Consider using the overflow behavior of smart splitters (or a Splitter Overflow Chain) to identify excess material. See the Item Sink, a Recycling Train, or, for low-volume parts, permanent storage like Not A Place Of Honor.
Network Of Factories
Train Network
Tractors and trucks are fun, but frustrating at scale. Truck-dense regions become subject to collisions which can disable trucks altogether. When power fails (and it will, invariably, fail), trucks cannot refuel, consume their available fuel, and become lost, somewhere miles in the wilderness. Tracking down dozens of trucks and refueling each by hand is a time-consuming process. Reorganizing stops requires laborious re-recording of each affected truck route.
Belts are a good alternative, but they have other weaknesses. Belts cannot send as many items as train tracks in a given area. Belts transmit neither power nor people (efficiently); those connections must be built separately. Most critically, a dedicated belt line must be created for each resource flow: sending two resources requires two belts. You can almost never re-use existing belts for new flows–as your network grows, you spend an increasing amount of time re-laying new belts between far-flung factories.
Instead, use trains as the principal means of connecting factories. Train networks provide power, material flow, and transportation in one network. Tracks are independent of the flows across them; once established, train networks rarely need to be changed, only gradually expanded to new factory sites. Trains are fast: a single freight station can easily saturate two belts. Use trains liberally: almost all factories should send their outputs out via trains, and receive low-volume materials (vis Shoulders of Giants) through trains as well.
For the actual shape of tracks, see Triangle Junction, Roundabout, Station Manifold, and Local Loop.
Station Per Component
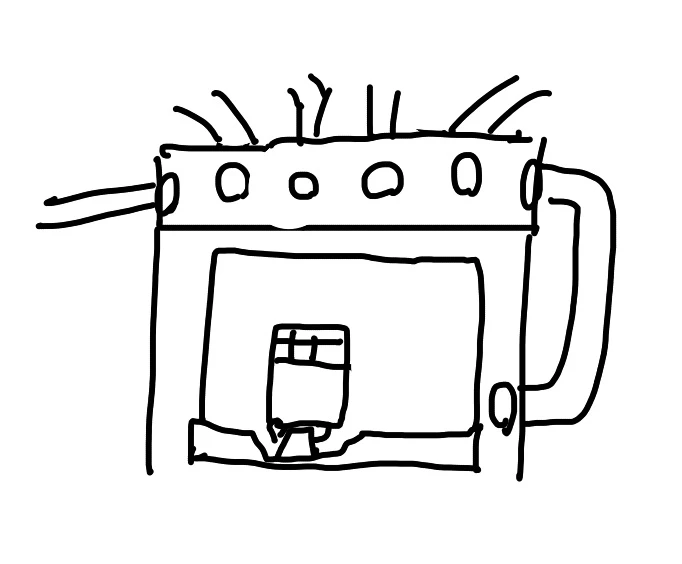
Train Network suggests that each factory use trains to receive and dispatch materials. Immiscible Materials tells us that we need a dedicated flow for each of those material types. Re-using the same train station for dropping off different types causes deadlock, which we could resolve with load shedding—but this is inefficient. Instead, each factory should have a dedicated train station for each type of item it produces, and each type of item it consumes. A motor factory should send its output to a “Motors” station, and might receive inputs at “Motors Stators Drop” and “Motors Rotors Drop” stations. Accompany stations with Station Buffer.
Station Buffer
When freight platforms load or unload cargo, their input and output belts pause. This can cause hiccups in production lines without much slack. To avoid this, feed the input or output of a station directly into a storage container or fluid buffer, then connect that buffer to wherever it needs to go.
Dedicated Trains
It is tempting, for some limited runs, to have a single train on which each car carries a different type of resource. However, this approach runs the risk of mixing materials when you adjust train routes later: one can easily wind up with a freight car full of concrete filling up a platform intended to receive circuit boards. Instead, devote each train to carrying only a single type of material. The exception to this rule is when the train is intended to mix materials, e.g. for Shopping Mall or Recycling Train: there, a single collector train can make many stops.
Recycling Train
Backpressure can backfire: refineries which produce fuel might, for example, stop doing so if they fill up on rubber or plastic. To get rid of this excess material, consider using a Recycling Train, which picks up components from factories which have too many, and makes regular stops at a recycling facility like a Shopping Mall or item sink.
Building Supply
When constructing a factory, you will often need a constant supply of parts: concrete, plates, frames, etc. Rather than return to a Shopping Mall each time, take advantage of Station Per Component to route necessary parts directly to your building site. Set up a dedicated building supply train which picks up the parts you need, and drops them at a temporary train station on-site. Consider Container Chain to store parts, and Recycling Train to discard excess.
A Train For You
Moving between factories, and from factories to far-off locales (e.g. for exploration) is time-consuming on foot, but taking existing trains runs the risk of interfering with their schedules. Instead, dedicate a train (or two) to transporting you. This train should typically have no freight car (so it does not accidentally mix materials). If you have two trains, keep one near you (for easy return), and the other at Home Base, so it’s available if you respawn.
Ground Clearance
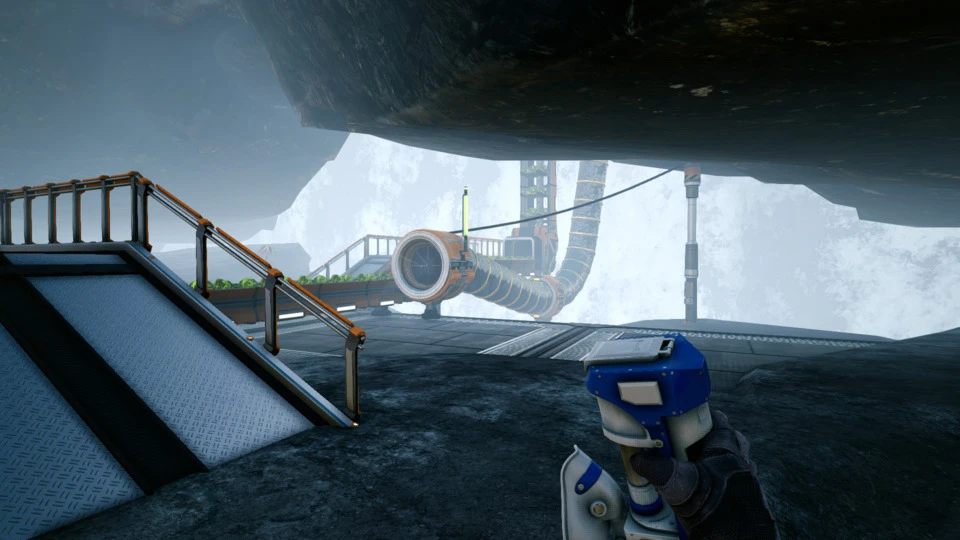
When laying out tracks, hypertubes, or belts between factories, leave extra ground clearance: it is frustrating to be walking, or driving a truck and have to dismantle a belt to get past. Once away from a factory, raise belts and hypertubes to their maximum level. Train tracks can be elevated at likely grade crossings via foundations or columns.
Track Layout
How does one lay out the tracks between stations?
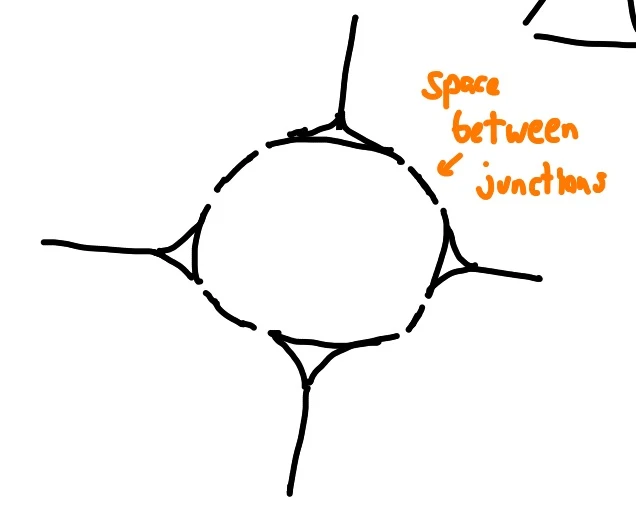
Triangle Junction
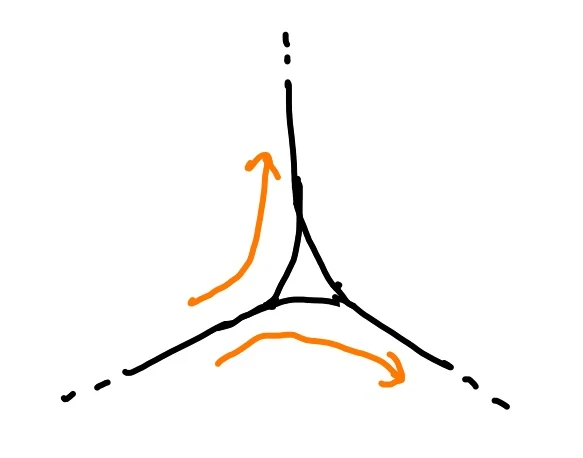
A train should be able to route directly from any station to any other, in any orientation: this implies that at any track junction, a train should be able to pick a direct path to any other track. AI limitations mean that certain types of forks (e.g. those which split 2:2 or 1:3) break trains. To avoid this, make every junction of three 1:2 forks, forming a triangle.
Roundabout
Where four tracks meet, offsetting two three-way junctions can do the trick. Where five or more meet, this may be cumbersome. A compact alternative is a roundabout: construct a compact circle of short track segments in the middle of the junction. Then, connect each inbound track to the circle in a Triangle Junction. The circle can also be a turn-around point for trains which are stuck on tracks that cannot, for whatever reason, offer a Triangle Junction.
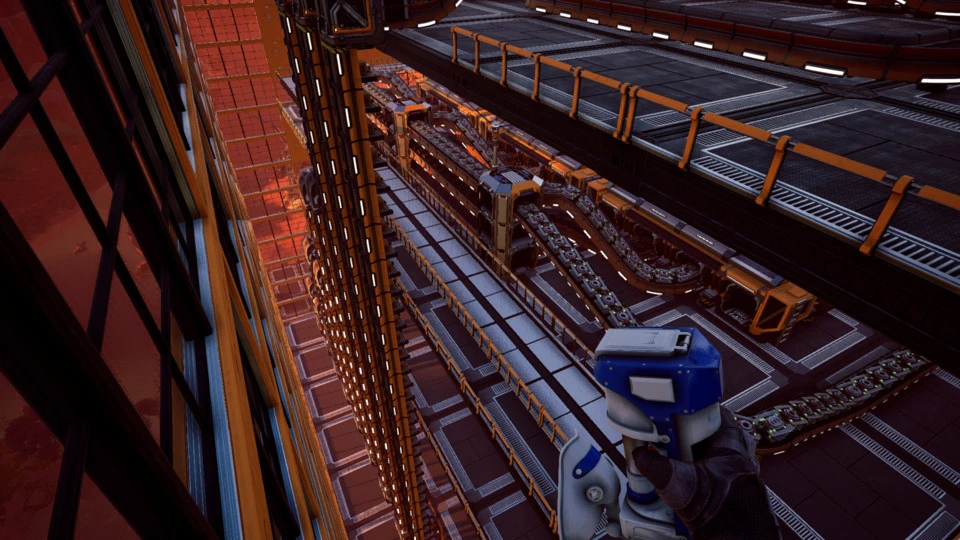
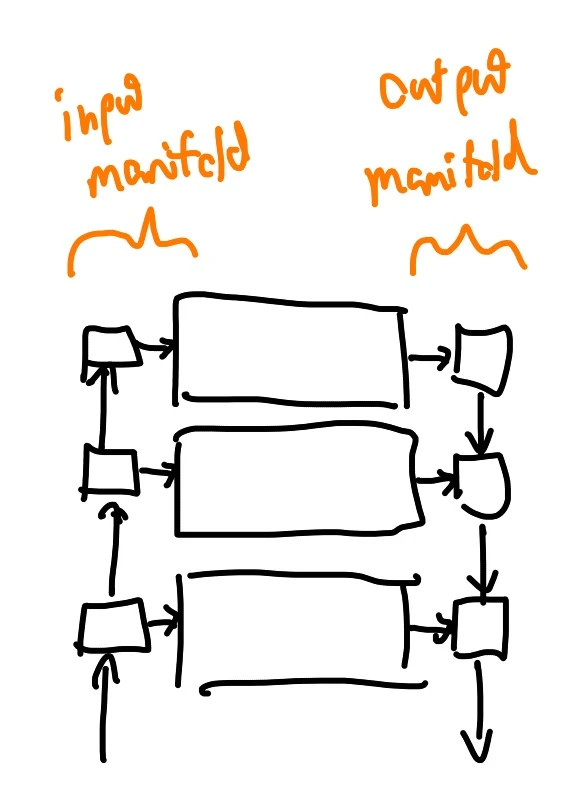
Station Manifold
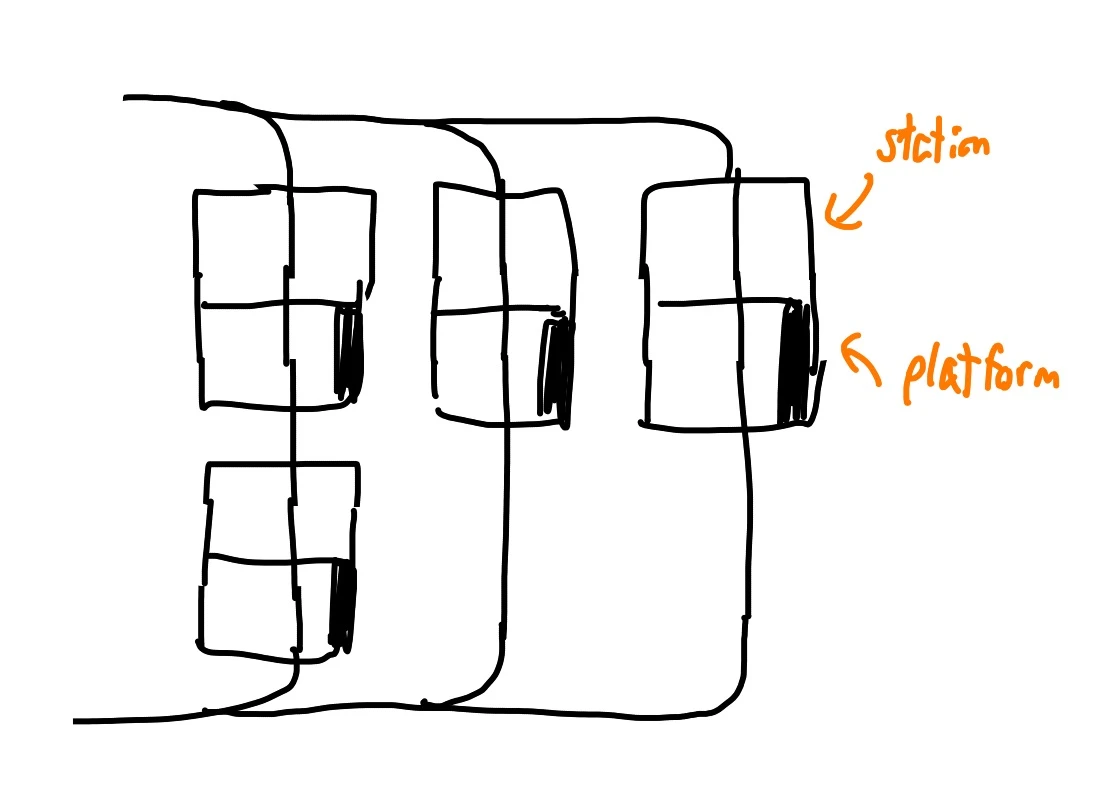
At factories, Station Per Component tells us that we will want many (often three to eight) train stations. Arranging these stations can use up a good deal of space. To lay them out compactly, arrange stations parallel, side-by-side, with just enough space in between freight platforms to load and unload cargo (e.g. via vertical belts). Orient stations facing the same direction for predictability, and to aid in Local Loop. At the cost of later expandability, one can place additional train stations in line, separated by a short distance (e.g. two tiles) of open track.
To feed these stations, run track perpendicular to the stations, across both their entrances and exits. Connect this track to each station via a 1:2 fork which curves 90 degrees to enter (exit) the station. Connect the inbound and outbound ends of this manifold, either via one or two Triangle Junctions, to Train Network: this forms a Local Loop.
Local Loop
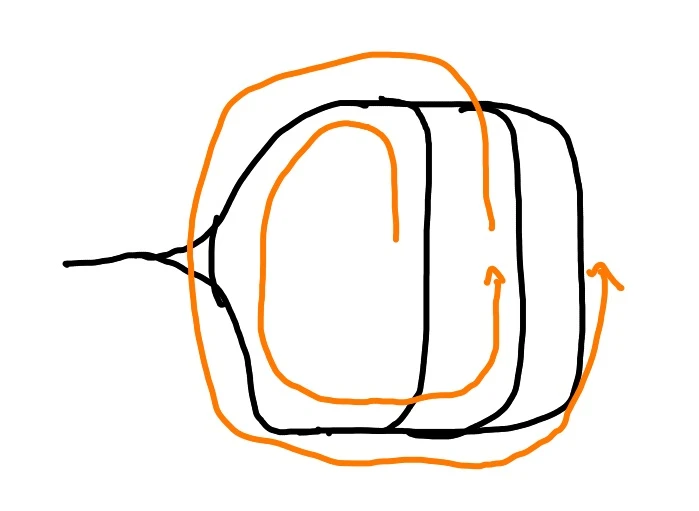
Where a train makes multiple stops at a single factory, it is inefficient to have it leave the factory, find the nearest roundabout (or other station), and turn around, then come back to a different station. Instead, accompany each factory with a Local Loop: a length of track which allows a train to leave the factory’s Station Manifold, and immediately turn around and enter it again. A Local Loop is formed implicitly by using Triangle Junctions; other junction types may need an explicit Local Loop.
Power Grids
With the relationships between factories fixed, we turn our attention to large-scale power generation and distribution.
Main Grid
Independent power grids fail independently, which is normally a good thing in systems design, but a bad idea for Satisfactory: with no centralized monitoring, you may have no way to know a distant grid has failed, and restarting it requires traveling to a pole which is connected to that grid. Instead, keep all of your main production on a single power grid. This improves observability: you know immediately if a fault occurs, and the grid can be restarted from anywhere. This improves efficiency: excess power from any factory can be shared with others.
Use the Train Network to carry power for the Main Grid.
Backup Grid
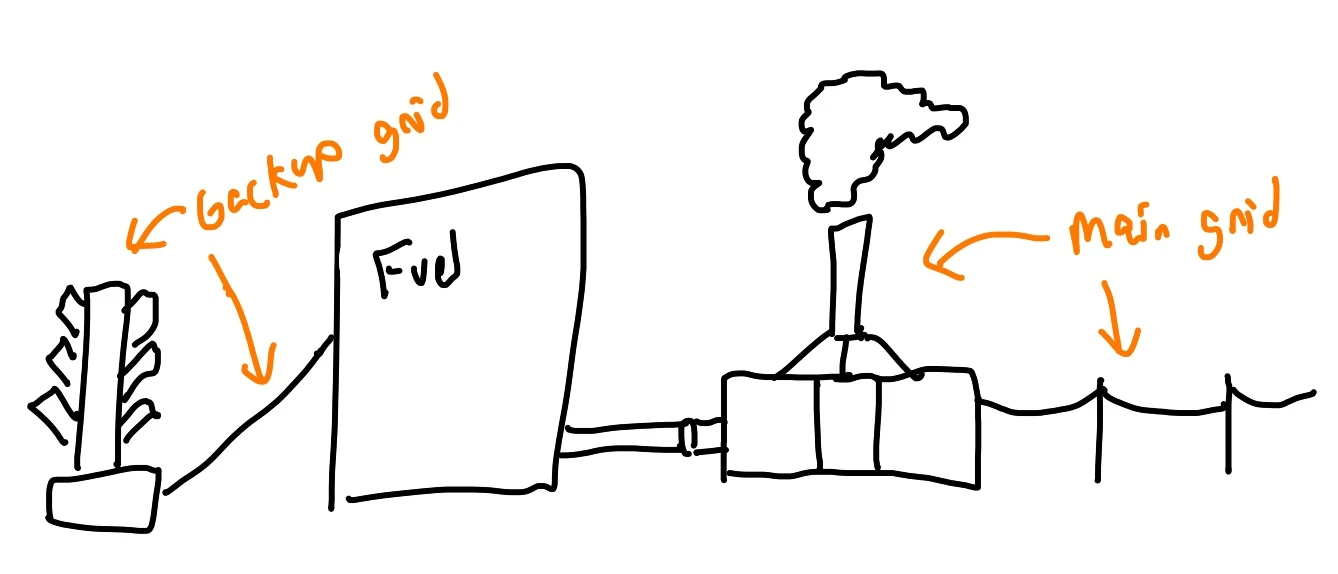
When main power fails, you can be left in a catch-22: it takes power to mine coal and process oil into fuel, but you may not have any fuel left. To avoid this problem, create a separate set of factories devoted purely to fuel production, and connect these factories not to the main grid, but to a backup power grid, supplied by more reliable generation infrastructure. The backup grid can be transmitted from site to site using normal power poles. Paint your backup grid in a special color to avoid linking it to the primary grid by accident.
In the early game, use a biomass burner to kickstart coal or fuel production when necessary. In the late game, use geothermal generators, which require no fuel and produce a constant supply of power. This supply is more than adequate to power the entire production line for nuclear fuel rods.
Backup Transit
When main power fails, your transit system (A Train For You) will fail with it. You will likely need to travel between Home Base and your Backup Grid, which could be a far distance. To make this travel easier, establish a dedicated series of hypertubes which connect key Backup Grid sites (e.g. miners, factories), your Main Grid generators, and Home Base. Connect these hypertube entrances only to the Backup Grid, such that even with main power down, you can comfortably travel between home base and the sites you’ll need to get generation going again.
Single Power Link
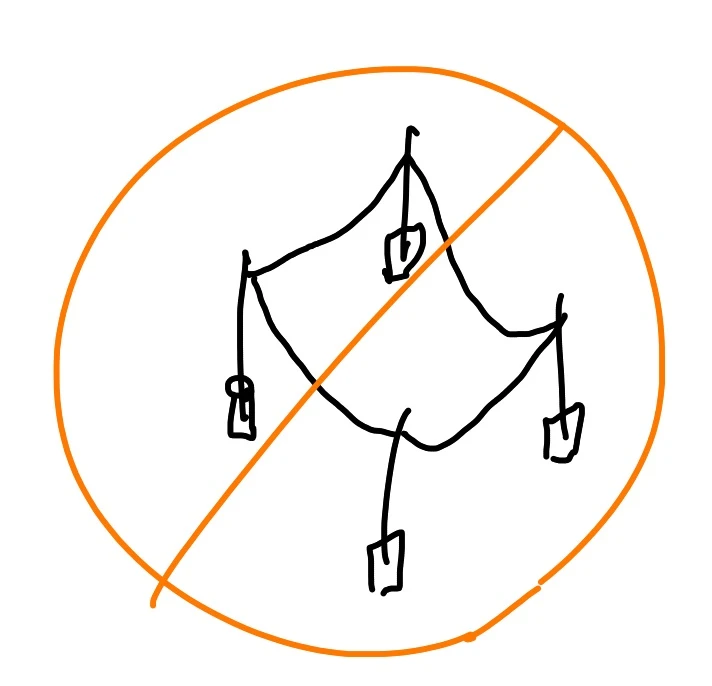
While redundancy is good in real power networks, it actually works against you in Satisfactory: when power is low, you will want to selectively power or unpower entire factories, Floors, or Zones, and this is difficult if there are many paths for power to take. Instead, ensure that each logical unit of your factory has exactly one path to the Main Grid. This allows you to incrementally power up a region by disconnecting and reconnecting single power lines.
This implies that power poles should form a tree (rather than a web) whose root is a single train station. Disconnecting that train station should power down the entire factory.
Special Sites
With the overall shape of our factory, transit, and power infrastructure fixed, we consider special sites–those not devoted to factory production, but which participate in the network nonetheless.
Home Base
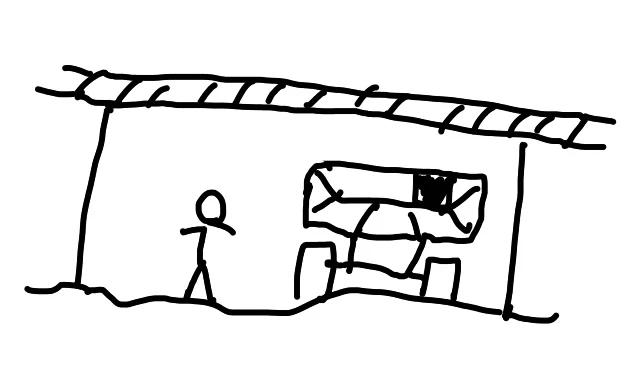
When a user respawns, they do so with low health and without equipment, and with a need to return, well-equipped, to the point of their death. This process forms the cornerstone of Home Base: a place where spawn, equipment, and transit are close at hand. Colocate these services nearby–or in the same building–to make this process painless. Having these things close together naturally suggests additional services: workbenches, a research station, a truck station, a Shopping Mall, a Recycling Drop.
Site Home Base in a place where it is convenient: towards the middle of the map will reduce transit times. Draw power and materials from Train Network, rather than belt connections: home base produces nothing, and does not require huge volumes of material. Keep it away from large factories, to reduce lag.
A Place to Spawn
The H.U.B is where you respawn: it is easy to place once, then leave it in place as you build outwards. As your factories sprawl, it can become easy to take for granted the long trek from the H.U.B. to wherever you needed to be. Instead, site the H.U.B in a special area of your Home Base, to make respawns comfortable. Place it as near as possible to Shopping Mall, so you can pick up supplies immediately following spawn.
Transit Hub
There are three primary means of transportation you’ll engage in game: on foot (well, mostly flying; the jetpack is a way of life), by hypertube (both within a building and between sites), and by train. Trucks and belts offer two more paths. You will frequently need to transfer between these transit systems, and from hypertube to hypertube where a junction is present. This is the role of the Transit Hub: a place where transit systems meet.
Situate your Transit Hub in a central location at each site, to minimize walking time: at home base, it should be roughly in the center of the shopping mall. Arrange hypertube entrances as close as possible to facilitate rapid transfers, and orient the entrances in a pattern which suggests their eventual destination. Separate local and remote hypertubes using position, orientation, level, or color, to reduce confusion. Train stations, due to their size and tracks, may need to be on a different floor: use a local hypertube to connect the station directly to your transit hub, so that one can walk immediately from the platform into the hub with as few steps as possible.
Rapid orientation in a Transit Hub reduces the accidental use of incorrect tubes or paths. Use windows, color, or layout to suggest a unique direction immediately upon arrival in the hub.
In outlying factories, a Transit Hub may be as simple as a hypertube entrance which drops one off in a central factory location. Along a hypertube route, use Hypertube Hop to guide the position of entrances.
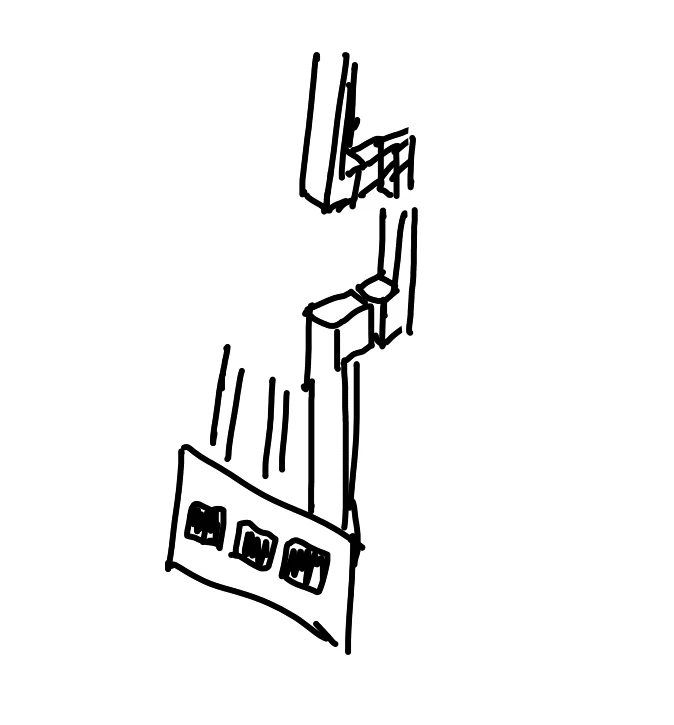
Hypertube Hop
Where a hypertube route makes a stop–for instance, at a factory or Transit Hub–consider creating a Hypertube Hop. Such a hop allows a rider to exit one tube, then immediately enter the next, without losing velocity. To get off a the local stop, the rider can slow down inside the tube, on approach.
One possible option is to have a cluster of tubes which point straight up, so that riders fly high into the air, and can use air control to select their next destination. Use a U-Jelly pad to cushion falls. This is great fun, but be advised that this transit station will, at some point, kill you in a slightly embarrassing manner.
A safer and more efficient option, for Transit Hubs with one clear path in and out, is to position the two entrances facing each other, perhaps one or two wall tiles apart, such that leaving one tube immediately flings you into the next. This simplifies long-term trips, since no rider control is required, and can build up fantastic speed.
Shopping Mall

When planning a new construction, heading out for repairs, or respawning, you will typically need to pick up many types of material: parts, tools, etc. Make these things readily available in a Shopping Mall: an area densely packed with storage containers, fed by belts. Draw materials from the Train Network, using a dedicated train which makes stops at a wide variety of station, and feed individual containers using Sushi Belt. Use Load Shedding to discard excess material.
Shopping Malls work well at Home Base, but you might want to build others to shorten travel time when making repeated trips for building supplies. Situate Shopping Malls close to Transit Hub, to facilitate these trips.
One pattern that works nicely is to alternate avenues of belts and walkways, and to have very short belts sticking out, like tongues, from each storage container, so that one can see what is being stored. Arrange containers into groups of logically connected items, like tools, or core building components. Connect these avenues by corridors, so that it is easy to walk from any container to any other. Leave space above the containers: flying can be even faster. Consider accompanying with a Recycling Bin.
Recycling Bin
When a player returns to the Shopping Mall for more items, they may need to discard unnecessary inventory. When a player returns from a resource-gathering or exploratory expedition, they may need to store slugs, flowers, etc. A Recycling Bin serves both purposes by providing a storage container (or containers) which empties itself–ideally, into a Shopping Mall. Once a Shopping Mall is established, adding a Recycling Bin is easy: simply connect the container’s output to the Shopping Mall’s input belt(s), via a merger.
A discard-only version of the Recycling Bin can be had by connecting a container to an Item Sink. This version is useful at construction sites for cleaning up unnecessary bulk materials. The Recycling Bin can also dispatch components to a dedicated train station for transfer to a Shopping Mall or Not a Place of Honor.
Not a Place of Honor
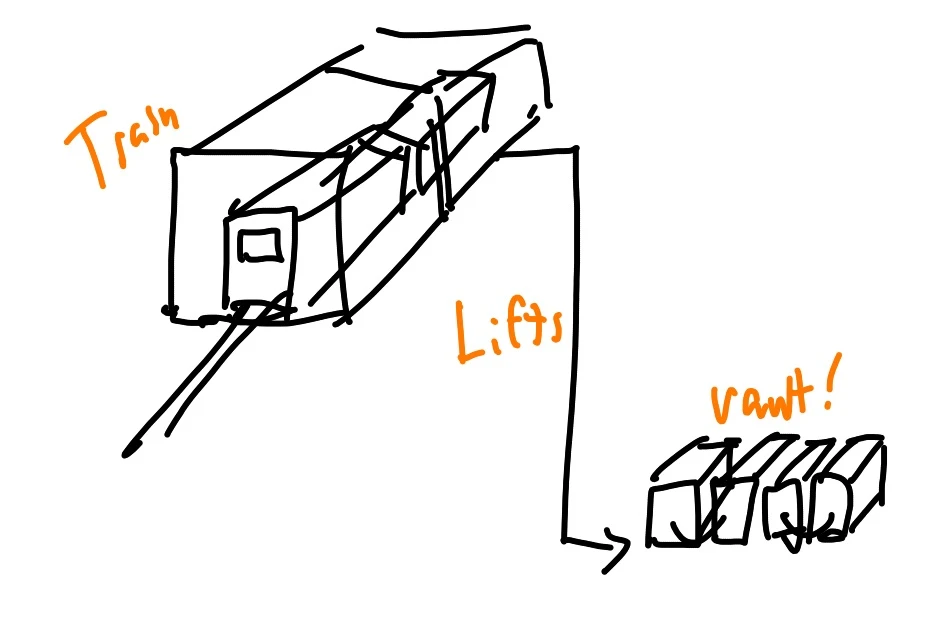
One waste disposal option is long-term storage. This is especially key for nuclear waste, but can technically store anything, so long as production rates are low enough compared to storage capacity. Nuclear waste is radioactive, so this storage facility should be far away from other people or factories.
Therefore: situate your waste disposal site far away from resource nodes, home basis, transit hubs, or other places people might like to be. Use vertical distance to irradiate less surface area: there are several chasms and cliffs which allow excellent sites. Store items in a Container Chain.
Use the Train Network to send waste to Not a Place of Honor, and local belts to fill the storage containers. Consider leaving an exit belt, possibly disconnected, to aid in transferring materials out of the storage containers at some later time; e.g. if relocation becomes necessary. Use Local Hypertubes to quickly access storage containers for inspection. On-Site PPE aids maintenance.
Space Elevator
The Space Elevator consumes specialized items (e.g. smart plating) which are not generally necessary for other construction. Many of those items are themselves ingredients in more advanced Space Elevator recipes. Factories With Goals and Shoulders of Giants tells us that these recipes should be produced near the space elevator.
A natural choice is to place the space elevator near Home Base, but this is not necessary: trips between the two are generally few and far between. Therefore: situate your Space Elevator wherever it is convenient, drawing materials from Train Network, and producing Space-Elevator-specific components in a local Factory which feeds directly into the Space Elevator.
Factory Structure
We now turn our attention to the overall structure of a single factory site, which organizes production into expandable stages, arranged in Zones on Floors, connected by linkages.
Stage Cascade
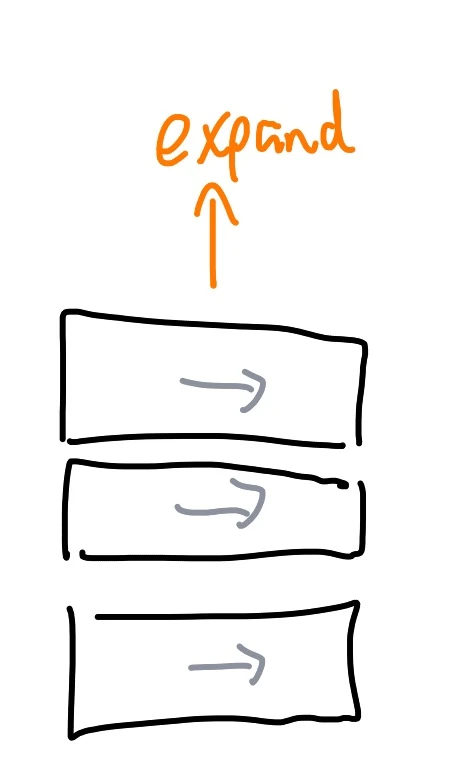
Per Factories With Goals, each factory produces one part, or a small number of related parts. However, making that part may require several steps. We call each step a stage, and devote a particular area of the factory to each stage. For instance, a factory which produces encased industrial beams might have an initial stage which produces steel, one which takes that steel and produces beams, one which takes limestone and produces concrete, and a final stage which takes concrete and steel and produces encased beams.
Each stage should be independently expandable, to account for later changes in required production, and linked to later stages via belts (or pipes). Expansion is easiest when a stage is simplest: therefore, each stage should generally consist of only one, or a small number, of machines. The exception is where belts in and out of a stage would be unable to keep up with the required flow of materials—for instance, screws. In this case, it often makes sense for a stage to include two or three machines; say, one which produces screws, and immediately feeds them into an assembler producing plates.
Stages should be arranged in a cascade, such that each stage produces items needed by later stages, connected by belts. Parts should generally flow in one direction, towards the final stage(s). Belts should be as short as possible: place a stage as close as possible to the stages which need its parts, rather than hopping long distances. For the shape of stages, consider Floor or Zone.
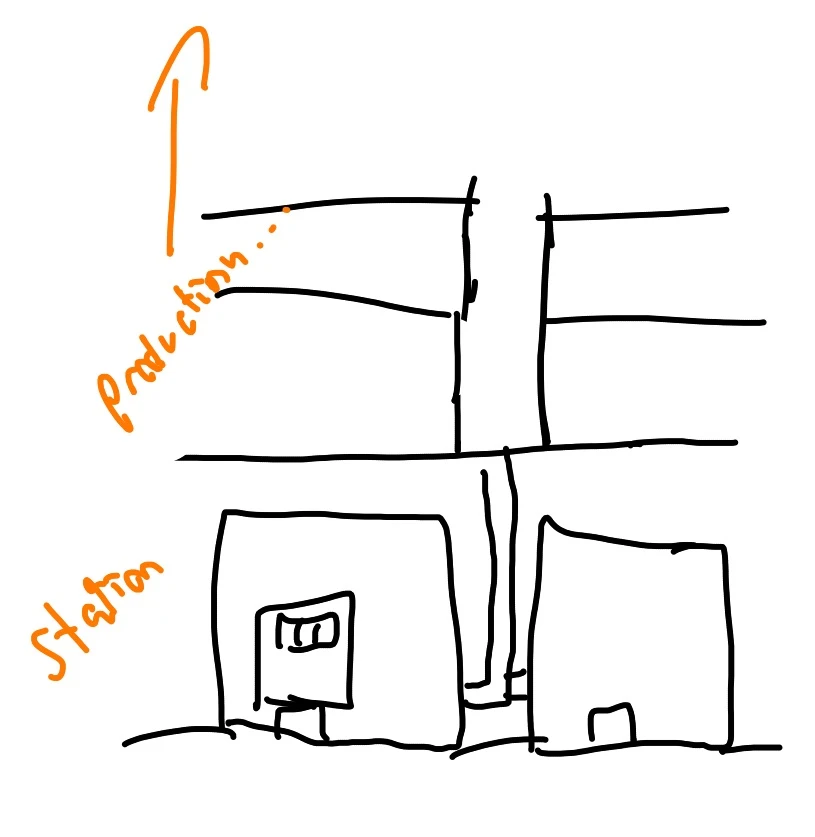
Floor
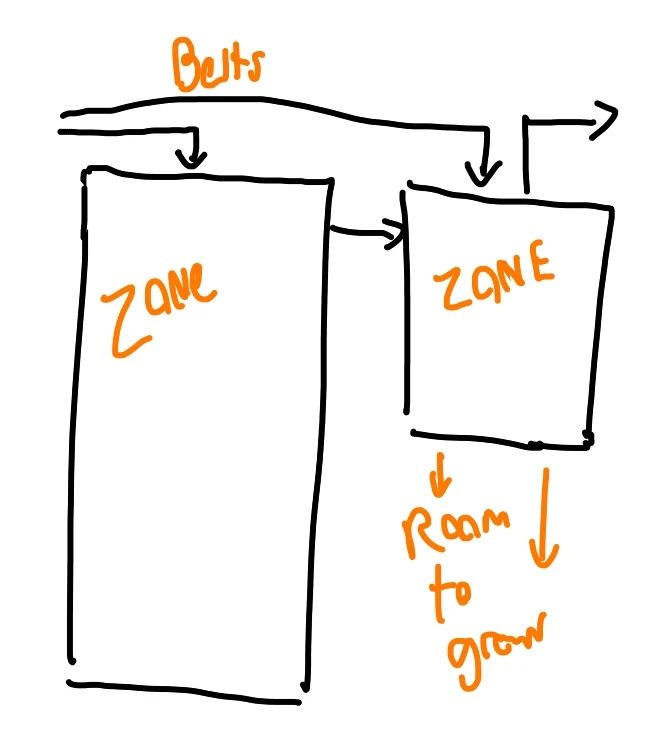
Factories can be built on dirt, but arranging them quickly becomes cumbersome. Instead, lay down a regular foundation of floor tiles, as thin as possible, so as to leave maximal space between floors. Floors are generally easy to expand: consider devoting each floor to a single Stage, or dividing a floor into a handful of Zones. The purpose of each floor is given by Ground Floor Station and Stage Cascade. See Floor Height for how high to make the floors. Link floors with Building Core.
Floors may be larger than required for production, either because space is plentiful and building vertically is time-consuming, or because lower floors with lots of machines feed into a much smaller number of machines in later stages. To make efficient use of this space, you may divide each Floor into Zones, separated by Comfortable Margins to allow for easy routing between Zones. Each Zone can be a single stage, or devoted to another purpose, like train stations or Transit Hub. Consider setting aside zones with color, belts, or pathways to clearly establish their boundaries.

Building Core
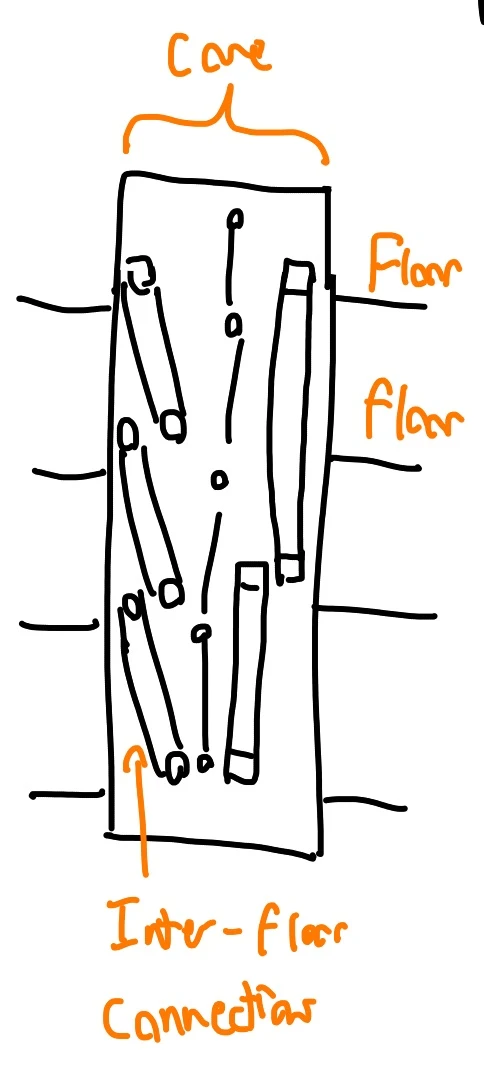
Our building is generally comprised of many Floors, or Zones. Parts and people must move efficiently between these Zones. This suggests the need for a place that connects Floors and Zones: we call this place a Building Core. Because Building Cores span the entire factory, and are difficult to retrofit, their scale and placement should be determined early in the layout process. Multiple cores may be sensible for larger factories.
Cores can be vertical, to connect Floors, or horizontal, to connect Zones. A vertical core could be as small as a 1x1 shaft running vertically between floors, but a more typical layout might be a 1x3, 2x3, or 3x3 shaft running the full height of the factory. Cores need not be compact, or at the center: consider Corner Core, or Wall Core.
For rapid transit between floors, site Building Core near a Transit Hub. To move people, place Elevator Banks and Emergency Stairs in Building Core, and set aside places for Maintenance Access: perhaps intertwined with Emergency Stairs. Use the core to centralize (Single Power Link) and hide power distribution, via Power Chase. Route materials from floor to floor using Conveyor Chase.
Basement Miners
Resource nodes and water are on the ground: it is there that we must extract our materials. Site miners, water extractors, and oil extractors directly on the ground, or, optionally, on a Floor just above ground level. Connect these resources to Stage Cascade using belts or pipes, perhaps through Building Core.
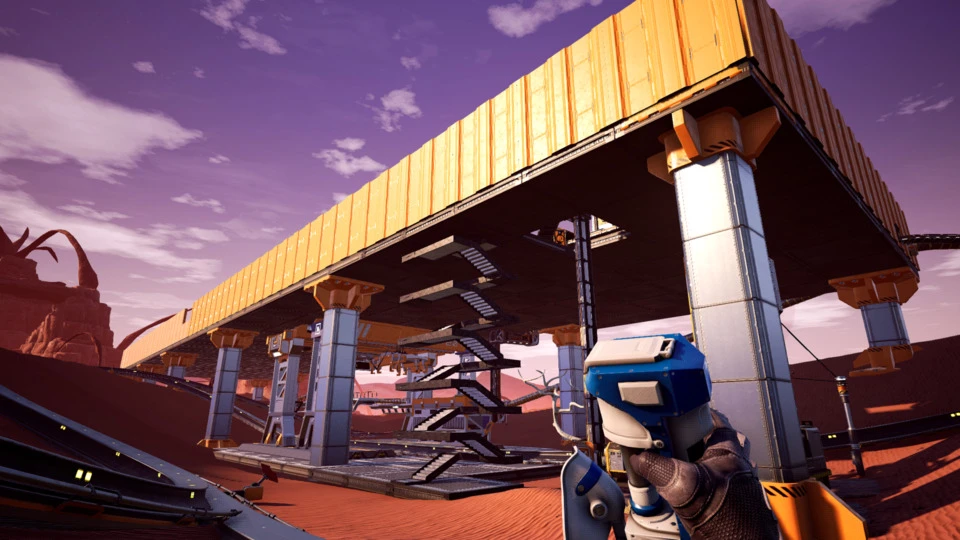
Ground Floor Station
Our factory will likely receive and send material via train stations–possibly organized into a Station Manifold. But where should these stations be in the building? Since tracks have a limited slope, it makes sense to place train stations at about the same level as nearby tracks. In most cases, this will be the ground floor. Where nearby tracks are above the ground floor, it can make sense to build train stations on higher floors, and to connect to those tracks via bridges.
Link Ground Floor Station to Stage Cascade via belts, pipes, etc; consider Building Core. Where throughput is critical, accompany the Station with Station Buffers. Since you will often arrive at a factory via this station, place it near Transit Hub or Local Hypertubes.
Build Up
Stage Cascade tells us that our floors will be arranged in a directed acyclic graph. Basement Miners and Ground Floor Station mean that inputs are generally low to the ground. Therefore, arrange subsequent stages on higher floors (or, for broad buildings, Zones leading away from these raw materials). The highest Floors in the factory should produce the final parts in the Stage Cascade. Return these parts to the Ground Floor Station via Building Core.
Arranging Floors in this order means that when we are laying out machines, we can build upwards incrementally, floor by floor, and always have prior stages producing parts. This aids in understanding the flow of materials through the factory, and identifying bottlenecks.
Refineries Down Low
Pumping fluids over long vertical distances is frustrating, and requires lots of fiddling with pumps. To reduce this, situate fluid-processing stages lower in your factory, or constrain them to a single floor.
Factory Shape
With the overall structure of a factory site established, we turn our attention to its concrete form: where it belongs, how high and broad to build, and which way it should face.
Factory Site
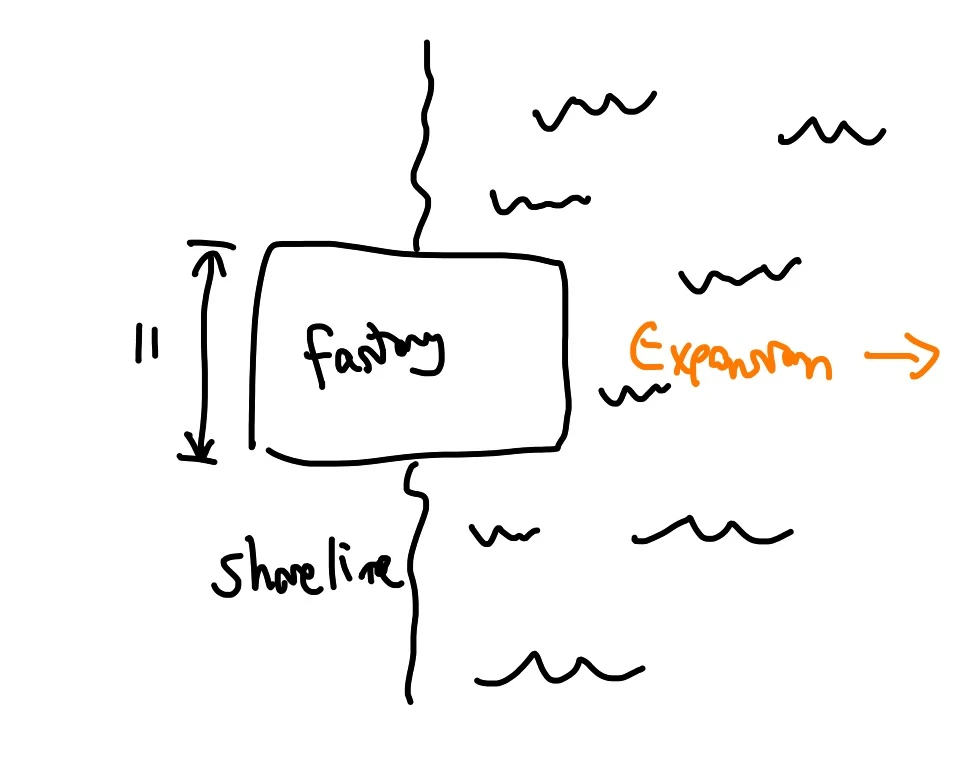
Factories Near Raw Materials tells us that our factory should be located near the resource nodes and high-volume materials it needs most. Refineries, in particular, may consume lots of water: consider building adjacent to, or out onto, a lake or sea. However, the scale of Station Manifold and the need for later expansion tells us that factories have a certain minimum size–for instance, 11x11 tiles. Choose a site where this area is readily available.
For later expansion, choose an area such that your factory can grow in one or two directions later. Most factories can grow upwards, but it is also helpful to grow sideways. Consider open fields, buttes, or dunes; cliff edges; or seas: anywhere with a large volume of horizontal space available.
Orientation
Align your foundations such that a flat edge faces the likely direction(s) of expansion. For lakes, align the structure to the shore; for cliffs, align it to the cliff edge. Ground Floor Station will need connections to the train network: consider the approach path for train tracks. If your Ground Floor Station might be expanded later (say, because you anticipate alternate recipes becoming available), orient Station Manifold so that later stations can be added in the direction of factory expansion, or leave extra space.
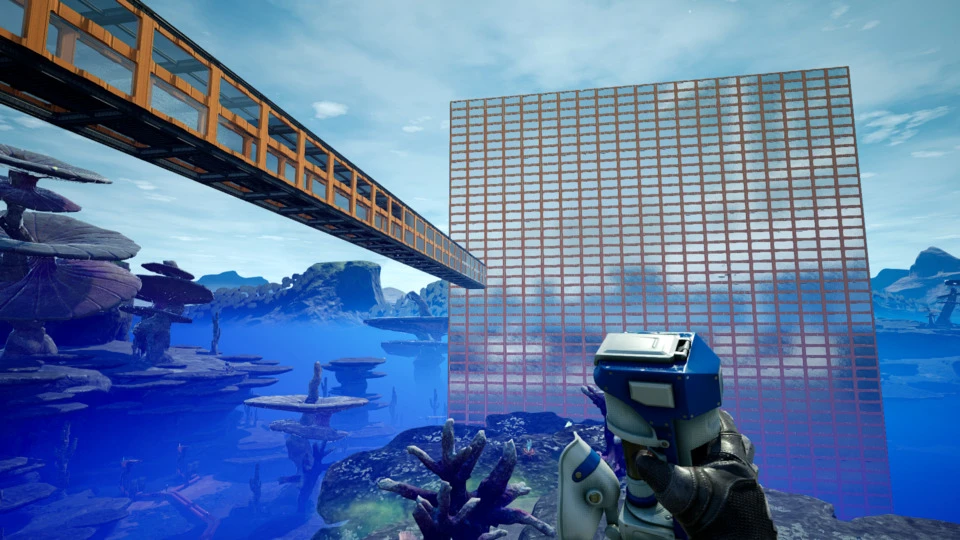
Scenic View
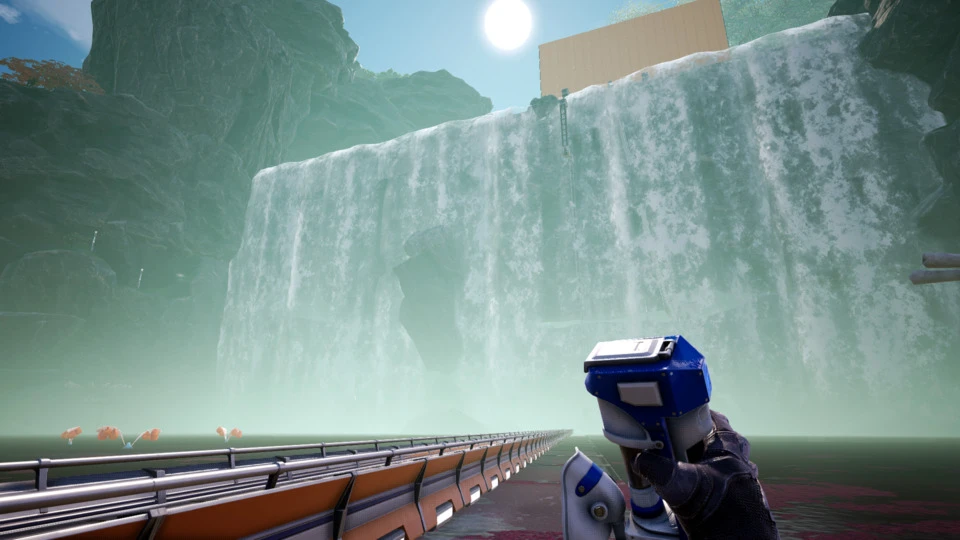
Satisfactory’s landscape is beautiful, and factories which are connected to that landscape are pleasing to be in. Consider orientations which will allow windows or wall gaps to face a scenic view, such as a waterfall, canyon, or sunrise.
Access to Light
For performance reasons, enclosing factories entirely in walls can be necessary. However, factories are easier to build, and more pleasing to be in, when there is light, brought in either via windows or wall gaps. Consider sites and orientations where the path of the sun can bring light into at least some of the factory floor.
Monumental Aspect
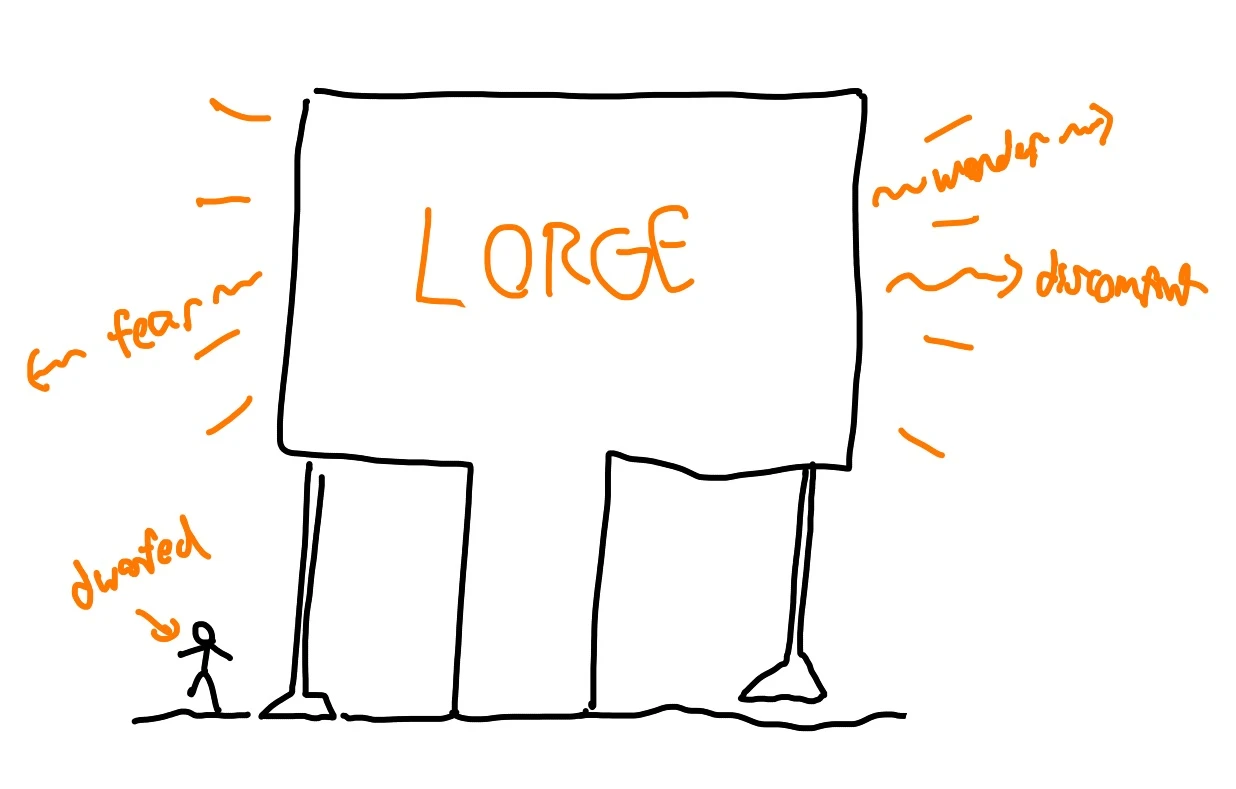
Buildings are more fun, and generate a sense of place, when they have distinct forms. The scale of Satisfactory buildings, and the rough materials provided, lend themselves well to a sort of monumental form which is visible from a far distance. Consider choosing an overall form which is unique, and connected in some way–complementing, opposing, framing, or focusing–the landscape around the site.

Floor Size
Ground Floor should be large enough to accommodate Ground Floor Station. For Station Manifold, at least 10 tiles are required on one axis: three for each turn into and out of the station, and four for the station itself.
Odd Dimensions
Certain pieces (e.g. walkways) in Satisfactory can only be aligned to the middle of a foundation, not the edge, and placing things exactly in the center is sometimes aesthetically desirable. As a general rule of thumb, prefer an odd number of foundation tiles for your floor dimensions: 9, 11, 15, etc: it ensures that the middle of the building will fall in the middle of a tile.
Floor Height
The height of each Floor is controlled by Stage Cascade: it must be high enough to enclose the buildings required for that Floor’s stages. For refineries, this is eight wall tiles high; for manufacturers, four high, for constructors and assemblers, three. Consider a four-wall minimum: it doesn’t cost much more to build, and affords the flexibility to replace constructors with assemblers later–and one can delete an entire floor to make space for refineries, if need be.
Shorter or taller Floors may be useful for aesthetic reasons: consider Entrance Transition, Transit Hub, Scenic View, and Maintenance Access.
Filling In The Core
Returning to the nuts and bolts of construction, we focus on the location and construction of the building core (or cores), from which the rest of the factory will grow.
Central Core
Building Core is generally full of stuff, which one might want, for aesthetic reasons, to hide behind opaque walls. These walls block views and light, and constrain entrances and exits to the building. Finally, people who use the Building Core for inter-floor transit prefer to minimize their walk time. For these reasons, it often makes sense to situate a core in the middle of a factory floor.
A Central Core blocks the horizontal flow of belts and Pedestrian Paths through the Floor. For this reason, it is generally a good idea to divide a Floor with a Central Core into two or more zones on either side of the core, and to leave extra margins for routing belts and pedestrian paths between them.
Central Cores may complicate later linear expansion: where expansion is likely to be necessary, consider Wall Core.
Wall Core
An alternative to a central core is to convert all (or part) of a wall into a building core–say, a volume one or two tiles deep, spanning the entire width of the factory. The natural direction of expansion is away from this wall, so place Wall Core at an edge of the building where expansion is not possible (e.g. near a tree or facing a cliff) or not desired. With opaque walls, Wall Core blocks Access to Light and Scenic View: choose a view one wants to block (e.g. for performance reasons), or consider Structural Expressionism.
Corner Core
Wall Cores need not span the full width of a structure. Instead, it can be helpful to build one or more small cores at the corners of a structure. This limits expansion, so use this pattern when you are confident in the final positions of the corners. Corner Core opens up the bulk of the wall for Access to Light, Scenic View, Train Network, etc.
Core Footprint
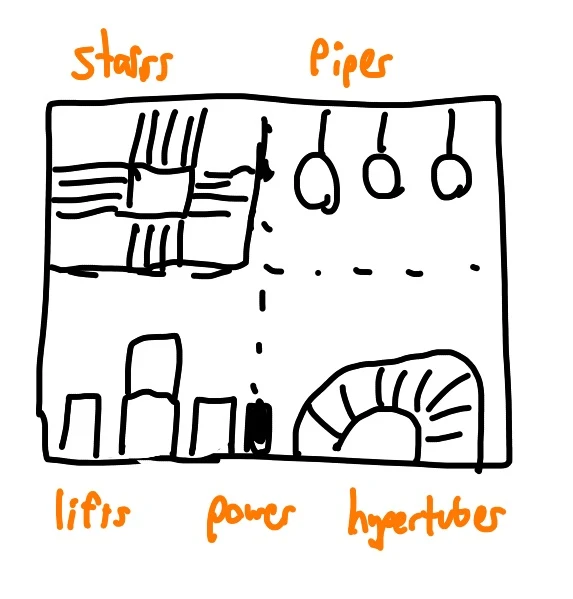
We now turn our attention to how wide the building core should be. A single foundation tile can support one stairwell and as many as nine conveyors lifts, hypertubes, or pipes (or more in a pinch). However, actually cramming all those conveyor lifts into that space can be tricky, and in order to access those pieces later, it’s helpful if they’re all laid out flat, rather than packed side by side. Moreover, some of these structures cannot comfortably be constructed in empty space: they require a wall attachment. Therefore, plan your Building Core such that each vertical (or horizontal) “track” has a single use. This suggests that Building Cores should not be too deep, because additional empty space is essentially wasted: one or two foundation tiles deep, rather than four or five.
Because of the width of pumps, the extra space required to extend conveyor lifts vertically, and the curvature of hypertubes, it is less advisable to place utilities on both sides of a single floor tile. For Wall Core, this is no concern: all access is through the inner wall face; Wall Core should generally be only one or two tiles deep. Where a Central Core is used on two (or all) sides, leave extra space: two or three tiles.
See Power Chase, Elevator Bank, Emergency Stairs, Lift Chase, and Pipe Chase for how to fill in the Building Core.
Power Chase
Each Floor requires power, and Building Core provides a natural place to put it. Per Single Power Link, select one Building Core to carry power, and use wall power poles to extend a single power line between all floors. Use double-sided wall power to connect the Power Chase to the power network on each floor. Keep Power Chase easily visible, so that you can disconnect or re-wire as necessary; don’t cover it up with pipes or lifts.
Elevator Bank
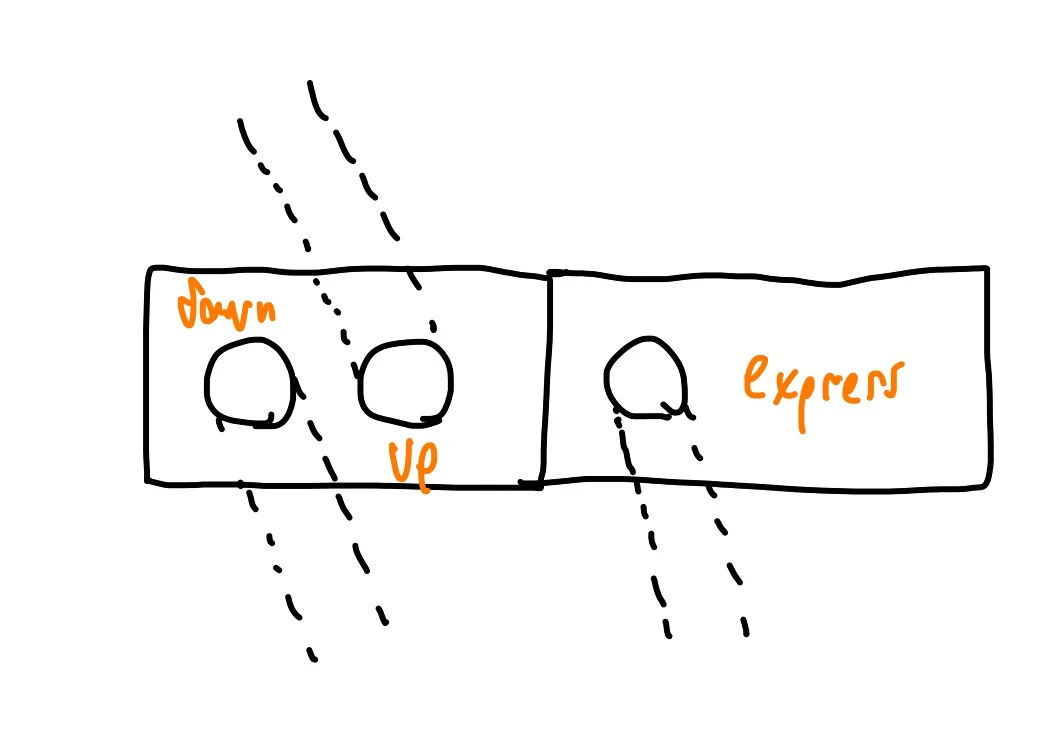
People need to move between floors, but stairs are cumbersome in tall buildings. Therefore, connect floors (or zones, for horizontal cores) using an Elevator Bank: a wall which is a part of the building core, with hypertube entrances to travel up or down. Pick a standard for directions (e.g. the up hypertube is always on the right) and stick to it: this aids navigability across many factories.
Use two entrances per wall tile, centered on the two rectangular regions of a wall tile: any closer, and you run the risk of leaving one entrance and being sucked immediately into the next. Power these entrances using Power Chase, from within Building Core.
Integrate Elevator Bank with Transit Hub, to facilitate rapid transfers between various factory floors and inter-factory transit. For buildings with many floors, or where a frequently traveled route (e.g. between Station Manifold and Transit Hub) demands it, build additional, dedicated elevators which skip over intervening floors or zones.
Emergency Stairs
When power fails, you can be left stranded with no way to change floors, short of building an emergency structure. To avoid this problem, place at least one emergency stairwell in a Building Core, with doors at each floor. These doors and stairs can form the basis for Maintenance Access; consider extending foundations or walkways to make it easier to work in the Building Core.
Lift Chase
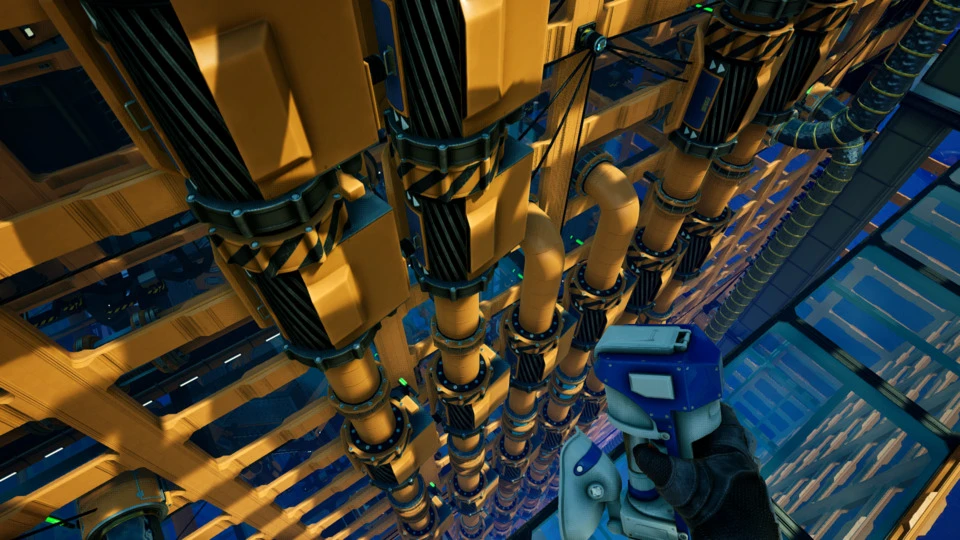
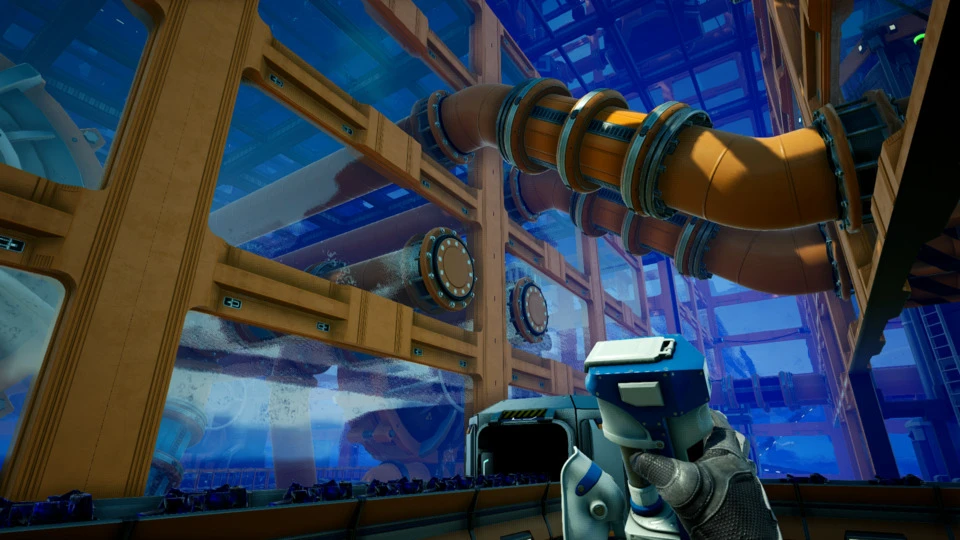
To move materials between floors, allocate part (likely, most) of your Building Core to a Lift Chase: a region of the Building Core wall where vertical conveyor lifts can transfer materials up or down. Building Up tells us that this flow will mostly be upwards, except for finished parts flowing down to the Ground Floor Station. Use three-hole conveyor walls to connect conveyor lifts to factory floors. Where one conveyor lift can’t stretch far enough, connect them end-to-end: Core Footprint ensures you will have enough space to do this.
Pipe Chase
Pipes for fluids can be routed from floor to floor in a similar style. Use Pipe Wall Holes to connect pipes from the factory floor to the chase, and wall mounts to align pipes vertically. Three holes per wall, in the same position as Lift Chase, works well. Use pumps, powered by Power Chase, to lift fluids where necessary. Pumps are prone to clipping through the walls: check the alignment in advance, and fix your pipes to the near or far wall, as appropriate, to avoid this.
Sense of Place
In conjunction with the layout of Building Core, and guided by the general site restrictions (Scenic View, etc.), you may wish to consider some more aesthetic concerns.

Entrance Transition
When you enter a building, it is pleasant to have some form of Entrance Transition, which makes the transition from outside to inside a distinct place. Christopher Alexander recommends distinguishing an Entrance Transition with changes in level, surface, direction, light, view, or scent. These can be applied to Transit Hubs–often your first point of arrival within a building, as well as ground-floor entrances, roofs, etc.
Train stations are often your first and final stops on a journey: pay attention to the view from the train, and how your train station can generate a sense of place.
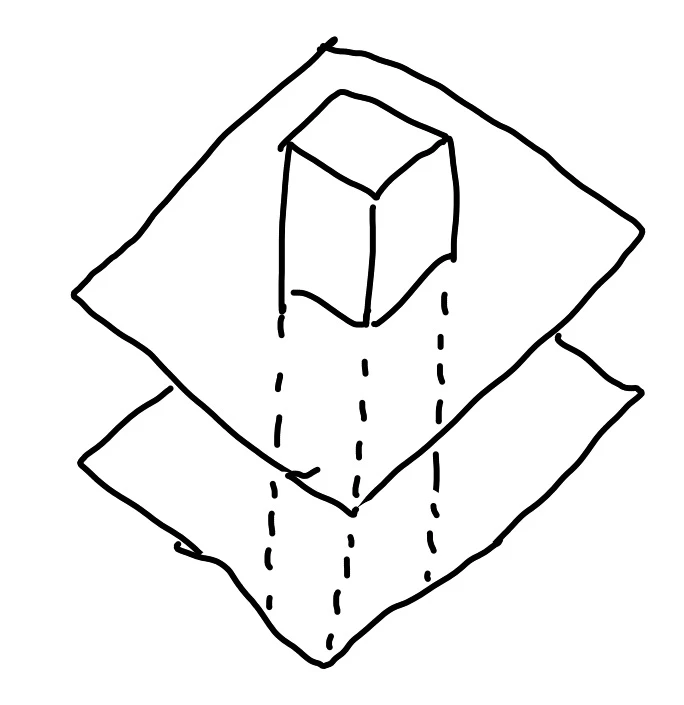
Ground Connection
Buildings can float in midair, but it is often more aesthetically pleasing to connect them to the ground via foundation columns, walls continued to the ground, pylons anchoring them to the sides of cliffs, and so on. If the building begins significantly above ground level, extend a Building Core to ground level, with an Emergency Stair and Elevator Bank.
Structural Expressionism
Building Cores need not be hidden. For observability, to bring in Access to Light, or to preserve a Scenic View, you may wish to expose a Building Core, or other functional parts of the building, through the use of windows or gaps in the wall. Consider glass foundations or other unorthodox ways of exposing critical components, while keeping them well-organized.
Element of Surprise
Buildings which are entirely predictable are boring. To create special, delightful places, which are full of contrast, use walls, floors, and terrain to selectively hide views or parts of the factory from view, then make them visible from a limited vantage point. For example, a hypertube could briefly expose the rider to the outside of a structure, or a flash of sunlight through glass. Reward people for climbing a structure by creating a special place at the roof. Route train tracks behind waterfalls. Make these places you will traverse in the course of your work, so that ordinary errands have some moments of delight.
Floor Logistics
Returning to the nuts and bolts: with the building core established, and initial materials flowing through it, it is time to fill in the factory floor. We begin with the flow of materials from the Building Core to a nearby Zone–later Zones on the same floor will follow the same pattern.
Comfortable Margin
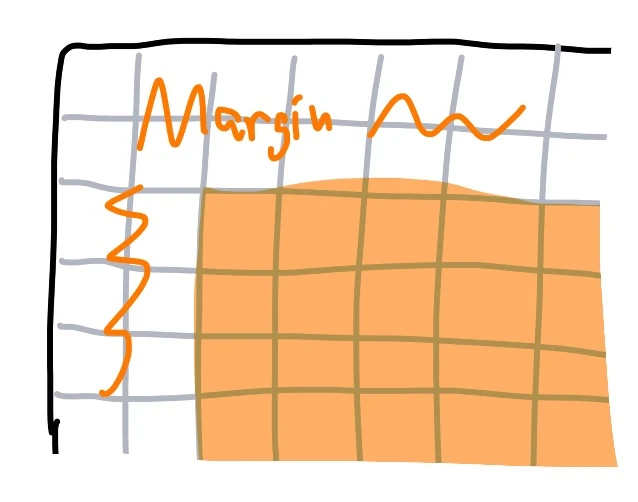
Factories invariably require more belts, and routing them through the middle of production Zones is cumbersome. Leave yourself space at the walls of the building, and between different Zones, for walking and later expansion. This space should be at least one tile, but two is generally better.
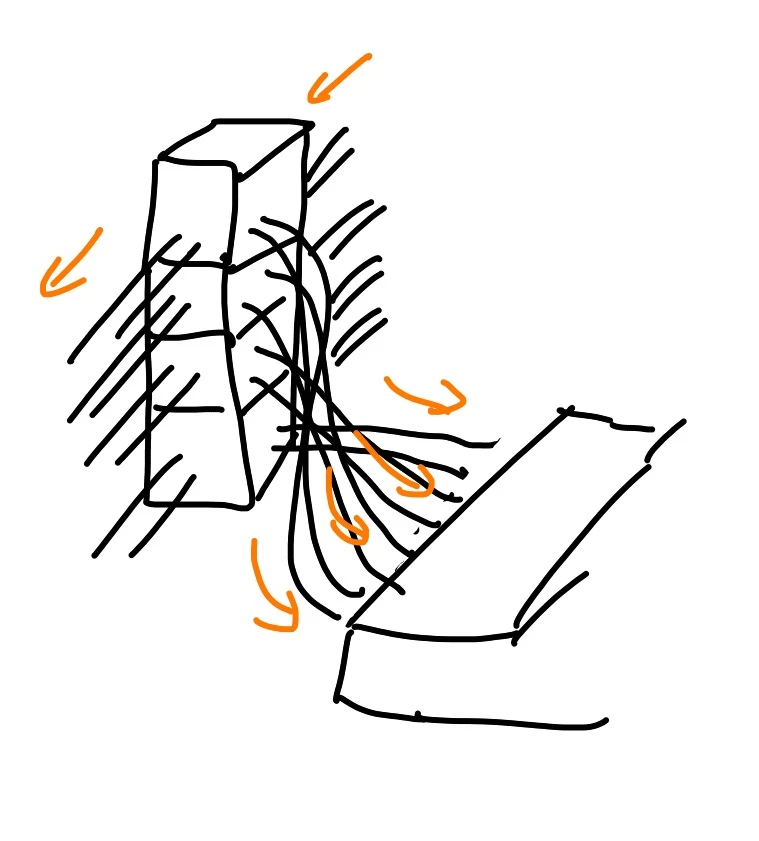
Belts In The Margins
To bring materials to a production Zone, and to take away its finished products, you will need belts and pipes. The Comfortable Margin is where this routing happens. Use the margin to route materials from the Building Core to the appropriate production zone. These belts can be free-form, Stacked Belts, or using Splitters at the Corners.
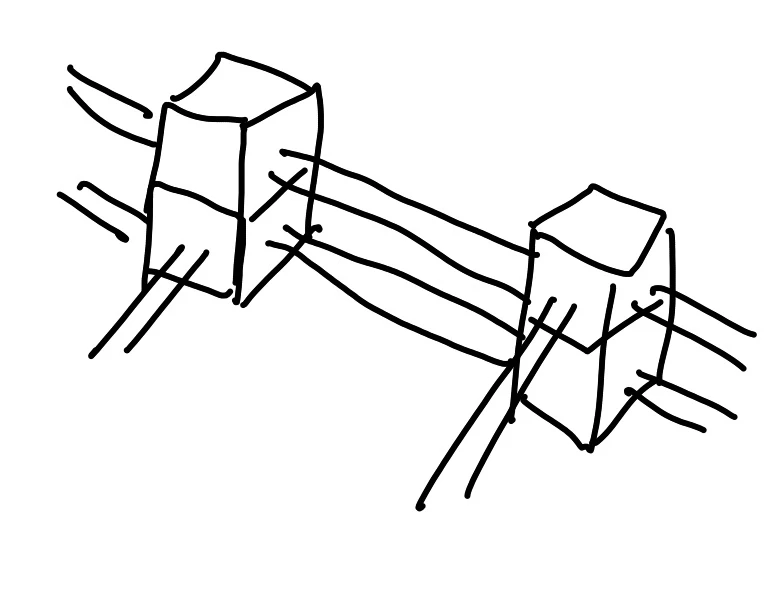
Stacked Belts
It is tempting to route several belts side-by-side, but this consumes extra space, makes it difficult to split lines, and links poorly to Belt Manifold. Instead, prefer positioning belts on top of each other, either by using stackable belt supports, or through stacking Splitters at the Corners. This is particularly useful in feeding Manufacturers as a part of Belt Manifold.
In general, try to reserve one level for a particular material, rather than routing different materials side by side. This reduces the need for complex grade crossings.
Splitters at the Corners
It can be tempting to simply turn a corner with a belt. However, later expansion may require splitting that belt, and placing splitters into densely packed belts can be difficult. It is also more difficult to consistently align belts when placing them free. Instead, consider using splitters (or mergers) as the foundation of your belt network, placing them at each corner or potential future junction. Stack them on top of each other to transfer multiple materials in a compact footprint. Once placed, connecting these splitters with belts is easy.
Pipes Over Belts
Refineries often involve a combination of fluids and belts, but the two do not perform identically. In particular, placing splitters precisely is easier to do on a ground foundation. Therefore, when placing refineries (and in general, to avoid level crossings), situate belts and splitters on the ground, and stack pipes above them.
Pedestrian Paths
Materials are not the only thing which flows through factories: people need to access them too. Leave space in the margins, or create it using walkways, for people to walk. Even if you’re flying most of the time, having designated pedestrian paths helps.
A pedestrian path need not be the ground: it is often convenient to be higher up. Consider the tops of refineries, factories, and storage containers as potential paths and perches for building. Leave vertical space to support this access.
Zone Layout
Stage Cascade gives the overall flow of materials between zones, and tells us what each Zone produces. Now we fill in a Zone by discussing the arrangement of machines and belts within it.
Expansion Axes
Zones should be designed for later expansion. These axes of expansion are governed by the site’s Orientation, and the position of Building Core(s). Therefore, align a zone so that it has room to grow, and orient its Production Arrays with this in mind.
Production Array
The Production Array is the basic unit of production: a series of machines (e.g. constructors, assemblers) arranged side by side, in a way that can be readily expanded later. In general, align machines in Production Array as close to each other as possible, so as to save space. High-volume parts may require a Production Array with multiple machines feeding each other; when doing this, consider their ratios carefully.
Feed Production Arrays using Belt Manifold or Sushi Belt.
Belt Manifold
A Production Array is a sort of surface through which materials flow and are transformed. Materials must flow efficiently across both sides of this surface. Except where belt throughput is insufficient, prefer a manifold: they are compact, easy to lay out, and readily expandable.
A Belt Manifold works by sending materials along a belt (or pipe) in a straight line, along the axis of expansion, and at right angles to the machines in the production array. At each machine, use a splitter to feed that machine’s inputs. Use Splitters at the Corners to make this layout easy, and Stacked Belts to make the manifold compact. Connect each manifold to Belts in the Margins via splitters.
On the output side, place another manifold, this time comprised of mergers, which gathers finished products from each machine in the Production Array.
Belt Manifolds can also be used for trains or storage systems.
Corrugated Manifold
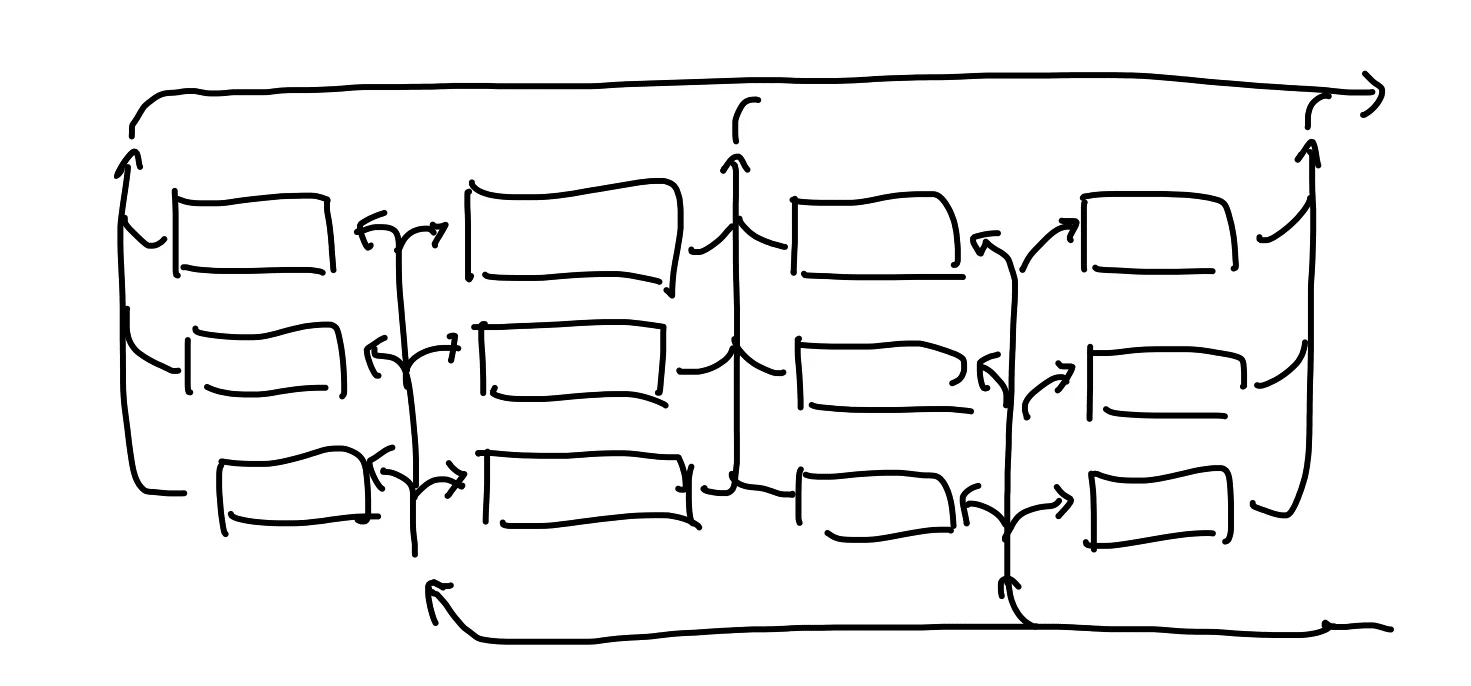
Where multiple Production Arrays are side-by-side, and belt capacity is sufficient, they can share Production Manifolds. To do this, adjacent Production Arrays need to face in opposite directions. The resulting input and output manifolds alternate in a sort of “crinkled” pattern, hence “corrugated”. Input and output lines need not face opposite directions: they can be laid on top of each other, using Stacked Belts, to one side; this facilitates expansion.
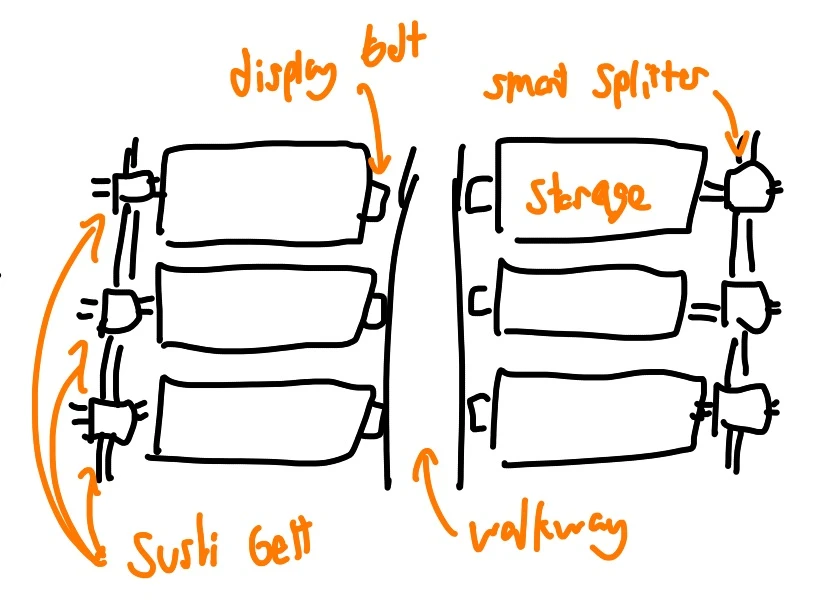
Sushi Belt
Some types of factories require diverse parts, low volumes, or a compact space, and do not care as much about efficiency. For these factories, a Sushi Belt can be a good choice: combining many types of parts on to a single belt, and using Smart Splitters to feed specific parts to factories. A Sushi Belt can be a good choice for manufacturing filters, ammunition, and so on, perhaps drawing on the same input as Shopping Mall. Produced components can be collected via a dedicated Belt Manifold, or returned to the Sushi Belt.
Sushi Belts will deadlock with backpressure. Each splitter should use an overflow setting to allow excess parts to flow along the main belt line, and discard excess components via Load Shedding.
Sushi Belts are inefficient if materials are not well-interleaved. Consider a storage container for each object type, and a Belt Manifold to merge their contents together.
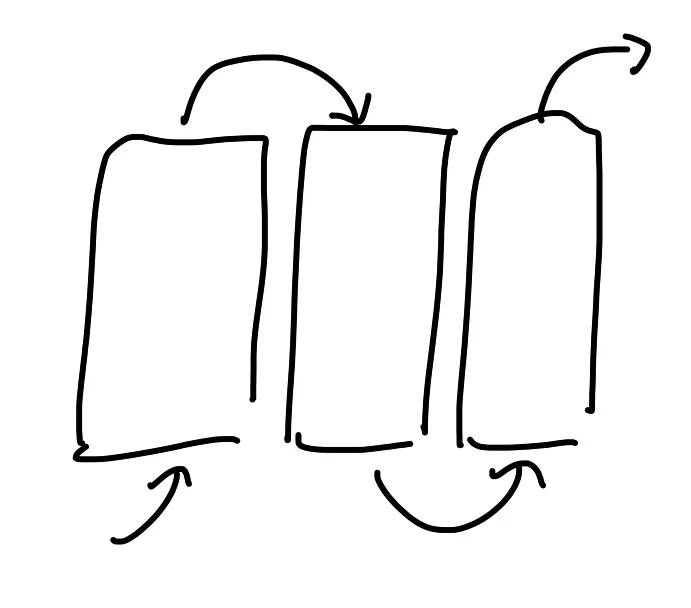
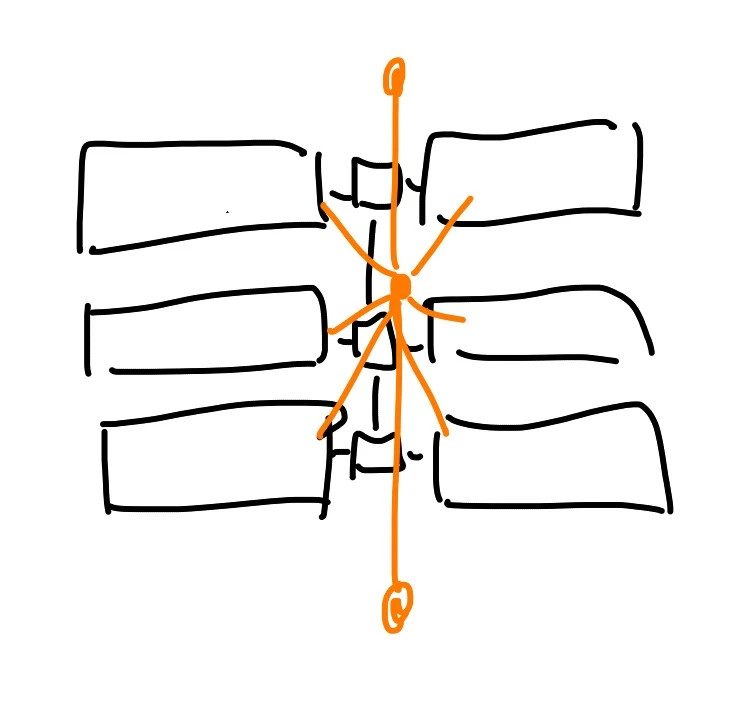
Overflow Chain
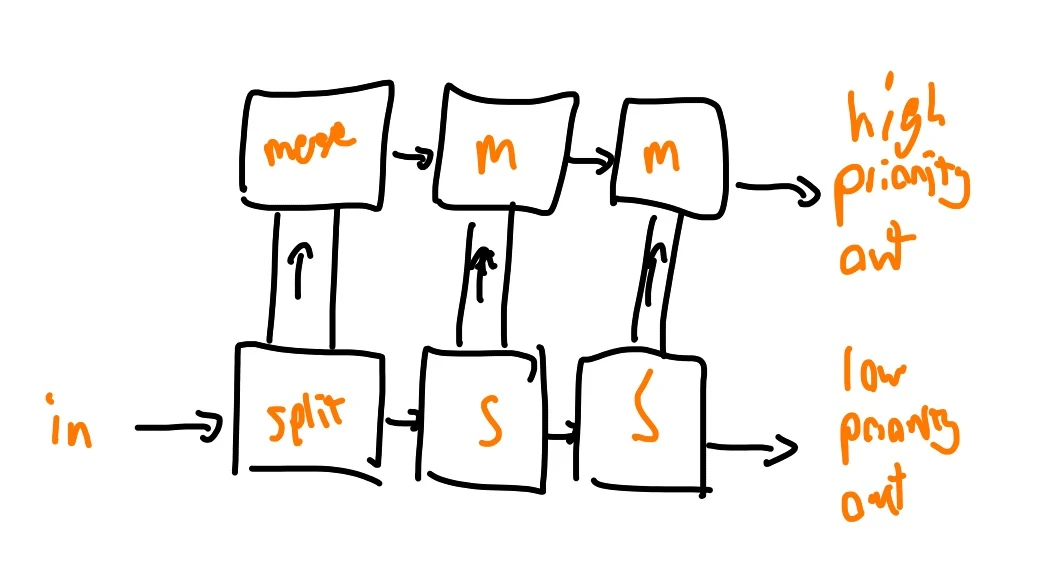
Sometimes it is important to control item priority. For instance, one might want to feed only excess materials from a Shopping Mall to an Item Sink. One option is programmable or smart splitters with the “overflow” option. Another is an Overflow Chain, which preferentially splits, or combines, belts using only plain splitters or mergers.
For a splitter chain, one constructs n (e.g. three) splitters in a row, and above (or below) them, places n mergers. Each splitter is connected to the merger above it via a pair of conveyor lifts on each side. The final output from the splitter chain becomes the low-priority output, and the output of the mergers is the high-priority output. When both are free, 1/(3n) of the items flow through the low-priority output, and the remainder through the high-priority output. If the high-priority output stalls, items flow out onto the low-priority output, as overflow.
The inverse of this technique send items into the merger chain, and withdraws them from the final merger: the result is that items are preferentially drawn from the splitter input.
Container Chain
Storage containers are nice, but can be small. To store large volumes of items (e.g. for local construction or This is Not a Place of Honor), place many storage containers side by side, facing opposite directions. Connect each container’s output to the next container’s input. This ensures that items always flow towards the final container.
Using a chain, rather than a manifold, allows for incremental expansion and contraction of the storage chain: one can add new containers to either end, and delete containers from the start of the chain, since they will be empty. It can also be drained from a single point.
Local Power
After placing machines, storage, and belts, it is time to attach power lines. Wall power poles are a good choice for routing power along the walls of a factory, but individual machines may require free-standing poles. Place these poles along the Expansion Axis between two Production Arrays, and space the poles so that machines on each side can be powered by a single line of poles. Use tier 2 or 3 power poles to reduce the number of poles required.
Single Power Link tells us that these power lines should be linked to the Power Chase, and from there to the Main Grid, via a single path: avoid creating mesh-like power grids.
Refineries
We turn our attention now to refineries, which present special challenges.
Fuck Refineries
Most machines in Satisfactory take n inputs and produce only a single output. This has the pleasant property that no network of these machines (so long as Immiscible Materials is followed) can deadlock. This is not true for refineries, which sometimes produce two outputs. When one output fills, the refinery stalls. This can take down an entire production chain.
Adding buffers generally obscures the problem by slowing the response of the system to control inputs, and the added storage space rarely resolves the underlying imbalance. Burning fuel can discard some refinery products, but requires power consumption, which may not be sufficient.
Therefore, find a way to independently consume or discard all double-output refinery products: for instance, feeding a factory which needs only that refinery item (rather than both, which could result in deadlock), by feeding excess into an item sink, or by sending it to a Recycling Train.
Recirculating Refinery
If your refineries have an excess of heavy oil residue, fuel, plastic, and/or rubber, there is a particular, and very strange, solution to the problem. It involves using alternate recipes to build a factory which takes at least two units of plastic as a one-time primer, and after an initial ramp-up period, converts arbitrary volumes of input heavy oil residue, fuel, rubber, and plastic into arbitrary volumes of rubber and plastic. Consuming either rubber or plastic (or any combination thereof) from this factory prevents deadlock. The process is power- and space-intensive, but remarkably material efficient.
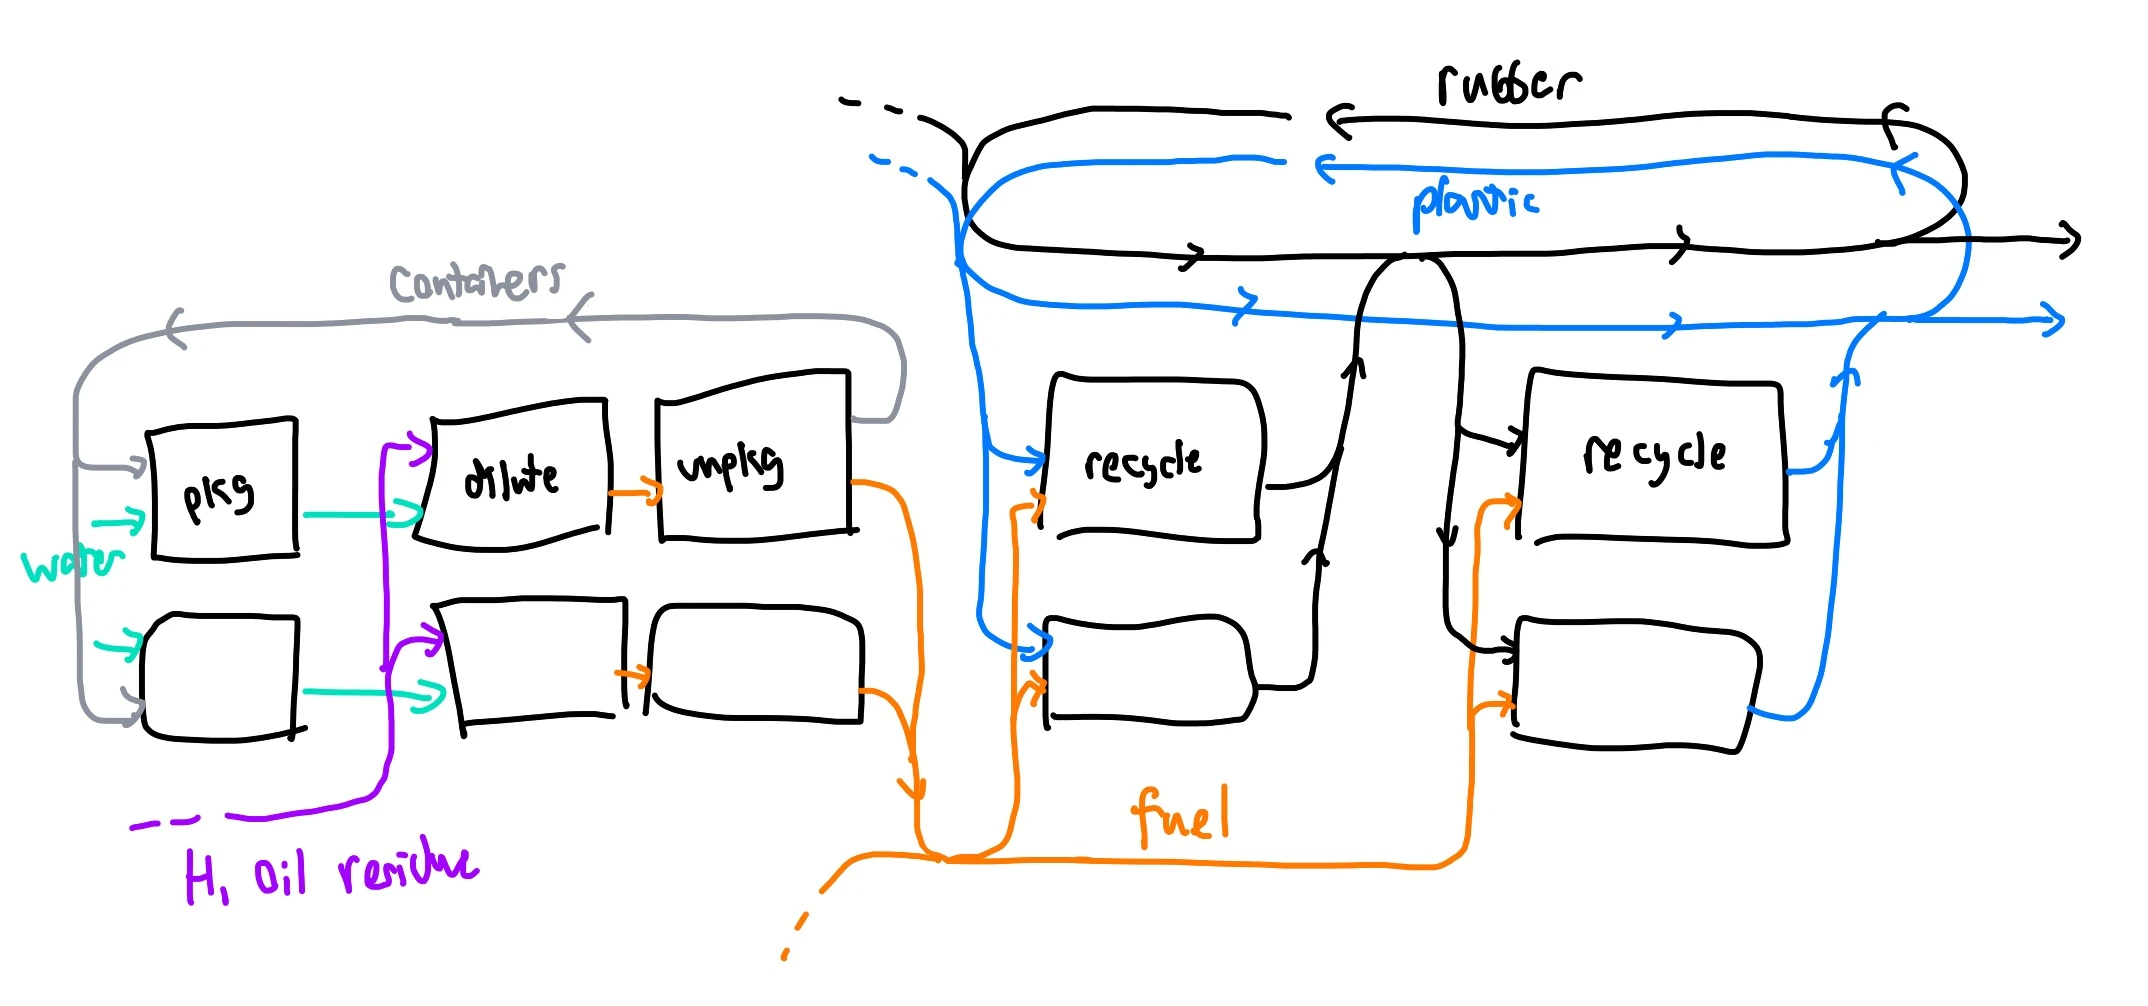
This hinges on two alternate recipes which consume fuel to convert 1 rubber into 2 plastic, and 1 plastic into 2 rubber, and connecting the two together in a loop. As long as some seed plastic (or rubber) is available to kickstart the process, the factory consumes fuel, filling up both loops with rubber and plastic. Either or both loops can be bled off via a splitter, and sent to other factories.
To consume heavy oil residue, we use the Diluted Fuel recipe in a closed loop: a water extractor feeds a water-packaging refinery. The bottled water is combined with heavy oil residue to yield packaged fuel, which is immediately unpackaged and fed into the refinery loop. The empty canisters can be re-used for the next round of water bottling: after an initial ramp-up period where canisters are injected, this factory is self-sustaining.
Finishing Work
With much of the building laid out, we turn to finishing touches: things that fill in gaps, or connect disjoint parts into a whole.
Walls Come Last
Walls fulfill essentially no structural purpose in Satisfactory, and it is entirely legitimate to build factories without walls: they are, after all, easier to expand. However, when expansion goals have been satisfied, to improve performance, or just for looks, it’s nice to finish a building by cladding it in walls. Do this once the basic layout of a floor has been solidified, so that you do not have to undo your work. Place windows at this time, in accordance with Access to Light, Scenic View, Element of Surprise, and so on.
Maintenance Access
Crawlspaces, miners, Building Cores, and other concealed spaces of your factories are easy to wall off and forget–but this complicates repairs and improvements later. Set aside space for maintenance access: doors and stairwells which allow access to these spaces. Jetpacks have limited fuel: in vertical spaces, set ledges, foundations, and walkways so that you have a stable place to perch while working.

On-Site PPE
One may arrive at a factory with hazardous conditions, like nuclear radiation, hostile creatures, or gas. If one is not properly equipped, it can be frustrating to return to the nearest Shopping Mall, pick up gear, and return. Instead, consider stocking a local chest with relevant protective equipment, like a hazmat suit and filters. Position this chest outside the hazardous region, and near the Transit Hub or Entrance Transition. Your future self will thank you.
Final Thoughts
Satisfactory is good.
Recommend
About Joyk
Aggregate valuable and interesting links.
Joyk means Joy of geeK