

Wayland and LVGL on PinePhone with Ubuntu Touch
source link: https://lupyuen.github.io/pinetime-rust-mynewt/articles/wayland
Go to the source link to view the article. You can view the picture content, updated content and better typesetting reading experience. If the link is broken, please click the button below to view the snapshot at that time.
Work-in-progress LVGL GUI Framework ported to Wayland EGL on PinePhone with Ubuntu Touch
We :heart: Old Underwear...
They feel comfy, they fit our contours. Nevermind the holes and the old stains
X11 is like Old Underwear.It's been around for 30 years... Yet we still use it in spite of its feature gaps and wonky quirks.
PinePhone on Ubuntu Touch feels like... New Underwear.
It runs Linux but it has none of the legacy X11 code. Because it's optimised for a great mobile experience with Wayland.
But New Underwear feels uncomfortable. So today we'll learn Wayland and understand how apps are built with Wayland.
Hopefully someday we'll move on to newer, simpler app frameworks (like LVGL and Flutter) as we discard our Old Underwear: X11, SDL, GTK, Qt, ...
The source code for this article may be found here...
X11 is the Graphical Display Service that runs on most Linux desktops and notebooks.
Let's hunt for the X11 Service on Pinebook Pro...
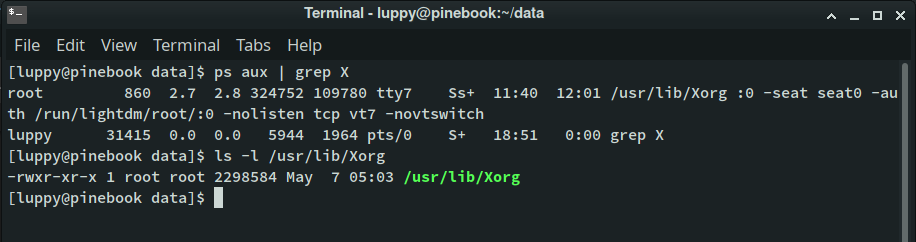
That's the X11 Service... A 2.2 MB
executable named
Xorg
.
The X11 Service controls the rendering of Linux apps (as well as the keyboard and mouse input) like this...
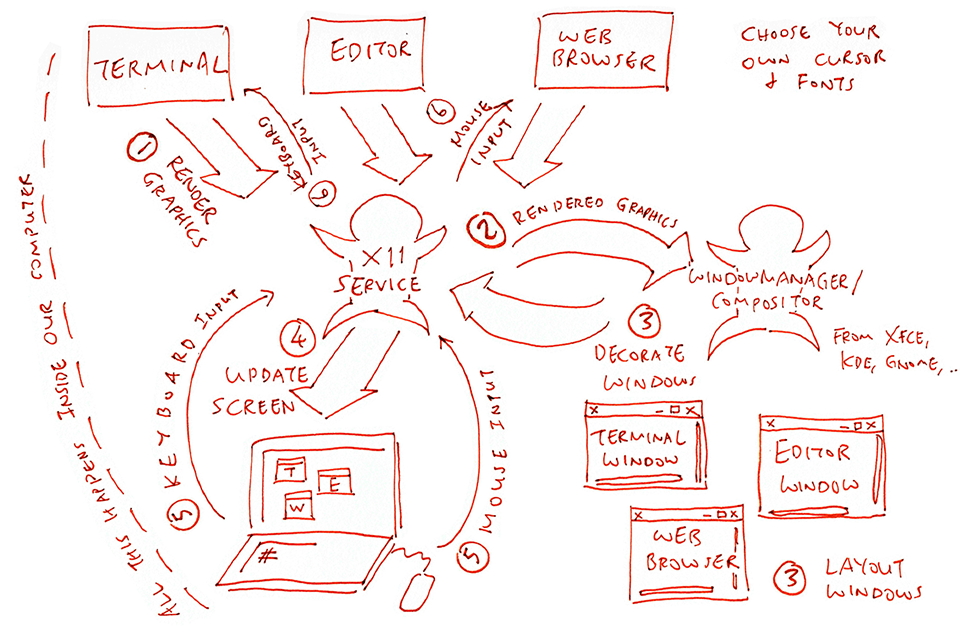
(Adapted from "Wayland Architecture" )
-
At the top we have the Linux programs running on our Linux machine: Terminal, Editor, Web Browser .
Each program renders its graphical display and transmits the raw graphics to the X11 Service (via a local TCP socket).
-
X11 Service forwards the rendered graphics to the Window Manager / Compositor .
The Window Manager / Compositor is provided by the Desktop Environment : Xfce, KDE, Gnome, ...
-
The Window Manager / Compositor wraps the rendered graphics into Display Windows and "decorates" them with scrollbars, title bar and minimise / maximise / close buttons.
The Window Manager / Compositor then draws the Display Windows into a Screen Buffer according to their screen coordinates.
-
The Screen Buffer is rendered to our screen by the X11 Service, talking to the Linux Display Driver .
-
Any keyboard and mouse input is captured by the X11 Service, and forwarded to the programs.
Why is X11 so complex? So many hops?
Because X11 was designed for Distributed Computing Systems.
Here's how I used (abused?) X11R4 at UIUC Systems Research Group way back in 1990 (30 years ago!)...
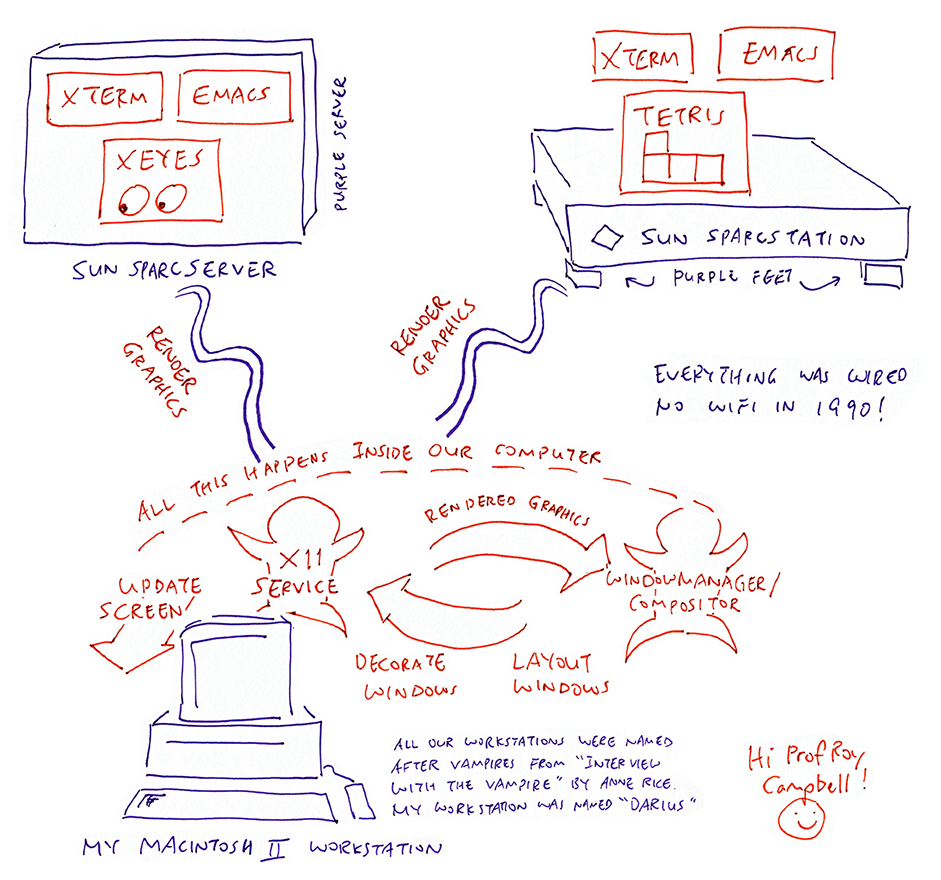
Thankfully things are a lot simpler now, lemme explain...
2 Wayland on Ubuntu Touch
Do we need overlapping or tiled windows on PinePhone?
Do we need to need to decorate PinePhone windows with a title bar and minimise / maximise / close buttons?
Do we even need any windows on PinePhone?
No! Because each PinePhone app takes control of the entire screen!
PinePhone uses a simpler Graphical Display Service: the Wayland Compositor .
Let's hunt for the Wayland Compositor on PinePhone...
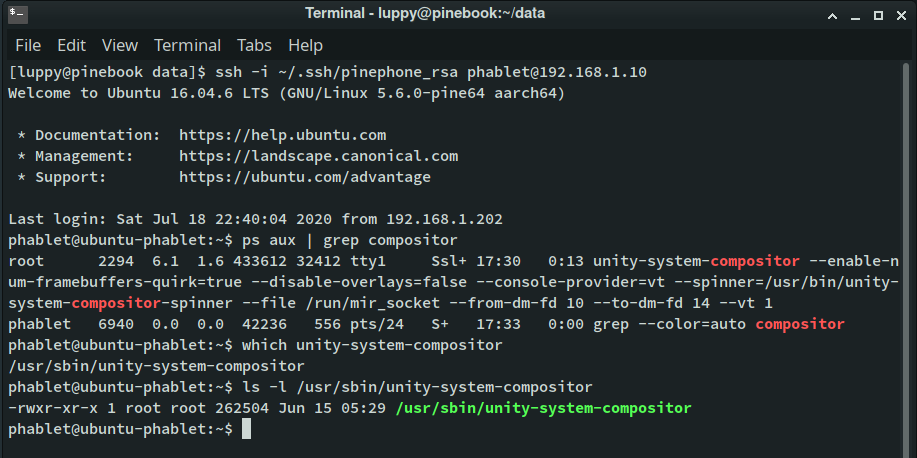
That's the Wayland Compositor... A 262 KB
executable named unity-system-compositor
.
Compare that with the 2.2 MB X11 Server on Pinebook Pro!
Here's how the Wayland Compositor controls apps and touchscreen input on PinePhone with Ubuntu Touch...
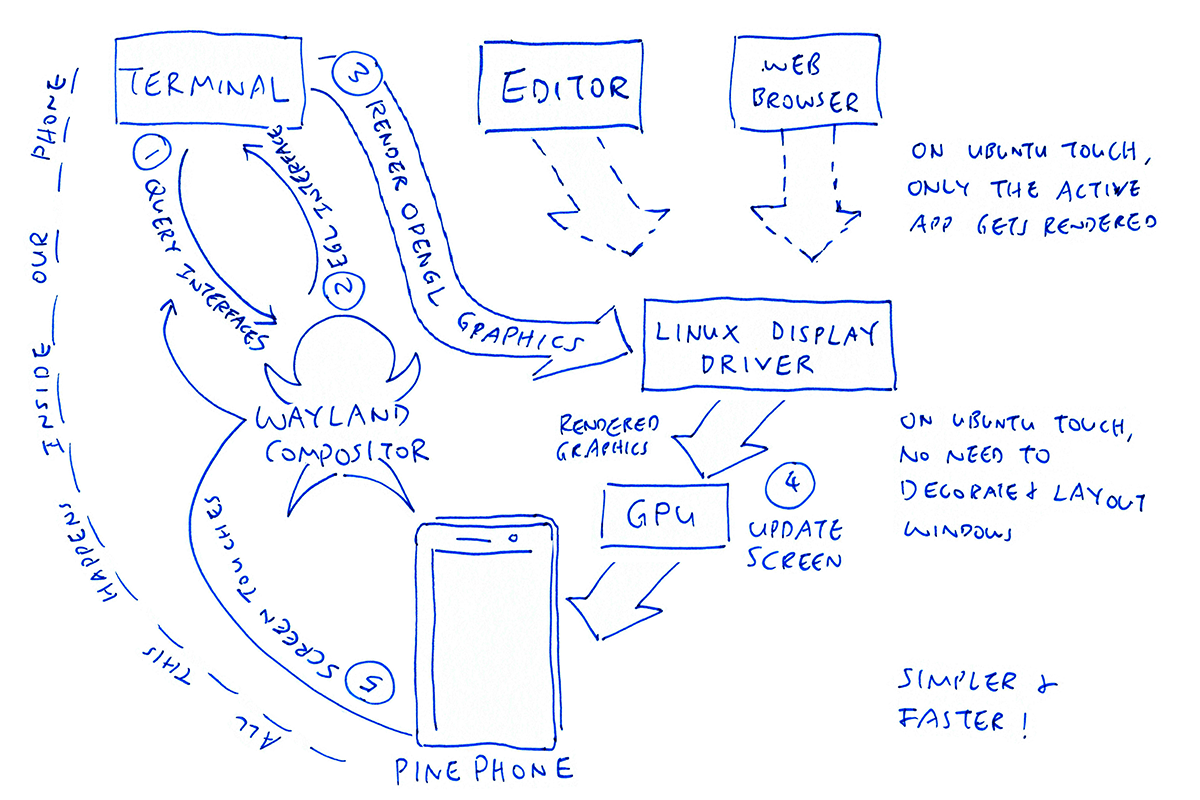
(Adapted from "Wayland Architecture" and "EGL API" )
-
At the top we have the apps running on our phone: Terminal, Editor, Web Browser .
Since each app runs fullscreen, only the active app will be rendered.
When then app starts, it queries the Wayland Compositor for the graphical display interfaces available. (They talk via a Linux socket file :
/run/user/32011/wayland-0) -
Wayland Compositor returns the EGL Interface to the app.
-
App calls the EGL Interface to render OpenGL graphics directly to the Linux Display Driver .
-
Linux Display Driver forwards the OpenGL rendering commands to the GPU to update the screen .
-
Any touchscreen input is captured by the Wayland Compositor, and forwarded to the active app.
Wayland looks so much simpler and faster than X11!
Wayland is designed for OpenGL and GPUs?
Yes! And I lied about Wayland being New Underwear... Wayland is not really that New!
Wayland was first released in 2008 ( 11 years ago )... Yet it was designed around OpenGL and GPUs, the same tech that powers our beautiful games today. ( And websites too )
Read on to learn how to render our own OpenGL graphics with Wayland and Ubuntu Touch on PinePhone...
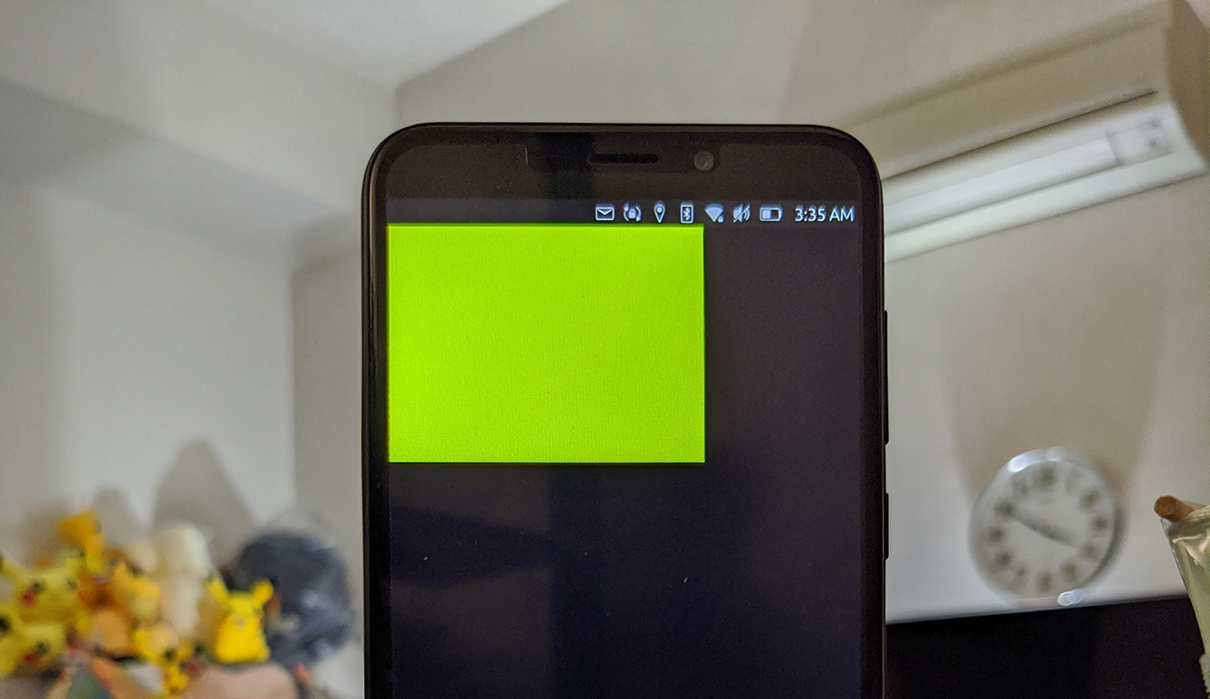
Rendering a yellow rectangle with Wayland and OpenGL on PinePhone
3 Render OpenGL Graphics with Wayland
Here's the function that calls OpenGL to render the yellow box above:
pinephone-mir/egl.c
/// Render the OpenGL ES2 display
static void render_display() {
    //  Fill the rectangular region with yellow
    glClearColor(
        1.0,  //  Red
        1.0,  //  Green
        0.0,  //  Blue
        1.0   //  Alpha
    );
    glClear(GL_COLOR_BUFFER_BIT);

    // Render now
    glFlush();
}
render_display()
looks exactly like normal OpenGL, and it works on PinePhone with Wayland! (Thanks to Ubuntu Touch)
Two things to note...
-
PinePhone supports a popular subset of OpenGL, known as OpenGL for Embedded Systems Version 2.0.
OpenGL ES is optimised for Embedded Devices. It's used by many mobile and console games today.
-
To render OpenGL ES graphics, we need to get the OpenGL ES Context and Window Surface from Wayland
Before calling render_display()
, we fetch the OpenGL Window Surface from Wayland like so:
pinephone-mir/egl.c
/// Dimensions of the OpenGL region to be rendered
static int WIDTH  = 480;
static int HEIGHT = 360;

static struct wl_egl_window *egl_window;  //  Wayland EGL Window
static EGLSurface egl_surface;            //  EGL Surface

//  Create the EGL Window and render OpenGL graphics
static void create_window(void) {
    //  Create an EGL Window from a Wayland Surface
    egl_window = wl_egl_window_create(surface, WIDTH, HEIGHT);
    assert(egl_window != EGL_NO_SURFACE);  //  Failed to create OpenGL Window

    //  Create an OpenGL Window Surface for rendering
    egl_surface = eglCreateWindowSurface(egl_display, egl_conf,
        egl_window, NULL);
    assert(egl_surface != NULL);  //  Failed to create OpenGL Window Surface

    //  Set the current rendering surface
    EGLBoolean madeCurrent = eglMakeCurrent(egl_display, egl_surface,
        egl_surface, egl_context);
    assert(madeCurrent);  //  Failed to set rendering surface

    //  Render the display
    render_display();

    //  Swap the display buffers to make the display visible
    EGLBoolean swappedBuffers = eglSwapBuffers(egl_display, egl_surface);
    assert(swappedBuffers);  //  Failed to swap display buffers
}
Functions named wl_egl_...
are provided by the Wayland EGL Interface. Functions named egl...
come from the cross-platform Mesa 3D Graphics Library
.
EGL vs OpenGL... What's the difference?
In Wayland, EGL is the Enabler for OpenGL.
Wayland only understands EGL and it will gladly hand us EGL objects... But it's up to us to transform EGL into OpenGL for rendering.
Thus in the code above, we take a Wayland Surface surface
and transform it into an EGL Window egl_window
...
//  Create an EGL Window from a Wayland Surface
egl_window = wl_egl_window_create(surface, WIDTH, HEIGHT);
Then we create an OpenGL Window Surface egl_surface
from that EGL Window...
//  Create an OpenGL Window Surface for rendering
egl_surface = eglCreateWindowSurface(egl_display, egl_conf,
    egl_window, NULL);
And we begin the OpenGL rendering...
//  Set the current rendering surface
eglMakeCurrent(egl_display, egl_surface,
    egl_surface, egl_context);

//  Render the display
render_display();

//  Swap the display buffers to make the display visible
eglSwapBuffers(egl_display, egl_surface);
Here's how we create a Wayland Region for OpenGL rendering:
pinephone-mir/egl.c
static struct wl_region *region;  //  Wayland Region

//  Create the Wayland Region for rendering OpenGL graphics
static void create_opaque_region(void) {
    //  Create a Wayland Region
    region = wl_compositor_create_region(compositor);
    assert(region != NULL);  //  Failed to create EGL Region

    //  Set the dimensions of the Wayland Region
    wl_region_add(region, 0, 0, WIDTH, HEIGHT);

    //  Add the Region to the Wayland Surface
    wl_surface_set_opaque_region(surface, region);
}
To learn more about EGL, check out "Programming Wayland Clients"
The Wayland EGL code in this article was adapted from that document.
4 Get EGL Context from Wayland
Earlier in create_window()
we called an EGL Context
egl_context
to render OpenGL graphics.
Here's how we get the EGL Context:
pinephone-mir/egl.c
/// Wayland EGL Interfaces for OpenGL Rendering
static EGLDisplay egl_display;  //  EGL Display
static EGLConfig  egl_conf;     //  EGL Configuration
static EGLContext egl_context;  //  EGL Context

//  Create the EGL Context for rendering OpenGL graphics
static void init_egl(void) {
    //  Attributes for our EGL Display
    EGLint config_attribs[] = {
        EGL_SURFACE_TYPE,    EGL_WINDOW_BIT,
        EGL_RED_SIZE,        8,
        EGL_GREEN_SIZE,      8,
        EGL_BLUE_SIZE,       8,
        EGL_RENDERABLE_TYPE, EGL_OPENGL_ES2_BIT,
        EGL_NONE
    };
    static const EGLint context_attribs[] = {
        EGL_CONTEXT_CLIENT_VERSION, 2,
        EGL_NONE
    };

    //  Get the EGL Display
    egl_display = eglGetDisplay((EGLNativeDisplayType) display);
    assert(egl_display != EGL_NO_DISPLAY);  //  Failed to get EGL Display

    //  Init the EGL Display
    EGLint major, minor;
    EGLBoolean egl_init = eglInitialize(egl_display, &major, &minor);
    assert(egl_init);  //  Failed to init EGL Display

    //  Get the EGL Configurations
    EGLint count, n;
    eglGetConfigs(egl_display, NULL, 0, &count);
    EGLConfig *configs = calloc(count, sizeof *configs);
    eglChooseConfig(egl_display, config_attribs,
        configs, count, &n);

    //  Choose the first EGL Configuration
    for (int i = 0; i < n; i++) {
        EGLint size;
        eglGetConfigAttrib(egl_display, configs[i], EGL_BUFFER_SIZE, &size);
        eglGetConfigAttrib(egl_display, configs[i], EGL_RED_SIZE, &size);
        egl_conf = configs[i];
        break;
    }
    assert(egl_conf != NULL);  //  Failed to get EGL Configuration

    //  Create the EGL Context based on the EGL Display and Configuration
    egl_context = eglCreateContext(egl_display, egl_conf,
        EGL_NO_CONTEXT, context_attribs);
    assert(egl_context != NULL);  //  Failed to create EGL Context
}
The above code in init_egl()
creates the EGL Context.
We call init_egl()
in our Main Function like so:
pinephone-mir/egl.c
/// Wayland Interfaces
static struct wl_surface       *surface;       //  Wayland Surface
static struct wl_shell_surface *shell_surface; //  Wayland Shell Surface

/// Connect to Wayland Compositor and render OpenGL graphics
int main(int argc, char **argv) {
    //  Get interfaces for Wayland Compositor and Wayland Shell
    get_server_references();
    assert(display != NULL);     //  Failed to get Wayland Display
    assert(compositor != NULL);  //  Failed to get Wayland Compositor
    assert(shell != NULL);       //  Failed to get Wayland Shell

    //  Create a Wayland Surface for rendering our app
    surface = wl_compositor_create_surface(compositor);
    assert(surface != NULL);  //  Failed to create Wayland Surface

    //  Get the Wayland Shell Surface for rendering our app window
    shell_surface = wl_shell_get_shell_surface(shell, surface);
    assert(shell_surface != NULL);

    //  Set the Shell Surface as top level
    wl_shell_surface_set_toplevel(shell_surface);

    //  Create the Wayland Region for rendering OpenGL graphics
    create_opaque_region();

    //  Create the EGL Context for rendering OpenGL graphics
    init_egl();

    //  Create the EGL Window and render OpenGL graphics
    create_window();

    //  Handle all Wayland Events in the Event Loop
    while (wl_display_dispatch(display) != -1) {}

    //  Disconnect from the Wayland Display
    wl_display_disconnect(display);
    return 0;
}
The main()
function in all Wayland apps follow the same steps...
-
Fetch the Wayland Compositor and Wayland Shell from the Wayland Registry ...
//  Get interfaces for Wayland Compositor and Wayland Shell
get_server_references();
We'll talk about
get_server_references()and the Wayland Registry in a while. -
Every Wayland App needs a Wayland Surface (screen buffer) for displaying the app...
//  Create a Wayland Surface for rendering our app
surface = wl_compositor_create_surface(compositor);
-
Create a Wayland Shell Surface (app window) for rendering our app...
//  Get the Wayland Shell Surface for rendering our app window
shell_surface = wl_shell_get_shell_surface(shell, surface);
-
Set the Shell Surface as the Top Level window for our app...
//  Set the Shell Surface as top level
wl_shell_surface_set_toplevel(shell_surface);
-
This part is specific to OpenGL apps...
Earlier we have seen
create_opaque_region(),init_egl()andcreate_window(). We call them to create the Wayland Region, EGL Context and EGL Window, and to render the OpenGL graphics.// Create the Wayland Region for rendering OpenGL graphics create_opaque_region(); // Create the EGL Context for rendering OpenGL graphics init_egl(); // Create the EGL Window and render OpenGL graphics create_window();
-
Every Wayland App needs an Event Loop for handling Wayland Events...
// Handle all Wayland Events in the Event Loop while (wl_display_dispatch(display) != -1) {} -
When our app terminates, we disconnect the Wayland Display...
//  Disconnect from the Wayland Display
wl_display_disconnect(display);
Now let's build and test the app on our Linux development machine. (We'll run it on PinePhone later)
5 Build and Test Wayland App on Linux
Now that we have created a simple Wayland app that renders OpenGL graphics... Let's build it!
Building a Wayland app is refreshingly simple (if you're used to GDK, Qt and SDL).
Here'a how we build the Wayland app in
egl.c
on a Linux machine (that has Wayland, MESA EGL and OpenGL ES2 libraries installed)...
# Build the Wayland EGL app
gcc \
    -g \
    -o egl \
    egl.c \
    -Wl,-Map=egl.map \
    -L/usr/lib/aarch64-linux-gnu/mesa-egl \
    -lwayland-client \
    -lwayland-server \
    -lwayland-egl \
    -lEGL \
    -lGLESv2
This produces the executable app egl
. Run the egl
app on our Linux machine like so...
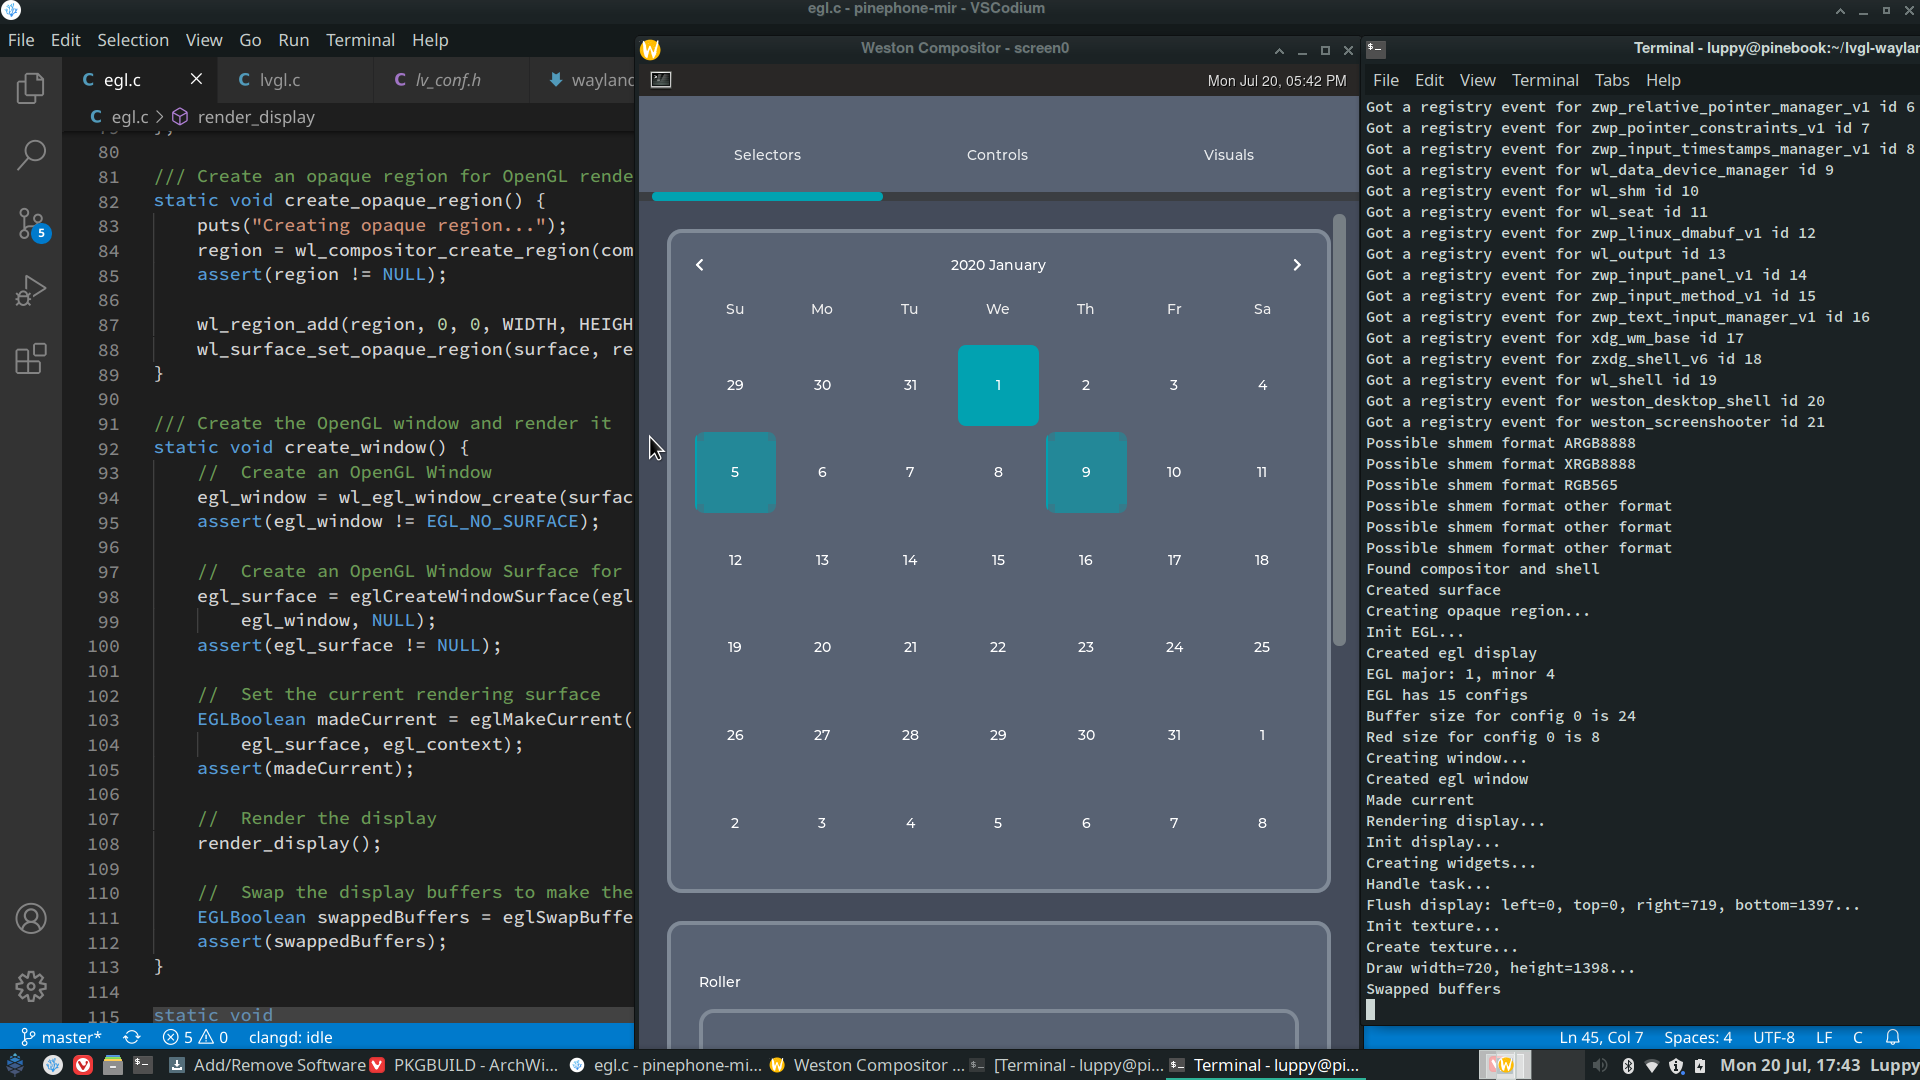
# Install Weston Wayland Compositor...
# For Arch Linux and Manjaro:
sudo pacman -S weston

# For Other Distros:
# Check https://github.com/wayland-project/weston

# Start the Weston Wayland Compositor on our computer with the PinePhone screen dimensions
weston --width=720 --height=1398 &

# Run the Wayland EGL app
./egl
This uses the Weston Compositor , the reference implementation of the Wayland Compositor that runs on X11.
We'll see this Inception-like window within a window...

We learn in a while how to build and run the app on PinePhone.
6 Fetch Wayland Interfaces
Earlier we used the Wayland Compositor and the Wayland Shell in our app...
-
Wayland Compositor(
compositor): Manages the screen buffer used by apps -
Wayland Shell(
shell): Manages the app windows
Here's how we fetch the two interfaces from Wayland:
pinephone-mir/egl.c
/// Wayland Interfaces
static struct wl_display *display; // Wayland Display
static struct wl_compositor *compositor; // Wayland Compositor
static struct wl_shell *shell; // Wayland Shell
/// Connect to Wayland Service and fetch the interfaces for Wayland Compositor and Wayland Shell
static void get_server_references(void) {
//  Connect to the Wayland Service
display = wl_display_connect(NULL);
if (display == NULL) {
fprintf(stderr, "Failed to connect to display\n");
exit(1);
}
//  Get the Wayland Registry
struct wl_registry *registry = wl_display_get_registry(display);
assert(registry != NULL); // Failed to get Wayland Registry
// Add Registry Callbacks to handle interfaces returned by Wayland Service
wl_registry_add_listener(registry, ®istry_listener, NULL);
//  Wait for Registry Callbacks to fetch Wayland Interfaces
wl_display_dispatch(display);
wl_display_roundtrip(display);
// We should have received interfaces for Wayland Compositor and Wayland Shell
assert(compositor != NULL); // Failed to get Wayland Compositor
assert(shell != NULL); // Failed to get Wayland Shell
}
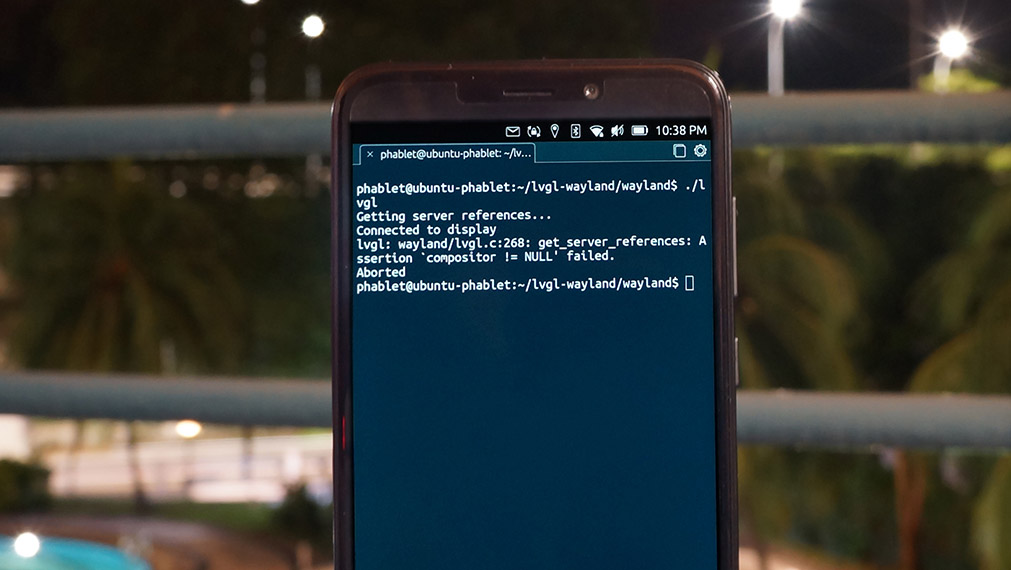
What happens inside get_server_references()
?
-
The Wayland Compositor runs as a Linux Service that listens on a Linux Socket File :
/run/user/32011/wayland-0for PinePhone on Ubuntu Touch.We connect to the Wayland Service like so...
// Connect to the Wayland Service display = wl_display_connect(NULL);
Remember that all functions named
wl_...come from the Wayland Library. -
To work with the Wayland Service, we fetch the Interfaces for the Wayland Compositor and Wayland Shell.
Wayland Interfacesare defined in the Wayland Registry ...
// Get the Wayland Registry struct wl_registry *registry = wl_display_get_registry(display);
-
To fetch the Compositor and Shell from the Wayland Registry, we add a Registry Listener (more about this later)...
// Add Registry Callbacks to handle interfaces returned by Wayland Service wl_registry_add_listener(registry, ®istry_listener, NULL);
-
Now we dispatch the Registry Listener request to the Wayland Service. (Remember that the Wayland Service operates on Linux Socket Messages)
// Wait for Registry Callbacks to fetch Wayland Interfaces wl_display_dispatch(display); wl_display_roundtrip(display);
And we'll get the compositor
and shell
objects populated from the Wayland Registry!
If you're curious, the Registry Listener works like this:
pinephone-mir/egl.c
/// Callbacks for interfaces returned by Wayland Service
static const struct wl_registry_listener registry_listener = {
    global_registry_handler,
    global_registry_remover
};

/// Callback for interfaces returned by Wayland Service
static void global_registry_handler(void *data, struct wl_registry *registry, uint32_t id,
    const char *interface, uint32_t version) {
    printf("Got interface %s id %d\n", interface, id);

    if (strcmp(interface, "wl_compositor") == 0) {
        //  Bind to Wayland Compositor Interface
        compositor = wl_registry_bind(registry, id,
            &wl_compositor_interface,   //  Interface Type
            1);                         //  Interface Version
    } else if (strcmp(interface, "wl_shell") == 0){
        //  Bind to Wayland Shell Interface
        shell = wl_registry_bind(registry, id,
            &wl_shell_interface,        //  Interface Type
            1);                         //  Interface Version
    }
}
global_registry_handler()
is the Callback Function that will be triggered for every interface in the Wayland Registry.
The Wayland Service for Ubuntu Touch unity-system-compositor
returns a whole bunch of interesting Wayland Interfaces (like qt_windowmanager
).
But today we'll bind to the Compositor Interface named wl_compositor
and Shell Interface named wl_shell
.
And that's how we render a yellow rectangle with Wayland and OpenGL!
Let's move on to something more interesting: Rendering a simple bitmap texture...
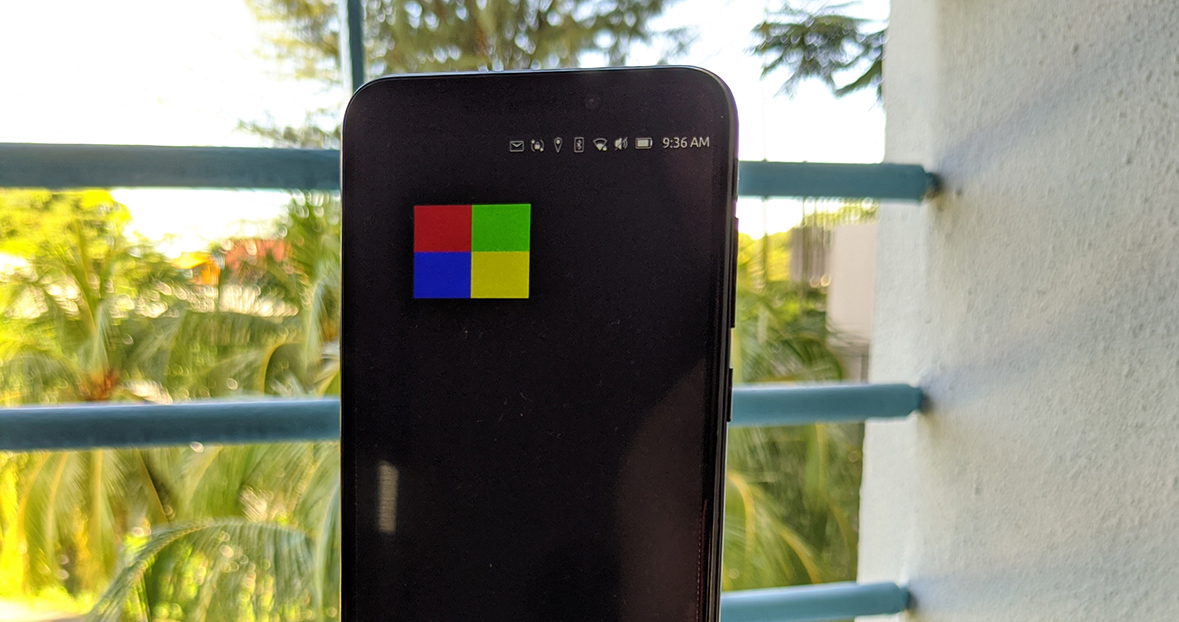
Rendering a simple bitmap texture with Wayland and OpenGL on PinePhone
7 Render OpenGL Bitmap Texture with Wayland
The four boxes we see above are rendered from a magnified 2-pixel by 2-pixel bitmap
:
pinephone-mir/texture.c
// 2x2 Image, 3 bytes per pixel (R, G, B)
GLubyte pixels[4 * 3] = {
    255, 0, 0,  // Red
    0, 255, 0,  // Green
    0, 0, 255,  // Blue
    255, 255, 0 // Yellow
};
We render the bitmap by creating an OpenGL Texture
:
pinephone-mir/texture.c
// Create a simple 2x2 texture image with four different colors
GLuint CreateSimpleTexture2D() {
    // Texture object handle
    GLuint textureId;

    // 2x2 Image, 3 bytes per pixel (R, G, B)
    GLubyte pixels[4 * 3] = {
        255, 0, 0,  // Red
        0, 255, 0,  // Green
        0, 0, 255,  // Blue
        255, 255, 0 // Yellow
    };

    // Use tightly packed data
    glPixelStorei(GL_UNPACK_ALIGNMENT, 1);

    // Generate a texture object
    glGenTextures(1, &textureId);

    // Bind the texture object
    glBindTexture(GL_TEXTURE_2D, textureId);

    // Load the texture
    glTexImage2D(GL_TEXTURE_2D, 0, GL_RGB, 2, 2, 0, GL_RGB, GL_UNSIGNED_BYTE, pixels);

    // Set the filtering mode
    glTexParameteri(GL_TEXTURE_2D, GL_TEXTURE_MIN_FILTER, GL_NEAREST);
    glTexParameteri(GL_TEXTURE_2D, GL_TEXTURE_MAG_FILTER, GL_NEAREST);
    return textureId;
}
(Not the most efficient way to render a bitmap... But let's try this and test drive PinePhone's GPU!)
This is the usual way we create an OpenGL Texture, as explained in "OpenGL® ES 3.0 Programming Guide" .
Here comes the tricky part... Before rendering the OpenGL Texture, we need to program the GPU Shaders
on PinePhone with a C-like language:
pinephone-mir/texture.c
// Initialize the shader and program object
int Init(ESContext *esContext) {
    esContext->userData = malloc(sizeof(UserData));
    UserData *userData = esContext->userData;
    GLbyte vShaderStr[] =
        "attribute vec4 a_position;   \n"
        "attribute vec2 a_texCoord;   \n"
        "varying vec2 v_texCoord;     \n"
        "void main()                  \n"
        "{                            \n"
        "   gl_Position = a_position; \n"
        "   v_texCoord = a_texCoord;  \n"
        "}                            \n";

    GLbyte fShaderStr[] =
        "precision mediump float;                            \n"
        "varying vec2 v_texCoord;                            \n"
        "uniform sampler2D s_texture;                        \n"
        "void main()                                         \n"
        "{                                                   \n"
        "  gl_FragColor = texture2D( s_texture, v_texCoord );\n"
        "}                                                   \n";

    // Load the shaders and get a linked program object
    userData->programObject = esLoadProgram(vShaderStr, fShaderStr);
    ...
(Yep a C program within a C program... Inception!)
esLoadProgram()
is defined in
pinephone-mir/shader.c
We're now talking to PinePhone's GPU, which is so low-level that it understand only Triangles, not Rectangles.
Hence to render the OpenGL Texture, we map the Rectangular Texture onto two Triangles and render them:
pinephone-mir/texture.c
// Draw a triangle using the shader pair created in Init()
void Draw(ESContext *esContext) {
    GLfloat vVertices[] = {
        -0.5f,   0.5f,  0.0f,  // Position 0
         0.0f,   0.0f,         // TexCoord 0
        -0.5f,  -0.5f,  0.0f,  // Position 1
         0.0f,   1.0f,         // TexCoord 1
         0.5f,  -0.5f,  0.0f,  // Position 2
         1.0f,   1.0f,         // TexCoord 2
         0.5f,   0.5f,  0.0f,  // Position 3
         1.0f,   0.0f          // TexCoord 3
    };
    GLushort indices[] = {
        0, 1, 2,  //  First Triangle
        0, 2, 3   //  Second Triangle
    };
    ...
    //  Draw the 6 vertices as 2 triangles
    glDrawElements(GL_TRIANGLES, 6, GL_UNSIGNED_SHORT, indices);
}
(Yes the math is starting to hurt... But that's the end of it!)
Finally we connect the above code to render the four colour boxes on PinePhone, thanks to Wayland and OpenGL: pinephone-mir/egl2.c
/// Render the OpenGL ES2 display
static void render_display() {
    //  Create the texture context
    static ESContext esContext;
    esInitContext ( &esContext );
    esContext.width  = WIDTH;
    esContext.height = HEIGHT;

    //  Draw the texture
    Init(&esContext);
    Draw(&esContext);

    //  Render now
    glFlush();
}
And that's our Wayland App that renders a simple OpenGL Bitmap Texture!
The OpenGL Texture code in this article was adapted from "OpenGL® ES 2.0 Programming Guide"
Let's head on towards greatness and something really useful: Graphical User Interfaces...
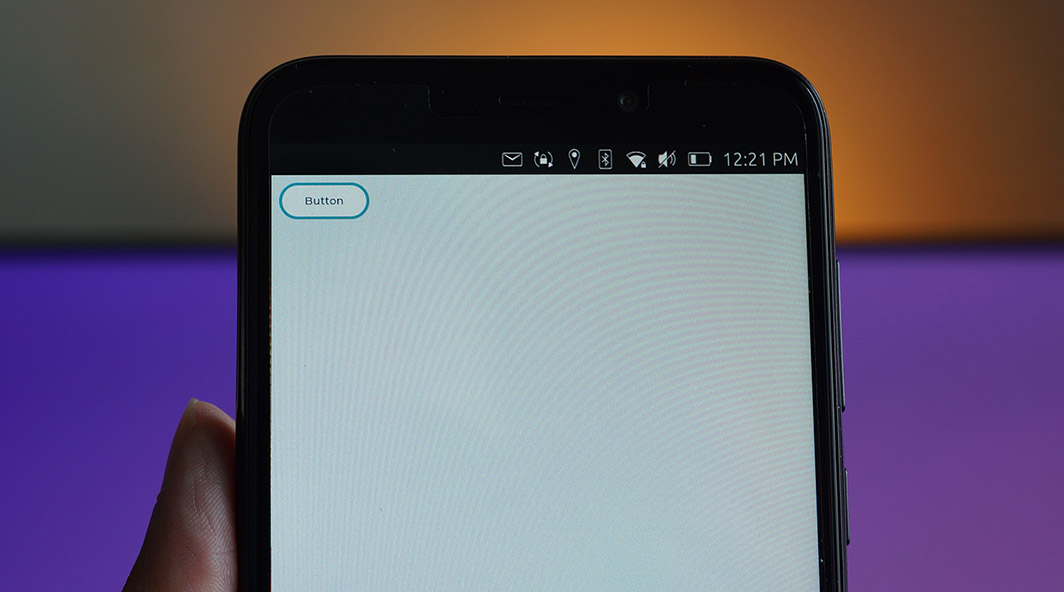
Button rendered with LVGL and Wayland on PinePhone
Now that we can render bitmaps on PinePhone, let's think...
How would we render a simple Graphical User Interface (GUI) on PinePhone, like the button above?
Why don't we use a simple GUI Toolkit like LVGL ? (Formerly LittleVGL)
Here's how we call the LVGL library to render that button:
lvgl-wayland/wayland/lvgl.c
#include "../lvgl.h"

/// Render a Button Widget and a Label Widget
static void render_widgets(void) {
    lv_obj_t * btn = lv_btn_create(lv_scr_act(), NULL);     //  Add a button the current screen
    lv_obj_set_pos(btn, 10, 10);                            //  Set its position
    lv_obj_set_size(btn, 120, 50);                          //  Set its size

    lv_obj_t * label = lv_label_create(btn, NULL);          //  Add a label to the button
    lv_label_set_text(label, "Button");                     //  Set the labels text
}
Easy peasy!
LVGL is a simple C toolkit designed for Embedded Devices, so it needs very little memory and processing power . LVGL is self-contained ... Fonts and icons are bundled into the LVGL library.
It's used on PineTime Smart Watch to render watch faces.
LVGL doesn't run on Wayland yet... But we'll fix that!
Remember how we rendered a simple 2-pixel by 2-pixel bitmap by creating an OpenGL Texture with CreateSimpleTexture2D()
?
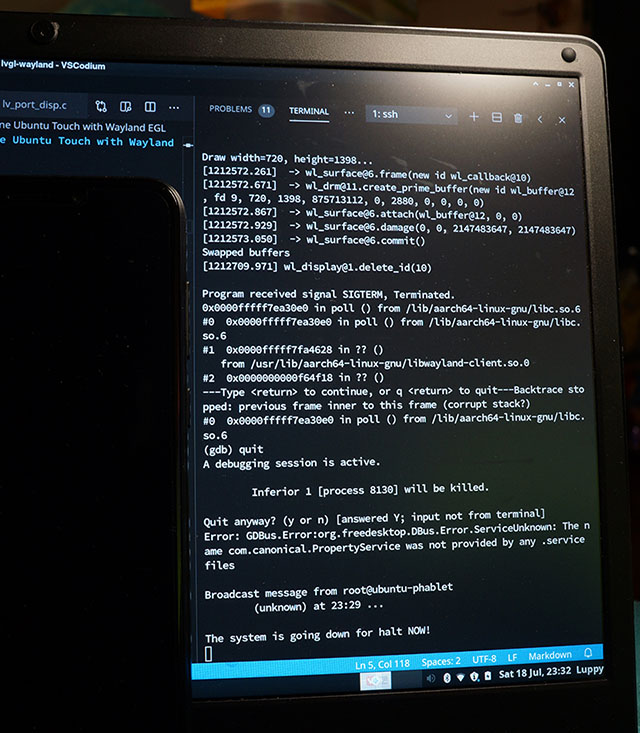
Let's extend that bitmap to cover the entire PinePhone screen: 720 pixels by 1398 pixels.
And we create the OpenGL Texture for the entire PinePhone screen like so:
lvgl-wayland/wayland/texture.c
///  PinePhone Screen Resolution, defined in lv_conf.h
#define LV_HOR_RES_MAX          (720)
#define LV_VER_RES_MAX          (1398)
#define LV_SCALE_RES            1

///  Screen buffer
#define BYTES_PER_PIXEL 3
GLubyte pixels[LV_HOR_RES_MAX * LV_VER_RES_MAX * BYTES_PER_PIXEL];

/// Create an OpenGL Texture for the screen buffer
GLuint CreateTexture(void) {
    GLuint texId;
    glGenTextures ( 1, &texId );
    glBindTexture ( GL_TEXTURE_2D, texId );

    glTexImage2D (
        GL_TEXTURE_2D,
        0,  //  Level
        GL_RGB,
        LV_HOR_RES_MAX,  //  Width
        LV_VER_RES_MAX,  //  Height
        0,  //  Format
        GL_RGB,
        GL_UNSIGNED_BYTE,
        pixels
    );
    glTexParameteri ( GL_TEXTURE_2D, GL_TEXTURE_MIN_FILTER, GL_LINEAR );
    glTexParameteri ( GL_TEXTURE_2D, GL_TEXTURE_MAG_FILTER, GL_LINEAR );
    glTexParameteri ( GL_TEXTURE_2D, GL_TEXTURE_WRAP_S, GL_CLAMP_TO_EDGE );
    glTexParameteri ( GL_TEXTURE_2D, GL_TEXTURE_WRAP_T, GL_CLAMP_TO_EDGE );
    return texId;
}
pixels
is the screen buffer that will contain the pixels for our rendered UI controls, like our button.
We'll tell LVGL to render into pixels
like so:
lvgl-wayland/wayland/texture.c
/// Set the colour of a pixel in the screen buffer
void put_px(uint16_t x, uint16_t y, uint8_t r, uint8_t g, uint8_t b, uint8_t a) {
    assert(x >= 0); assert(x < LV_HOR_RES_MAX);
    assert(y >= 0); assert(y < LV_VER_RES_MAX);
    int i = (y * LV_HOR_RES_MAX * BYTES_PER_PIXEL) + (x * BYTES_PER_PIXEL);
    pixels[i++] = r;  //  Red
    pixels[i++] = g;  //  Green
    pixels[i++] = b;  //  Blue
}
(Simplistic, not efficient though)
We'll render the OpenGL Texture the same way as before:
lvgl-wayland/wayland/lvgl.c
/// Render the OpenGL ES2 display
static void render_display() {
    //  This part is new...

    //  Init the LVGL display
    lv_init();
    lv_port_disp_init();

    //  Create the LVGL widgets: Button and label
    render_widgets();

    //  Render the LVGL widgets
    lv_task_handler();

    //  This part is the same as before...

    //  Create the texture context
    static ESContext esContext;
    esInitContext ( &esContext );
    esContext.width  = WIDTH;
    esContext.height = HEIGHT;

    //   Draw the texture
    Init(&esContext);
    Draw(&esContext);

    //  Render now
    glFlush();
}
But now we have injected the calls to the LVGL library...
-
lv_init(): Initialise the LVGL library -
lv_port_disp_init(): Initialise our display -
render_widgets(): Calls the LVGL library to create two UI controls: a Button and a Label -
lv_task_handler(): Let LVGL render the UI controls into our screen buffer
Now let's tweak the LVGL library to render UI controls into our screen buffer pixels
9 Port LVGL to Wayland
Porting LVGL to Wayland and Ubuntu Touch is straightforward.
According to the LVGL Porting Doc
, we need to code a Flush Callback Function disp_flush()
that will be called by LVGL to render UI controls to the screen buffer.
Here's our implementation for Wayland:
lvgl-wayland/wayland/lv_port_disp.c
//  Flush the content of the internal buffer to the specific area on the display
//  You can use DMA or any hardware acceleration to do this operation in the background but
//  'lv_disp_flush_ready()' has to be called when finished.
static void disp_flush(lv_disp_drv_t * disp_drv, const lv_area_t * area, lv_color_t * color_p) {
    //  The most simple case (but also the slowest) to put all pixels to the screen one-by-one
    for(int32_t y = area->y1; y <= area->y2; y++) {
        for(int32_t x = area->x1; x <= area->x2; x++) {
            //  Put a pixel to the screen buffer
            put_px(x, y,
                color_p->ch.red,
                color_p->ch.green,
                color_p->ch.blue,
                0xff);
            color_p++;
        }
    }
    //  Inform the graphics library that we are ready with the flushing
    lv_disp_flush_ready(disp_drv);
}
We've seen earlier that put_px()
draws pixels in the simplest way possible. Eventually we should use PinePhone's GPU for rendering LVGL controls, by implementing the LVGL GPU Callbacks
.
Light and Dark Themes are provided by LVGL. To select the default theme just edit
lvgl-wayland/lv_conf.h
Here's Dark Theme...
//  For Dark Theme...
#define LV_THEME_DEFAULT_FLAG LV_THEME_MATERIAL_FLAG_DARK
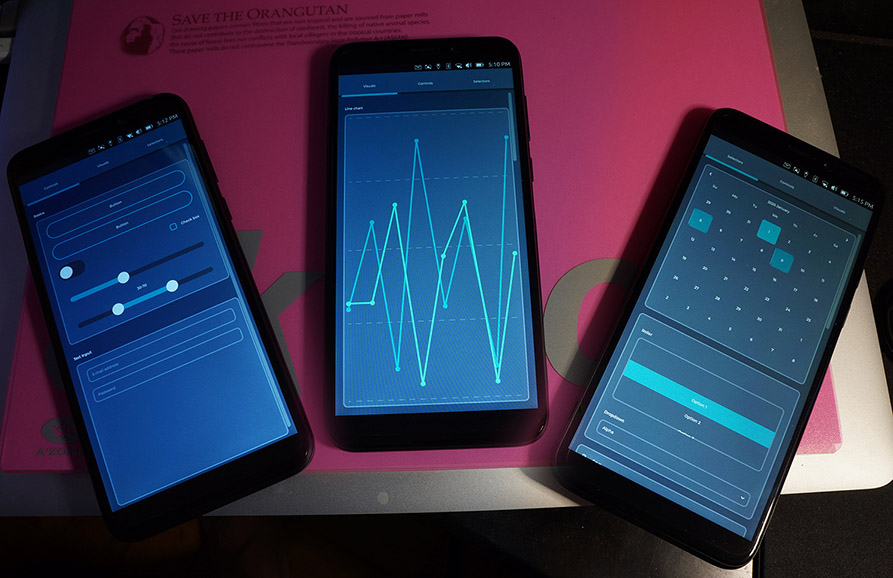
And Light Theme...
//  For Light Theme...
#define LV_THEME_DEFAULT_FLAG LV_THEME_MATERIAL_FLAG_LIGHT
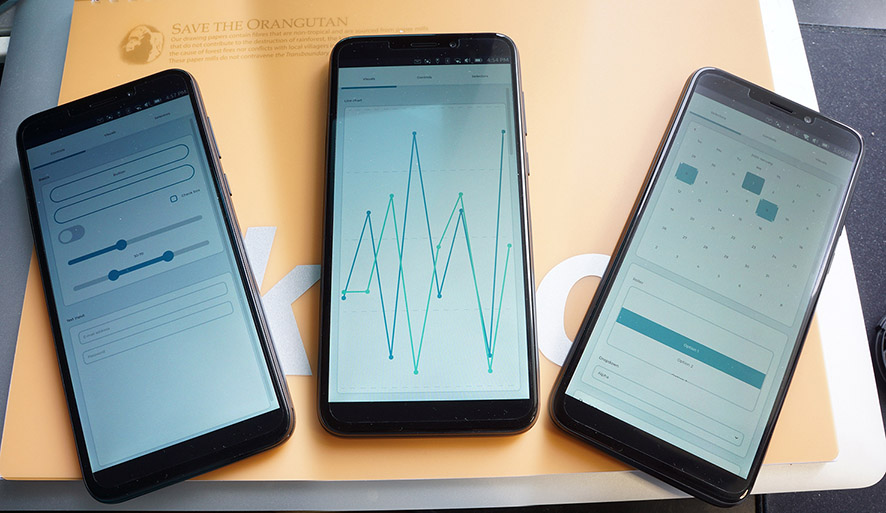
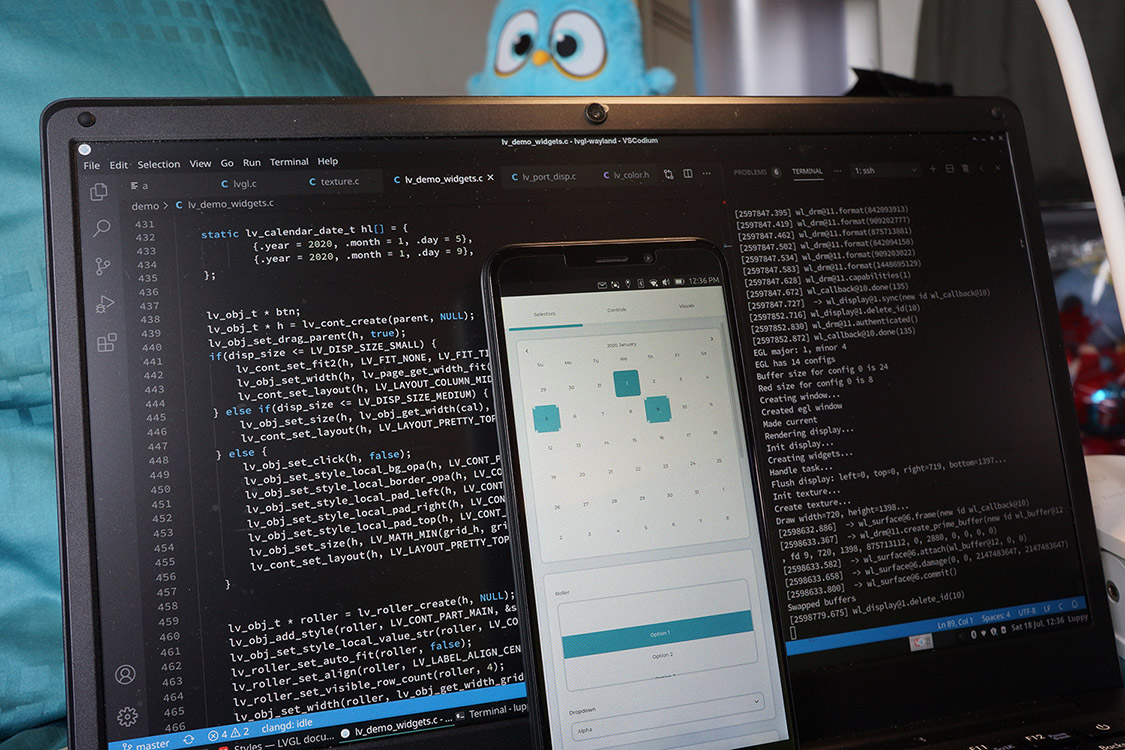
The screens above were rendered by updating one line in
lvgl-wayland/wayland/lvgl.c
...
/// Render the OpenGL ES2 display
static void render_display() {
    //  Init the LVGL display
    lv_init();
    lv_port_disp_init();

    //  Create the LVGL widgets
    lv_demo_widgets();  //  Previously render_widgets()
lv_demo_widgets()
comes from
lvgl-wayland/demo/lv_demo_widgets.c
What about Touch Input in LVGL for Ubuntu Touch?
We haven't handled Touch Input yet... Lemme know if you're keen to help!
Do we really have to code LVGL Apps for PinePhone in C?
Rust is supported too!
We may write LVGL Apps for PinePhone in Rust by calling the
lvgl-rs
Rust Wrapper for LVGL
by
Rafael Carício
.
(Fun Fact: lvgl-rs
wasoriginally created for PineTime Smart Watch... Today it's used by Rust on PlayStation Portable
too!)
How small is LVGL on PinePhone with Ubuntu Touch?
1.5 MBfor the Light / Dark Theme LVGL Demo App above.
Not that big, considering that the font, icons and debugging symbols are bundled inside.
How does LVGL compare with Qt, GTK and SDL on PinePhone with Ubuntu Touch?
Qt is the only officially supported App Toolkit on Ubuntu Touch.
GTK and SDL are supposed to work on Wayland... But I couldn't get them to work on Ubuntu Touch.
(Probably because legacy X11 compatibility is missing from Ubuntu Touch, i.e. XWayland)
I applaud the maintainers of X11, Qt, GTK and SDL because every new release needs to support so many legacy features. Kudos!
But what if we could start from scratch, drop the legacy stuff, and build a simpler UI toolkit for Wayland?
LVGL is the experiment that we're undertaking today!
10 Build LVGL on PinePhone with Ubuntu Touch
Follow these steps to build LVGL on PinePhone over SSH.
(If we haven't enabled SSH on PinePhone, check the "Configure SSH on PinePhone" instructions below)
Connect to PinePhone over SSH and enter these commands...
# Make system folders writeable before installing any packages
sudo mount -o remount,rw /

# Install dev tools and GLES2 library
sudo apt install gcc gdb git make libgles2-mesa-dev

# Download the source code
cd ~
git clone https://github.com/lupyuen/lvgl-wayland
cd lvgl-wayland

# Build the app
make
This creates the executable ~/lvgl-wayland/wayland/lvgl
Can we just run lvgl
from the Terminal Command Line?
Nope! Because Wayland and Ubuntu Touch are super-secure, thanks to AppArmor .
But there's a way to trick AppArmor into allowing lvgl
to be launched (since we are Superuser).
Read on to learn how...
Fighting AppArmor Security... Permission Denied!
11 Inject LVGL into File Manager App
For rapid testing (and to work around AppArmor), we shall replace the File Manager
app by our lvgl
app because File Manager has no AppArmor restrictions
(Unconfined).
(More about AppArmor in a while)
Connect to PinePhone over SSH and enter these commands...
# Make system folders writeable and go to File Manager Click Package folder
sudo mount -o remount,rw /
cd /usr/share/click/preinstalled/.click/users/@all/com.ubuntu.filemanager

# Back up the desktop file. Restore this desktop file to go back to the normal File Manager
sudo cp com.ubuntu.filemanager.desktop com.ubuntu.filemanager.desktop.old

# Edit the desktop file
sudo nano com.ubuntu.filemanager.desktop
We're now altering the behaviour of File Manager, by tampering with the Click Package settings for File Manager.
(Why are we tampering with a Click Package? We'll learn in a while)
Change the Exec
line from...
Exec=filemanager
To...
Exec=./run.sh
Save and exit nano
We have modded the File Manager icon so that it now launches run.sh
instead of the usual filemanager
executable.
(It's like switching the executable for a Windows Explorer Shortcut)
We'll be installing run.sh
later with a script:
lvgl.sh
In the meantime, check that
run.sh
(located at ~/lvgl-wayland/wayland
) contains the following...
# Log Wayland messages
export WAYLAND_DEBUG=1

# Run lvgl app
./lvgl
If we see this...
# Debug lvgl app
gdb \
    -ex="r" \
    -ex="bt" \
    -ex="frame" \
    --args ./lvgl
It means that the lvgl
app will be started with the gdb
debugger.
If it crashes with a bad C pointer, the gdb
debugger will show a helpful stack trace.
And this...
# Run lvgl app with strace
./strace \
   -s 1024 \
   ./lvgl
Is for tracing the lvgl
app with strace
. It shows everything
done by the app.
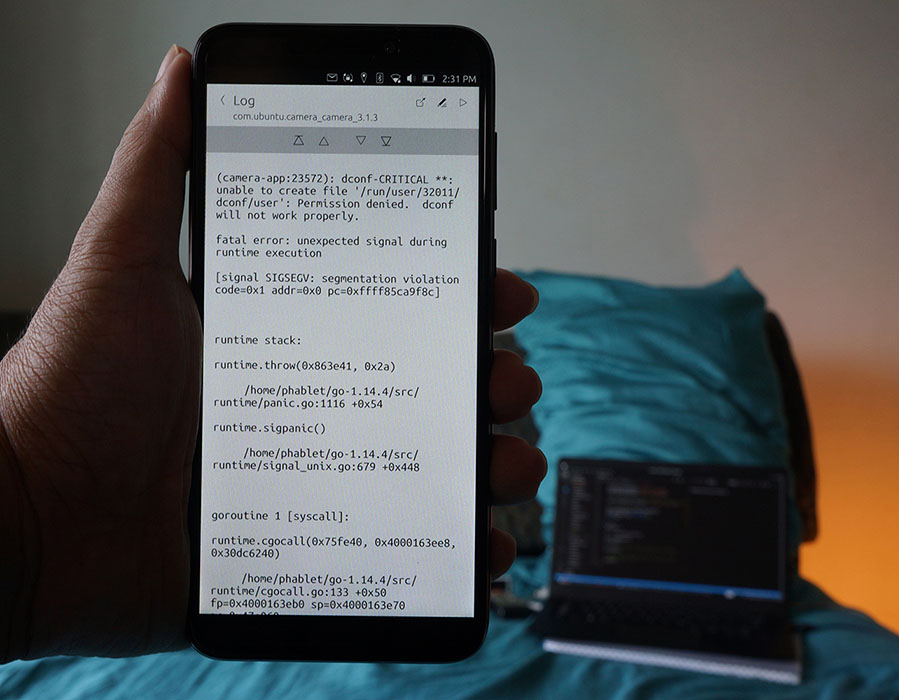
Check out this strace
log for the File Manager on Ubuntu Touch
12 Run LVGL on PinePhone with Ubuntu Touch
Finally we're ready to run our lvgl
app!
Connect to PinePhone over SSH and enter these commands...
cd ~/lvgl-wayland
./wayland/lvgl.sh
The script
lvgl.sh
copies
run.sh
from ~/lvgl-wayland/wayland
to the Click Package Folder for File Manager...
/usr/share/click/preinstalled/.click/users/@all/com.ubuntu.filemanager
In a few seconds we'll see the message...
*** Tap on File Manager icon on PinePhone
Go ahead and tap the File Manager icon on PinePhone.
Our LVGL App shall run instead of the File Manager.
In the SSH console, press Ctrl-C
to stop the log display.
The log file for the app is located at...
/home/phablet/.cache/upstart/application-click-com.ubuntu.filemanager_filemanager_0.7.5.log
The log for the Wayland Compositor unity-system-compositor
may be useful for troubleshooting...
/home/phablet/.cache/upstart/unity8.log
Copy the log files to our machine like this...
scp -i ~/.ssh/pinephone_rsa [email protected]:/home/phablet/.cache/upstart/application-click-com.ubuntu.filemanager_filemanager_0.7.5.log .
scp -i ~/.ssh/pinephone_rsa [email protected]:/home/phablet/.cache/upstart/unity8.log .
13 Overcome AppArmor Security on Ubuntu Touch
To understand Wayland, AppArmor and Ubuntu Touch Security, let's look inside the script
lvgl.sh
and discover how it launches our lvgl
app...
-
Our
lvglapp doesn't have a close button, so let's terminate the app if it's already running...# Kill the app if it's already running pkill lvgl
-
In Ubuntu Touch, User Directories (like our Home Directory) are writeable by default.
System Directories(like
/usr/share) are mounted with read-only access, to prevent tampering of system files. (Think malware)Since we're Superuser, we may remount System Directories with read-write access...
# Make system folders writeable
sudo mount -o remount,rw /
-
Why do we need read-write access?
Because we'll be copying our app
lvgland the scriptrun.shto a System Directory...# Copy app to File Manager folder cd wayland sudo cp lvgl /usr/share/click/preinstalled/.click/users/@all/com.ubuntu.filemanager # Copy run script to File Manager folder sudo cp run.sh /usr/share/click/preinstalled/.click/users/@all/com.ubuntu.filemanager
-
What's this folder
/usr/share/click/preinstalled/.click/users/@all/com.ubuntu.filemanager?This is the Click Package folder for File Manager.
Ubuntu Touch Apps (like File Manager) are packaged as Click Packages for installation on our phones.
When the app is installed, Ubuntu Touch extracts the Click Package into a folder under
/usr/share/click.Inside the Click Package folder we'll find the executables, libraries and data files that are needed for running the app.
The folder also contains a
.desktopfile. (Earlier we've seencom.ubuntu.filemanager.desktopfor File Manager) This file tells Ubuntu Touch how to launch the app. -
Does the app run as our user account
phablet?Nope. For security, Ubuntu Touch Apps run under an account with restricted privileges:
clickpkgThis account has no access to our
phabletfiles. That's why we copy thelvglapp andrun.shscript to the Click Package folder, which is accessible byclickpkgWe set the ownership of
lvglandrun.shtoclickpkgso that it can execute the files...# Set ownership on the app and the run script sudo chown clickpkg:clickpkg /usr/share/click/preinstalled/.click/users/@all/com.ubuntu.filemanager/lvgl sudo chown clickpkg:clickpkg /usr/share/click/preinstalled/.click/users/@all/com.ubuntu.filemanager/run.sh
-
Our
lvglapp andrun.shscript have been staged in the Click Package folder.We ask the human to tap the File Manager icon...
# Start the File Manager
echo "*** Tap on File Manager icon on PinePhone"
-
Ubuntu Touch launches our
lvglapp. As our app runs, it logs debugging messages to Standard Output and Standard Error.The messages are captured in this log file...
# Monitor the log file
echo >/home/phablet/.cache/upstart/application-click-com.ubuntu.filemanager_filemanager_0.7.5.log
tail -f /home/phablet/.cache/upstart/application-click-com.ubuntu.filemanager_filemanager_0.7.5.log
Why can't we run our lvgl
app from the Terminal Command Line?
Because Ubuntu Touch's Wayland Service stops unauthorized processes from grabbing the Compositor...
We see this in the Wayland Compositor log: /home/phablet/.cache/upstart/unity8.log
ApplicationManager REJECTED connection from app with pid 6710
as it was not launched by upstart, and no desktop_file_hint is specified
That's why we need to inject lvgl
into File Manager... So that Wayland thinks that the File Manager is grabbing the Compositor.
Why did we choose the File Manager app instead of another app like Camera?
Because File Manager has Unconfined AppArmor Permissions... It can do anything!
(But still restricted by the clickpkg
user permissions)
Look at the AppArmor Policy
for the File Manager App:
filemanager.apparmor
{
    "policy_version": 16.04,
    "template": "unconfined",
    "policy_groups": []
}
Compare this with the AppArmor Policy for the Camera App:
camera.apparmor
{
    "policy_groups": [
        "picture_files",
        "video_files",
        "camera",
        "audio",
        "video",
        "usermetrics",
        "content_exchange",
        "content_exchange_source",
        "location"
    ],
    "policy_version": 16.04,
    "read_path": [
        "@{PROC}/*/mounts",
        "/dev/disk/by-label/"
    ]
}
The AppArmor Policy says that the Camera App may only access selected features (like recording audio and video). And it's only allowed to read specific paths (like /dev/disk/by-label
).
strace
won't work with the AppArmor Policy for Camera App.
So for tracing our app with strace
, we "borrow" the Unconfined AppArmor Policy for File Manager.
To troubleshoot problems with AppArmor, check the system log in /var/log/syslog
14 What I like about Ubuntu Touch on PinePhone
While attempting to port the PineTime Companion App to PinePhone with GTK (and failing miserably), I had these thoughts...
-
AppArmor is good, because iOS and Android have similar apps security
-
Read-only file system is good(system files are read-only by default, user files are read-write). Helps to prevent security holes. (Even PineTime has a read-only Flash ROM)
-
Why is Qt supported on Ubuntu Touch and not GTK?Because building a Linux mobile app requires mobile-friendly widgets.
I think Qt has more mobile-friendly widgets, even through the internal plumbing is way too complicated.
When I get GTK running on Ubuntu Touch, I will face the same problem with widgets. And I have to make GTK widgets look and feel consistent with Qt / Ubuntu Touch widgets.
That's why I decided to move away from GTK and focus on a simpler widget framework with LVGL.
-
Older kernel basein Ubuntu Touch... I don't do kernel hacking much so it doesn't matter to me.
I think for mobiles we only need to support a few common chipsets, so an older kernel is probably fine.
That explains why Raspberry Pi 4 isn't supported by Ubuntu Touch... The hardware is just too new.
-
The issues I'm struggling with now... Wayland, GTK3, ... are actually really old stuff. Updating the kernel won't help.
-
Ubuntu Touch is pure Wayland, none of the legacy X11 stuff. Xwayland is not even there (unless you use the Libertine containers ugh).
The pure Wayland environment causes GTK to break, because GTK assumes some minimal X11 support (i.e. Xwayland).
It's better to start from scratch with a toolkit that's not based on X11, like LVGL.
-
So Ubuntu Touch is not really that bad for PinePhone... It's just painful for building non-Qt apps.
After posting my thoughts , the UBports, GNOME and Xfce Community responded with encouraging and insightful notes...
14.1 UBports on Ubuntu Touch, Wayland and Mir
-
Ubuntu Touch supports Wayland only on non-Android devices like PinePhone
-
Ubuntu Touch uses older kernels on Android devices , only because that's the only way to run on those devices. PinePhone uses a newer kernel.
-
UBports is fixing that with Halium9 , a Hardware Abstraction Layer based on parts of AOSP 9 and other hardware enablement components
Read about Unity8 / Mir / Lomiri's complicated history
14.2 GNOME and GTK on Wayland
-
GNOME Shell developers are working into making X11 completely optional
-
GTK can already be built without X11 backend
-
Proprietary Nvidia graphics drivers didn't have Wayland support out of the box as they wanted to use EGLStreams rather than GBM. So Nvidia did the work to get GNOME and KDE to support EGLStreams.
-
Only GNOME and KDE have Wayland support and the support isn't feature complete compared to X11 , which is why most distros with GNOME and KDE editions still do not default to Wayland
Wayland feels like New Underwear... And it needs a New App Toolkit like LVGL to make us comfortable.
If you're keen to help make LVGL the Newer, Simpler App Toolkit on Wayland, Ubuntu Touch and PinePhone, please lemme know ! :grinning:
16 Configure SSH on PinePhone
First Thingto do when we get our new PinePhone: Open the PinePhone Back Cover and Remove the Battery Insulation Sticker!
(Can't believe I missed that!)
Second Thing: Protect the SSH Service on PinePhone with SSH Keys . And start the SSH Service only when necessary.
Here's how...
16.1 Generate SSH Keys
-
On our Computer (not PinePhone), open a Command Prompt. Enter this (and fill in our email)...
ssh-keygen -t rsa -b 4096 -C "[email protected]"
-
When prompted...
Enter a file in which to save the key
Press
Enter. This stores the new SSH Key in the.sshfolder in our Home Directory. -
When prompted...
Enter a file in which to save the key
Enter...
pinephone_rsa
We'll create an SSH Key Pair named
pinephone_rsa(Private Key) andpinephone_rsa.pub(Public Key) -
When prompted...
Enter passphrase
Press
Enter. We won't need a passphrase unless our PinePhone needs to be super-secure.
This creates an SSH Key Pair in the .ssh
folder in our Home Directory...
-
pinephone_rsacontains the Private Key. Never give the Private Key to others! -
pinephone_rsa.pubcontains the Public Key. We'll copy this to PinePhone now.
16.2 Install SSH Keys
-
Copy
pinephone_rsa.pubfrom the.sshfolder in our Home Directory to a MicroSD Card. -
Insert the MicroSD Card into PinePhone. Copy
pinephone_rsa.pubto our Home Directory on PinePhone.(Check the section "Copy Files from MicroSD Card on PinePhone" below)
-
Tap the Terminal icon on PinePhone. Enter...
# Go to home directory
cd

# If .ssh folder doesn't exist, create it
mkdir .ssh
chmod 700 .ssh

# Set public key as the authorized key
cp pinephone_rsa.pub .ssh/authorized_keys
chmod 600 .ssh/authorized_keys

# Show the SSH files
ls -la ~/.ssh
We should see this...
drwx------  2 phablet phablet 4096 Jul  7 20:06 .
drwxr-xr-x 28 phablet phablet 4096 Jul 24 11:38 ..
-rw-------  1 phablet phablet  743 Jul  7 20:08 authorized_keys
Check that the permissions (
rw) and owner (phablet) are correct.
16.3 Start SSH Service
To start the SSH Service on PinePhone, open the Terminal app.
Create a file named a
...
nano a
Type this script into the a
file...
#!/bin/sh
# Script to start SSH service and show IP address

# Start SSH service
sudo service ssh start

# Show IP address
ifconfig | \
    grep -v "127.0.0.1" | \
    grep "inet addr:"

# Ping repeatedly to keep WiFi alive
ping google.com
Save the file and exit nano
.
(Or download the file from
lvgl-wayland/a
and copy via a MicroSD Card. Check the next section for instructions.)
When we're ready do coding on PinePhone, enter this at the Terminal command line...
. a
(There's a space between " .
" and " a
")
The script starts the SSH Service and displays the IP address for PinePhone...
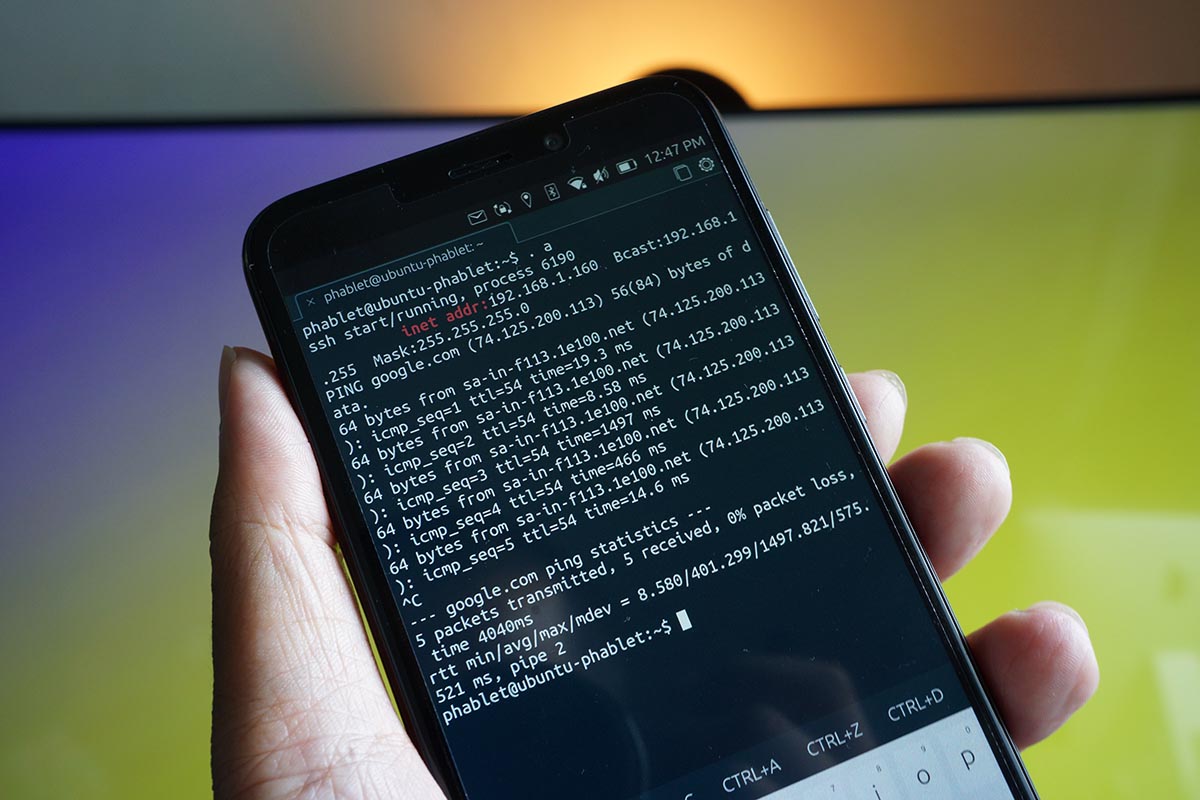
From our Computer, we'll connect to PinePhone at the IP adddress indicated by inet addr
, say 192.168.1.160
...
ssh -i ~/.ssh/pinephone_rsa [email protected]
And that's how we access PinePhone via SSH!
When we press PinePhone's power button to switch off PinePhone, we'll see ths amusing message from olden times...
If typing on a touch keyboard is not your thing, try copying the files from a MicroSD card...
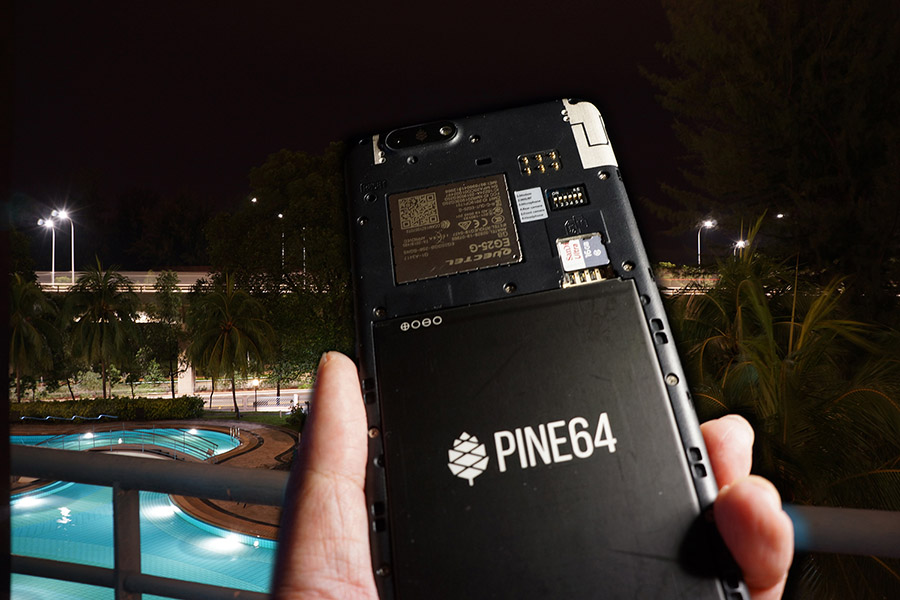
How we insert a MicroSD Card into PinePhone at night
It's useful to transfer files to PinePhone via MicroSD Card, like SSH Keys and the SSH Script a
above.
(Sadly PinePhone on Ubuntu Touch doesn't allow receiving files over Bluetooth)
The MicroSD card on PinePhone doesn't appear in the File Manager unless we mount it.
Tap the Terminal icon on PinePhone and enter the following...
ls -l /dev/disk/by-label
We should see something like this...
lrwxrwxrwx 1 root root 15 Jul 23 22:24 BOOT_MNJRO -> ../../mmcblk0p1
lrwxrwxrwx 1 root root 15 Jul 23 22:24 cache -> ../../mmcblk2p8
lrwxrwxrwx 1 root root 15 Jul 23 22:24 ROOT_MNJRO -> ../../mmcblk0p2
lrwxrwxrwx 1 root root 16 Jul 23 22:24 userdata -> ../../mmcblk2p10
These are the Partition Labels on our MicroSD Card.
Let's say we wish to mount the MicroSD Card partition ROOT_MNJRO
, which links to /dev/mmcblk0p2
...
mkdir /tmp/sdcard
sudo mount /dev/mmcblk0p2 /tmp/sdcard
ls -l /tmp/sdcard
(If we don't see our Patition Label, try mounting the numbered partitions anyway: /dev/mmcblk0p1
, p2
, p3
, ...)
We should see the contents of our MicroSD Card.
The MicroSD Card will now appear in File Manager as /tmp/sdcard
, ready for us to copy the files.
Or just copy files from the Command Line like so...
cp /tmp/sdcard/a ~
When we're done, unmount our MicroSD Card...
sudo umount /tmp/sdcard
18 Build and Test LVGL App on Linux
Our LVGL App works on Linux machines like Pinebook Pro...
# Download the source code
git clone https://github.com/lupyuen/lvgl-wayland
cd lvgl-wayland

# Build the lvgl executable
make

# Install Weston Wayland Compositor...
# For Arch Linux and Manjaro:
sudo pacman -S weston

# For Other Distros:
# Check https://github.com/wayland-project/weston

# Start the Weston Wayland Compositor with the PinePhone screen dimensions
weston --width=720 --height=1398 &

# Run the lvgl executable
./wayland/lvgl
Recommend
About Joyk
Aggregate valuable and interesting links.
Joyk means Joy of geeK