
讲真!开发者要了解的微前端架构
source link: http://developer.51cto.com/art/202004/613738.htm
Go to the source link to view the article. You can view the picture content, updated content and better typesetting reading experience. If the link is broken, please click the button below to view the snapshot at that time.
【51CTO.com快译】随着前端技术的发展,针对此类架构的解决方案也不断涌现。如下图所示,前端架构领域的主要思路是将前端分别独立出来,以便后期组合一个更大的整体,同时也方便独立的团队对其进行维护。

让我们先来总结一下微服务,给开发应用带来的好处:
- 解耦的代码库。
- 自治的团队。
- 与技术和框架无关。
- 能够独立部署。
- 具有可扩展性。
- 具有可重用性。
什么是微前端
如下图所示,微前端(Micro-frontends)延续了上述仅在后端实现的微服务的各项优势,能够让不同的团队实现端到端的代码交付。

使用微前端的场景
- 不同团队疲于应付大量的代码库。
- 代码的所有权频繁发生变更。
- 产品的部署被应用程序的其他部分拖延。
- 希望使用不同的前端(FE)框架。
编排(Orchestration)
借助业务流程,我们可以在服务器端和客户端上,利用不同的方法将不同的微前端组合成为一个功能完备的应用程序,以发挥最佳性能。
在此,我们介绍一种方案--构建时间整合(Build time integration)。其特点是:
- 每个微前端应用程序都代表一个npm软件包。
- 主应用程序(orchestrator/container)将自身构建为具有所有依赖项(微前端)的最终捆绑包。
JavaScript
{
  "name": "@super-app/container",
  "version": "1.0.0",
  "description": "My super app",
  "dependencies": {
   "@super-app/products-list": "2.0.0",
   "@super-app/header": "4.5.2",
   "@super-app/order": "1.0.0"
  }
}
上述代码似乎符合逻辑,但实际上却暗藏着一个巨大的缺陷:每当微前端应用程序发生变更时,整个orchestrator及其所有的依赖项都必须随即重建,以创建出新的版本。那么,这样会导致每个微前端的潜在延迟、回滚、甚至是错误。与此同时,由于每个团队都对相同的软件包版本存在着依赖性,因此这实际上会导致新版本的创建更加困难。下面,我们来看看如何避免此类情况的发生。
1.客户端编排
- 客户端路由。
- 状态共享。
- 注册所有的应用程序。
- 如果有可能的话,尽量解决共享依赖项。
- 初始化主应用程序。
- 编写来自不同微前端应用的程序片段。
为了达到上述功能,您可以使用如下程序库:
- single-spa(https://single-spa.js.org/):一种顶级的路由器。
- hinclude(http://mnot.github.io/hinclude/):包含了HTML程序片段。
- h-include(https://github.com/gustafnk/h-include):包括使用各种Web组件的HTML片段。
我们可以通过对不同API的简单Ajax调用,来完成程序片段的编写。为了返回预先渲染(pre-rendered)的HTML,API可以在前端被合并,或者仅返回所需的脚本标签,以及带有ID的特定HTML标签,以方便加载那些程序片段可以呈现的ID。
此外,您也可以使用Vanilla JS、或其他类型的框架,来自行实现编排的目的。
1.1路由
- 使用History API(https://developer.mozilla.org/en-US/docs/Web/API/Window/history),来初始化应用内的路由器。
- 自定义浏览器事件(https://developer.mozilla.org/en-US/docs/Web/API/CustomEvent/CustomEvent)、或PubSub库(https://github.com/mroderick/PubSubJS)。
- 将路由保留在Orchestrator应用上。
1.2共享全局状态,并在应用之间进行通信
- 每个微前端都具有公开状态的Observable模式。RxJS非常适用于这种模式。
- 自定义浏览器事件。
- 实现Cookie、会话或本地存储。
1.3共享主要UI库的代码
- 在选择第三方库时,应选择一个在微前端中能够支持所有可能用到的框架类型的库。
- 如果您想自行开发库,则可以使用Web组件(https://www.webcomponents.org/),以保持通用性。
- 团队成员各司其职对库进行开发与维护,而不必专门创建某个特定的团队。
1.4样式冲突
- 为每个团队确定不同CSS类的特定前缀。
- 使用BEM样式(http://getbem.com/)。
- 使用JSS等样式组件(styled-components),以避免在使用CSS和JS库时发生冲突。
- 使用Web组件中的Shadow DOM(https://developer.mozilla.org/en-US/docs/Web/Web_Components/Using_shadow_DOM)。
1.5 SEO和UX
- Skeleton UI(https://uxdesign.cc/engaging-users-with-progressive-loading-in-skeleton-screen-335a4e287a55)是一种在未加载内容之前的预定义初始化屏幕。
- 在ESI或SSI的帮助下,进行服务器端的渲染。
1.6 Web组件
它们包括4个规范定义:
1.6.1自定义元素(Custom Element)
- https://w3c.github.io/webcomponents/spec/custom/。
通过使用自定义元素(https://developer.mozilla.org/en-US/docs/Web/API/Window/customElements)的API,您可以使用各种生命周期、属性变更处理程序、事件处理程序等方法,来创建功能齐全的自定义HTML元素。
如下是创建自定义元素的过程:
- 创建一个扩展HTMLElement的类。
- 自定义生命周期方法、及其属性。
- 在connectedCallback()生命周期方法的内部,将新元素与HTML模板相关联。
- 使用自定义元素API注册该元素。
- 在HTML中使用此元素。
JavaScript
class MyIcon extends HTMLElement {
  constructor() {
    super();
    this._iconCode = null;
  }


  static get observedAttributes() {
    return ["code"];
  }
  attributeChangedCallback(name, oldValue, newValue) {
    // name will always be "code" due to observedAttributes
    this._iconCode = newValue;
    this._render();
  }
  connectedCallback() {
    this._render();
  }
  get code() {
    return this._iconCode;
  }
  set code(value) {
    this.setAttribute("code", value);
  }
  _render() {
    // append needed elements to the DOM or the shadow DOM
  }
}
customElements.define("my-icon", MyIcon);
// Usage: <my-icon code="flower"></my-icon>
1.6.2 Shadow DOM
- https://w3c.github.io/webcomponents/spec/shadow/。
- https://developer.mozilla.org/zh-CN/docs/Web/Web_Components/Using_shadow_DOM。
JavaScript
Element.attachShadow();
上述的attachShadow方法仅采用了一个属性为mode的对象作为参数。据此,您可以使用open和closed两种模式,来创建在作用域样式和独立组件上隔离的DOM树。其中,Open意味着您可以使用在主页上下文中编写的JavaScript,去访问Shadow DOM。而closed则意味着仅使用自定义元素上下文中的Javascript,去访问Shadow DOM。可见,当您必须隔离CSS时,此法非常实用。
JavaScript
import React from 'react';
import ReactDOM from 'react-dom';
import App from './App';
class MyCusotomElement extends HTMLElement {
  constructor() {
    super();
    this.shadow = this.attachShadow({ mode: 'closed' }); // Or open
  }
  connectedCallback() {
    ReactDOM.render(<App />, this.shadow);
  }
}
customElements.define("my-custom-element", MyCusotomElement);
1.6.3 ES模块
- https://html.spec.whatwg.org/multipage/webappapis.html#integration-with-the-javascript-module-system。
在此,我们只需要导入、导出JS模块即可。
1.6.4 HTML模板
- https://html.spec.whatwg.org/multipage/scripting.html#the-template-element/。
- https://html.spec.whatwg.org/multipage/scripting.html#the-slot-element。
使用HTML模板(如下面代码中的),您可以创建在加载时未能呈现的HTML片段。当然,您也可以在运行时,使用JavaScript对其进行初始化。
HTML
<div id="example"></div>
<template id="example-template">
  <table>
    <tr>
      <td>What is this?</td>
      <td>My example template.</td>
    </tr>
  </table>
</template>
JavaScript
// Find our template
var template = document.querySelector('#example-template');
// Find our target element
var target = document.querySelector('#example');
// Clone the content of our template
var content = document.importNode(template.content, true);
// Append the template content to our target element
target.appendChild(content);
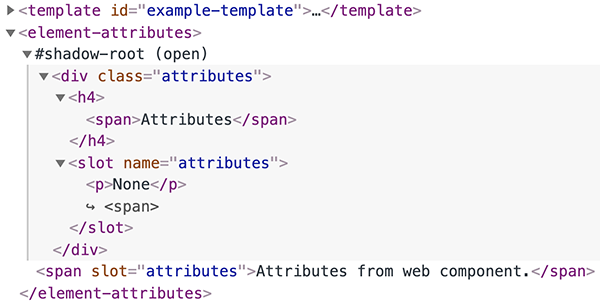
如下面的代码所示,另一个实用的元素是。它是Web组件技术的一部分,可用作Web组件内的占位符,您可以使用自己的标记来填充它。
HTML
<template id="example-template">
  <div class="attributes">
    <h4><span>Attributes</span></h4>
    <slot name="attributes"><p>None</p></slot>
  </div>
</template>
<element-attributes>
  <span slot="attributes">Attributes from web component.</span>
</element-attributes>
JavaScript
customElements.define('element-attributes',
  class extends HTMLElement {
    constructor() {
      super();
      const template = document
        .getElementById('example-template')
        .content;
      this.attachShadow({ mode: 'open' })
        .appendChild(template.cloneNode(true));
    }
  }
其结果模板为:

具有slot属性的已定义span元素,将在具有name属性的slot元素内被呈现,其值与我们在span元素上的slot属性值相匹配。
2.服务器端编排
- 具有代理请求的服务器路由。
- 注册所有应用程序。
- 如果有的话,可解决共享依赖项。
- 服务与组合那些来自不同的微前端应用的程序片段。
2.2 引导程序应用
通常,我们可以将服务器端业务流程的方案,称为Bootstrap应用。由于它们比较复杂,因此我们往往会用到如下两个典型的方案。
2.2.1 Zalandos解决方案
Project Mosaic9( https://www.mosaic9.org/ )。

用户只需进入其页面,通过浏览器点击其路由器,以决定是采用API调用、还是布局式调用。对于API调用而言,路由器会将请求代理到所需的API处。而在布局调用中,路由器会调用布局服务,以了解所有可能的布局,进而从不同的端点加载它们。
下图展示了如何通过微前端工作流程,来创建一个开源项目的完整步骤:

2.2.2 Facebook解决方案
上述Zalando中Tailor.js的灵感,实际上来源于Facebook的BigPipe。由于具有相似之处,我们不做过多的介绍,您可以参阅:https://www.facebook.com/notes/facebook-engineering/bigpipe-pipelining-web-pages-for-high-performance/389414033919/,以获悉其工作原理。
2.3片段组成的可能性
针对服务器端的片段组成,我们可以使用Server side include(SSI)和Edge side include(ESI),这两种传统技术,来轻松地将不同的HTML标记组合为一个。当然,这两种技术,都需要我们维护一个对应着静态HTML文件的URL映射。
2.3.1 Server side include(SSI)
- http://www.alticore.eu/wasd_root/doc/env/env_0400.html。
- https://www.owasp.org/index.php/Server-Side_Includes_(SSI)_Injection。
- https://www.w3.org/Jigsaw/Doc/User/SSI.html。
- http://httpd.apache.org/docs/current/howto/ssi.html#basic。
- 是一种简单的解释型服务器端脚本语言。
- 得到了Apache和Nginx的支持。
下面是其主HTML文件的代码:
HTML
<html lang="en">
  <head>
    <meta charset="utf-8">
    <title>SSI</title>
  </head>
  <body>
    <!--# include file="$PAGE.html" -->
  </body>
</html>
在Nginx中的配置为:
Java
server {
  listen 8080;
  server_name localhost;
  root /usr/share/nginx/html;
  index index.html;
  # Turn on the SSI ferature
  ssi on;
  # Set the $PAGE variable used inside the main HTML
  location /browse {
    set $PAGE 'browse';
  }
  location /profile {
    set $PAGE 'profile'
  }
}
2.3.2 Edge side include(ESI)
- https://www.w3.org/TR/esi-lang。
- 使用到了小标记(Small markup)语言。
- 目前只是建议,并非标准。
- 由包括Nginx和Varnish等不同的技术或库,来提供支持。
- 对于NodeJS而言,具有nodei的npm软件包。
HTML
<html lang="en">
    <head>
      <meta charset="utf-8">
       <title>ESI</title>
     </head>
     <body>
      <esi:include src="http://example.com/1.html" alt="http://example.com/2.html" />
     </body>
</html>
2.3.3自行实现
当然,您也可以在服务器端实现自己的解析器、或某种标记帮助器。几乎每一个模板库都可以实现自定义的标签解析。
结论
您可以根据自己所面对的问题,通过分析,来选择适合自己的微前端。常见的实现方式有如下两种:
完全独立
- 每个团队都选择自己的技术栈,且不共享代码。
- 每个片段都进行自己的API调用。
- 每个视图都由功能齐全的片段所组成。
- 每个微前端应用都有自己的CI/CD。
战略合作
- 大家同意技术栈,并共享公共库。
- API调用流需经过bootstrap应用。
- 共享UI库。
- 共享CI/CD。
原文标题:Introduction to Micro-Frontend Architecture,作者:Mayur Ingle
【51CTO译稿,合作站点转载请注明原文译者和出处为51CTO.com】
【责任编辑:庞桂玉 TEL:(010)68476606】
Recommend
About Joyk
Aggregate valuable and interesting links.
Joyk means Joy of geeK