

4 hidden settings to make Chrome for Android even better | Computerworld
source link: https://www.computerworld.com/article/2474114/android/android-4-hidden-settings-to-make-chrome-for-android-even-better.html
Go to the source link to view the article. You can view the picture content, updated content and better typesetting reading experience. If the link is broken, please click the button below to view the snapshot at that time.

Not your average Android news — a diverse mix of advice, insight, and analysis with veteran Android journalist JR Raphael.
6 secret settings for better browsing in Chrome on Android
Supercharge your smartphone browsing experience with these powerful yet completely concealed options.

Hey. You. Yes, you there — the one with your overly moist eyeballs pointed at the screen. What if I were to tell you that that the browser you rely on for all of your web-based exploring on Android had oodles of extra features — top-secret settings that'd add awesome powers into your mobile browsing adventures and make wiggling your way around this wacky ol' web of ours meaningfully better?
Well, provided you're using Google's Chrome browser for Android, that's as true as true can be. And best of all, it doesn't take much to uncover all of Chrome's carefully concealed treasures — if you know where to look.
Continuing on our ever-present theme of digging up hidden features and out-of-sight time-savers, I thought now would be a fine time to break out my metaphorical spelunker's hat (which is quite some cap, lemme tell ya) and dive deep into Chrome's cloudiest corners. And good golly, are there some spectacular goodies just begging to be unearthed there.
[ Keep up on the latest thought leadership, insights, how-to, and analysis on IT through Computerworld’s newsletters. ]
The six settings on this page will make your Android-based web browsing more powerful, more efficient, and generally just more pleasant. They're all just sitting there waiting to be found, too — so really, why not take advantage of what they have to offer?
Before we spelunk any further, though, one quick word of warning: All of these settings are part of Chrome's flags system, which is a home for under-development options that are still actively being worked on and aren't technically intended for mainstream use. The flags system is meant for expert users and other similarly informed (and/or insane) folk who want to get an early look at advanced items. It also evolves pretty regularly, so it's entirely possible some of the settings mentioned here may look different from what I've described or even be gone entirely at some point in the not-so-distant future.
[Psst: Love shortcuts? My Android Shortcut Supercourse will teach you tons of time-saving tricks for your phone. Sign up now for free!]
What's more, the flags system has loads of advanced options within it, some of which could potentially cause websites to look weird, Chrome itself to become unstable, or even your ears to start spewing a delightfully minty steam. (Hey, you never know.) So in other words: Proceed with caution, follow my instructions carefully, and don't mess with anything else you encounter in this area of the browser unless you actually understand it and genuinely know what you're doing.
Got all that? Good. Now, let's give your browser some spiffy new superpowers, shall we?
Chrome Android setting No. 1: The magic custom shortcut button
This first secret Chrome setting for Android is probably my favorite — 'cause it's just so darn useful, no matter how you tend to hop around the web on your phone.
It's an extra button that gets added into the top of the Android Chrome browser and then gives you extra-easy access to whatever function you use the most: sharing, opening up a new tab, or launching a new web search with only the silky sound of your salamander voice.
If you really want to get wild, you can even let Chrome analyze your usage for you and turn the button into a dynamic command center where the browser automatically decides which of those buttons is most likely to be useful for you at any given moment and then adjusts itself accordingly.
However you approach it, you'll save yourself the step of first tapping to open Chrome's main menu and then clumsily pawing around to find the function you need. And if you use some of these functions as frequently as I do, all those saved seconds can really add up.
So what are you waiting for? To get that extra option in Chrome on your phone this instant:
- Type chrome:flags into the browser's address bar.
- Type the word adaptive into the search box at the top of the screen that comes up.
- Look for the lines labeled "Adaptive button in top toolbar" and "Adaptive button in top toolbar customization." Tap the box beneath each of 'em and change its setting to "Enabled."
- Tap the Relaunch button at the bottom of the screen.
And that's it — you did it! (Go ahead and give yourself a quick pat on the back, you audacious explorer.) Once your Android Chrome app restarts itself, you can tap the three-dot menu icon in the browser's upper-right corner and select "Settings," then look for the freshly added "Toolbar shortcut" option to configure exactly how your fancy new button will work.
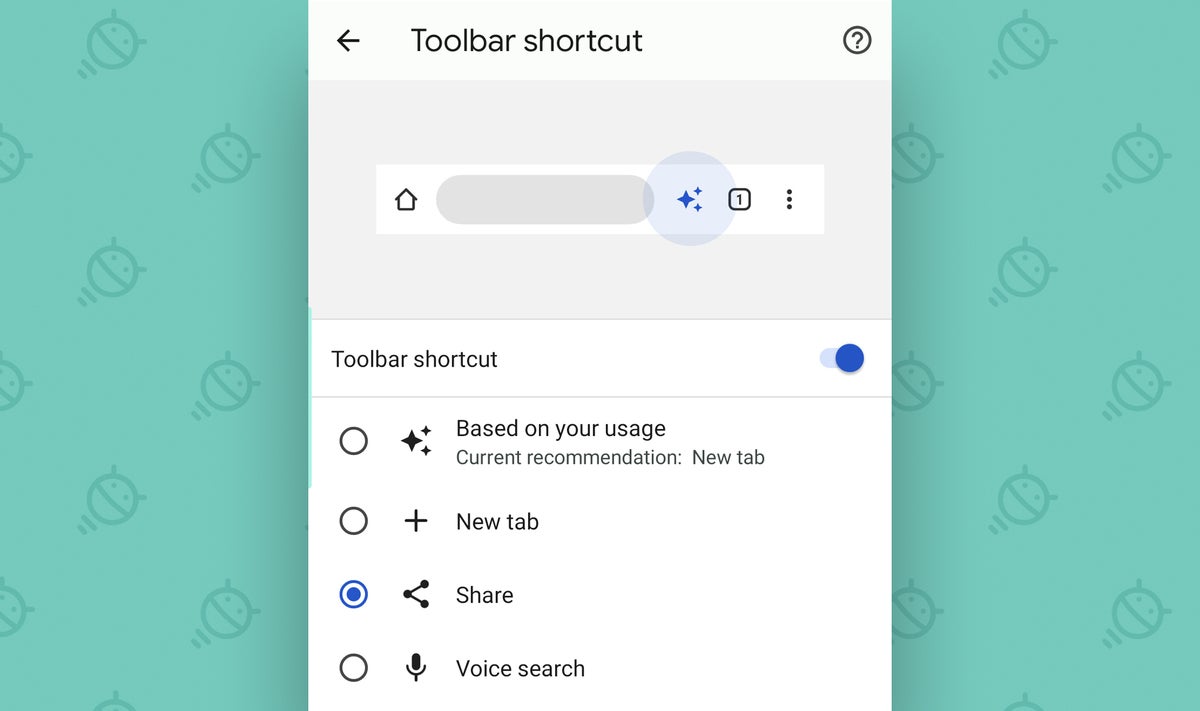
Make that selection once, then enjoy having the button of your choice a single tap away for all of eternity (or, y'know, until Google mucks around with this again).
Chrome Android setting No. 2: A better Chrome widget
Android's in the midst of a long-awaited widget revival, but one widget that's remained woefully underwhelming is the weary ol' widget for Chwome. (Whoops — got carried away there. Sowwy 'bout that.)
Chrome's widget selection has long consisted of the uninspired options for putting a browser-specific search bar or a bland box showing your bookmarks on your home screen, and that's it. But now, you can add two far more appealing browser control panels into that mix — if you know how to uncover 'em.
Thankfully, you're about to:
- Once again, type chrome:flags into your browser's address bar.
- This time, type widget into the box on the screen that comes up.
- See the line labeled "Quick Action Search Widget"? Tap the box beneath that bad boy and change its setting to "Enabled."
- Go grab yourself a bowl of pretzels and/or cheese poofs. You deserve it.
- Tap the Relaunch button at the bottom of the screen.
After Chrome restarts, wipe off your snack-encrusted fingies and head back to your home screen. Long-press on any open area to find your device's widget selector. Find and tap "Chrome" in the list of choices, and you oughta then find yourself facing two snazzy new options for your Android widget-using pleasure:
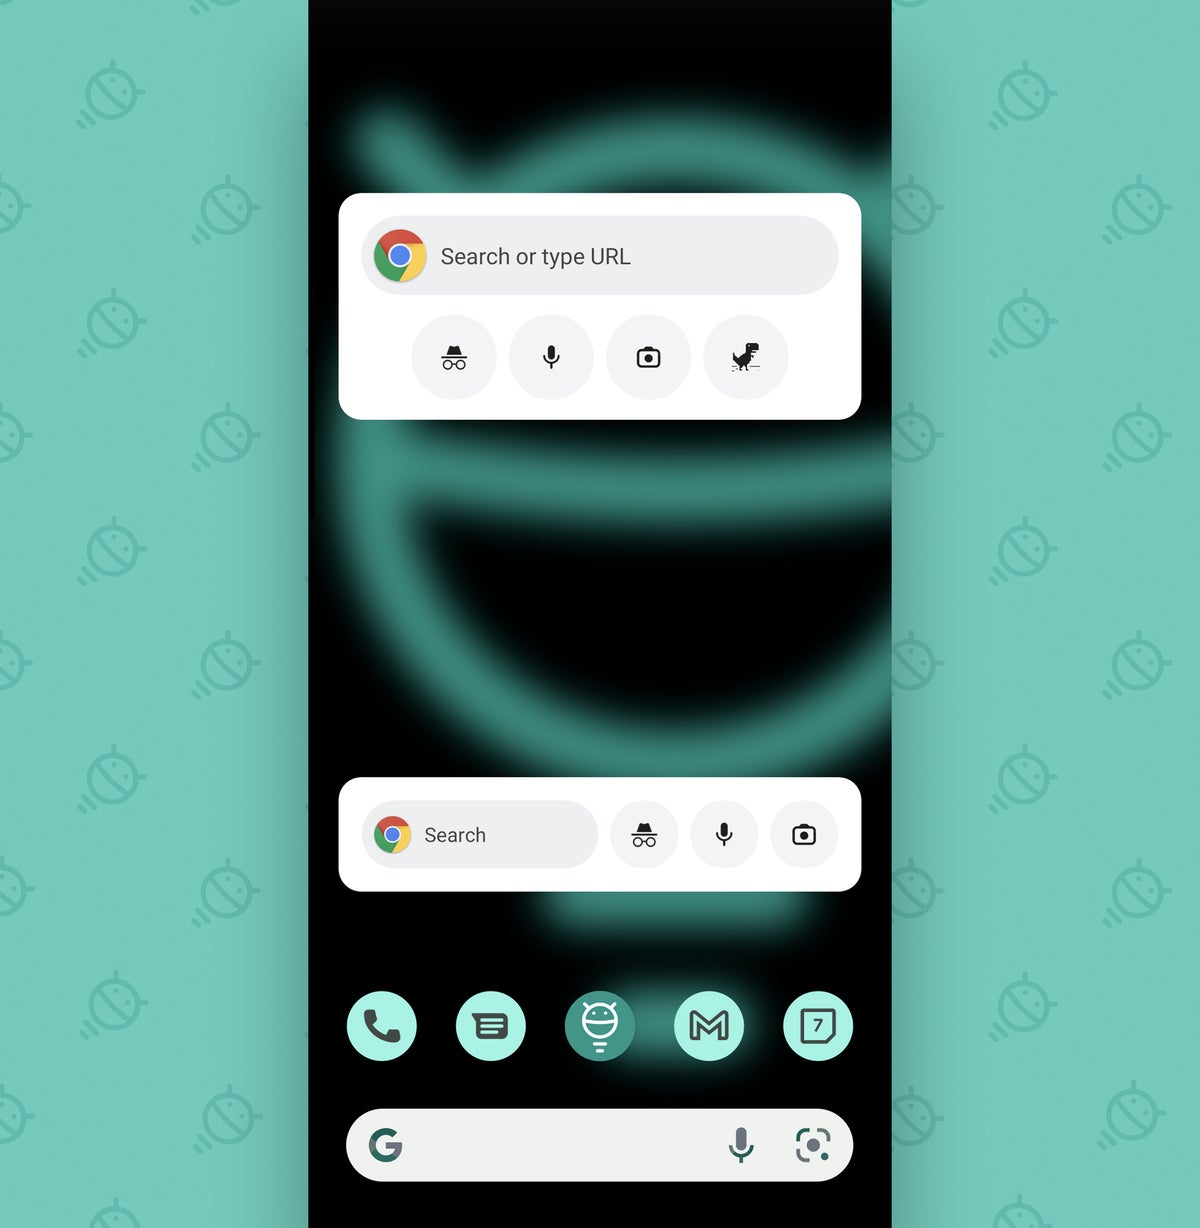
Much more useful than those rusty old options, wouldn't ya say?
Chrome Android setting No. 3: A more sensible article-saving system
Google added a handy way to save pages from Chrome into a browser-based read-it-later list a while back. Yippee, right? Sure — it's a nice enough concept in theory (though try to contain yourself, for cryin' out loud; we've got a ways to go yet). The problem is that by default, the feature is strangely buried and difficult to use on Android.
To wit: If you want to save something into your Chrome reading list from your phone, the only way to do it is usually to long-press on a link within a page and then look for the option to add that link into your list.
That's fine and dandy, but what if you want to save the current page you're actively viewing? Vexingly, the Chrome Android browser has no way to do it.
Unless, that is, you know this trick:
- Type chrome:flags into the browser's address bar (starting to feel familiar yet?).
- Type read into the box at the top of the screen that comes up.
- Find the "Reading List" option, tap the box beneath it, and change its setting from "Default" to "Enabled (with app menu item)."
- Tap the blue Relaunch button at the bottom of the screen.
Now, anytime you want to save a page you're viewing into your Chrome reading list, all you've gotta do is tap the browser's three-dot menu icon — and bam! Right there in that main menu is the obvious-seeming option to add that very article directly into your list.
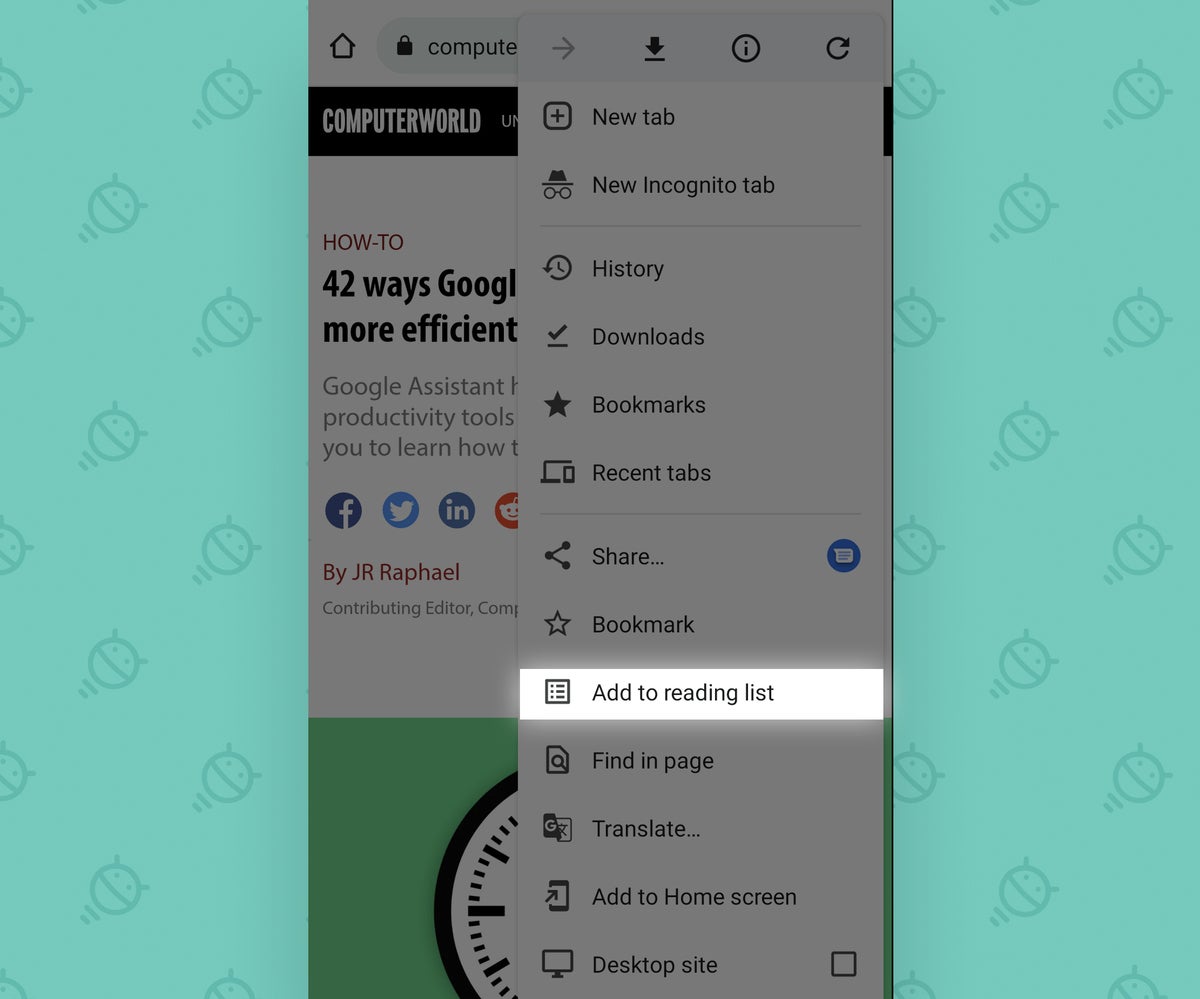
Almost painfully sensible, no?
Oh, and when you're ready to find the stuff you've saved, just tap the three-dot menu icon in Chrome's upper-right corner, select "Bookmarks," and look for the "Reading list" option there. (If you don't see it right away, you might have to hit a back-facing arrow in the upper-left corner of the screen and/or hit your forehead forcefully to initiate a brain reset.)
And speaking of your browser's bookmarks...
Chrome Android setting No. 4: A more modern bookmarks interface
Chrome's bookmarks area on Android hasn't gotten much love as of late. The interface has looked a bit blah, to use the technical term, for quite a while now. But fear not, for Google hasn't forgotten about it entirely.
You can fast-track your Android phone into Chrome's new-and-improved bookmarks setup by making this quick tweak:
- Type chrome:flags into the browser's address bar.
- Type bookmarks into the search box on the screen that comes up.
- Tap the line labeled "Bookmarks refresh" and change its setting from "Disabled" to "Enabled (everything)."
- Tap the Refresh button at the bottom of the screen.
After your browser restarts, tap the three-dot menu icon in its upper-right corner and tap "Bookmarks" in that main Chrome menu. You'll be greeted with a freshened-up Android bookmark view that doesn't look like it was last touched in the prehistoric ages — and as an added perk, you'll also notice a new and less ambiguous option for adding a site into your bookmarks within that main Chrome menu.
Chrome Android setting No. 5: A web-wide dark mode
Android's had a system-wide Dark Theme option since 2019's Android 10 release, but you know what's weird? Even when your device is in its fully darkened state, pages in your phone's web browser are still as bright as day (or, um, however bright they usually are).
As of now, y'see, Android's dark mode doesn't have any impact on the web as it appears within Chrome — only on the menus and other areas around the actual page you're viewing. And that's a bit of a bummer, since a big part of what you do on your phone probably revolves around what's within your browser's borders.
But wait! Chrome actually does have a way to make the entire web responsive to Android's Dark Theme. It just isn't activated or available by default. Once you find and flip the switch, though, any page you open on the web will automatically transform itself whenever your phone's dark mode is enabled. See?
(Insert wild oohing, ahhing, and optional (though generally not encouraged) undergarment throwing here.)
Here's the trick:
- Assuming you have Android 10 or higher on your phone, open up Chrome and type chrome:flags into the browser's address bar.
- Type darken into the search box at the top of the screen that comes up.
- See the item labeled "Darken websites checkbox in themes setting"? Tap the box beneath it and change it from "Default" to "Enabled."
- Cackle once whilst thinking about darkness, just for good measure.
- Tap the Relaunch button at the bottom of the screen.
There's just one more step to finish. Once Chrome restarts itself, you'll have to go into the browser's settings and actually enable the new option we just uncovered:
- Tap the three-dot menu icon in the Chrome's upper-right corner and select Settings.
- In the main Chrome settings menu, tap "Theme."
- Under the "System default" option, you should see a new checkbox that says "Apply dark theme to sites, when possible." Check it!
- Make your way out of that menu and back to the main browser area.
And there ya have it: From here on out, anytime you activate your phone's Dark Theme, any pages you're viewing within Chrome will automatically follow suit.
Chrome Android setting No. 6: A more powerful Incognito mode
This last Chrome Android tip is a bit more niche in nature, but if you've ever felt the need around it, you'll absolutely appreciate its arrival.
It's a simple switch that removes Chrome's built-in policy of prohibiting screenshots while you're in the browser's Incognito mode — a somewhat puzzling rule that typically makes it impossible to capture anything within an Incognito tab in Chrome.
So say, for instance, you're using Chrome's Incognito mode to look at something without being signed in. Or maybe you're relying on it to check on a certain search without having the term get connected to your Google browsing history. Or maybe you're using it for, erm, certain other undisclosed purposes.
Whatever the case, there are bound to be moments when you want to snap a screenshot of something in that sort of state. And now, you can.
Here's all there is to it:
- One last time, type chrome:flags into your browser's address bar.
- Type incognito into the search box on the screen that comes up.
- Find the line labeled "Incognito Screenshot" and change its setting from "Default" to "Enabled."
- Tap the Relaunch button at the bottom of the screen.
And that's it: You can now capture screenshots of Incognito windows whenever your privacy-browsing heart desires.
Just remember: If you snap something accidentally at an (ahem) inadvertent moment, it's up to you to go find and delete it.
Ready for even more advanced Android knowledge? Sign up for my free Android Shortcut Supercourse and learn tons of time-saving tricks!
Recommend
About Joyk
Aggregate valuable and interesting links.
Joyk means Joy of geeK