

采用简易的环形延时队列处理秒级定时任务的解决方案 - balahoho
source link: http://www.cnblogs.com/hohoa/p/7739271.html
Go to the source link to view the article. You can view the picture content, updated content and better typesetting reading experience. If the link is broken, please click the button below to view the snapshot at that time.
采用简易的环形延时队列处理秒级定时任务的解决方案
在稍微复杂点业务系统中,不可避免会碰到做定时任务的需求,比如淘宝的交易超时自动关闭订单、超时自动确认收货等等。对于一些定时作业比较多的系统,通常都会搭建专门的调度平台来管理,通过创建定时器来周期性执行任务。如刚才所说的场景,我们可以给订单创建一个专门的任务来处理交易状态,每秒轮询一次订单表,找出那些符合超时条件的订单然后标记状态。这是最简单粗暴的做法,但明显也很low,自己都下不去手写这样的代码,所有必须要找个更好的方案。
回到真实项目中的场景,系统中某个活动上线后要给目标用户发送短信通知,这些通知需要按时间点批量发送。虽然已经基于quartz.net给系统搭建了任务调度平台,但着实不想用上述方案来实现。在网上各种搜索和思考,找到一篇文章让我眼前一亮,稍加分析发现里面的思路完全符合现在的场景,于是决定在自己项目中实现出来。
这种方案的核心就是构造一种数据结构,称之为环形队列,但实际上还是一个数组,加上对它的循环遍历,达到一种环状的假象。然后再配合定时器,就可以实现按需延时的效果。上面提到的文章中也介绍了实现思路,这里我采用我的理解再更加详细的解释一下。
我们先为这个数组分配一个固定大小的空间,比如60,每个数组的元素用来存放任务的集合。然后开启一个定时器每隔一秒来扫描这个数组,扫完一圈刚好是一分钟。如果提前设置好任务被扫描的圈数(CycleNum)和在数组中的位置(Slot),在刚好扫到数组的Slot位置时,集合里那些CycleNum为0的任务就是达到触发条件的任务,拉出来做业务操作然后移除掉,其他的把圈数减掉一次,然后留到下次继续扫描,这样就实现了延时的效果。原理如下图所示:
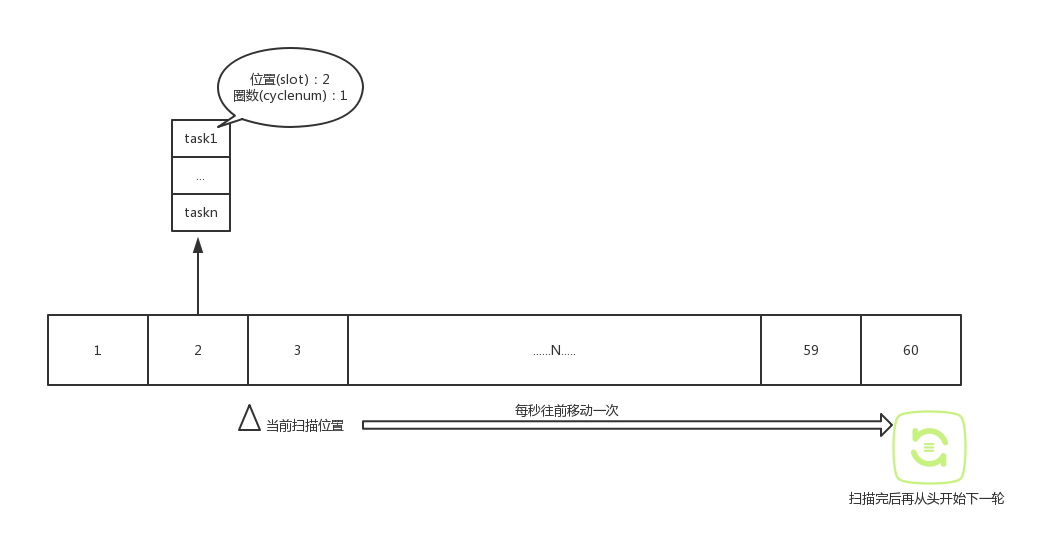
可以看出中间的重点是计算出每个任务所在的位置以及需要循环的圈数。假设当前时间为15:20:08,当前扫描位置是2,我的任务要在15:22:35这个时刻触发,也就是147秒后。那么我需要循环的圈数就是147/60=2圈,需要被扫描的位置就是(147+2)%60=29的地方。计算好任务的坐标后塞到数组中属于它的位置,然后静静等待被消费就好啦。
光讲原理不上代码怎么能行呢,根据上面的思路,下面一步步在.net平台下实现出来。
先做一些基础封装。
首先构造任务参数的基类,用来记录任务的位置信息和定义业务回调方法:
    public class DelayQueueParam
    {
        internal int Slot { get; set; }

        internal int CycleNum { get; set; }

        public Action<object> Callback { get; set; }
    }
接下来是核心地方。再构造队列的泛型类,真实类型必须派生自上面的基类,用来扩展一些业务字段方便消费时使用。队列的主要属性有当前位置指针以及数组容器,主要的操作有插入、移除和消费。插入任务时需要传入执行时间,用来计算这个任务的坐标。
    public class DelayQueue<T> where T : DelayQueueParam
    {
        private List<T>[] queue;

        private int currentIndex = 1;

        public DelayQueue(int length)
        {
            queue = new List<T>[length];
        }

        public void Insert(T item, DateTime time)
        {
            //根据消费时间计算消息应该放入的位置
            var second = (int)(time - DateTime.Now).TotalSeconds;
            item.CycleNum = second / queue.Length;
            item.Slot = (second + currentIndex) % queue.Length;
            //加入到延时队列中
            if (queue[item.Slot] == null)
            {
                queue[item.Slot] = new List<T>();
            }
            queue[item.Slot].Add(item);
        }

        public void Remove(T item)
        {
            if (queue[item.Slot] != null)
            {
                queue[item.Slot].Remove(item);
            }
        }

        public void Read()
        {
            if (queue.Length >= currentIndex)
            {
                var list = queue[currentIndex - 1];
                if (list != null)
                {
                    List<T> target = new List<T>();
                    foreach (var item in list)
                    {
                        if (item.CycleNum == 0)
                        {
                            //在本轮命中,用单独线程去执行业务操作
                            Task.Run(()=> { item.Callback(item); });
                            target.Add(item);
                        }
                        else
                        {
                            //等下一轮
                            item.CycleNum--;
                            System.Diagnostics.Debug.WriteLine($"@@@@@索引:{item.Slot},剩余:{item.CycleNum}");
                        }
                    }
                    //把已过期的移除掉
                    foreach (var item in target)
                    {
                        list.Remove(item);
                    }
                }
                currentIndex++;
                //下一遍从头开始
                if (currentIndex > queue.Length)
                {
                    currentIndex = 1;
                }
            }
        }
    }
接下来是使用方法。
创建一个管理队列实例的静态类,里面封装对队列的操作:
    public static class NotifyPlanManager
    {
        private static DelayQueue<NotifyPlan> _queue = new DelayQueue<NotifyPlan>(60);

        public static void Insert(NotifyPlan plan, DateTime time)
        {
            _queue.Insert(plan, time);
        }

        public static void Read()
        {
            _queue.Read();
        }
    }
构建我们的实际业务参数类,派生自DelayQueueParam:
    public class NotifyPlan : DelayQueueParam
    {
        public Guid CamId { get; set; }

        public int PreviousTotal { get; set; }

        public int Amount { get; set; }
    }
生产端往队列中插入数据:
    Action<object> callback = (result) =>
    {
        var np = result as NotifyPlan;
        //这里做自己的业务操作
        //举个例子:
        Debug.WriteLine($"活动ID:{np.CamId},已发送数量:{np.PreviousTotal},本次发送数量:{np.Amount}");
    };
    NotifyPlanManager.Insert(new NotifyPlan
    {
        Amount = set.MainAmount,
        CamId = camId,
        PreviousTotal = 0,
        Callback = callback
    }, smsTemplate.SendDate);
再创建一个每秒执行一次的定时器用做消费端,我这里使用的是FluentScheduler,核心代码:
    internal class NotifyPlanJob : IJob
    {
        /// <summary>
        /// 执行计划
        /// </summary>
        public void Execute()
        {
            NotifyPlanManager.Read();
        }
    }

    internal class JobFactory : Registry
    {
        public JobFactory()
        {
            //每秒运行一次
            Schedule<NotifyPlanJob >().ToRunEvery(1).Seconds();
        }
    }

  JobManager.Initialize(new JobFactory());
然后开启调试运行,打开本机的系统时间面板,对着时间看输出结果。亲测有效。
这种方案的好处是避免了频繁地扫描数据库和不必要的业务操作,另外也很方便控制时间精度。带来的问题是如果web服务异常或重启可能会发生任务丢失的情况,我目前的处理方法是在数据库中标记任务状态,服务启动时把状态为“排队中”的任务重新加载到队列中等待消费。
以上方案在单机环境测试没问题,多节点情况下暂时没有深究。若有设计实现上的缺陷,欢迎讨论与指正,要是有更好的方案,那就当抛砖引玉,再好不过了~
Recommend
About Joyk
Aggregate valuable and interesting links.
Joyk means Joy of geeK