

Unity Beat ’Em Up Game Tutorial – Getting Started
source link: https://www.tuicool.com/articles/hit/NN73Yr3
Go to the source link to view the article. You can view the picture content, updated content and better typesetting reading experience. If the link is broken, please click the button below to view the snapshot at that time.

 This is an excerpt taken from Chapter 1, “Getting Started”, of our book Beat ’Em Up Game Starter Kit – Unity , which equips you with all tools, art and instructions you’ll need to create your own addictive mobile game for Android and iOS. Enjoy!
In this tutorial, you’ll start your journey with game building in the same way you start a game — through the title screen!
You’ll be making this game in Unity, a powerful and popular game creation engine. If you don’t have Unity already, you should download and install the latest version before continuing.
As you assemble the first bits of your game’s UI, you’ll go through the basics of Unity and familiarize yourself with the Unity editor. By the end of it, you’ll be well on your way to making your very own beat ‘em up game.
What are you waiting for? You’ve got games to build and things to beat up! Get to it!
Note : If you’re already familiar with Unity, feel free to skip ahead a bit to the section Creating the Title Scene . On the other hand, if you feel a little rusty or you’re new to Unity, start from the top!
Getting Started
Start up Unity and click New . You’ll see the following window:
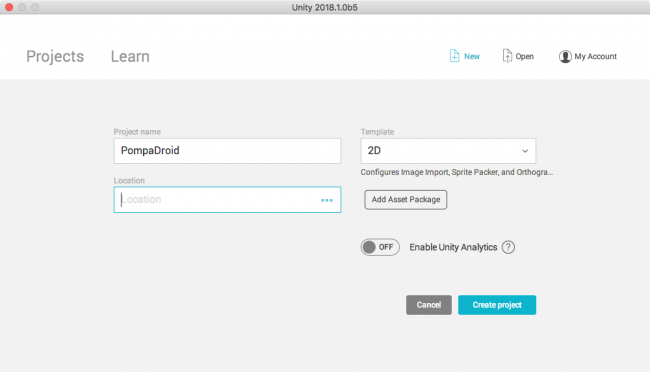
- Enter PompaDroid as the Project Name , and then select the Location to where you want to save the project.
Select 2D as the Template . Finally, click the Create Project button.
Just like that, you created your very first Unity project. Since you went with 2D settings, your images will all import as 2D sprites instead of textures.
If you feel compelled to change this, you can do so under Edit \ Project Settings \ Editor . It is labeled as Default Behaviour Mode .

Note : You’re probably wondering why you named the game PompaDroid. As you’ll soon see, the main character has a funky pompadour hairdo, and he’s about to beat up on a bunch of droids. My apologies in advance to the Android devs out there.
With the Unity editor now open, first things first: you need to set the target platform.
On the menu at the top, select File \ Build Settings . Select iOS in the Platform section.
At the bottom of the window, click Switch Platform , and then check Development Build .
Close the window.
You’ve just set up your game to run on iOS devices. If you prefer to build for Android, just do the same thing but select Android instead of iOS. It’s that simple to build the same game for a different platform!
Note : If you encounter a “no module loaded” error for the desired platform, just download the module by clicking Open Download Page . Go through the steps to get the install process going, then come back to set up your folders and go through the crash course. When installation finishes, you can just circle back to finish setting up the platform.

Clearing Starter Files
Depending on which Unity version you are using, starting a new project may or may not include starter files for you to use. These files are not necessary for PompaDroid. If your starter project is not empty, the following steps will help you delete all of the unused assets.
Create a new scene by choosing File \ New Scene in the top menu. Once a new Scene has been loaded, select all files inside the Assets folder in the Project view, and right-click Delete to remove them from the project.
Setting up the Project Folders
Now is an excellent time to think ahead and set up a system for your project files — orderly assets are easier to find.
In the Project window , right-click the Assets folder and select Create \ Folder . Name this folder Scenes .
Repeat these steps and create Images , Prefabs and Scripts folders.
No surprises here — you’ll save your various assets in these folders.
Unity Crash Course
You’re at the point where it’s time for a Unity editor crash course. Unity veterans may want to skip this part.
Note : If you want a not-so-quick explanation about using the Unity editor, you can read more about it at http://docs.unity3d.com/Manual/UnityOverview.html .

The Unity editor comprises several windows. Except for the toolbar, all windows can be detached, docked, grouped and resized. Go ahead, try dragging and dropping things to see what you’re working with here.
Its interface allows you to create a variety of layouts that suit personal and project needs, so your layout may look unique from other developers’ layouts.
Toolbar

The toolbar contains essential tools you need for manipulating GameObjects.
Transform Tools

These tools let you manipulate the Scene view and its GameObjects. From left to right, these are:
- Grab tool: Allows you to pan around the Scene view.
- Translate tool: Used for moving GameObjects.
- Rotate tool: Allows you to rotate GameObjects.
- Scale tool: Used to scale GameObjects.
- Rect tool: Allows you to manipulate 2D elements in Unity (Sprites and UI).
- Transform tool: Allows you to move, rotate and scale using only one tool.
Transform Gizmo Toggles

Toggles are what you use to change how transform tools affect GameObjects. From left to right, these are:
- Pivot Toggle: Toggles whether transforms happen from the center of the GameObjects or around their pivot points. It’s useful when rotating GameObjects.
- World Space & Local Space Toggle: Toggles whether the transforms should work on world or local space.
Playback Buttons

These buttons allow you to run and test your game. From left to right, these are:
- Play button: Runs the current scene.
- Pause button: Pauses and resumes the game.
- Step button: Allows you to jump forward by one frame when the game is paused. It’s useful for hunting down pesky bugs.
Hierarchy

The Hierarchy is a complete list of all GameObjects in your current scene.
Scene View

The Scene view is a viewing window into the world you’re creating. You’ll be able to select, position and manipulate GameObjects here.
Project Window

The Project window, sometimes referred to as the Project browser, contains all the assets that belong to your project. You can add, delete, search, rename and move assets here.
- The left-hand side shows your project’s folder structure.
- The right-hand side shows all the assets contained in the folder you’ve selected on the left.
Game View

The Game view renders what the camera(s) sees. It’s a decent representative of the final product.
Inspector Window

The Inspector window is for viewing the GameObjects’ properties, assets and other preferences and settings.
Basic Unity Concepts
You have a basic understanding of how to get around in the Unity editor. Now get ready to absorb a few more core concepts that’ll help you make the most of this tutorial.
GameObjects
Meet the fundamental objects in Unity. Without them, you have…nothing.
They are the “things” that make up a game — literally what the name implies: objects in your game. They can be trees, lights, floors, cameras, a ball, a car, a slice of bacon, a hot buttered waffle, etc. (Hungry yet?)
The Hierarchy window lists GameObjects used in the current scene.

GameObjects are basically containers that can contain components, which are building blocks that define a GameObject’s capabilities. Components allow GameObjects to display images, play audio, think with an AI, handle physics, display 3D meshes and so much more!
Unity comes with many built-in components, but you can (and will) create some of your own by scripting — more on that later.
The following shows all the components that belong to the GameObject named Hero.
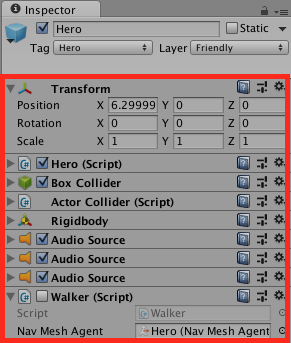
A GameObject doesn’t fly solo; it always has a transform component that determines the GameObject’s position, rotation and scale.

UI elements (still GameObjects) have a much more complicated transform called RectTransform . You’ll learn about them in a later chapter.

Parenting
Parenting is simple. Well, at least it is in the Unity engine! Any GameObject can become the child of another GameObject. The Hierarchy view is where you see and manipulate children and parents. Child GameObjects are indented beneath their respective parents.
There are no limits on how many children a parent can have, but each child can only have one parent.
The next image shows you an example of such a relationship: Image is a child of Joystick, and Joystick is a child of Controls Canvas. It’s just one big, happy family in there!

To make one GameObject a child of another, just drag one over another in the Hierarchy. To unparent, just do the opposite — it’s as easy as pie!
In the example, GameObject 1 is now a child of GameObject 2:

You’ve finished the Unity crash course and have the basic understanding you need to start creating a game!
Don’t worry if you’re not totally clear on everything so far. You can always come back to this part to refresh your memory, and trust me when I say you’ll become very familiar with the engine as you create PompaDroid.
Creating the Title Scene
You’ve created the project and are ready to build. When you first visit a new project, Unity greets you with a new, unsaved scene.
To save it, select File \ Save Scene and name the scene MainMenu . Navigate to the Scenes folder and click Save .
Saving is simple enough. Look closer at the scene — contrary to what you might think it isn’t empty. By default, Unity created a Main Camera GameObject.
You don’t need it for the title scene, so select the Main Camera in the Hierarchy window, right-click and select Delete .
Your scene won’t stay empty for long!
Find the Images folder under Assets in the Project window .
Right-click and select Create \ Folder . Name it MainMenu — this is where you’ll add all the assets you need to make the title screen.
Open MainMenu then right-click it and select Import New Asset . Navigate to the Chapter 1 Assets folder that comes with this tutorial.
Import bg _ title.png , bg _ title _ touchtostart.png and bg _ title _ txt.png to MainMenu .

Note : An alternative way to import files into Unity is to drag the files directly into the Project window.
Now select the three assets you just imported in the Project window. Go to the Inspector and set Pixels Per Unit to 32 and set FilterMode to Point . Click on Apply to save your changes.

What did you just do?
- Setting the value of a world space unit in Pixels Per Unit means that 1 Unity world space unit equals 32 pixels.
- Setting Filter Mode to Point means textures will look blocky when magnified. Perfect for pixel art. This setting determines what happens when an image is stretched.
The assets are ready to use on the title screen — speaking of title screens, here’s what yours will look like:

How are you going to make that? By using Unity’s UI of course!
Setting Up the Canvas
In the Hierarchy window, click Create \ UI \ Image to create three new GameObjects and a plain white box:

A canvas comprises three components: canvas, canvas scaler and graphics raycaster. You’ll find them in the Inspector.
Remember that you’ll need to create a canvas for all UI objects in Unity.
- The Canvas represents the space where the UI is drawn. You’ll learn more about this later. For now, just keep in mind that all UI elements have an ancestor of a canvas component that renders on screen.
- The Canvas Scaler handles the overall size of the canvas. A common use case is when you want the game’s UI to scale automatically to the current screen size.
- The Graphics Raycaster determines if a raycast can hit a canvas. It’s important when setting up correct UI functionalities such as button clicks.
Secondly, Unity also created an Image GameObject as a child of the Canvas GameObject. It contains two components: a Canvas Renderer that’s required to render a UI object on a canvas, and an Image component that draws the sprite set in the source image field.
Lastly, there’s also a new EventSystem GameObject containing an Event System component that handles all the events the UI system uses. You won’t be able to interact with UI elements without this component. It also contains a Standalone Input Module to handle game input.
Adding the Background Image
Select the Image GameObject from the Hierarchy . Next, open Images \ MainMenu from the Assets folder in the Project window, and drag bg _ title to the Source Image field in the Image component.
Tadaaa! The white square on the screen now shows the bg_title image — you may need to zoom out to see it.

Note : Another way to set the source image field is to click the knob on the right side to open a sprite selection window where you can select the sprite you want.

Take a closer look. It’s there…but why is it shrunken, squished and squared off?

It definitely shouldn’t look like this!
Making it Pretty with the Canvas Scaler
First, you need to determine the resolution and pixel per unit import settings for bg_title.
Select bg _ title in the Project window and check the pixel per unit value.

For the image resolution, select the sprite (bg_title) in the Project window and check its properties at the bottom of the Inspector .

You imported bg_title at 32 pixels per unit and its dimensions are 568 x 384 pixels, so you still need to configure the canvas scaler to match these settings. Remember, this component scale’s the UI to fit the screen size.
In the Canvas Scaler component of the Canvas GameObject , change UI Scale Mode to Scale With Screen Size . Set Reference Resolution to the sprite resolution of 568 x 384 .
Set Screen Match Mode to Match Width or Height , and Match Value to 0 . Finally, set Reference Pixels Per Unit to 32 .

Now you can fill the screen with the background image.
Select the Image GameObject. Set both PosX and PosY to 0 to center the image, and in the Image component, click Set Native Size .

There you go! Now look at the Game view and change the resolution by selecting various devices from the top-left drop-down selector. You’ll notice the image stays fullscreen because the canvas scaler now knows to maintain its size at bg_title’s resolution!
Add Text Sprites to the Title Screen
Now you have a lovely textured wall, but there are no prompts to tell players what to do next. This is a job for a text sprite!
Create two more images by right-clicking in the Hierarchy , then selecting UI \ Image . Rename the first Image GameObject to TitleText by right-clicking and selecting Rename .
Drag bg _ title _ txt to the Image component’s Source Image .
Rename the second Image GameObject to TouchToStart and then drag bg _ title _ touchtostart to the Image component’s Source Image . Click the Set Native Size button on both Image components. Make sure that both TitleText and TouchToStart are children of Canvas.

Hmmm, that’s not quite right. Seems like a good time to go over repositioning things.

Select the Rect Tool on the toolbar — it allows you to change the position, rotation, scale and dimensions of 2D GameObjects.
Select TitleText and drag it around the selection box in the Scene view, then do the same with TouchToStart until you have something similar to this:

If one of the sprites “disappears” after you drag it around, check the order of GameObjects in the Hierarchy and make sure your screen matches the above screenshot.
Now you’ve got a legitimate title screen!
Note : Alternatively, you can change positioning from each sprite’s Rect transform component. Set a specific value by typing it in or dragging the text of the value you want to adjust.

This is the moment you’ve been waiting for — click the Run button on the Toolbar .
What happens when the game is running? Absolutely nothing! There is nothing to run…yet.
The next task is to allow the player to start the game from the title screen.
Buttons and Scripts
In this section, you’ll create controls and points of interaction on your scene. Here’s where you’ll work with scripting for the first time.
Create a Button
Users naturally look for things to press, tap and swipe, even when you’ve made them non-essential. You should always add a button so the user has no doubts about how to start the game.
Select Image in the Hierarchy, and then click the Add Component button in the Inspector. Select UI \ Button , and then on the newly created Button component, set Transition to None .

Note : Button transitions let you change the look of buttons when they’re pressed, disabled, hovered over or selected. You don’t need any transitions for this title screen, but don’t let that stop you from experimenting with various button transition modes!
Currently, your button is merely an empty shell. You’ll change that by adding a custom script as a component to your canvas GameObject and creating a corresponding script file in the root of the Assets folder.
Select the Canvas GameObject, click Add Component and select New Script . Name it MainMenu , set the language to C Sharp and then click Create and Add .
Find it under Assets in the Project window, drag it to the Scripts folder, and then double-click the script to open it in your code editor.
Change the contents of MainMenu to match the following:
using UnityEngine;
using UnityEngine.SceneManagement;

public class MainMenu : MonoBehaviour {
  void Start() {
  //1
    Application.targetFrameRate = 60;
  }

  //2
  public void GoToGame() {
  //3
    SceneManager.LoadScene("Game");
  }
}
Save the script and take a closer look at what you did:
- In the
Startmethod, you changedApplication.targetFrameRateto60, which limits gameplay to 60 FPS (frames per second). It’s fast enough but helps your game avoid being a battery hog, which could easily happen if you left FPS uncapped. - You added a method named
GoToGame()and made itpublicso you can call it from the button you created earlier. -
SceneManager.LoadScene()loads another scene. In this case, a soon-to-be-created scene named “ Game” .
Save , close the editor and return to Unity.
Giving the Button Something to Call
The Button component needs to call the GoToGame() method.
Select the Image in the Hierarchy. In the Button component, click the + that’s beneath the OnClick() field. Drag the Canvas GameObject to the field named None (Object) . Select MainMenu \ GoToGame() from the drop-down to the right.

Well, that was pretty easy! Now your button calls MainMenu.GoToGame() whenever it’s pressed!
Adding a Game Scene
Start with saving your current scene by going to File \ Save Scene . Afterwards, create a new, empty scene by clicking on File \ New Scene . Save this new scene and put it inside the Assets \ Scenes folder. Name it Game .
Open the MainMenu scene by double-clicking the Assets \ Scenes \ MainMenu scene file in the Project window.
Run the game again and press anywhere on the screen.

Fail! Although you created a new scene, Unity doesn’t know whether to include it in the game or not.
To add it, navigate to File \ Build Settings . Drag the two scenes from the Scenes folder to the Scenes in Build field. If needed, removed other scenes that are added and drag the scenes to show MainMenu above the Game scene. Unity always starts from the top.

Save the scene and run the game again. Click the background and there you go! You’re looking at an awe-inspiring empty scene.
You might notice an issue while clicking things in the title scene. For instance, if you click the PompaDroid Logo or the Touch to Start text, nothing happens.
It’s not really a bug, it’s just that you haven’t walked through making a transition to the game scene. Don’t blame yourself for this one! :]

Just like bouncers keep the rif-raf out of a club, your sprites currently block click events from reaching the background. Your next task is to let the click events pass through.
Uncheck Raycast Target in the Image component of both TitleText and TouchToStart to fix this.
Run again and click the text logo. It now transitions to the game scene! Bug fixed!
Where to Go From Here?
Congratulations, you now have a functional title screen at your disposal! Not bad, especially since you’re probably new to Unity.
At this point, you know how to:
- Set up a new Unity project
- Navigate the Unity editor
- Create a simple scene using Unity’s UI
- And finally, load a new scene
If you enjoyed what you learned in this tutorial, why not check out our complete book, Beat ’Em Up Game Starter Kit – Unity , available on our online store?
What could possibly be a more amusing way to burn time than slaughtering a horde of bad guys with trusty right and left hooks? Creating your very own beat ‘em up game, of course!
Beat ‘em up games have been around since the inception of 8-bit games and experienced their glory days when early console gaming and arcade gaming were all the rage — long before the world turned to pixels in the early part of the 21st century.
In the Unity version of this popular book, we’ll walk you through building a complete beat ’em up game on Unity.
With Unity’s great suite of 2D tools, it’s easy to build a game once and make it available to multiple platforms. The dark days of building for one platform, then painstakingly building your ingenious game on another engine for a different platform are over!
More than a book, this starter kit equips you with the tools, assets, fresh starter projects for each chapter, and step-by-step instructions to create an addictive beat ‘em up game for Android and iOS.
Each chapter builds on the last. You build out features one at a time, allowing you to learn at a steady, logical, and fun pace. Components were designed with reusability in mind so you can easily customize the resulting game.
This starter kit is for beginner to intermediate developers who have at least poked around Unity, perhaps even built a game, but need guidance around how to create a beat ‘em up game.
And even better, the book is on sale as part of our Game On Book Launch event ! But hurry, it’s only on sale until Friday, June 8. Don’t miss out.
If you have any comments or questions about this tutorial, please join in the forum discussion below!
Recommend
About Joyk
Aggregate valuable and interesting links.
Joyk means Joy of geeK