

负载均衡集群介绍、LVS介绍及调度算法、LVS NAT模式搭建-网管的学习之路-51CTO博客
source link: http://blog.51cto.com/754599082/2066629
Go to the source link to view the article. You can view the picture content, updated content and better typesetting reading experience. If the link is broken, please click the button below to view the snapshot at that time.
负载均衡集群介绍
-
实现负载均衡集群的软件有:LVS、keepalived、Nginx、haproxy等。其中LVS属于四层(网络OSI模型);Nginx 属于七层;haproxy既可以认为是四层,也可以当作是七层使用。
-
keepalived 的负载均衡功能其实就是lvs
-
LVS、haproxy这种四层负载均衡可以分发除80端口以外的通信,如mysql-3306;而nginx 仅仅支持http,https,mail。
- 相对来说,LVS 这种四层的更加稳定,能承受更多的请求,而nginx 这种七层的更加灵活,能实现更多的个性化需求。
LVS 介绍
- LVS 是由中国人章文嵩开发的
- 流行度不亚于apache的httpd,基于TCP/IP做的路由和转发,稳定性和效率很高
- LVS 最新版本基于Linux 内核2.6,有好多年不更新了
- LVS 有三种常见的模式:NAT、DR、IP Tunnel
- LVS 架构中有一个核心角色叫做分发器(Load balancer),它用来分发用户的请求,还有诸多处理用户请求的服务器(Real Sever,简称rs)
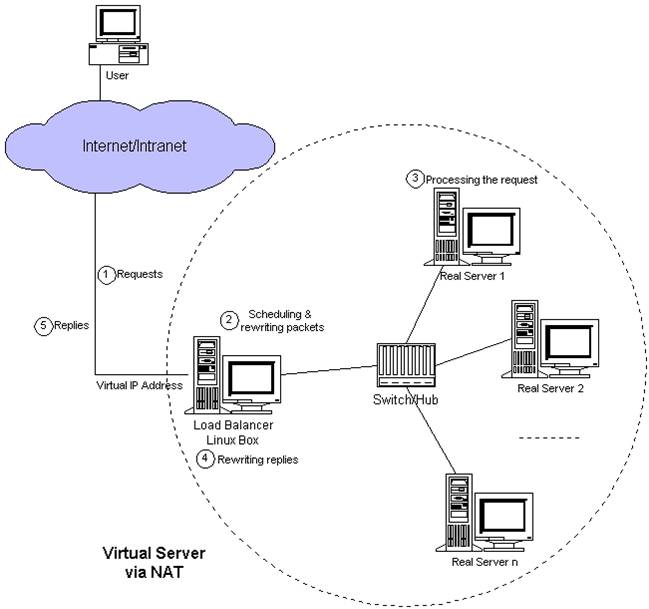
LVS NAT 模式
-
这种模式借助iptables的nat表来实现
-
用户的请求到分发器后,通过预设的iptables规则,把请求的数据包转发到后端的rs上去
-
rs需要设定网关为分发器的内网ip
-
用户请i去的数据包和返回给用户的数据包全部经过分发器,所以分发器成为瓶颈
- 在nat模式中,只需要分发器有公网ip即可,所以比较节省公网ip资源
注意: 该模式中,load balancer 是限制该架构处理用户请求的一个瓶颈,所以该模式比较适合小模式的集群(服务器rs在10台以内);该模式的优势是节省公网资源。
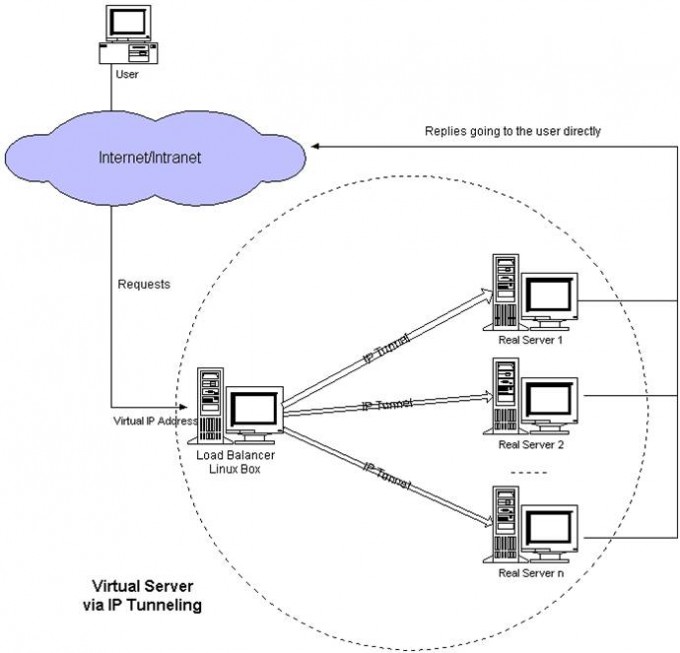
LVS IP Tunnel模式
-
这种模式,需要有一个公共的IP配置在分发器和所有rs上,我们把它叫做vip
-
客户端请求的目标IP为vip,分发器接收到请求数据包后,会对数据包做一个加工,会把目标ip改为rs的IP,这样数据包就到了rs上
- rs接收数据包后,会还原原始数据包,这样目标IP为vip,因为所有rs上配置了这个vip,所以它会认为是它自己
注意: real server通过一个公网IP直接返回到用户,这就省略数据回到load balancer分发器的过程,这样就load balancer就没有瓶颈。
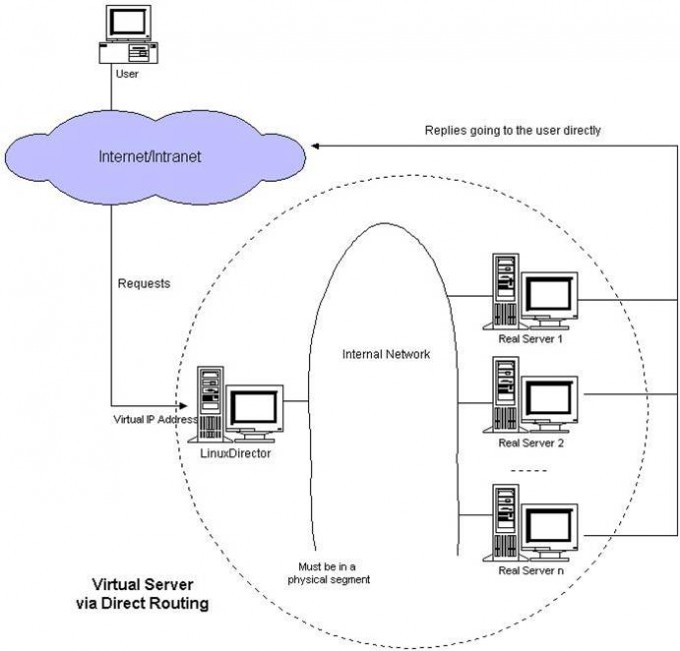
LVS DR 模式
-
这种模式,也需要有一个公共的IP配置在分发器和所有rs上,也就是vip
-
和IP Tunnel不同的是,它会把数据包的MAC地址修改为rs的MAC地址
- rs接收数据包后,会还原原始数据包,这样目标IP 为vip,因为所有rs上配置了这个vip,所以它认为是它自己
LVS 调度算法
-
轮询 Round-Robin rr
- 用户的请求过来,它均衡的将请求分发到rs上,没有优劣之分
-
加权轮询 Weight Round-Robin wrr
- 带权重的轮询,可以对机器单独设置权重,对权重高的机器发送的请求会多一些
-
最小连接 Least-Connection lc
- 把请求发送到请i去数量少的rs上
-
加权最小连接 Weight Least-Connection wlc
- 带权重的最小连接,权重高的优先
-
基于局部性的最小连接 Locality-Based Least Connection lblc
-
带复制的基于局部性最小连接 Locality-Based Least Connections with Replication lblcr
-
目标地址散列调度 Destination Hashing dh
- 源地址散列调度 Source Hashing sh
常用的是前四中算法
LVS NAT模式搭建
是通过iptables 实现
-
准备三台虚拟机
-
分发器 (调度器director)
内网:192.168.159.133,外网:192.168.64.151
-
real server1 (real 1)
内网:192.168.159.131,网关:192.168.159.130
-
real server2 (real 2)
内网:192.168.159.132,网关:192.168.159.130
-
-
关闭三台机器的防火墙
建议使用iptables:
[root@centos04 ~]# systemctl stop firewalld
// 关闭firewalld 防火墙[root@centos04 ~]# systemctl disable firewalld
// 禁止firewalld防火墙开机启动// 此处建议使用iptables
[root@centos04 ~]# yum install -y iptables.service
// 安装iptables.servcie[root@centos04 ~]# systemctl enable iptables
// 设置iptables 开机启动[root@centos04 ~]# systemctl start iptables
// 开启iptables 服务[root@centos04 ~]# iptables -F
// 清空防火墙规则[root@centos04 ~]# service iptables save
// 保存当前规则// 进行该设置的原因是NAT模式是基于防火墙nat表的一种模式,所以会使用iptables规则。
临时关闭selinux
[root@centos04 ~]# getenforce
// 查看selinux状态
// Enforcing 为开启, Permissive 为关闭
[root@centos04 ~]# setenforce 0/1
// 开启、关闭防火墙
// 0为关闭、1为开启永久关闭selinux
[root@centos04 ~]# vim /etc/selinux/config
// 将selinux 由enforcing 改成disabled
配置分发器
-
在dir(分发器)上安装ipvsadm
[root@centos04 ~]# yum install -y ipvsadm
// 这个工具和iptables 有点像
// 如果下载很慢,则进入/etc/yum.repos.d/
// 将epel.repo 重命名,下在完之后改回来 -
在dir(分发器)上编写脚本
[root@centos04 ~]# vim /usr/local/sbin/lvs_nat.sh
#! /bin/bash
// director 服务器上开启路由转发功能
echo 1 > /proc/sys/net/ipv4/ip_forward
// 关闭icmp的重定向
echo 0 > /proc/sys/net/ipv4/conf/all/send_redirects
echo 0 > /proc/sys/net/ipv4/conf/default/send_redirects
// 注意区分网卡名字,我这里的两个网卡分别为ens33和ens37
echo 0 > /proc/sys/net/ipv4/conf/ens33/send_redirects
echo 0 > /proc/sys/net/ipv4/conf/ens37/send_redirects
// director 设置nat防火墙
iptables -t nat -F
iptables -t nat -X
iptables -t nat -A POSTROUTING -s 192.168.64.0/24 -j MASQUERADE
// director设置ipvsadm规则
IPVSADM='/usr/sbin/ipvsadm'
$IPVSADM -C
// -C=clear,清除规则
$IPVSADM -A -t 192.168.64.151:80 -s rr
// -A:=add,添加规则,定义算法的规则;
// -t:分发器ip(外网ip);
// -s 指定算法;
// -p:指定超时时间(解决session问题:保证同一请求被分发到同一rs上)单位为秒。
// 因为添加-p选项后会影响测试效果,所以在此不加该参数(注:时间不能设置为0)
$IPVSADM -a -t 192.168.64.151:80 -r 192.168.159.131:80 -m -w 1
$IPVSADM -a -t 192.168.64.151:80 -r 192.168.159.132:80 -m -w 1
// -a:=add,增加nat架构中的rs;
// -r:指定rs的IP;
// -m:指定LVS模式为NAT(masquerade)
// -w:=weight,指定权重执行脚本:
[root@centos04 ~]# sh /usr/local/sbin/lvs_nat.sh
// 执行该脚本时无错误输出说明没问题。查看ipvsadm规则:
[root@centos04 ~]# ipvsadm -ln
IP Virtual Server version 1.2.1 (size=4096)
Prot LocalAddress:Port Scheduler Flags
-> RemoteAddress:Port Forward Weight ActiveConn InActConn
TCP 192.168.64.151:80 rr
-> 192.168.159.131:80 Masq 1 0 0
-> 192.168.159.132:80 Masq 1 0 0
-
在两台rs上安装Nginx,并分别设置主页来区分两台机器。
[root@localhost ~]# yum install -y nginx
[root@localhost ~]# systemctl start nginx// 如果nginx 是yum安装,其主页目录为 /usr/share/nginx/html/index.html
-
访问外网ip:192.168.64.151
[root@centos04 ~]# curl 192.168.64.151
This is real server 2
[root@centos04 ~]# curl 192.168.64.151
this is real server 1
[root@centos04 ~]# curl 192.168.64.151
This is real server 2
[root@centos04 ~]# curl 192.168.64.151
this is real server 1
Recommend
About Joyk
Aggregate valuable and interesting links.
Joyk means Joy of geeK