

7 Node.js Design Patterns Every Developer Should Know
source link: https://blog.bitsrc.io/nodejs-design-patterns-must-know-8ef0a73b3339
Go to the source link to view the article. You can view the picture content, updated content and better typesetting reading experience. If the link is broken, please click the button below to view the snapshot at that time.
1. Facade

(Source: https://refactoring.guru/design-patterns/facade)
Firstly, it’s important that you understand the Facade pattern. This is very important in Node.js apps.
Simply put, the Facade design pattern simplifies complex subsystems by providing a unified interface.
It acts as a single entry point, hiding all the internal implementation details and promoting easier interaction with the underlying functionalities. It acts as a gateway, shielding clients from intricate details.
For example, the process of logging into a website using a Google account can be considered as a real-world example of a Facade. You only need to click on the “Login with Google” button and it acts as a unified login option.
You don’t need to worry about entering your email, password, or other personal details.
Benefits:
- Simplified Interface: This reduces cognitive load for developers making the interactions with complex systems easy.
- Reduced Coupling: Decoupling client code from internal implementation details can improve code maintainability and flexibility.
- Improved Readability: Encapsulates complex logic within the Facade, making code more organized and understandable.
- Controlled Access: Enable specific rules or validations before accessing the underlying features.
Consider this snippet:
// Complex Module
class ComplexModule {
  initialize() {
    // Complex initialization logic
  }

operation1() {
    // Complex operation 1
  }

operation2() {
    // Complex operation 2
  }
}

// Client Code
const complexModule = new ComplexModule();
complexModule.initialize();
complexModule.operation1();
complexModule.operation2();
The snippet showcases how your app might interact if you added the subsystem communication outside of your module. You’d have to manually execute all of the operations, and you’d likely face issues in maintaining your code.
However, check out this snippet:
// Facade for Complex Module
class ModuleFacade {
  constructor() {
    this.complexModule = new ComplexModule();
  }

performOperations() {
    this.complexModule.initialize();
    this.complexModule.operation1();
    this.complexModule.operation2();
  }
}

// Client Code
const moduleFacade = new ModuleFacade();
moduleFacade.performOperations();
Now, as you can see, we no longer have the sub-module initializations outside of the module, but rather encapsulated in a function performOperations that handles all internal complex sub-system communication.
So you get one clean approach to handle complex communication trees.
To view it’s full implementation, visit here.
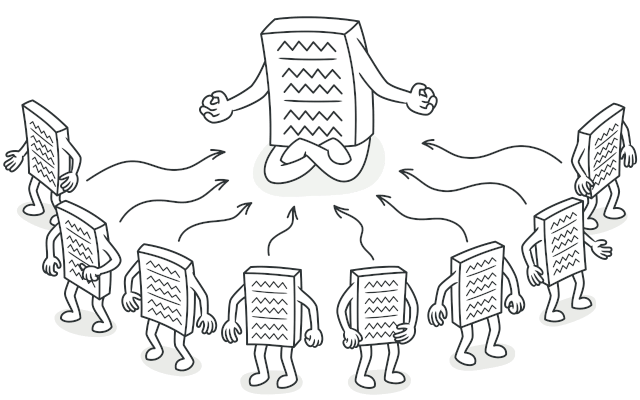
2. Singleton
(Source: https://refactoring.guru/design-patterns/singleton)
Next up, this is one of the patterns that you’ll likely be using every single day of your life until you retire. Sometimes, you’ll need to make sure that you only have one instance of something.
For example, consider a database connection. Do you need more than one database connection to your app at a given time? Can you reuse an existing connection?
That’s where Singleton comes into the picture. It ensures that your class has one global instance that can be accessed using a static method.
Benefits:
- Global Access: A convenient way to access shared data or functionality from anywhere in your application.
- Resource Management: Ensures efficient use of resources like database connections, loggers, or file handles by having only one instance.
- Consistency: Enforces consistent behavior as modifications affect only a single instance.
- Controlled State: Simplifies state management by having a central point for data manipulation.
Here’s how a singleton implementation will look like in Node.js:
class ConfigManager {
  constructor() {
    this.databaseConfig = { /* database configuration */ };
    this.apiKey = "your_api_key";
    // Other application-wide configurations
  }

static getInstance() {
    if (!this.instance) {
      this.instance = new ConfigManager();
    }
    return this.instance;
  }

getDatabaseConfig() {
    return this.databaseConfig;
  }

getApiKey() {
    return this.apiKey;
  }

// Additional methods to retrieve other configurations
}

// Usage
const configManager = ConfigManager.getInstance();

// Accessing configurations
const databaseConfig = configManager.getDatabaseConfig();
const apiKey = configManager.getApiKey();
You might have a Node.js application that interacts with multiple external services, each requiring specific configuration parameters. Using the Singleton pattern, you can create a ConfigManager class responsible for handling these configurations in a centralized manner.
To view it’s full implementation, visit here.
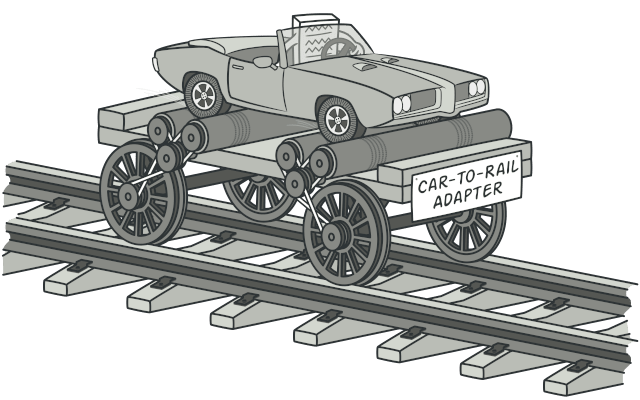
3. Adapter
(Source: https://refactoring.guru/design-patterns/adapter)
Next, you’ll have to imagine a scenario where an API that you’re consuming and a client that you’re working on has an incompatible API.
For example, you might have a React component that accepts two props:
- First Name
- Last Name
But your API returns a variable:
- Full Name
So, if you’re in a position where you don’t have access to update the API Body, you’ll have to work with what you have, and make your app work.
That’s where the adapter pattern comes into the picture.
The Adapter pattern bridges the gap between incompatible interfaces, allowing them to work together seamlessly.
Benefits:
- Interoperability: Enables communication between components with different interfaces, promoting system integration and reuse.
- Loose Coupling: Decouples client code from the concrete implementation of the adapted component, improving flexibility and maintainability.
- Flexibility: Allows adapting new components without modifying existing code by creating new adapters.
- Reusability: The adapter implementation can be reused for similar compatibility needs, reducing code duplication.
Example:
Below, you can find a simple coding example of an Adapter design pattern. To view a full implementation, visit here.
Old system
class OldSystem {
  request() {
    return "Old System Request";
  }
}
New system & Adapter
class NewSystem {
  newRequest() {
    return "New System Request";
  }
}

class Adapter {
  constructor(newSystem) {
    this.newSystem = newSystem;
  }

request() {
    return this.newSystem.newRequest();
  }
}
Client usage
// Using the OldSystem
const oldSystem = new OldSystem();
console.log(oldSystem.request()); // Outputs: Old System Request

// Using the Adapter with the NewSystem
const newSystem = new NewSystem();
const adapter = new Adapter(newSystem);
console.log(adapter.request()); // Outputs: New System Request
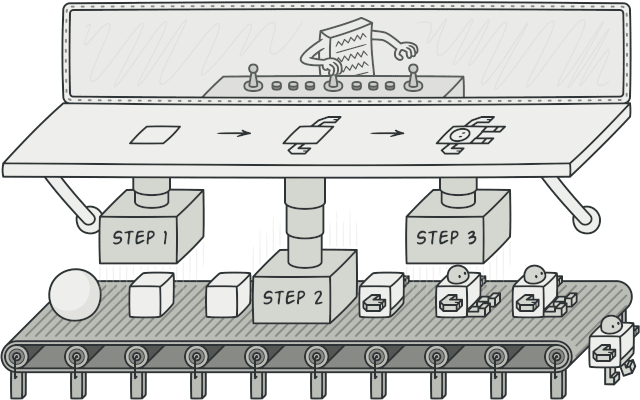
4. Builder
(Source: https://refactoring.guru/design-patterns/builder)
Next, we’re going to be looking a pattern that you can use to construct objects and make object management much easier.
The Builder pattern separates the construction of a complex object from its representation.
It’s like assembling a custom PC — choosing components individually and constructing the final product. In Node.js, the Builder pattern aids in constructing objects with intricate configurations, ensuring a step-by-step, customizable process.
In this design pattern, instead of having a constructor with numerous arguments, you create separate methods (“builders”) for each optional property of the object. These methods often return the current instance of the class (this) to allow chaining them together for building objects incrementally.
Benefits:
- Improved Readability: Clearer code by explicitly setting each property with meaningful method names.
- Flexibility: Construct objects with only the necessary properties, avoiding unexpected values in unused fields.
- Immutability: The
build()method often creates a new instance instead of modifying the builder, promoting immutability and easier reasoning. - Error Handling: It is easier to validate property values and throw errors within builder methods than in a complex constructor.
Example:
Below, you can find a simple coding example of a Builder design pattern. To explore it’s full implementation, visit here.
class UserBuilder {
  constructor(name) {
    this.name = name;
    this.email = null;
    this.address = null;
  }

withEmail(email) {
    this.email = email;
    return this; // Method chaining
  }

withAddress(address) {
    this.address = address;
    return this;
  }

build() {
    // Validate and build the User object
    const user = new User({
      name: this.name,
      email: this.email,
      address: this.address,
    });
    return user;
  }
}

// Client code
const user1 = new UserBuilder('John')
  .withEmail('[email protected]')
  .withAddress('123 Main St.')
  .build();

console.log(user1); // Prints the complete User object with values
5. Factory

(Source: https://refactoring.guru/design-patterns/factory-method)
The Factory pattern provides an interface for creating objects but lets subclasses alter the type of objects created.
Picture it as a manufacturing plant with different assembly lines for producing distinct products. In Node.js, the Factory pattern excels in creating objects without specifying their concrete classes, fostering flexibility and extensibility.
Benefits:
- Decoupling: Client code is decoupled from specific object creation logic, promoting flexibility and maintainability.
- Centralized Control: You can easily add new object types or modify existing ones without affecting client code, as long as the Factory handles the changes.
- Flexibility: The Factory can choose the appropriate object based on runtime conditions or configuration, making your code more adaptable.
- Encapsulation: Object creation details are hidden within the Factory, improving code readability and maintainability.
Example:
Below, you can find a simple coding example of a Factory design pattern. Visit here for more coding examples.
Shape Interface
// Shape interface
class Shape {
  draw() {}
}
Concrete shapes
// Concrete implementations of the Shape interface
class Circle extends Shape {
  draw() {
    console.log("Drawing Circle");
  }
}

class Square extends Shape {
  draw() {
    console.log("Drawing Square");
  }
}

class Triangle extends Shape {
  draw() {
    console.log("Drawing Triangle");
  }
}
Shape factory
// ShapeFactory class responsible for creating instances of shapes
class ShapeFactory {
  createShape(type) {
    switch (type) {
      case 'circle':
        return new Circle();
      case 'square':
        return new Square();
      case 'triangle':
        return new Triangle();
      default:
        throw new Error('Invalid shape type');
    }
  }
}
Client code
// Client code using the ShapeFactory to create shapes
const shapeFactory = new ShapeFactory();

const circle = shapeFactory.createShape('circle');
circle.draw(); // Outputs: Drawing Circle

const square = shapeFactory.createShape('square');
square.draw(); // Outputs: Drawing Square

const triangle = shapeFactory.createShape('triangle');
triangle.draw(); // Outputs: Drawing Triangle
6. Prototype
(Source: https://refactoring.guru/design-patterns/prototype)
The Prototype pattern involves creating new objects by copying an existing object, known as the prototype.
It creates duplicates of a master key. It’s useful when creating an object is more expensive than copying an existing one.
Concept:
- Prototype: Define a base object with desired properties and methods. This serves as the blueprint for subsequent objects.
- Cloning: You create new objects by copying the prototype, often using built-in methods like
Object.createor custom cloning logic. - Customization: The newly created objects can have their individual properties modified without affecting the original prototype.
Benefits:
- Performance: Cloning existing objects is generally faster than constructing new ones from scratch, especially for complex objects.
- Memory Efficiency: By sharing properties and methods through the prototype, you avoid redundant storage, reducing memory usage.
- Dynamic Modifications: You can easily extend the prototype later to add new functionalities to all existing and future instances.
Example:
Below, you can find a simple coding example of a Prototype design pattern. Visit here for more coding examples.
Prototype object
// Prototype object
const animalPrototype = {
  type: 'unknown',
  makeSound: function () {
    console.log('Some generic sound');
  },
  clone: function () {
    return Object.create(this); // Using Object.create() for cloning
  },
};
Customize instance
// Custom instances based on the prototype
const dog = animalPrototype.clone();
dog.type = 'Dog';
dog.makeSound = function () {
  console.log('Woof!');
};

const cat = animalPrototype.clone();
cat.type = 'Cat';
cat.makeSound = function () {
  console.log('Meow!');
};
Client code
// Client code using the customized instances
dog.makeSound(); // Outputs: Woof!
cat.makeSound(); // Outputs: Meow!
7. Proxy

(Source: https://refactoring.guru/design-patterns/proxy)
The Proxy pattern serves as a surrogate or placeholder for another object, controlling access to it.
This creates an intermediary object (“proxy”) that stands between a client and a real object. This proxy controls access to the real object, potentially intercepting and modifying operations before or after they reach the target.
This allows you to add additional functionalities without directly altering the real object’s implementation. The Proxy pattern is instrumental for lazy loading, access control, or adding logging/debugging features.
To gain a better understanding of the Proxy Design Pattern and its use cases in the React environment, check this out:
Benefits:
- Controlled Access: Enforce permissions or validation before interacting with the real object.
- Additional Functionality: Add features like logging, caching, or security without changing the object itself.
- Abstraction: Simplify client code by hiding the real object’s implementation details.
- Flexibility: Dynamically change the target object or handler behavior at runtime.
Example:
Below, you can find a simple coding example of the Proxy design pattern, and for more coding examples visit here.
In all of these examples, I used the JavaScript Proxy object to create proxies for other objects. To get a more in-depth understanding of the JavaScript inbuilt Proxy, you can visit here.
const target = {
  name: 'Alice',
  sayHello() {
    console.log(Hello, my name is ${this.name} );
  },
};

const handler = {
  get(target, prop, receiver) {
    console.log(Property ${prop} accessed );
    return Reflect.get(target, prop, receiver);
  },
  set(target, prop, value, receiver) {
    console.log(Property ${prop} set to ${value} );
    return Reflect.set(target, prop, value, receiver);
  },
};

const proxy = new Proxy(target, handler);

proxy.name; // Output: Property name accessed
proxy.sayHello(); // Output: Property sayHello accessed
                  //        Hello, my name is Alice
proxy.name = 'Bob'; // Output: Property name set to Bob
Concluding Thoughts
Design patterns are important for every developer to learn. Whether you’re a beginner or an expert, it’s important that you understand design patterns and its use in modern software development as it lets you build better software, quicker.
If you wish to check out the code we covered, checkout this Bit Scope I’ve implemented.
Thank you for reading.
Recommend
About Joyk
Aggregate valuable and interesting links.
Joyk means Joy of geeK