

Build a spreadsheet app with an AI-copilot (Next.js, gpt4, LangChain, & Copi...
source link: https://dev.to/copilotkit/build-an-ai-powered-spreadsheet-app-nextjs-langchain-copilotkit-109d
Go to the source link to view the article. You can view the picture content, updated content and better typesetting reading experience. If the link is broken, please click the button below to view the snapshot at that time.
TL;DR
In this article, you'll learn how to build an AI-powered spreadsheet application that allows you to perform various accounting functions and interact with data easily using plain English commands.
We'll cover how to:
- build web applications with Next.js,
- create spreadsheet applications with React Spreadsheet, and
- integrate AI into software applications with CopilotKit.
- Make spreadsheets easier to use and more enjoyable

CopilotKit: The framework for building in-app AI copilots
CopilotKit is an open-source AI copilot platform. We make it easy to integrate powerful AI into your React apps.
Build:
- ChatBot: Context-aware in-app chatbots that can take actions in-app 💬
- CopilotTextArea: AI-powered textFields with context-aware autocomplete & insertions 📝
- Co-Agents: In-app AI agents that can interact with your app & users 🤖

(Forgive the AI's spelling mistakes and star CopilotKit :)
Now back to the article!
Prerequisites
To fully understand this tutorial, you need to have a basic understanding of React or Next.js.
Here are the tools required to build the AI-powered spreadsheet application:
- React Spreadsheet - a simple package that enables us to add spreadsheets within React applications.
- OpenAI API - provides an API key that enables us to carry out various tasks using ChatGPT models.
- Tavily AI - a search engine that enables AI agents to conduct research and access real-time knowledge within the application.
- CopilotKit - an open-source copilot framework for building custom AI chatbots, in-app AI agents, and text areas.
Project Set up and Package Installation
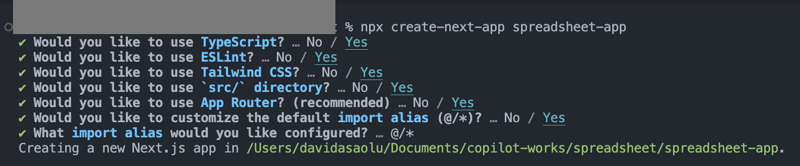
First, create a Next.js application by running the code snippet below in your terminal:
npx create-next-app spreadsheet-app
Select your preferred configuration settings. For this tutorial, we'll be using TypeScript and Next.js App Router.
Next, install the OpenAI library, Heroicons, and the React Spreadsheet package along with its dependencies:
npm install openai react-spreadsheet scheduler @heroicons/react
Finally, install the CopilotKit packages. These packages enable us to retrieve data from the React state and add AI copilot to the application.
npm install @copilotkit/react-ui @copilotkit/react-textarea @copilotkit/react-core @copilotkit/backend
Congratulations! You're now ready to build the application.
Building the Spreadsheet application
In this section, I'll walk you through building the spreadsheet application with React Spreadsheet.
The application is divided into two components: the Sidebar and the SingleSpreadsheet.
To set up these components, navigate to the Next.js app folder and create a components folder containing these files:
cd app
mkdir components && cd components
touch Sidebar.tsx SingleSpreadsheet.tsx

Import the newly created components into the app/page.tsx file.
"use client";
import React, { useState } from "react";
//👇🏻 import the components
import { SpreadsheetData } from "./types";
import Sidebar from "./components/Sidebar";
import SingleSpreadsheet from "./components/SingleSpreadsheet";

const Main = () => {
    return (
        <div className='flex'>
            <p>Hello world</p>
        </div>
    );
};
export default Main;
Next, create the React states that will contain the spreadsheet data, and pass them as props into the components.
const Main = () => {
    //👇🏻 holds the title and data within a spreadsheet
    const [spreadsheets, setSpreadsheets] = React.useState<SpreadsheetData[]>([
        {
            title: "Spreadsheet 1",
            data: [
                [{ value: "" }, { value: "" }, { value: "" }],
                [{ value: "" }, { value: "" }, { value: "" }],
                [{ value: "" }, { value: "" }, { value: "" }],
            ],
        },
    ]);

    //👇🏻 represents the index of a spreadsheet
    const [selectedSpreadsheetIndex, setSelectedSpreadsheetIndex] = useState(0);

    return (
        <div className='flex'>
            <Sidebar
                spreadsheets={spreadsheets}
                selectedSpreadsheetIndex={selectedSpreadsheetIndex}
                setSelectedSpreadsheetIndex={setSelectedSpreadsheetIndex}
            />
            <SingleSpreadsheet
                spreadsheet={spreadsheets[selectedSpreadsheetIndex]}
                setSpreadsheet={(spreadsheet) => {
                    setSpreadsheets((prev) => {
                        console.log("setSpreadsheet", spreadsheet);
                        const newSpreadsheets = [...prev];
                        newSpreadsheets[selectedSpreadsheetIndex] = spreadsheet;
                        return newSpreadsheets;
                    });
                }}
            />
        </div>
    );
};
The code snippet creates React states that hold the spreadsheet data and its index and pass them as props into the components.
The Sidebar component accepts all the available spreadsheets, and the SingleSpreadsheet component receives all the spreadsheets, including the setSpreadsheet function that updates the spreadsheet data.
Copy the code snippet below into the Sidebar.tsx file. It displays all the spreadsheets within the application and allows users to switch between them.
import React from "react";
import { SpreadsheetData } from "../types";

interface SidebarProps {
    spreadsheets: SpreadsheetData[];
    selectedSpreadsheetIndex: number;
    setSelectedSpreadsheetIndex: (index: number) => void;
}

const Sidebar = ({
    spreadsheets,
    selectedSpreadsheetIndex,
    setSelectedSpreadsheetIndex,
}: SidebarProps) => {
    return (
        <div className='w-64 h-screen bg-gray-800 text-white overflow-auto p-5'>
            <ul>
                {spreadsheets.map((spreadsheet, index) => (
                    <li
                        key={index}
                        className={`mb-4 cursor-pointer ${
                            index === selectedSpreadsheetIndex
                                ? "ring-2 ring-blue-500 ring-inset p-3 rounded-lg"
                                : "p-3"
                        }`}
                        onClick={() => setSelectedSpreadsheetIndex(index)}
                    >
                        {spreadsheet.title}
                    </li>
                ))}
            </ul>
        </div>
    );
};

export default Sidebar;

Update the SingleSpreadsheet.tsx file as shown below:
import React from "react";
import Spreadsheet from "react-spreadsheet";
import { SpreadsheetData, SpreadsheetRow } from "../types";

interface MainAreaProps {
    spreadsheet: SpreadsheetData;
    setSpreadsheet: (spreadsheet: SpreadsheetData) => void;
}

//👇🏻 adds a new row to the spreadsheet
const addRow = () => {
    const numberOfColumns = spreadsheet.rows[0].length;
    const newRow: SpreadsheetRow = [];
    for (let i = 0; i < numberOfColumns; i++) {
        newRow.push({ value: "" });
    }
    setSpreadsheet({
        ...spreadsheet,
        rows: [...spreadsheet.rows, newRow],
    });
};

//👇🏻 adds a new column to the spreadsheet
const addColumn = () => {
    const spreadsheetData = [...spreadsheet.data];
    for (let i = 0; i < spreadsheet.data.length; i++) {
        spreadsheet.data[i].push({ value: "" });
    }
    setSpreadsheet({
        ...spreadsheet,
        data: spreadsheetData,
    });
};

const SingleSpreadsheet = ({ spreadsheet, setSpreadsheet }: MainAreaProps) => {
    return (
        <div className='flex-1 overflow-auto p-5'>
            {/** -- Spreadsheet title ---*/}

            <div className='flex items-start'>
                {/** -- Spreadsheet rows and columns---*/}
                {/** -- Add column button ---*/}
            </div>

            {/** -- Add row button ---*/}
        </div>
    );
};

export default SingleSpreadsheet;
From the code snippet above,
- The
SingleSpreadsheet.tsxfile includes the addRow and addColumn functions. - The
addRowfunction calculates the current number of rows, adds a new row, and updates the spreadsheet accordingly. - Similarly, the
addColumnfunction adds a new column to the spreadsheet. - The
SingleSpreadsheetcomponent renders placeholders for the user interface elements.
- The
Update the SingleSpreadsheet component to render the spreadsheet title, its data, and the add row and column buttons.
return (
    <div className='flex-1 overflow-auto p-5'>
        {/** -- Spreadsheet title ---*/}
        <input
            type='text'
            value={spreadsheet.title}
            className='w-full p-2 mb-5 text-center text-2xl font-bold outline-none bg-transparent'
            onChange={(e) =>
                setSpreadsheet({ ...spreadsheet, title: e.target.value })
            }
        />
        {/** -- Spreadsheet rows and columns---*/}
        <div className='flex items-start'>
            <Spreadsheet
                data={spreadsheet.data}
                onChange={(data) => {
                    console.log("data", data);
                    setSpreadsheet({ ...spreadsheet, data: data as any });
                }}
            />
            {/** -- Add column button ---*/}
            <button
                className='bg-blue-500 text-white rounded-lg ml-6 w-8 h-8 mt-0.5'
                onClick={addColumn}
            >
                +
            </button>
        </div>
        {/** -- Add row button ---*/}
        <button
            className='bg-blue-500 text-white rounded-lg w-8 h-8 mt-5 '
            onClick={addRow}
        >
            +
        </button>
    </div>
);
To ensure everything works as expected, create a types.ts file within the app folder containing all the static types declared within the application.
export interface Cell {
  value: string;
}

export type SpreadsheetRow = Cell[];

export interface SpreadsheetData {
  title: string;
  rows: SpreadsheetRow[];
}
Congratulations! 🎉 Your spreadsheet application should be working perfectly. In the upcoming sections, you'll learn how to add an AI copilot that automates various tasks using CopilotKit.
Improving the App Functionalities with CopilotKit
Here, you'll learn how to add an AI copilot to the spreadsheet application to automate and perform complex actions using CopilotKit.
CopilotKit offers both frontend and backend packages. They enable you to plug into the React states and process application data on the backend using AI agents.
First, let's add the CopilotKit React components to the application frontend.
Adding CopilotKit to the Frontend
Within the app/page.tsx, add the code snippet below at the top of the Main component.
import "@copilotkit/react-ui/styles.css";
import { CopilotKit } from "@copilotkit/react-core";
import { CopilotSidebar } from "@copilotkit/react-ui";
import { INSTRUCTIONS } from "./instructions";
const HomePage = () => {
return (
<CopilotKit url='/api/copilotkit'>
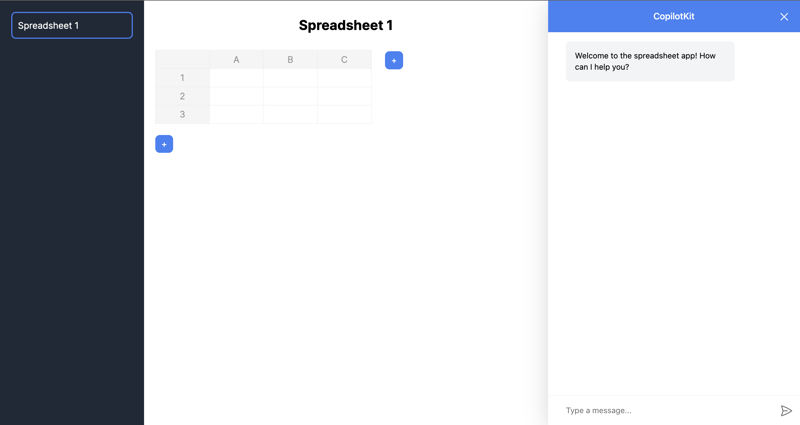
<CopilotSidebar
instructions={INSTRUCTIONS}
labels={{
initial: "Welcome to the spreadsheet app! How can I help you?",
}}
defaultOpen={true}
clickOutsideToClose={false}
>
<Main />
</CopilotSidebar>
</CopilotKit>
);
};
const Main = () => {
//--- Main component //
};
export default HomePage;
From the code snippet above,
- I imported the CopilotKit, its sidebar component, and CSS file to use its frontend components within the application.
- The CopilotKit component accepts a
urlprop that represents the API server route where CopilotKit will be configured. - The Copilot component also renders the CopilotSidebar component , allowing users to provide custom instructions to the AI copilot within the application.
- Lastly, you can export the
HomePagecomponent containing theCopilotSidebarand theMaincomponents.
From the code snippet above, you'll notice that the CopilotSidebar component has an instructions prop. This prop enables you to provide additional context or guidance to CopilotKit.
Therefore, create an instructions.ts file within the app folder and copy these commands into the file.
Next, you need to plug CopilotKit into the application's state to access the application's data. To achieve this, CopilotKit provides two hooks: useCopilotAction and useMakeCopilotReadable.
The useCopilotAction hook allows you to define actions to be carried out by CopilotKit. It accepts an object containing the following parameters:
-
name- the action's name. -
description- the action's description. -
parameters- an array containing the list of the required parameters. -
render- the default custom function or string. -
handler- the executable function that is triggered by the action.
useCopilotAction({
    name: "sayHello",
    description: "Say hello to someone.",
    parameters: [
        {
            name: "name",
            type: "string",
            description: "name of the person to say greet",
        },
    ],
    render: "Process greeting message...",
    handler: async ({ name }) => {
        alert(`Hello, ${name}!`);
    },
});
The useMakeCopilotReadable hook provides the application state to CopilotKit.
import { useMakeCopilotReadable } from "@copilotkit/react-core";

const appState = ...;
useMakeCopilotReadable(JSON.stringify(appState));
Now, let's return to our spreadsheet application. In the SingleSpreadsheet component, pass the application state into CopilotKit as shown below.
import {
    useCopilotAction,
    useMakeCopilotReadable,
} from "@copilotkit/react-core";

const SingleSpreadsheet = ({ spreadsheet, setSpreadsheet }: MainAreaProps) => {
    //👇🏻 hook for providing the application state
    useMakeCopilotReadable(
        "This is the current spreadsheet: " + JSON.stringify(spreadsheet)
    );

    // --- other lines of code
};
Next, you need to add two actions to the SingleSpreadsheet component that runs when a user updates the spreadsheet’s data and adds a new row of data using CopilotKit.
Before we proceed, create a utils folder containing a canonicalSpreadsheetData.ts file within the app folder.
cd app
mkdir utils && cd utils
touch canonicalSpreadsheetData.ts
Copy the code snippet below into the file. It accepts the updates made to the spreadsheet and converts them to the required format for rows of data within the spreadsheet.
import { SpreadsheetRow } from "../types"

export interface RowLike {
    cells: CellLike[] | undefined;
}

export interface CellLike {
    value: string;
}

export function canonicalSpreadsheetData(
    rows: RowLike[] | undefined
): SpreadsheetRow[] {
    const canonicalRows: SpreadsheetRow[] = [];

    for (const row of rows || []) {
        const canonicalRow: SpreadsheetRow = [];
        for (const cell of row.cells || []) {
            canonicalRow.push({value: cell.value});
        }
        canonicalRows.push(canonicalRow);
    }

    return canonicalRows;
}
Now, let’s create the actions using the useCopilotAction hook within the SingleSpreadsheet component. Copy the first action below:
import { canonicalSpreadsheetData } from "../utils/canonicalSpreadsheetData";
import { PreviewSpreadsheetChanges } from "./PreviewSpreadsheetChanges";
import { SpreadsheetData, SpreadsheetRow } from "../types";
import { useCopilotAction } from "@copilotkit/react-core";

  useCopilotAction({
    name: "suggestSpreadsheetOverride",
    description: "Suggest an override of the current spreadsheet",
    parameters: [
      {
        name: "rows",
        type: "object[]",
        description: "The rows of the spreadsheet",
        attributes: [
          {
            name: "cells",
            type: "object[]",
            description: "The cells of the row",
            attributes: [
              {
                name: "value",
                type: "string",
                description: "The value of the cell",
              },
            ],
          },
        ],
      },
      {
        name: "title",
        type: "string",
        description: "The title of the spreadsheet",
        required: false,
      },
    ],
    render: (props) => {
      const { rows } = props.args
      const newRows = canonicalSpreadsheetData(rows);

      return (
        <PreviewSpreadsheetChanges
          preCommitTitle="Replace contents"
          postCommitTitle="Changes committed"
          newRows={newRows}
          commit={(rows) => {
            const updatedSpreadsheet: SpreadsheetData = {
              title: spreadsheet.title,
              rows: rows,
            };
            setSpreadsheet(updatedSpreadsheet);
          }}
        />
      )
    },
    handler: ({ rows, title }) => {
      // Do nothing.
      // The preview component will optionally handle committing the changes.
    },
  });
The code snippet above executes the user’s task and displays a preview of the result using the CopilotKit generative UI feature. The suggestSpreadsheetOverride action returns a custom component (PreviewSpreadsheetChanges) that accepts the following as props:
- the new rows of data to be added to the spreadsheet,
- some texts -
preCommitTitleandpostCommitTitle, and - a
commitfunction that updates the spreadsheet.
You’ll learn how to use them shortly.
Create the PreviewSpreadsheetChanges component within the components folder and copy the code snippet below into the file:
import { CheckCircleIcon } from '@heroicons/react/20/solid'
import { SpreadsheetRow } from '../types';
import { useState } from 'react';
import Spreadsheet from 'react-spreadsheet';

export interface PreviewSpreadsheetChanges {
  preCommitTitle: string;
  postCommitTitle: string;
  newRows: SpreadsheetRow[];
  commit: (rows: SpreadsheetRow[]) => void;
}

export function PreviewSpreadsheetChanges(props: PreviewSpreadsheetChanges) {
  const [changesCommitted, setChangesCommitted] = useState(false);

  const commitChangesButton = () => {
    return (
      <button
        className="inline-flex items-center gap-x-2 rounded-md bg-indigo-600 px-3.5 py-2.5 text-sm font-semibold text-white shadow-sm hover:bg-indigo-500 focus-visible:outline focus-visible:outline-2 focus-visible:outline-offset-2 focus-visible:outline-indigo-600"
        onClick={() => {
          props.commit(props.newRows);
          setChangesCommitted(true);
        }}
      >
        {props.preCommitTitle}
      </button>
    );
  }

  const changesCommittedButtonPlaceholder = () => {
    return (
      <button
        className=" inline-flex items-center gap-x-2 rounded-md bg-gray-100 px-3.5 py-2.5 text-sm font-semibold text-green-600 shadow-sm cursor-not-allowed"
        disabled
      >
        {props.postCommitTitle}
        <CheckCircleIcon className="-mr-0.5 h-5 w-5" aria-hidden="true" />
      </button>
    );
  }

  return (
    <div className="flex flex-col">
      <Spreadsheet
        data={props.newRows}
      />

      <div className="mt-5">
        {changesCommitted ? changesCommittedButtonPlaceholder() :  commitChangesButton() }
      </div>

    </div>
  );
}
The PreviewSpreadsheetChanges component returns a spreadsheet containing the data generated from a request and a button (with the preCommitTitle text) that allows you to commit these changes to the main spreadsheet table (by triggering the commit function). This ensures you are satisfied with the result before adding it to the spreadsheet.
Add the second action below to the SingleSpreadsheet component.
  useCopilotAction({
    name: "appendToSpreadsheet",
    description: "Append rows to the current spreadsheet",
    parameters: [
      {
        name: "rows",
        type: "object[]",
        description: "The new rows of the spreadsheet",
        attributes: [
          {
            name: "cells",
            type: "object[]",
            description: "The cells of the row",
            attributes: [
              {
                name: "value",
                type: "string",
                description: "The value of the cell",
              },
            ],
          },
        ],
      },
    ],
    render: (props) => {
      const status = props.status;
      const { rows } = props.args
      const newRows = canonicalSpreadsheetData(rows);
      return (
        <div>
          <p>Status: {status}</p>
          <Spreadsheet
            data={newRows}
          />
        </div>
      )
    },
    handler: ({ rows }) => {
      const canonicalRows = canonicalSpreadsheetData(rows);
      const updatedSpreadsheet: SpreadsheetData = {
        title: spreadsheet.title,
        rows: [...spreadsheet.rows, ...canonicalRows],
      };
      setSpreadsheet(updatedSpreadsheet);
    },
  });
The appendToSpreadsheet action updates the spreadsheet by adding the new rows of data to it.
Here is a short demo of the actions:
[https://www.youtube.com/watch?v=kGQ9xl5mSoQ]
Finally, add an action within the Main component that creates a new Spreadsheet when the user provides the instruction.
useCopilotAction({
    name: "createSpreadsheet",
    description: "Create a new  spreadsheet",
    parameters: [
      {
        name: "rows",
        type: "object[]",
        description: "The rows of the spreadsheet",
        attributes: [
          {
            name: "cells",
            type: "object[]",
            description: "The cells of the row",
            attributes: [
              {
                name: "value",
                type: "string",
                description: "The value of the cell",
              },
            ],
          },
        ],
      },
      {
        name: "title",
        type: "string",
        description: "The title of the spreadsheet",
      },
    ],
    render: (props) => {
      const { rows, title } = props.args;
      const newRows = canonicalSpreadsheetData(rows);

      return (
        <PreviewSpreadsheetChanges
          preCommitTitle="Create spreadsheet"
          postCommitTitle="Spreadsheet created"
          newRows={newRows}
          commit={ (rows) => {
            const newSpreadsheet: SpreadsheetData = {
              title: title || "Untitled Spreadsheet",
              rows: rows,
            };
            setSpreadsheets((prev) => [...prev, newSpreadsheet]);
            setSelectedSpreadsheetIndex(spreadsheets.length);
          }}
        />
      );
    },
    handler: ({ rows, title }) => {
      // Do nothing.
      // The preview component will optionally handle committing the changes.
    },
  });
Congratulations! You've successfully created the required actions for this application. Now, let's connect the application to the Copilotkit backend.
Adding Tavily AI and OpenAI to CopilotKit
At the beginning of this tutorial, I introduced you to the Tavily AI - a search engine that provides knowledge to AI agents, and OpenAI - a library that enables us to access the GPT-4 AI model.
In this section, you'll learn how to get the Tavily and OpenAI API keys and integrate them into CopilotKit to build advanced and intelligent applications.
Visit the Tavily AI website, create an account, and copy your API key into a .env.local file for your project.

Next, navigate to the OpenAI Developers' Platform, create an API key, and copy it into the .env.local file.

Below is a preview of the .env.local file, which includes the API keys and specifies the OpenAI model to be used. Please note that access to the GPT-4 model requires a ChatGPT Plus subscription.
TAVILY_API_KEY=<your_API_key>
OPENAI_MODEL=gpt-4-1106-preview
OPENAI_API_KEY=<your_API_key>
Back to our application, you need to create an API route for Copilot. Therefore, create anapi/copilotkitfolder containing aroute.ts and add a tavily.ts file.
cd app
mkdir api && cd api
mkdir copilotkit && cd copilotkit
touch route.ts tavily.ts
Create a function within the tavily.ts file that accepts the user's query, conducts research with the query using the Tavily Search API, and summarizes the result using the OpenAI GPT-4 model.
import OpenAI from "openai";

export async function research(query: string) {
    //👇🏻 sends the request to the Tavily Search API
    const response = await fetch("https://api.tavily.com/search", {
        method: "POST",
        headers: {
            "Content-Type": "application/json",
        },
        body: JSON.stringify({
            api_key: process.env.TAVILY_API_KEY,
            query,
            search_depth: "basic",
            include_answer: true,
            include_images: false,
            include_raw_content: false,
            max_results: 20,
        }),
    });
    //👇🏻 the response
    const responseJson = await response.json();
    const openai = new OpenAI({ apiKey: process.env.OPENAI_API_KEY! });

    //👇🏻 passes the response into the OpenAI GPT-4 model
    const completion = await openai.chat.completions.create({
        messages: [
            {
                role: "system",
                content: `Summarize the following JSON to answer the research query \`"${query}"\`: ${JSON.stringify(
                    responseJson
                )} in plain English.`,
            },
        ],
        model: process.env.OPENAI_MODEL,
    });

    //👇🏻 returns the result
    return completion.choices[0].message.content;
}
Finally, you can execute the research function within the route.ts file by passing the user's query into the function and providing its response to CopilotKit.
import { CopilotBackend, OpenAIAdapter } from "@copilotkit/backend";
import { Action } from "@copilotkit/shared";
import { research } from "./tavily";

//👇🏻 carries out a research on the user's query
const researchAction: Action<any> = {
    name: "research",
    description: "Call this function to conduct research on a certain query.",
    parameters: [
        {
            name: "query",
            type: "string",
            description:
                "The query for doing research. 5 characters or longer. Might be multiple words",
        },
    ],
    handler: async ({ query }) => {
        console.log("Research query: ", query);
        const result = await research(query);
        console.log("Research result: ", result);
        return result;
    },
};

export async function POST(req: Request): Promise<Response> {
    const actions: Action<any>[] = [];
    if (process.env.TAVILY_API_KEY!) {
        actions.push(researchAction);
    }
    const copilotKit = new CopilotBackend({
        actions: actions,
    });

    const openaiModel = process.env.OPENAI_MODEL;

    return copilotKit.response(req, new OpenAIAdapter({ model: openaiModel }));
}
Congratulations! You’ve completed the project for this tutorial.
Conclusion
CopilotKit is an incredible tool that allows you to add AI Copilots to your products within minutes. Whether you're interested in AI chatbots and assistants or automating complex tasks, CopilotKit makes it easy.
If you need to build an AI product or integrate an AI tool into your software applications, you should consider CopilotKit.
You can find the source code for this tutorial on GitHub:
https://github.com/CopilotKit/spreadsheet-demo
Thank you for reading!
Recommend
About Joyk
Aggregate valuable and interesting links.
Joyk means Joy of geeK