

Waking my computer from afar
source link: https://bernsteinbear.com/blog/wakeonlan/?
Go to the source link to view the article. You can view the picture content, updated content and better typesetting reading experience. If the link is broken, please click the button below to view the snapshot at that time.
I have a desktop computer at home with a decent CPU and GPU and RAM and all that. I use it when I need to do Beefy Processing Things like compiling LLVM or when I want to save battery on my laptop. I like leaving it in hibernation mode to save power, but sometimes I forget to wake it up on a day that I might need it from the library or something. For that, I need to be able to wake it up remotely.
wakeonlan
Fortunately, some smart folks thought of this years ago and came up with Wake on LAN. There are tools such as etherwake and wakeonlan that can send a magic packet to the computer’s network controller and wake up a sleeping machine. That’s fantastic, except:
- Sometimes I leave the house, which (because of NAT) means I cannot easily send the computer a packet. I could probably find a way to get my router to notice the packet coming from WAN and forward it appropriately, but… eh1.
- I could probably SSH into my router and send the appropriate packet, but installing tools on my router, even though it’s running OpenWRT, is kind of irritating.
So I need to find a way to get the packet to come from inside the house and not from my router. Sounds like a great excuse to buy a low-power computer and use that as a bastion host. I decided to buy a Raspberry Pi Zero 2 W, but that’s because it was reasonably priced and available with a short walk.
A very small server
After some nonsense2 setting up the Pi, I managed to SSH into it and send a WoL packet. Nice! But I also have to be able to access the SSH server from outside the house. Instead of setting up port forwarding or OpenVPN on my router, I added the Pi to my Tailscale network (no, this is not an ad; just happy), which was pretty painless.
cedar% ssh raspberrypi
max@raspberrypi:~ $ wakeonlan MY:MA:CA:DD:RE:SS
max@raspberrypi:~ $ ^D
cedar%
Then I remembered some of our old college apartment infrastructure and realized I should probably have a webpage as well. It would be neat to be able to open a page on my laptop or phone and wake my desktop from its slumber.
Because I wanted to write as little code and infrastructure as possible, this is served via Busybox httpd.
$ /usr/bin/busybox httpd -vv -p 80 -c /home/max/httpd.conf -f
...
The configuration file just sets index.html as the default directory index
page and sets the root directory.
When I click one of the buttons, it sends a request to—yes, you guessed it—a CGI handler. It’s very small, and could even be smaller if I didn’t log error output. For example, here is the wake handler:
#!/usr/bin/env python3
import subprocess
print("Content-Type: text/html")
print()
result = subprocess.run(["wakeonlan", "MY:MA:CA:DD:RE:SS"], capture_output=True)
if result.returncode != 0:
    print("<pre>")
    print("stderr:", result.stderr.decode('utf-8'))
    print("stdout:", result.stdout.decode('utf-8'))
    print("</pre>")
else:
    print("He has risen")
Because I didn’t want to have to hit the back button and also vaguely remembered an interesting snippet of code I saw on lobste.rs recently, I decided to use HTMZ to inject this CGI-printed response into the original page3.
<!DOCTYPE html>
<html>
<body>
<form target=htmz>
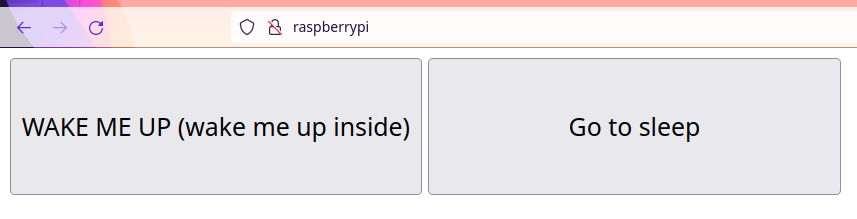
<button formaction="/cgi-bin/wake.cgi#wake-response">WAKE ME UP (wake me up inside)</button>
<button formaction="/cgi-bin/sleep.cgi#wake-response">Go to sleep</button>
</form>
<div id="wake-response"></div>
<iframe hidden name=htmz onload="setTimeout(()=>document.querySelector(contentWindow.location.hash||null)?.replaceWith(...contentDocument.body.childNodes))"></iframe>
</body>
</html>
This means that when I click the “WAKE ME UP” button, I see what happened right
beneath the buttons. And I didn’t even have to write any JS or do any
presentation logic inside the CGI handler; the HTMZ handled it for me using the
hash link in the formaction.
Systems administration
Because I want this server to come up without any manual intervention, I set up
a systemd service for it. Instead of fiddling around with the services in
/etc that require root, I instead made a user service. This means that the
service only has my privileges and I don’t need to use sudo.
I put the wake.service file (below) into $HOME/.config/systemd/user/wake.service and ran:
loginctl enable-linger maxto allow my user to run long-running services without staying logged insystemctl --user enable waketo enable the servicesystemctl --user start waketo start it up
You might have to also do systemctl --user daemon-reload to get systemd to
reload the service from disk or something, but I am not clear on that.
# The service
[Unit]
Description=Wake

[Service]
Type=simple
ExecStart=/usr/bin/busybox httpd -vv -p 80 -c /home/max/httpd.conf -f
Restart=on-failure

[Install]
WantedBy=multi-user.target
This is great. It means that I can enable it once and forget about it, even across restarts. I don’t even need to touch the service if I edit the CGI, since it’s loaded from disk on every request. I think I only need to touch the systemd service if I want to change the httpd configuration.
Now, you might be wondering to yourself “Max, you said you weren’t running as
root. How are you binding to port 80?” Well, sudo setcap
CAP_NET_BIND_SERVICE=+eip /usr/bin/busybox. But you could also run on an
unprivileged port like 8080.
This was probably the last dose of systems administration that I’ll need for the next six years or so. See you all soon for some more programming languages or breadposting.
All the code
To see all of the code and configuration in its brief glory, check out the Git repo.
-
I just remembered as I wrote this that in college we also configured a voice assistant to, when prompted with some key phrase, send an HTTP request to our router, which would then send a WoL packet to our media server. That was pretty useful. ↩
-
I don’t know why, but getting my Pi to post took about 6 hours of troubleshooting. It was made more difficult because I didn’t have any USB OTG cables or mini HDMI cables, so I was very in the dark—I only knew if it came online if it joined the WiFi network and acquired a DHCP lease. What I learned eventually is:
- My Pi only supports 2.4GHz, not 5GHz
- The 64 bit Raspberry Pi OS images, lite or otherwise, are trouble; 32 bit seems to work okay
- The image does not come with user accounts or SSH enabled and that needs to be manually enabled using some funky half-documented first-boot configuration
- Older versions of the official imaging tool provided by Raspberry Pi
simply do NOT work and I might have been better off using
dd
But it’s fine. It works now. I only wasted a lot of time on Pi Day, of all days. ↩
-
It doesn’t really make sense for this project, but I learned while poking around on the HTMZ page that a browser won’t make repeated GET requests from an iframe. Fortunately, there is a very slightly different version of HTMZ for that. ↩
Recommend
About Joyk
Aggregate valuable and interesting links.
Joyk means Joy of geeK