

使用Vscode调试远程服务器docker里的Python代码
source link: http://fancyerii.github.io/2024/02/16/docker-py-debug/
Go to the source link to view the article. You can view the picture content, updated content and better typesetting reading experience. If the link is broken, please click the button below to view the snapshot at that time.
前文介绍了远程调试服务器上的python代码的方法,但是有的时候在服务器上直接安装比较复杂,但是运行docker镜像比较简单。使用docker的好处是方便运维,但是它对开发并不友好(尤其是整到k8s里之后)。本文介绍怎么远程调试docker容器里的python代码(通常使用gpu)。
目录
安装docker
目前docker分为两个版本:Docker Desktop和Docker Engine,它们的差异可以参考Difference between Docker Desktop and Docker Engine。简单来说Docker Desktop就是一个虚拟机,在虚拟机里运行dockerd(docker daemon),并且提供一套GUI来与dockerd交互。因为windows/macos无法运行docker镜像,通常的做法是装一个linux虚拟机,在里面运行docker镜像。而Docker Desktop把这个虚拟机自带(隐藏)了虚拟机,并且提供了GUI的docker client,这样用户不需要登录到虚拟机里用docker(cli)去与dockerd交互了。不过对于我们linux用户来说这个东东没啥用,本来使用Docker的目的就是提供一个轻量级的虚拟机,而且用命令行比GUI方便多了,另外在服务器上一般都是没有UI的。所以我们只需要安装Docker Engine就行。
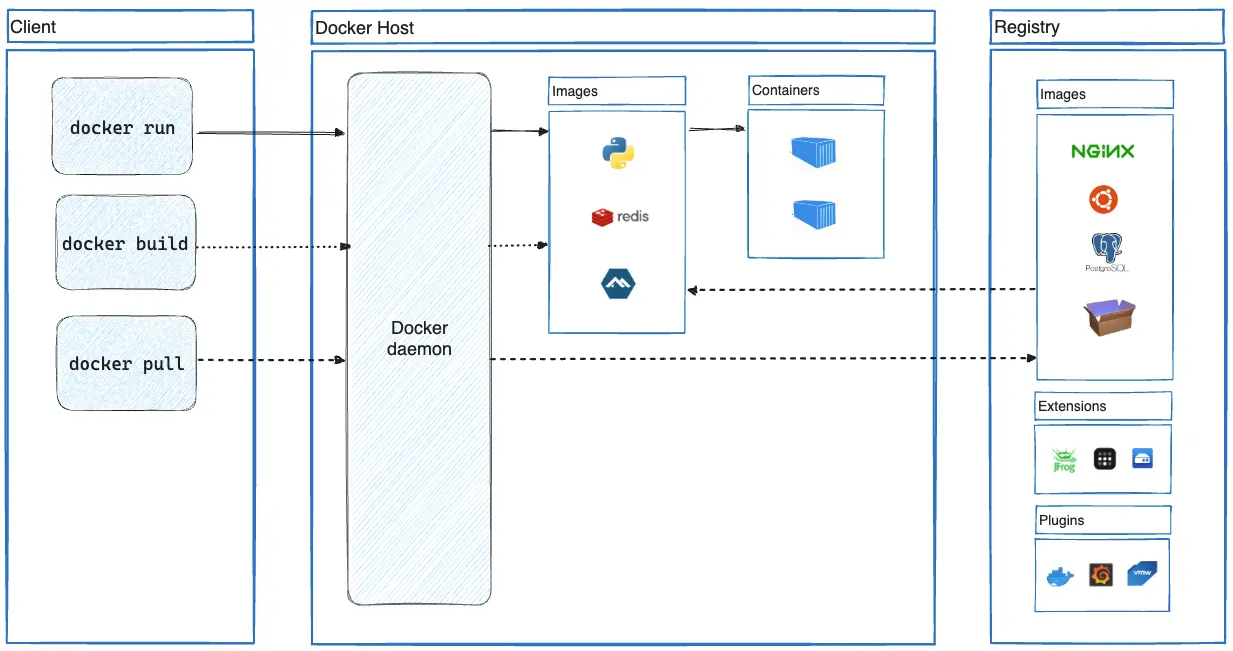
根据官方文档,Docker Engine包括:
- 一个运行时间长的守护进程 dockerd 的服务器。
- 指定接口的 API,程序可以用来与 Docker 守护进程通信和指示。
- 一个命令行接口(CLI)客户端 docker。
CLI 使用 Docker API 通过脚本编写或直接 CLI 命令来控制或与 Docker 守护程序进行交互。许多其他 Docker 应用程序使用底层的 API 和 CLI。守护程序创建和管理 Docker 对象,例如镜像、容器、网络和卷。Docker Engine的架构如下图所示:
本文介绍在Ubuntu下的安装,其它系统安装请参考安装文档。
卸载已有安装
for pkg in docker.io docker-doc docker-compose docker-compose-v2 podman-docker containerd runc; do sudo apt-get remove $pkg; done
# Add Docker's official GPG key:
sudo apt-get update
sudo apt-get install ca-certificates curl
sudo install -m 0755 -d /etc/apt/keyrings
sudo curl -fsSL https://download.docker.com/linux/ubuntu/gpg -o /etc/apt/keyrings/docker.asc
sudo chmod a+r /etc/apt/keyrings/docker.asc

# Add the repository to Apt sources:
echo \
  "deb [arch=$(dpkg --print-architecture) signed-by=/etc/apt/keyrings/docker.asc] https://download.docker.com/linux/ubuntu \
  $(. /etc/os-release && echo "$VERSION_CODENAME") stable" | \
  sudo tee /etc/apt/sources.list.d/docker.list > /dev/null
sudo apt-get update
sudo apt-get install docker-ce docker-ce-cli containerd.io docker-buildx-plugin docker-compose-plugin
sudo docker run hello-world
非sudo运行
默认情况必须sudo才能运行,这很不方便。注意:我们这里的安装还是常规(root)方式安装的,虽然可以用非sudo的docker run运行镜像,但是容器启动后本身的权限是root。并且dockerd的启动关闭等也需要root权限。如果读者想使用非root安装和管理dockerd,请参考Run the Docker daemon as a non-root user (Rootless mode)。
sudo groupadd docker
sudo usermod -aG docker $USER
newgrp docker # 激活group
正常情况下newgrp docker后就可以运行了,网上很多资料说要退出并且重新登入。我测试是不需要的。
验证一下:
docker run hello-world
sudo systemctl enable docker.service
sudo systemctl enable containerd.service
如果需要关闭,可以使用:
sudo systemctl disable docker.service
sudo systemctl disable containerd.service
安装NVIDIA Container Toolkit
为了在docker里运行gpu程序,我们还需要安装NVIDIA Container Toolkit。本文介绍Ubuntu下的安装,其它系统请参考文档。
更新源和安装
curl -fsSL https://nvidia.github.io/libnvidia-container/gpgkey | sudo gpg --dearmor -o /usr/share/keyrings/nvidia-container-toolkit-keyring.gpg \
  && curl -s -L https://nvidia.github.io/libnvidia-container/stable/deb/nvidia-container-toolkit.list | \
    sed 's#deb https://#deb [signed-by=/usr/share/keyrings/nvidia-container-toolkit-keyring.gpg] https://#g' | \
    sudo tee /etc/apt/sources.list.d/nvidia-container-toolkit.list

sudo apt-get update

sudo apt-get install -y nvidia-container-toolkit
sudo nvidia-ctk runtime configure --runtime=docker
sudo systemctl restart docker
docker run --rm --gpus all ubuntu nvidia-smi
Docker代理设置
对于国内用户来说,使用代理是必不可少的功能。但是Docker的代理设置包括docker client、docker deamon和docker runtime的设置,我们首先必须搞清楚这些概念的区别。下节内容主要参考Docker and Proxy。
docker client
这个设置通常没有太大必要(尤其对普通国内用户来说)。不过为了完整性以及对比,我们还是留下这部分内容。
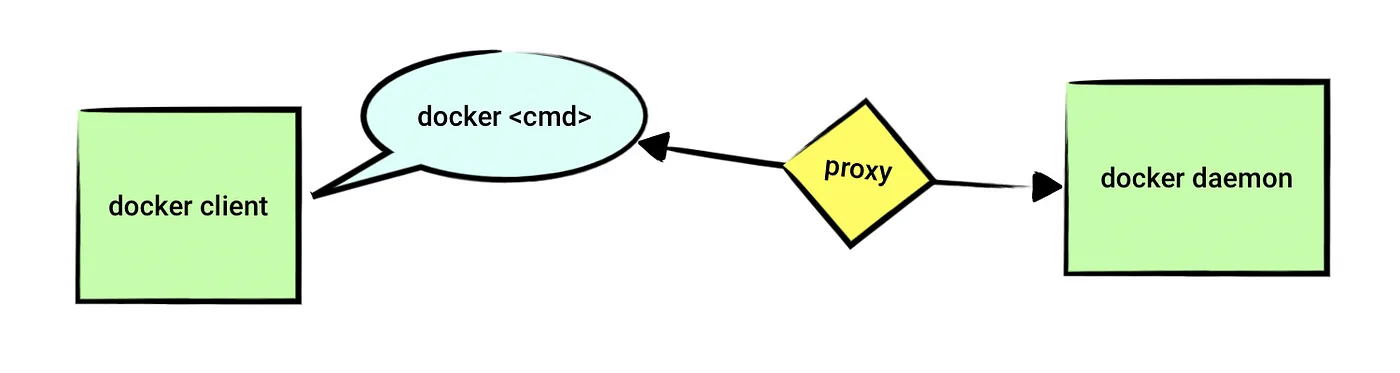
前面介绍过docker engine包括dockerd,这是真正干活的家伙。不过我们需要通过docker cli(也就是我们常用的docker命令)去命令它干活。
默认情况下,dockerd监听在unix socket “/var/run/docker.sock”。docker cli通过这个socket和服务器通信。关于dockerd的远程访问,读者可以参考Configure remote access for Docker daemon。 有一些文章也通过修改这个文件的权限来使得不通过sudo执行docker run:
sudo setfacl -m user:$USER:rw /var/run/docker.sock
不过这个方法并不好,原因是如果dockerd以后不用socket来提供服务,改用tcp,那么它就失效了。比较好的方法是前面介绍修改group的方法。
对于unix socket来说,当然没有什么代理设置的必要。除非是公司提供统一的dockerd服务,然后开一个代理。
如果真的有这个必要,根据文档,那么直接设置环境变量就可以了,因为docker是Go实现的,它使用如下的环境变量:
export http_proxy=http://proxy.example.com:80/
export https_proxy=https://proxy.example.com:443/
export no_proxy=dockerhost.local
根据文档,全大写或者小写都是可以的。
linux是大小写敏感的,http_proxy和HTTP_PROXY环境变量在linux下是两个环境变量。而且这个环境变量并没有一个规范,完全取决于程序怎么解读。比较安全的做法是大小写的都设置。关于这个问题读者可以参考Are HTTP_PROXY, HTTPS_PROXY and NO_PROXY environment variables standard?。目前看起来小写的http_proxy支持者更多一点。关于http_proxy和https_proxy的区别,可以参考difference between http_proxy and https_proxy,简单来说http_proxy是普通http请求时的代理,https_proxy是https请求的代理。注意:这是远程被访问网址的区别,代理服务器本身的地址可能都是http的,尤其是我们设置的各种翻墙代理。比如:
export http_proxy=http://myserver:7890
export https_proxy=http://myserver:7890
上面的http_proxy和https_proxy都是使用http://的代理服务器。
更多内容还可以参考We need to talk: Can we standardize NO_PROXY?。
dockerd
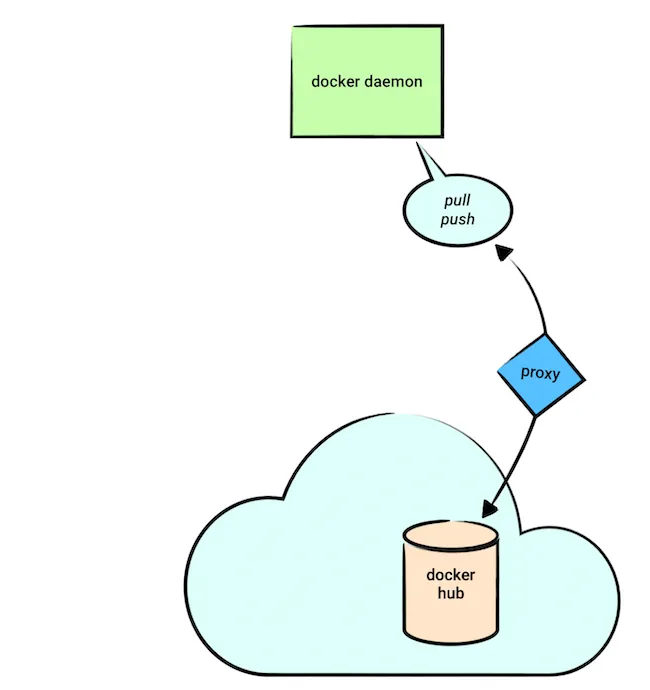
这个是我们经常设置的代理。它的主要作用是dockerd从hub拉取或者推送镜像时使用。我们使用docker pull/push命令让dockerd去拉取或者推送镜像,有时需要代理。比如pull一些科学上网里的内容,或者push到自己公司的仓库。
安装官方文档,这个叫做daemon的代理设置,官方文档为Configure the daemon with systemd
sudo mkdir -p /etc/systemd/system/docker.service.d
然后创建/etc/systemd/system/docker.service.d/http-proxy.conf文件,增加如下内容:
[Service]
Environment="HTTP_PROXY=http://proxy.example.com:3128"
Environment="HTTPS_PROXY=http://proxy.example.com:3128"
如果我们有一些registries比如内部的不想使用代理,那么可以增加NO_PROXY:
Environment="NO_PROXY=docker-registry.local"
因为dockerd在后台运行,为了让设置生效,我们需要重启(需要root权限,除非是rootless安装):
sudo systemctl daemon-reload
sudo systemctl restart docker
我们可以验证一下:
sudo systemctl show --property=Environment docker
runtime代理
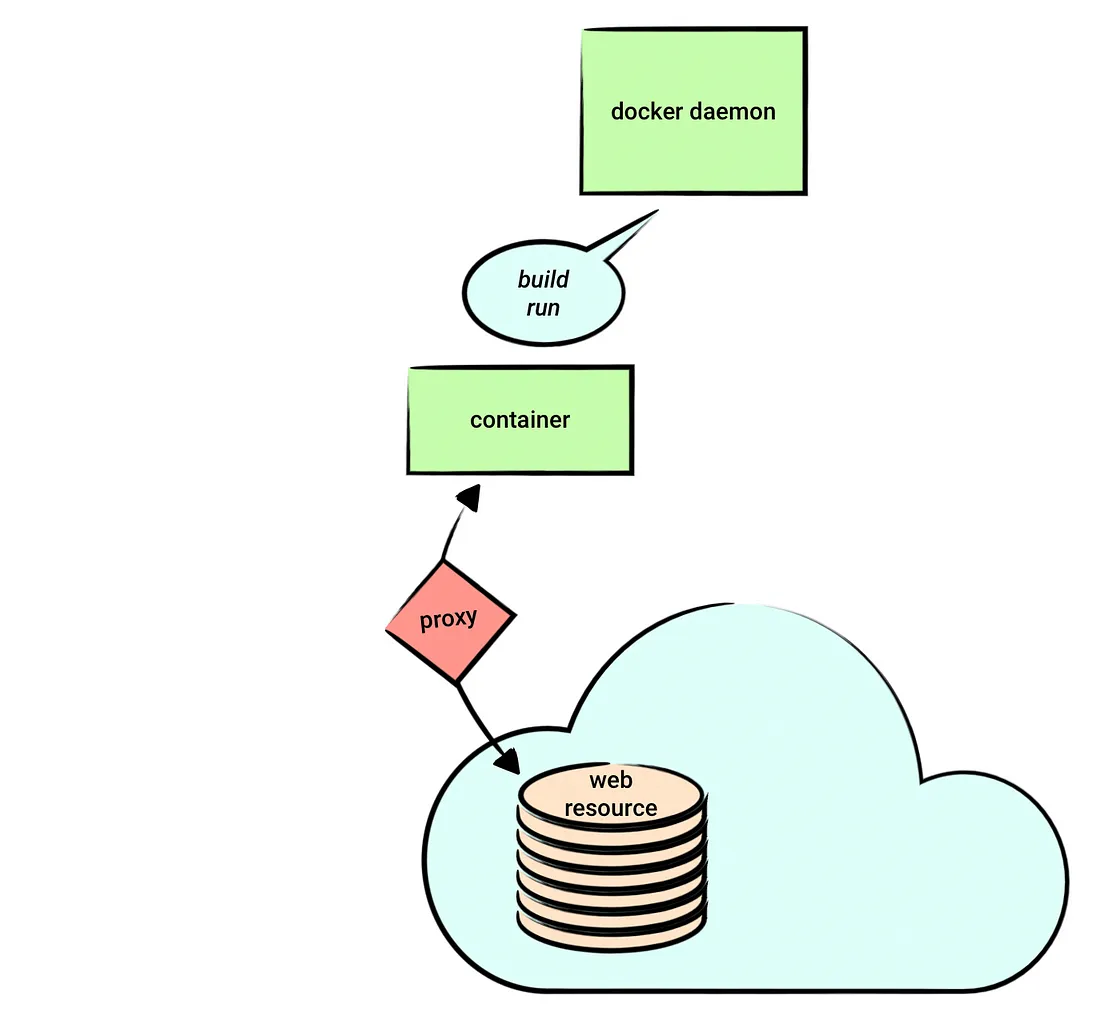
我们在用docker build或者docker run构建或者运行容器时有的时候也需要代理。比如构建时经常会用如下的命令:
RUN wget ...
我们可以把docker的容器想象成一个虚拟机。我们虽然可以在外面设置http_proxy,但是用docker build启动容器时这些环境变量不会传递过去。有两种方法把环境变量传入容器:设置docker.json;命令行传递。
设置docker.json
创建:~/.docker/config.json(可能需要mkdir ~/.docker)。修改为:
{
 "proxies": {
   "default": {
     "httpProxy": "http://proxy.example.com:3128",
     "httpsProxy": "https://proxy.example.com:3129",
     "noProxy": "*.test.example.com,.example.org,127.0.0.0/8"
   }
 }
}
注意这里没有下划线,而且大小写是驼峰式的。如果我们设置了httpProxy,那么docker build/run时会同时设置http_proxy和HTTP_PROXY。httpsProxy也是类似的。
除此之外还有不太常用的ftpProxy和allProxy,详细可以参考Configure Docker to use a proxy server。
我们修改后可以测试一下,看看docker run和docker build是否使用了上述变量:
$ docker run --rm alpine sh -c 'env | grep -i  _PROXY'
HTTPS_PROXY=https://proxy.example.com:3129
no_proxy=*.test.example.com,.example.org,127.0.0.0/8
NO_PROXY=*.test.example.com,.example.org,127.0.0.0/8
https_proxy=https://proxy.example.com:3129
http_proxy=http://proxy.example.com:3128
HTTP_PROXY=http://proxy.example.com:3128
$ docker build \
  --no-cache \
  --progress=plain \
  - <<EOF
FROM alpine
RUN env | grep -i _PROXY
EOF
#1 [internal] load .dockerignore
#1 transferring context: 2B done
#1 DONE 0.0s

#2 [internal] load build definition from Dockerfile
#2 transferring dockerfile: 74B done
#2 DONE 0.0s

#3 [internal] load metadata for docker.io/library/alpine:latest
#3 DONE 0.0s

#4 [1/2] FROM docker.io/library/alpine
#4 CACHED

#5 [2/2] RUN env | grep -i _PROXY
#5 0.262 HTTPS_PROXY=https://proxy.example.com:3129
#5 0.262 no_proxy=*.test.example.com,.example.org,127.0.0.0/8
#5 0.262 NO_PROXY=*.test.example.com,.example.org,127.0.0.0/8
#5 0.262 https_proxy=https://proxy.example.com:3129
#5 0.262 http_proxy=http://proxy.example.com:3128
#5 0.262 HTTP_PROXY=http://proxy.example.com:3128
#5 DONE 0.4s

#6 exporting to image
#6 exporting layers 0.1s done
#6 writing image sha256:1480c4f99cd4f24c7ddb63f7589f25c3c8108bfb133516c62f68d2036c910a01 done
#6 DONE 0.1s
命令行
上面的修改是对所有的docker run/build命令都生效。为了临时使用,用命令行参数更方便。
docker build --build-arg HTTP_PROXY="http://proxy.example.com:3128" .
docker run --env HTTP_PROXY="http://proxy.example.com:3128" redis
注意区别:docker build是 --build-arg;而docker run是–env。
不要在Dockerfile里通过ENV来设置代理!!!! 初学者可能想通过在Dockerfile里设置:
ENV http_proxy="...."
千万不要这样,否则别人拉取你的镜像就无法运行了。
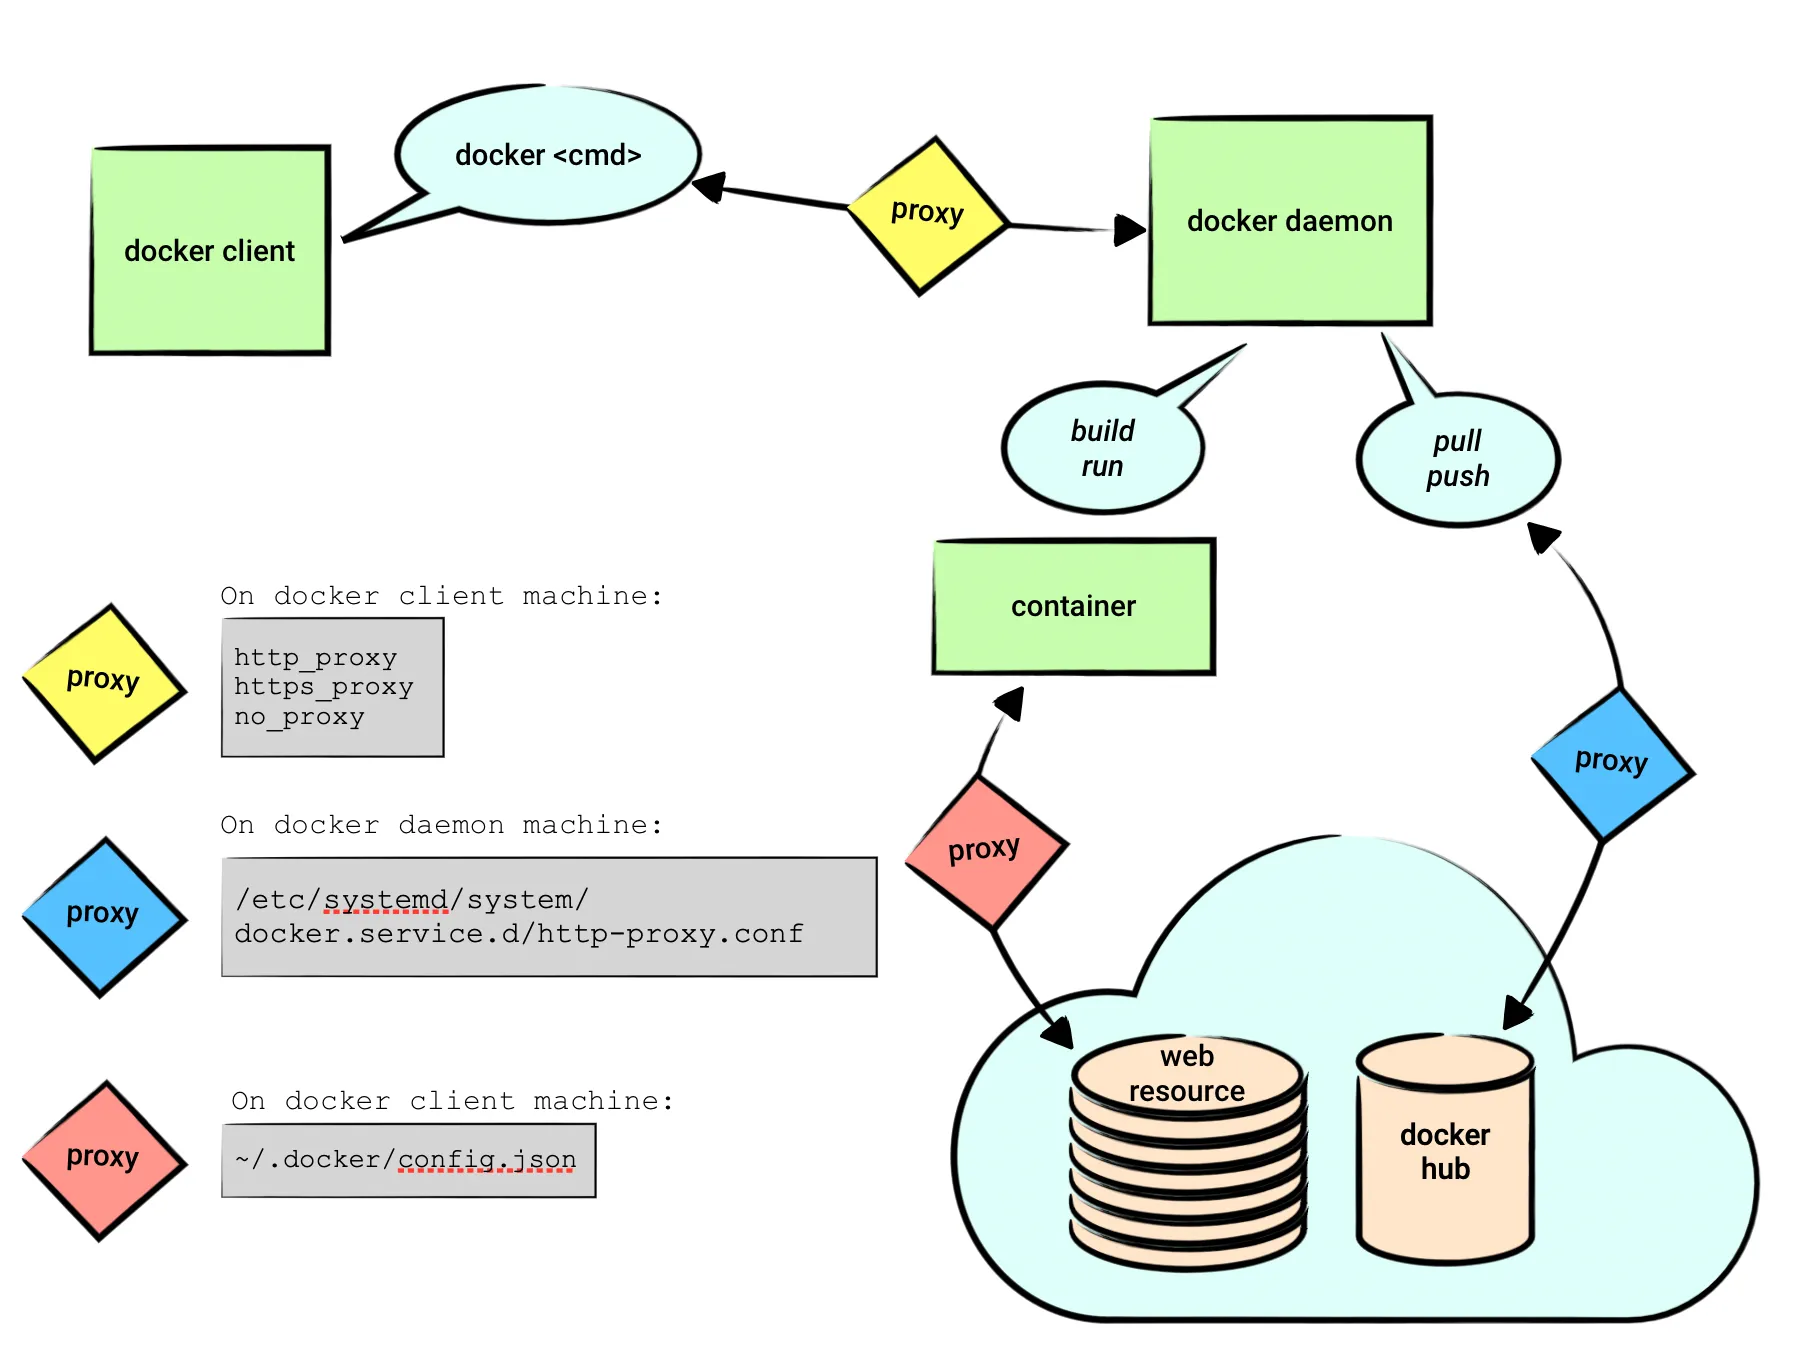
Docker代理总结
下图非常清晰的总结了Docker的代理设置和应用范围:
Nvidia-Driver
假设我们要开发tensorflow的程序,那么我们首先要拉取tensorflow的镜像。使用Docker的好处就是不用自己安装CUDA/CUDNN/TensrRT这些库。因为特定版本的Tensorflow在编译时是和特定版本的CUDA/CUDNN/TensorRT深度绑定的,如果大版本号不匹配,基本很难通过编译,即使小版本号不对,可能也会失败。所以如果要在一台机器安装不同版本的Tensorflow是一件很麻烦的事情。有了Docker之后,它会在Docker里安装自己的CUDA/CUDNN/TensorRT版本,而且容器之间是完全隔离的,从而避免环境的冲突。
不过即使使用Docker,还是有一个事情需要注意,那就是Nvidia-Driver和CUDA之间的兼容关系。每一个版本的CUDA发布时都会有一个特定版本的Nivida-Driver与之一起发布,如果我们手动安装有安装时可以选择安装(更新)Nvidia-Driver。
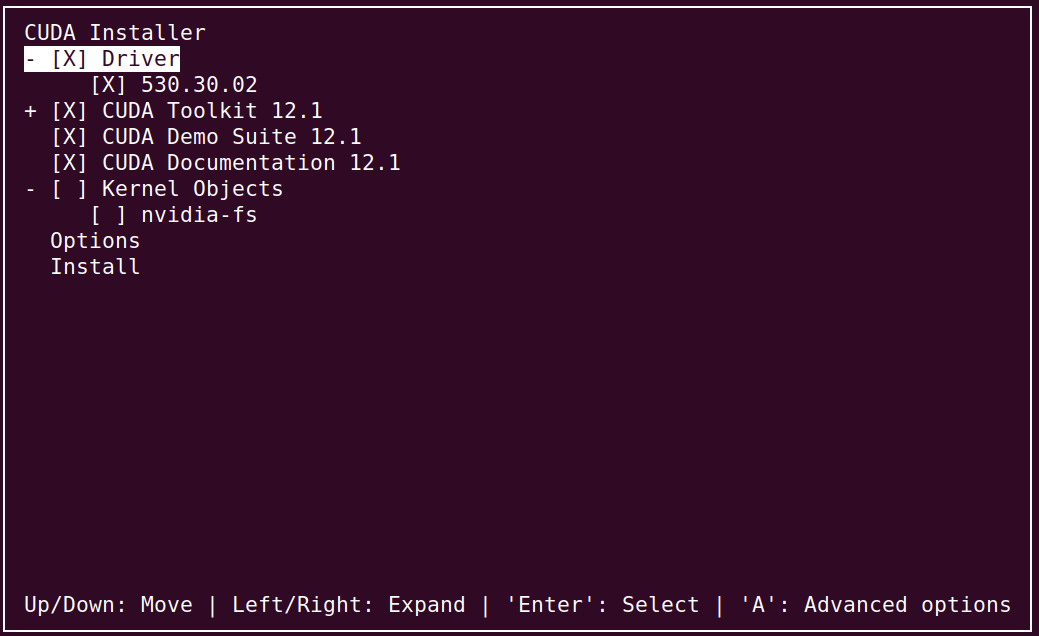
比如下面的安装命令,从名字可以看出它自带Nvidia-Driver 530.30.02:
$ sudo bash /nas/lili/soft/cuda_12.1.1_530.30.02_linux.run
不过Nvidia-Driver和CUDA的兼容相对比较灵活,不像Tensorflow和CUDA版本那么深度绑定。CUDA和Nvidia-Driver的兼容信息可以在这里查询,只需要把12.1.1换成你需要的版本就行,这里也有所有CUDA版本的列表。
我们看一下CUDA的兼容信息:
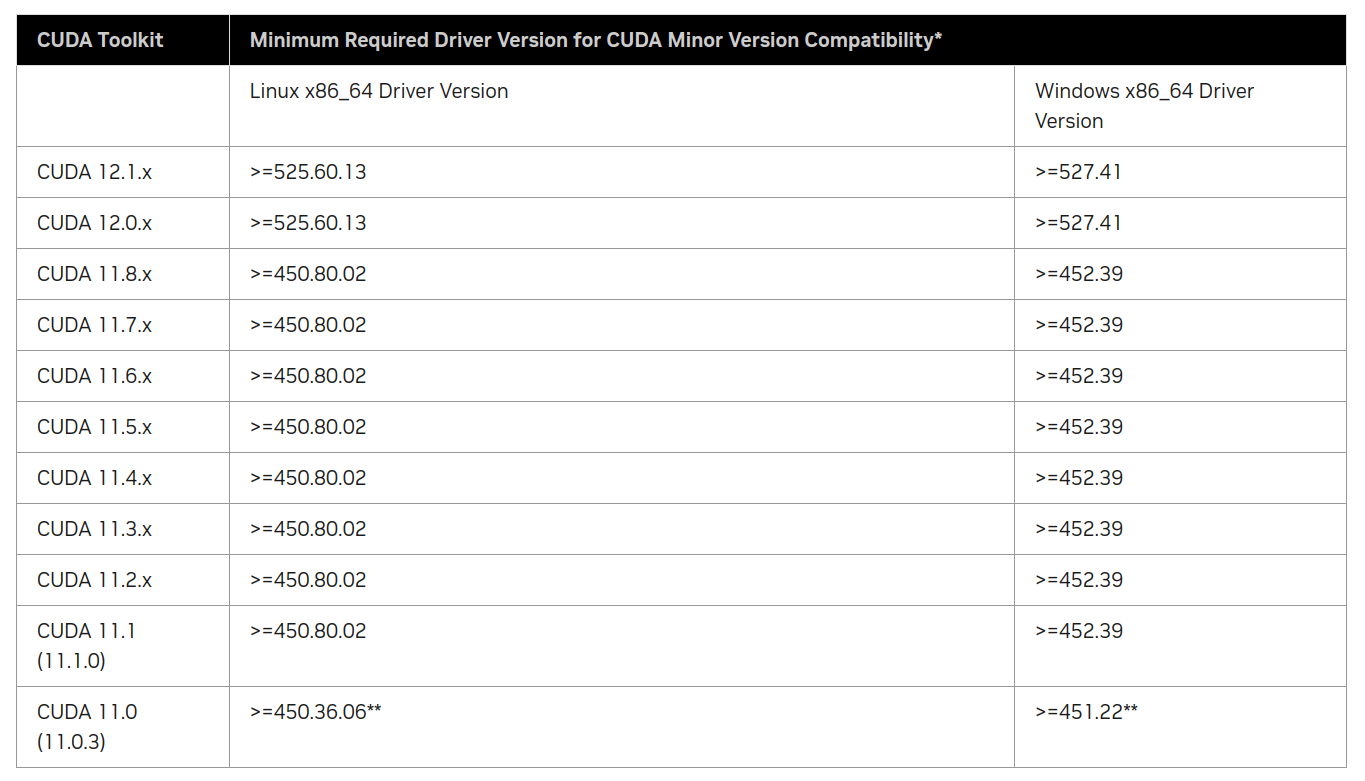
上表是CUDA最低要求的版本,而下表(部分,完整列表请参考上面链接)是CUDA自带(推荐)的版本信息:
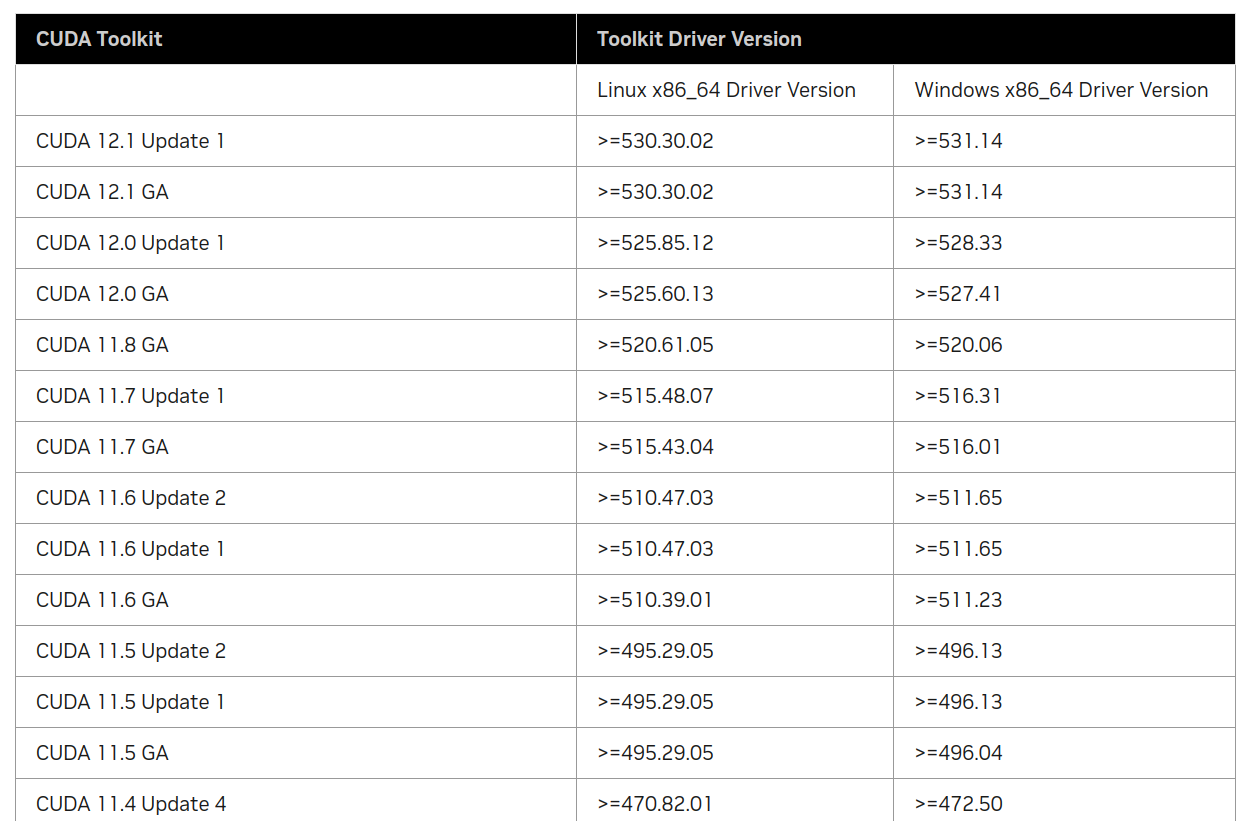
可以看到12.1.1(CUDA 12.1 Update 1)确实自带的Nvidia-Driver版本是530.30.02。
拉取tf镜像
完整的镜像列表可以去这里搜索,我们拉取最新(2024/2/16)的gpu版本的Tensorflow 2.15.0。
docker pull tensorflow/tensorflow:2.15.0-gpu
docker run -it --gpus all tensorflow/tensorflow:2.15.0-gpu
$import tensorflow as tf
2024-02-18 02:43:26.283147: E external/local_xla/xla/stream_executor/cuda/cuda_dnn.cc:9261] Unable to register cuDNN factory: Attempting to register factory for plugin cuDNN when one has already been registered
2024-02-18 02:43:26.283204: E external/local_xla/xla/stream_executor/cuda/cuda_fft.cc:607] Unable to register cuFFT factory: Attempting to register factory for plugin cuFFT when one has already been registered
2024-02-18 02:43:26.283926: E external/local_xla/xla/stream_executor/cuda/cuda_blas.cc:1515] Unable to register cuBLAS factory: Attempting to register factory for plugin cuBLAS when one has already been registered
2024-02-18 02:43:26.289011: I tensorflow/core/platform/cpu_feature_guard.cc:182] This TensorFlow binary is optimized to use available CPU instructions in performance-critical operations.
To enable the following instructions: AVX2 FMA, in other operations, rebuild TensorFlow with the appropriate compiler flags.
>>> print("Num GPUs Available: ", len(tf.config.list_physical_devices('GPU')))
Num GPUs Available:  8
注意:上面会出现Error信息,提示”unable to register cuDNN/cuFFT/cuBLAS factory”。不过我简单的测试了一下好像实际不影响使用。去网上搜索了一下,好像这个信息挺多的,我也提了一个issue。
使用其它镜像
除了Tensorflow的官方镜像,我们也可以使用Nvidia的镜像,这里的镜像版本相对晚一些,比如截止本文时间(2024/2/16),它只有2.14的Tensorflow,不过我感觉Nvidia的镜像兼容性更好一些。读者可以在这里查询相关信息。不过有一点需要注意,这里的版本号是nvidia统一命名的,和Tensorflow/Pytorch无关。
它的版本信息在这里。我们截取部分来看一下:
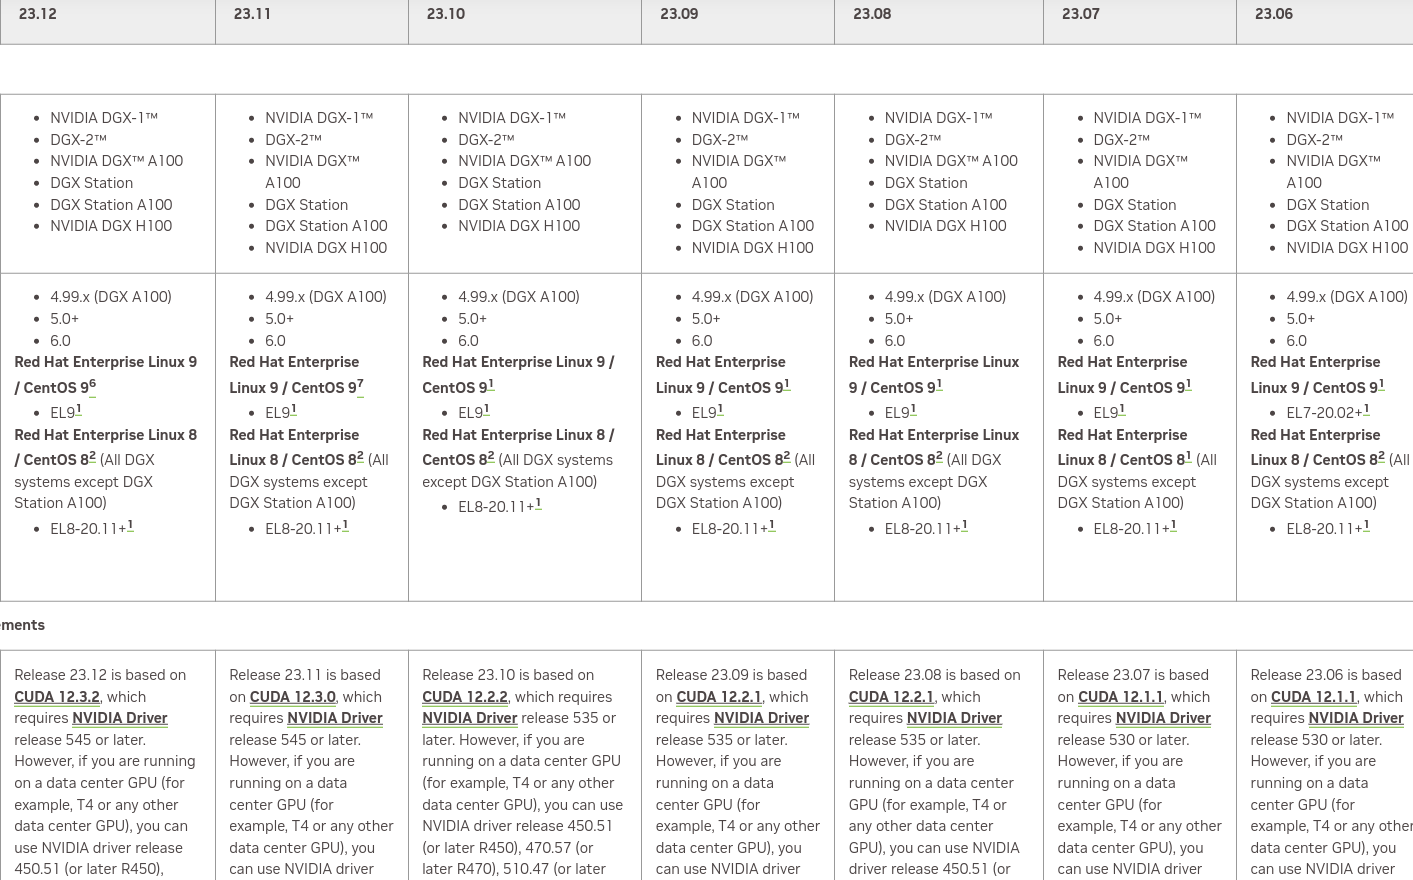
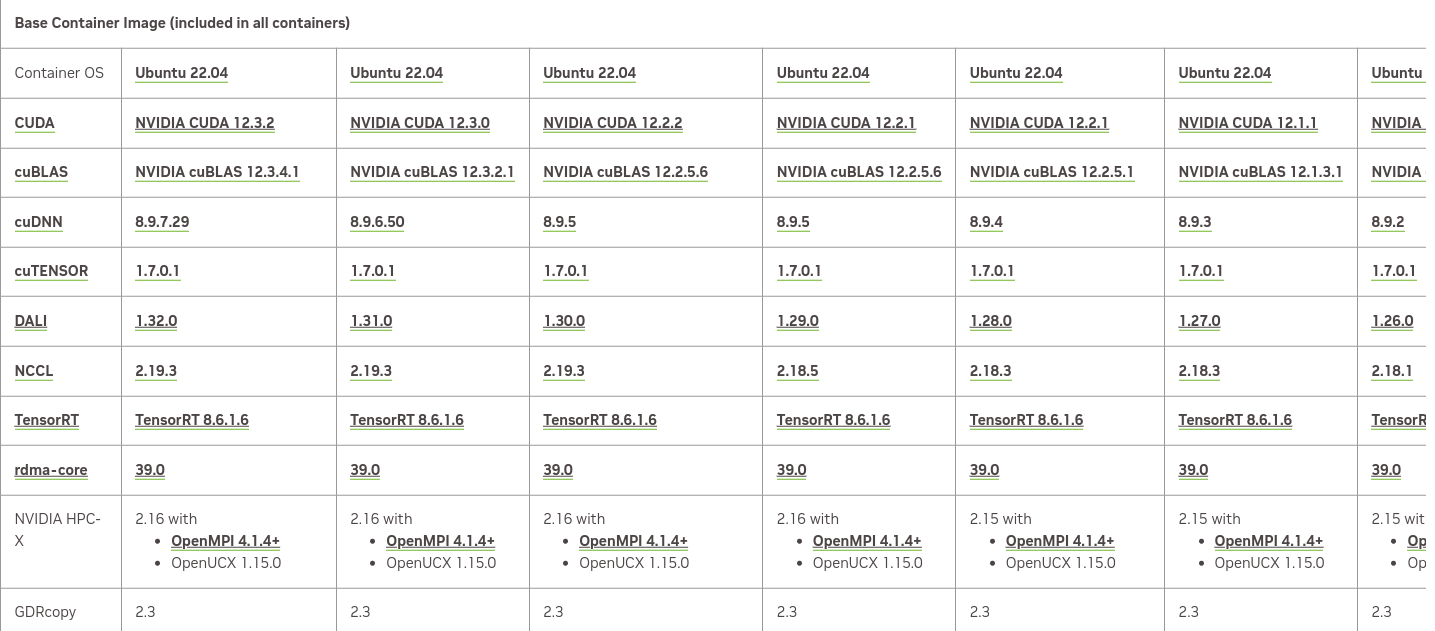
表格非常大,我只是截取了一部分。这里需要根据你机器的Nvidia-Driver选择合适的版本。比如我的机器是535.xxx,那么它最多支持23.10的版本。我们可以看看这个版本基础镜像的内容:

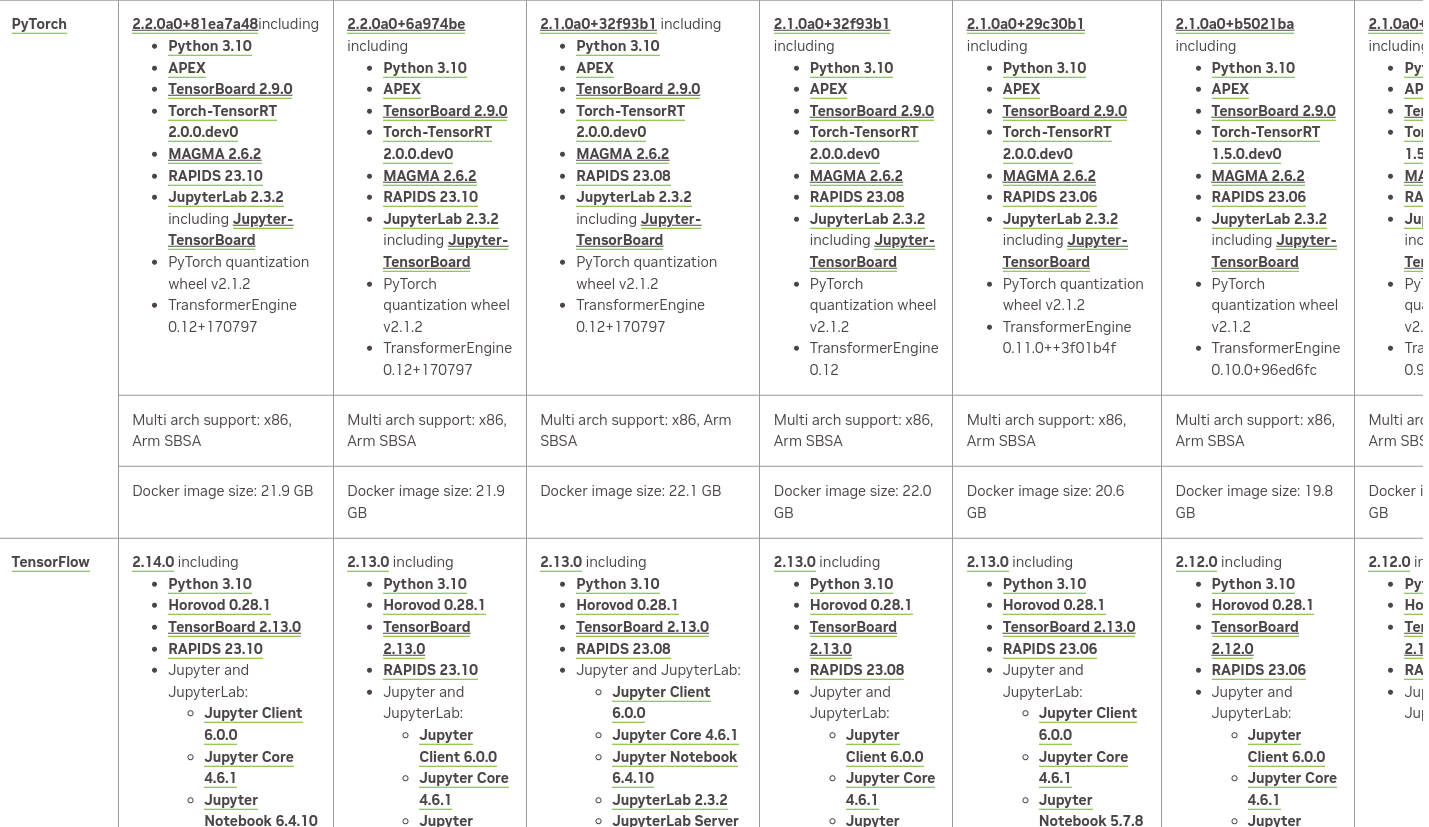
支持的pytorch和tensorflow版本如下:
我们可以使用下面的命令拉取:
docker pull nvcr.io/nvidia/tensorflow:23.10-tf2-py3
构建包含sshd的镜像
我们的目的是调试docker里的python代码,方法是使用vscode的ssh调试。默认的docker是没有安装sshd的,而且也不对外提供端口访问。因此我们需要在基础镜像的基础上安装额外的软件,从而方便我们调试。我们需要安装sshd,因此我们创建如下的Dockerfile:
FROM tensorflow/tensorflow:2.15.0-gpu

# Update the system, install OpenSSH Server, and set up users
RUN apt-get update && apt-get upgrade -y && \
    apt-get install -y openssh-server

# Create user and set password for user and root user
RUN  useradd -rm -d /home/ubuntu -s /bin/bash -g root -G sudo -u 1000 ubuntu && \
    echo 'ubuntu:1234' | chpasswd && \
    echo 'root:1234' | chpasswd

# Set up configuration for SSH
RUN mkdir -p /var/run/sshd && \
    sed -i 's/PermitRootLogin prohibit-password/PermitRootLogin yes/' /etc/ssh/sshd_config && \
    sed 's@session\s*required\s*pam_loginuid.so@session optional pam_loginuid.so@g' -i /etc/pam.d/sshd && \
    echo "export VISIBLE=now" >> /etc/profile

# Expose the SSH port
EXPOSE 22

# Run SSH
CMD ["/usr/sbin/sshd", "-D"]
注意上面Dockerfile的密码,分别是ubuntu和root的密码,请修改。
然后运行:
docker build -t tensorflow-2.15-gpu-debug:v1 .
然后我们运行它,注意要把端口22映射成其它端口,因为服务器的22端口被host占用了(否则我们ssh不上去了):
docker run -it --ipc=host --ulimit memlock=-1 --ulimit stack=67108864 --gpus all -p 2222:22 -p 5678:5678 --volume /nas/lili/codes/pt/tf/dockerdebug:/workspace/share tensorflow-2.15-gpu-debug:v1
开放端口5678是为了后面用debugpy远程调试使用,你也可以使用其它端口。另外我们需要用--volume给docker持久化的磁盘,这样我们的代码可以持久保存。
接着我们可以像普通的ssh那样连接到远程的docker容器里了:
ssh -p 2222 ubuntu@server
而且在容器里,ubuntu账号可以su到root,这样你就可以执行任何命令了。为了方便vscode调试,我们可以配置免密登录:
ssh-copy-id -p 2222 ubuntu@server
每次输入-p 2222也很烦,可以配置本机~/.ssh/config:
Host server
    Port 2222
    User ubuntu
vscode server的问题
如果这个时候我们用vscode连接,可能会出现问题。错误信息如下:
> ERROR: no certificate subject alternative name matches requested host name ‘vscode.cdn.azure.cn’. To connect to vscode.cdn.azure.cn insecurely, use `--no-check-certificate'.
原因是vscode会用wget去vscode.cdn.azure.cn下载一些东西,但是没有证书。我们还需要修改配置:
echo "check_certificate = off" >> ~/.wgetrc
改了之后还是错误,不过错误变了:
> WARNING: no certificate subject alternative name matches requested host name ‘vscode.cdn.azure.cn’. https://vscode.cdn.azure.cn/stable/d037ac076cee195194f93ce6fe2bdfe2969cc82d/vscode_cli_alpine_x64_cli.tar.gz?1: 2024-02-18 07:30:32 ERROR 400: The request URI is invalid..
证书的错误变成了警告,但是服务器出现404。这可不是我们的问题了啊,怎么办呢?
搜索到这个issue,原来是微软的服务器的问题。如果我们有一台国外的服务器,我们可以测试一下:
$ wget -O vscode-server.tar.gz -c https://update.code.visualstudio.com/commit:d037ac076cee195194f93ce6fe2bdfe2969cc82d/server-linux-x64/stable
--2024-02-18 17:21:37--  https://update.code.visualstudio.com/commit:d037ac076cee195194f93ce6fe2bdfe2969cc82d/server-linux-x64/stable
Resolving update.code.visualstudio.com (update.code.visualstudio.com)... 13.107.213.69, 13.107.246.69, 2620:1ec:bdf::69, ...
Connecting to update.code.visualstudio.com (update.code.visualstudio.com)|13.107.213.69|:443... connected.
HTTP request sent, awaiting response... 302 Found
Location: https://vscode.download.prss.microsoft.com/dbazure/download/stable/d037ac076cee195194f93ce6fe2bdfe2969cc82d/vscode-server-linux-x64.tar.gz [following]
--2024-02-18 17:21:37--  https://vscode.download.prss.microsoft.com/dbazure/download/stable/d037ac076cee195194f93ce6fe2bdfe2969cc82d/vscode-server-linux-x64.tar.gz
Resolving vscode.download.prss.microsoft.com (vscode.download.prss.microsoft.com)... 152.195.19.97, 2606:2800:11f:1cb7:261b:1f9c:2074:3c
Connecting to vscode.download.prss.microsoft.com (vscode.download.prss.microsoft.com)|152.195.19.97|:443... connected.
HTTP request sent, awaiting response... 200 OK
Length: 51112534 (49M) [application/octet-stream]
Saving to: ‘vscode-server.tar.gz’
同样的命令,我们用国内的服务器测试一下:
$ wget --no-check-certificate -O vscode-server.tar.gz -c https://update.code.visualstudio.com/commit:d037ac076cee195194f93ce6fe2bdfe2969cc82d/server-linux-x64/stable
--2024-02-18 17:22:36--  https://update.code.visualstudio.com/commit:d037ac076cee195194f93ce6fe2bdfe2969cc82d/server-linux-x64/stable
Resolving update.code.visualstudio.com (update.code.visualstudio.com)... 13.107.213.69, 13.107.246.69, 2620:1ec:46::69, ...
Connecting to update.code.visualstudio.com (update.code.visualstudio.com)|13.107.213.69|:443... connected.
HTTP request sent, awaiting response... 302 Found
Location: https://vscode.cdn.azure.cn/stable/d037ac076cee195194f93ce6fe2bdfe2969cc82d/vscode-server-linux-x64.tar.gz?1 [following]
--2024-02-18 17:22:37--  https://vscode.cdn.azure.cn/stable/d037ac076cee195194f93ce6fe2bdfe2969cc82d/vscode-server-linux-x64.tar.gz?1
Resolving vscode.cdn.azure.cn (vscode.cdn.azure.cn)... 40.126.88.64
Connecting to vscode.cdn.azure.cn (vscode.cdn.azure.cn)|40.126.88.64|:443... connected.
WARNING: no certificate subject alternative name matches
	requested host name ‘vscode.cdn.azure.cn’.
HTTP request sent, awaiting response... 400 The request URI is invalid.
2024-02-18 17:22:44 ERROR 400: The request URI is invalid..
原来vscode的remote ssh插件需要安装一些东西,它下载的地址是https://update.code.visualstudio.com/commit:d037ac076cee195194f93ce6fe2bdfe2969cc82d/server-linux-x64/stable,注意commit后面的”d037ac076cee195194f93ce6fe2bdfe2969cc82d”是vscode的版本信息,可以用下面命令查看:
$ code --version
1.84.0
d037ac076cee195194f93ce6fe2bdfe2969cc82d
x64
同样的url,国内的会重定向到vscode.cdn.azure.cn,但是这个目前已经不能用了。怎么办呢?一种方法是开一个国外的vpn,这样微软服务器判断出请求不是国内就会正常重定向到vscode.download.prss.microsoft.com。但是如果没有vpn怎么办呢?我们可以手工下载:
wget -O vscode-server.tar.gz https://vscode.download.prss.microsoft.com/dbazure/download/stable/d037ac076cee195194f93ce6fe2bdfe2969cc82d/vscode-server-linux-x64.tar.gz
这个网址我测试了不用翻墙也是可以访问的,如果不行,那么就想其它办法下载。
下载了之后需要把这个文件复制到docker容器里:
scp vscode-server.tar.gz server:~/
接着登录到容器执行下面命令:
$ mkdir -p ~/.vscode-server/bin
$ tar xf vscode-server.tar.gz
$ mv vscode-server-linux-x64 ~/.vscode-server/bin/d037ac076cee195194f93ce6fe2bdfe2969cc82d
注意所有的操作都要匹配你客户端的vscode的hash:d037ac076cee195194f93ce6fe2bdfe2969cc82d。
这个时候就可以正常用vscode进行远程ssh操作了。
commit修改
为了持久化上面的操作,我们需要用docker commit保存修改:
docker ps # 找到容器id
docker commit your-id tensorflow-2.15-gpu-debug:v2
以后就用tensorflow-2.15-gpu-debug:v2这个镜像就ok了。当然如果你用vscode装了其它插件,也记得要commit。
import tensorflow as tf
print("TensorFlow version:", tf.__version__)

mnist = tf.keras.datasets.mnist

(x_train, y_train), (x_test, y_test) = mnist.load_data()
x_train, x_test = x_train / 255.0, x_test / 255.0

model = tf.keras.models.Sequential([
  tf.keras.layers.Flatten(input_shape=(28, 28)),
  tf.keras.layers.Dense(128, activation='relu'),
  tf.keras.layers.Dropout(0.2),
  tf.keras.layers.Dense(10)
])

loss_fn = tf.keras.losses.SparseCategoricalCrossentropy(from_logits=True)

model.compile(optimizer='adam',
              loss=loss_fn,
              metrics=['accuracy'])

model.fit(x_train, y_train, epochs=5)
在容器里运行:
ubuntu@c2eb9de3d45c:/workspace/share$ python -Xfrozen_modules=off -m debugpy --listen 0.0.0.0:5678 --wait-for-client testtf.py
然后就是和普通的remote ssh一样远程调试了。对此不熟悉的读者可以参考VSCode远程调试Python。
Recommend
About Joyk
Aggregate valuable and interesting links.
Joyk means Joy of geeK