

API with NestJS #144. Creating CLI applications with the Nest Commander
source link: https://wanago.io/2024/02/05/api-nestjs-cli-nest-commander/
Go to the source link to view the article. You can view the picture content, updated content and better typesetting reading experience. If the link is broken, please click the button below to view the snapshot at that time.

- 1. API with NestJS #1. Controllers, routing and the module structure
- 2. API with NestJS #2. Setting up a PostgreSQL database with TypeORM
- 3. API with NestJS #3. Authenticating users with bcrypt, Passport, JWT, and cookies
- 4. API with NestJS #4. Error handling and data validation
- 5. API with NestJS #5. Serializing the response with interceptors
- 6. API with NestJS #6. Looking into dependency injection and modules
- 7. API with NestJS #7. Creating relationships with Postgres and TypeORM
- 8. API with NestJS #8. Writing unit tests
- 9. API with NestJS #9. Testing services and controllers with integration tests
- 10. API with NestJS #10. Uploading public files to Amazon S3
- 11. API with NestJS #11. Managing private files with Amazon S3
- 12. API with NestJS #12. Introduction to Elasticsearch
- 13. API with NestJS #13. Implementing refresh tokens using JWT
- 14. API with NestJS #14. Improving performance of our Postgres database with indexes
- 15. API with NestJS #15. Defining transactions with PostgreSQL and TypeORM
- 16. API with NestJS #16. Using the array data type with PostgreSQL and TypeORM
- 17. API with NestJS #17. Offset and keyset pagination with PostgreSQL and TypeORM
- 18. API with NestJS #18. Exploring the idea of microservices
- 19. API with NestJS #19. Using RabbitMQ to communicate with microservices
- 20. API with NestJS #20. Communicating with microservices using the gRPC framework
- 21. API with NestJS #21. An introduction to CQRS
- 22. API with NestJS #22. Storing JSON with PostgreSQL and TypeORM
- 23. API with NestJS #23. Implementing in-memory cache to increase the performance
- 24. API with NestJS #24. Cache with Redis. Running the app in a Node.js cluster
- 25. API with NestJS #25. Sending scheduled emails with cron and Nodemailer
- 26. API with NestJS #26. Real-time chat with WebSockets
- 27. API with NestJS #27. Introduction to GraphQL. Queries, mutations, and authentication
- 28. API with NestJS #28. Dealing in the N + 1 problem in GraphQL
- 29. API with NestJS #29. Real-time updates with GraphQL subscriptions
- 30. API with NestJS #30. Scalar types in GraphQL
- 31. API with NestJS #31. Two-factor authentication
- 32. API with NestJS #32. Introduction to Prisma with PostgreSQL
- 33. API with NestJS #33. Managing PostgreSQL relationships with Prisma
- 34. API with NestJS #34. Handling CPU-intensive tasks with queues
- 35. API with NestJS #35. Using server-side sessions instead of JSON Web Tokens
- 36. API with NestJS #36. Introduction to Stripe with React
- 37. API with NestJS #37. Using Stripe to save credit cards for future use
- 38. API with NestJS #38. Setting up recurring payments via subscriptions with Stripe
- 39. API with NestJS #39. Reacting to Stripe events with webhooks
- 40. API with NestJS #40. Confirming the email address
- 41. API with NestJS #41. Verifying phone numbers and sending SMS messages with Twilio
- 42. API with NestJS #42. Authenticating users with Google
- 43. API with NestJS #43. Introduction to MongoDB
- 44. API with NestJS #44. Implementing relationships with MongoDB
- 45. API with NestJS #45. Virtual properties with MongoDB and Mongoose
- 46. API with NestJS #46. Managing transactions with MongoDB and Mongoose
- 47. API with NestJS #47. Implementing pagination with MongoDB and Mongoose
- 48. API with NestJS #48. Definining indexes with MongoDB and Mongoose
- 49. API with NestJS #49. Updating with PUT and PATCH with MongoDB and Mongoose
- 50. API with NestJS #50. Introduction to logging with the built-in logger and TypeORM
- 51. API with NestJS #51. Health checks with Terminus and Datadog
- 52. API with NestJS #52. Generating documentation with Compodoc and JSDoc
- 53. API with NestJS #53. Implementing soft deletes with PostgreSQL and TypeORM
- 54. API with NestJS #54. Storing files inside a PostgreSQL database
- 55. API with NestJS #55. Uploading files to the server
- 56. API with NestJS #56. Authorization with roles and claims
- 57. API with NestJS #57. Composing classes with the mixin pattern
- 58. API with NestJS #58. Using ETag to implement cache and save bandwidth
- 59. API with NestJS #59. Introduction to a monorepo with Lerna and Yarn workspaces
- 60. API with NestJS #60. The OpenAPI specification and Swagger
- 61. API with NestJS #61. Dealing with circular dependencies
- 62. API with NestJS #62. Introduction to MikroORM with PostgreSQL
- 63. API with NestJS #63. Relationships with PostgreSQL and MikroORM
- 64. API with NestJS #64. Transactions with PostgreSQL and MikroORM
- 65. API with NestJS #65. Implementing soft deletes using MikroORM and filters
- 66. API with NestJS #66. Improving PostgreSQL performance with indexes using MikroORM
- 67. API with NestJS #67. Migrating to TypeORM 0.3
- 68. API with NestJS #68. Interacting with the application through REPL
- 69. API with NestJS #69. Database migrations with TypeORM
- 70. API with NestJS #70. Defining dynamic modules
- 71. API with NestJS #71. Introduction to feature flags
- 72. API with NestJS #72. Working with PostgreSQL using raw SQL queries
- 73. API with NestJS #73. One-to-one relationships with raw SQL queries
- 74. API with NestJS #74. Designing many-to-one relationships using raw SQL queries
- 75. API with NestJS #75. Many-to-many relationships using raw SQL queries
- 76. API with NestJS #76. Working with transactions using raw SQL queries
- 77. API with NestJS #77. Offset and keyset pagination with raw SQL queries
- 78. API with NestJS #78. Generating statistics using aggregate functions in raw SQL
- 79. API with NestJS #79. Implementing searching with pattern matching and raw SQL
- 80. API with NestJS #80. Updating entities with PUT and PATCH using raw SQL queries
- 81. API with NestJS #81. Soft deletes with raw SQL queries
- 82. API with NestJS #82. Introduction to indexes with raw SQL queries
- 83. API with NestJS #83. Text search with tsvector and raw SQL
- 84. API with NestJS #84. Implementing filtering using subqueries with raw SQL
- 85. API with NestJS #85. Defining constraints with raw SQL
- 86. API with NestJS #86. Logging with the built-in logger when using raw SQL
- 87. API with NestJS #87. Writing unit tests in a project with raw SQL
- 88. API with NestJS #88. Testing a project with raw SQL using integration tests
- 89. API with NestJS #89. Replacing Express with Fastify
- 90. API with NestJS #90. Using various types of SQL joins
- 91. API with NestJS #91. Dockerizing a NestJS API with Docker Compose
- 92. API with NestJS #92. Increasing the developer experience with Docker Compose
- 93. API with NestJS #93. Deploying a NestJS app with Amazon ECS and RDS
- 94. API with NestJS #94. Deploying multiple instances on AWS with a load balancer
- 95. API with NestJS #95. CI/CD with Amazon ECS and GitHub Actions
- 96. API with NestJS #96. Running unit tests with CI/CD and GitHub Actions
- 97. API with NestJS #97. Introduction to managing logs with Amazon CloudWatch
- 98. API with NestJS #98. Health checks with Terminus and Amazon ECS
- 99. API with NestJS #99. Scaling the number of application instances with Amazon ECS
- 100. API with NestJS #100. The HTTPS protocol with Route 53 and AWS Certificate Manager
- 101. API with NestJS #101. Managing sensitive data using the AWS Secrets Manager
- 102. API with NestJS #102. Writing unit tests with Prisma
- 103. API with NestJS #103. Integration tests with Prisma
- 104. API with NestJS #104. Writing transactions with Prisma
- 105. API with NestJS #105. Implementing soft deletes with Prisma and middleware
- 106. API with NestJS #106. Improving performance through indexes with Prisma
- 107. API with NestJS #107. Offset and keyset pagination with Prisma
- 108. API with NestJS #108. Date and time with Prisma and PostgreSQL
- 109. API with NestJS #109. Arrays with PostgreSQL and Prisma
- 110. API with NestJS #110. Managing JSON data with PostgreSQL and Prisma
- 111. API with NestJS #111. Constraints with PostgreSQL and Prisma
- 112. API with NestJS #112. Serializing the response with Prisma
- 113. API with NestJS #113. Logging with Prisma
- 114. API with NestJS #114. Modifying data using PUT and PATCH methods with Prisma
- 115. API with NestJS #115. Database migrations with Prisma
- 116. API with NestJS #116. REST API versioning
- 117. API with NestJS #117. CORS – Cross-Origin Resource Sharing
- 118. API with NestJS #118. Uploading and streaming videos
- 119. API with NestJS #119. Type-safe SQL queries with Kysely and PostgreSQL
- 120. API with NestJS #120. One-to-one relationships with the Kysely query builder
- 121. API with NestJS #121. Many-to-one relationships with PostgreSQL and Kysely
- 122. API with NestJS #122. Many-to-many relationships with Kysely and PostgreSQL
- 123. API with NestJS #123. SQL transactions with Kysely
- 124. API with NestJS #124. Handling SQL constraints with Kysely
- 125. API with NestJS #125. Offset and keyset pagination with Kysely
- 126. API with NestJS #126. Improving the database performance with indexes and Kysely
- 127. API with NestJS #127. Arrays with PostgreSQL and Kysely
- 128. API with NestJS #128. Managing JSON data with PostgreSQL and Kysely
- 129. API with NestJS #129. Implementing soft deletes with SQL and Kysely
- 130. API with NestJS #130. Avoiding storing sensitive information in API logs
- 131. API with NestJS #131. Unit tests with PostgreSQL and Kysely
- 132. API with NestJS #132. Handling date and time in PostgreSQL with Kysely
- 133. API with NestJS #133. Introducing database normalization with PostgreSQL and Prisma
- 134. API with NestJS #134. Aggregating statistics with PostgreSQL and Prisma
- 135. API with NestJS #135. Referential actions and foreign keys in PostgreSQL with Prisma
- 136. API with NestJS #136. Raw SQL queries with Prisma and PostgreSQL range types
- 137. API with NestJS #137. Recursive relationships with Prisma and PostgreSQL
- 138. API with NestJS #138. Filtering records with Prisma
- 139. API with NestJS #139. Using UUID as primary keys with Prisma and PostgreSQL
- 140. API with NestJS #140. Using multiple PostgreSQL schemas with Prisma
- 141. API with NestJS #141. Getting distinct records with Prisma and PostgreSQL
- 142. API with NestJS #142. A video chat with WebRTC and React
- 143. API with NestJS #143. Optimizing queries with views using PostgreSQL and Kysely
- 144. API with NestJS #144. Creating CLI applications with the Nest Commander
Command Line Applications are very useful for developers. We can interact with them by executing specific commands in the terminal, giving us much control and flexibility. You probably already interact with various CLI applications, such as Git or NPM.
Interestingly, we can also use NestJS to create a Command Line Interface (CLI) application. In this article, we learn what we can do with CLI apps and how to implement one with NestJS and the Nest Commander.
Command Line Interface applications
A straightforward example of a CLI tool is cp, which is used to copy files.
cp file.txt copiedFile.txt |
Let’s break it down:
- cp is the command name
- file.txt copiedFile.txt are arguments. The first one is the file name we want to copy, and the second is the destination.
Many options are configurable through options.
cp -R directoryToCopy copiedDirectory |
In the above example, -R is an option. It means we want to copy a folder with all its contents recursively.
In some cases, options can have their own arguments as well. For example, the following command makes a GET request and displays the result in the terminal:
curl https://www.google.com |
However, we can use the -o option to store the result of the request in the file. If we do that, we need to provide an additional argument with the name of the output file.
curl -o output.html https://www.google.com |
It is worth noticing that options are prefixed with a single dash if they use a shorthand or an abbreviated version of the option. On the other hand, options prefixed with two dashes are usually followed by a whole word or multiple words. For example, we can use --output instead of -o when using curl.
Creating CLI applications with NestJS
To create a CLI application with NestJS, let’s first create a new NestJS project.
npx @nestjs/cli new nestjs-cli |
The @nestjs/cli is a CLI tool created by the NestJS team.
We also need to install the Nest Commander library.
npm install nest-commander |
First, we need to adjust our bootstrap method in the main.ts file.
main.ts
import { AppModule } from './app.module'; import { CommandFactory } from 'nest-commander'; async function bootstrap() { await CommandFactory.run(AppModule); bootstrap(); |
We can now create our first simple command. To do that, we need to create a class that extends the CommandRunner and has the run method.
get-date.command.ts
import { Command, CommandRunner } from 'nest-commander'; @Command({ name: 'get-date', description: 'Prints the date' }) export class GetDateCommand extends CommandRunner { async run() { const currentDate = new Date(); console.log(currentDate.toLocaleDateString()); |
We mark the run method with async because it needs to return a promise.
Above, we create the current-date command that prints the current date.
We must also add our class to the providers array in our module.
app.module.ts
import { Module } from '@nestjs/common'; import { GetDateCommand } from './get-date/get-date.command'; @Module({ providers: [GetDateCommand], export class AppModule {} |
Running our command
To test our command, we must build our NestJS application and run it with Node.js. We can simplify this process by creating an appropriate script in our package.json file.
package.json
"scripts": { // ... "start": "nest build && node dist/main.js" // ... |
We can now run the start script and provide the command name we want to run.
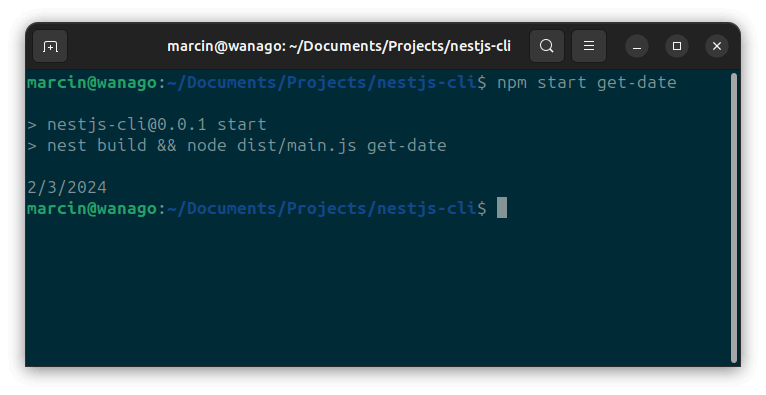
Using arguments
Let’s change our code so that the get-date command accepts a date it should format.
get-date.command.ts
import { Command, CommandRunner } from 'nest-commander'; @Command({ name: 'get-date', description: 'Prints the date' }) export class GetDateCommand extends CommandRunner { parseDate(date?: string) { if (date) { return new Date(date); return new Date(); async run(parameters: string[]) { const parsedDate = this.parseDate(parameters[0]); console.log(parsedDate.toLocaleDateString()); |
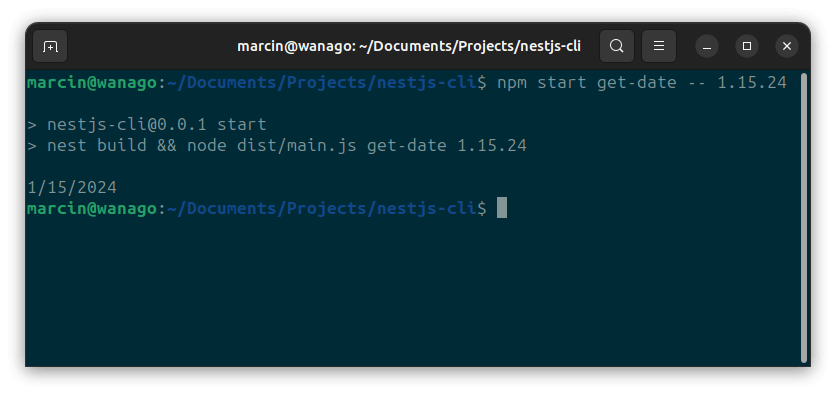
Any argument we pass to our command is available through the first argument in the run method.
There is a catch, though. Since we use npm to run our script, we must use the -- separator before providing the arguments.
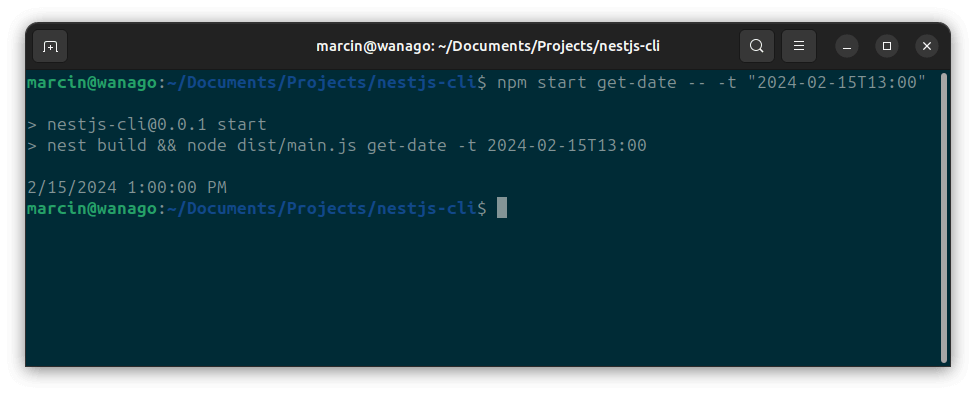
Using options
Let’s handle an option that signifies that we want to include the time in the output. To do that, we need to use the @Option decorator.
get-date.command.ts
import { Command, CommandRunner, Option } from 'nest-commander'; interface GetDateOptions { time?: boolean; @Command({ name: 'get-date', description: 'Prints the date' }) export class GetDateCommand extends CommandRunner { parseDate(date?: string) { if (date) { return new Date(date); return new Date(); formatDate(parsedDate: Date, shouldIncludeTime: boolean) { if (shouldIncludeTime) { return `${parsedDate.toLocaleDateString()} ${parsedDate.toLocaleTimeString()}`; return parsedDate.toLocaleDateString(); async run(parameters: string[], options: GetDateOptions) { const parsedDate = this.parseDate(parameters[0]); const formattedDate = this.formatDate(parsedDate, options.time); console.log(formattedDate); @Option({ flags: '-t, --time', description: 'Means that the output should include time', parseTimeOption() {} |
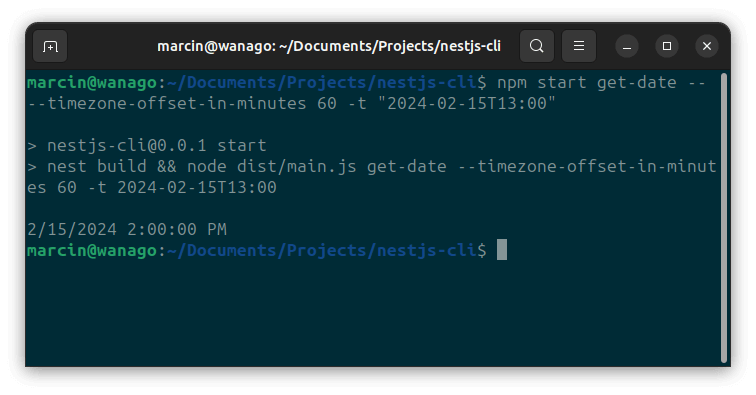
We can provide additional arguments related to our option. For example, let’s allow the users to provide the timezone offset they want to use with the date.
All arguments we pass to our commands are treated as strings. The @Option is a method decorator, and we can use that to parse the argument from a string to a number.
get-date.command.ts
import { Command, CommandRunner, Option } from 'nest-commander'; interface GetDateOptions { time?: boolean; timezoneOffsetInMinutes?: number; @Command({ name: 'get-date', description: 'Prints the date' }) export class GetDateCommand extends CommandRunner { parseDate(date?: string) { if (date) { return new Date(date); return new Date(); processTimezoneOffset(parsedDate: Date, timezoneOffset?: number) { if (timezoneOffset) { return new Date(parsedDate.getTime() + timezoneOffset * 60000); return parsedDate; formatDate(parsedDate: Date, shouldIncludeTime?: boolean) { if (shouldIncludeTime) { return `${parsedDate.toLocaleDateString()} ${parsedDate.toLocaleTimeString()}`; return parsedDate.toLocaleDateString(); async run(parameters: string[], options: GetDateOptions) { const parsedDate = this.parseDate(parameters[0]); const dateWithTimezoneOffset = this.processTimezoneOffset( parsedDate, options.timezoneOffsetInMinutes, const formattedDate = this.formatDate(dateWithTimezoneOffset, options.time); console.log(formattedDate); @Option({ flags: '-t, --time', description: 'Means that the output should include time', parseTimeOption() {} @Option({ flags: '-z, --timezone-offset-in-minutes [timezoneOffsetInMinutes]', description: 'The timezone offset in minutes', parseTimezoneOffsetOption(value: string) { return Number(value); |
Thanks to that, we can provide the number of minutes we want to add or subtract from the provided date.
Summary
In this article, we’ve gone through how command-line interface applications work and how to control them with arguments and options. We also learned how to implement a CLI application using NestJS and the Nest Commander. With the right approach, command-line interface applications can be straightforward, practical, and valuable tools for developers.
Series Navigation<< API with NestJS #143. Optimizing queries with views using PostgreSQL and KyselyRecommend
About Joyk
Aggregate valuable and interesting links.
Joyk means Joy of geeK