

Fruit and Vegetable Market Shop using MERN
source link: https://www.geeksforgeeks.org/fruit-and-vegetable-market-shop-using-mern/
Go to the source link to view the article. You can view the picture content, updated content and better typesetting reading experience. If the link is broken, please click the button below to view the snapshot at that time.

In this comprehensive guide, we’ll walk through the step-by-step process of creating a Fruit and Vegetable Market Shop using the MERN (MongoDB, Express.js, React, Node.js) stack. This project will showcase how to set up a full-stack web application where users can view, filter, and purchase various fruits and vegetables.
Preview of final output: Let us have a look at how the final output will look like.
.jpg)
Prerequisites:
Approach to create Fruit and Vegetable Market Shop in MERN:
- Import Statements:
- Import necessary dependencies and components.
- React is imported for defining React components.
ProductListandHeaderare custom components, assumed to be present in the./componentsdirectory.CustomItemContextis imported, presumably a custom context provider.
- Functional Component:
- Define a functional component named
App.
- Define a functional component named
- Context Provider:
- Wrap the
HeaderandProductListcomponents inside theCustomItemContextprovider. This suggests that the components within this provider have access to the context provided byCustomItemContext.
- Wrap the
- Component Rendering:
- Render the following components:
CustomItemContext: Presumably, this is a context provider that wraps its child components (HeaderandProductList). The purpose of this context is not clear from the provided code snippet.Headercomponent.ProductListcomponent.
- Render the following components:
Steps to Create the Backend:
Step 1: Create a directory for project
npm init backend
Step 2: Open project using the command
cd backend
Step 3: Installing the required packages
npm install express mongoose cors
Project Structure:
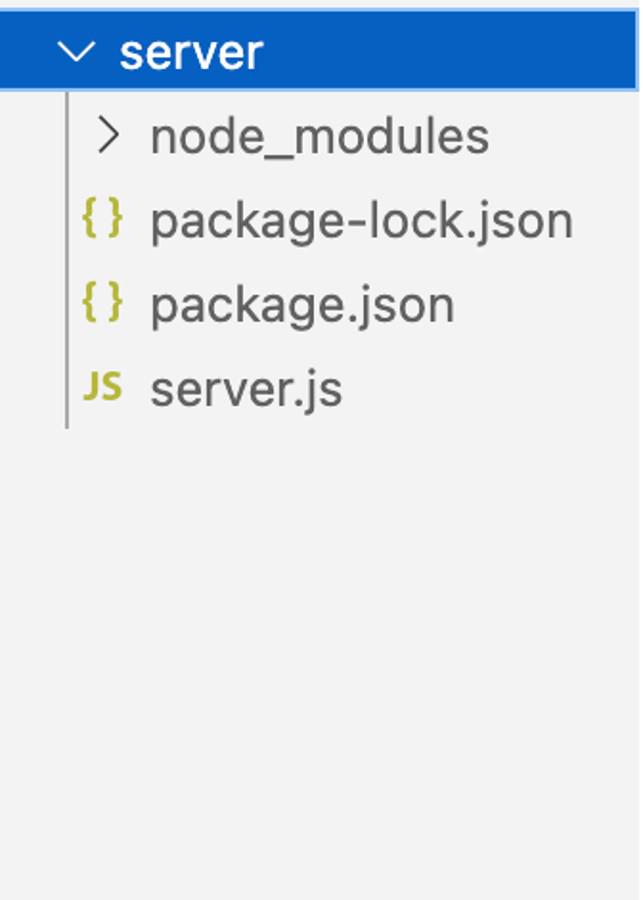
Backend project structure
The updated dependencies in package.json file for backend will look like:
"dependencies": {
    "cors": "^2.8.5",
    "express": "^4.18.2",
    "mongoose": "^8.0.0",
}
Example: Create `server.js` and paste the below code.
- Javascript
// server.jsconst express = require('express');const mongoose = require('mongoose');const app = express();const PORT = process.env.PORT || 5000;const cors = require('cors');{useNewUrlParser: true,useUnifiedTopology: true});app.use(express.json());app.use(cors()); // Use the cors middlewareconst productSchema = new mongoose.Schema({name: String,type: String,description: String,price: Number,image: String,});const Product = mongoose.model('Product', productSchema);// Function to seed initial data into the databaseconst seedDatabase = async () => {try {await Product.deleteMany(); // Clear existing dataconst products = [{name: 'Apple', type: 'Fruit',description: 'Fresh and crispy',price: 150,image:},{name: 'Banana',type: 'Fruit',description: 'Rich in potassium',price: 75,image:},{name: 'Orange',type: 'Fruit',description: 'Packed with vitamin C',price: 200,image:},{name: 'Carrot',type: 'Vegetable',description: 'Healthy and crunchy',price: 100,image:},{name: 'Broccoli',type: 'Vegetable',description: 'Nutrient-rich greens',price: 175,image:},{name: 'Grapes',type: 'Fruit',description: 'Sweet and juicy',price: 250,image:},{name: 'Strawberry',type: 'Fruit',description: 'Delicious red berries',price: 300,image:},{name: 'Lettuce',type: 'Vegetable',description: 'Crisp and fresh',price: 120,image:},{name: 'Tomato',type: 'Vegetable',description: 'Versatile and flavorful',price: 180,image:},{name: 'Cucumber',type: 'Vegetable',description: 'Cool and hydrating',price: 130,image:},];await Product.insertMany(products);console.log('Database seeded successfully');} catch (error) {console.error('Error seeding database:', error);}};// Seed the database on server startupseedDatabase();// Define API endpoint for fetching all productsapp.get('/api/products', async (req, res) => {try {// Fetch all products from the databaseconst allProducts = await Product.find();// Send the entire products array as JSON responseres.json(allProducts);} catch (error) {console.error(error);res.status(500).json({ error: 'Internal Server Error' });}});app.listen(PORT, () => {console.log(`Server is running on port ${PORT}`);}); |
Start the backend server:
node server.js
Steps to Create the Frontend:
Step 1: Set up React frontend using the command.
npx create-react-app client
Step 2: Navigate to the project folder using the command.
cd client
Project Structure:
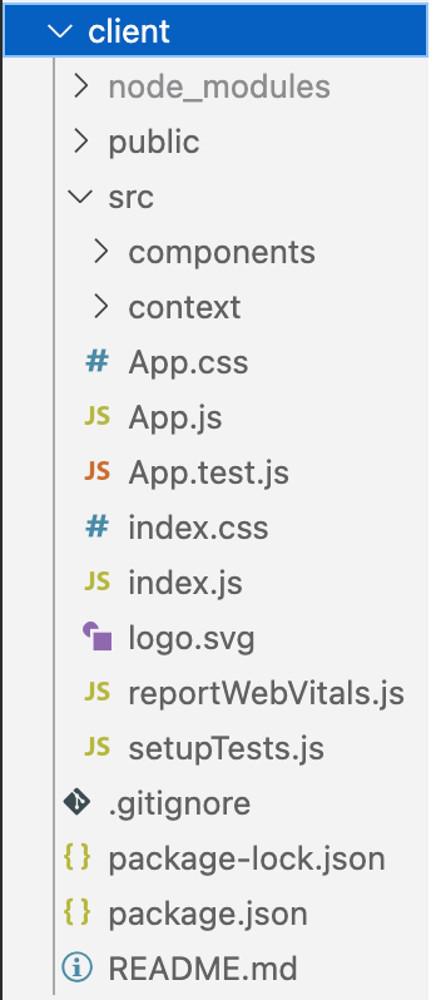
Client /Frontend project structure
The updated dependencies in package.json for frontend will look like:
"dependencies": {
    "react": "^18.2.0",
    "react-dom": "^18.2.0",
    "react-scripts": "5.0.1",
    "web-vitals": "^2.1.4"
}
- Javascript
- Javascript
- Javascript
- Javascript
- Javascript
// client/src/App.jsimport React from 'react';import ProductList from './components/ProductList';import Header from './components/Header';import './App.css'import CustomItemContext from './context/ItemContext';const App = () => {return (<CustomItemContext><Header /><ProductList /></CustomItemContext>);};export default App; |
To start frontend code:
npm start
Output:
.gif)
Final Project Output
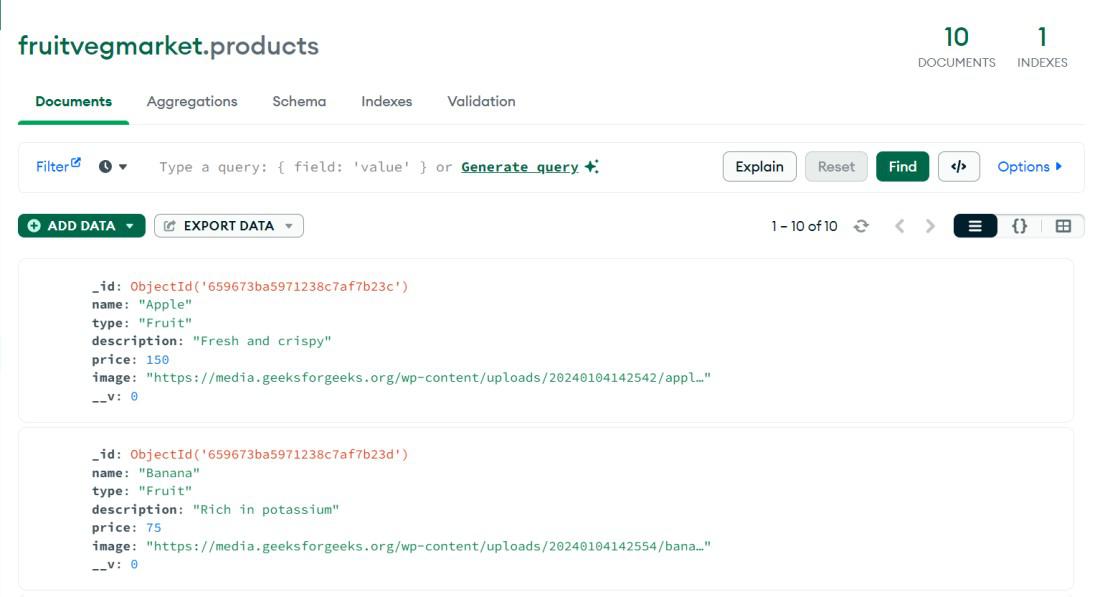
Output of Data Saved in Database:
Recommend
About Joyk
Aggregate valuable and interesting links.
Joyk means Joy of geeK