

Unix as IDE (2012)
source link: https://blog.sanctum.geek.nz/series/unix-as-ide/
Go to the source link to view the article. You can view the picture content, updated content and better typesetting reading experience. If the link is broken, please click the button below to view the snapshot at that time.
Blog Archives
This series has been independently translated into Chinese, Russian, Turkish, and Korean, and formatted as an ebook.
Newbies and experienced professional programmers alike appreciate the concept of the IDE, or integrated development environment. Having the primary tools necessary for organising, writing, maintaining, testing, and debugging code in an integrated application with common interfaces for all the different tools is certainly a very valuable asset. Additionally, an environment expressly designed for programming in various languages affords advantages such as autocompletion, and syntax checking and highlighting.
With such tools available to developers on all major desktop operating systems
including GNU/Linux and BSD, and with many of the best free of charge, there’s not
really a good reason to write your code in Windows Notepad, or with nano or
cat.
However, there’s a minor meme among devotees of Unix and its modern-day derivatives that “Unix is an IDE”, meaning that the tools available to developers on the terminal cover the major features in cutting-edge desktop IDEs with some ease. Opinion is quite divided on this, but whether or not you feel it’s fair to call Unix an IDE in the same sense as Eclipse or Microsoft Visual Studio, it may surprise you just how comprehensive a development environment the humble Bash shell can be.
How is UNIX an IDE?
The primary rationale for using an IDE is that it gathers all your tools in the same place, and you can use them in concert with roughly the same user interface paradigm, and without having to exert too much effort to make separate applications cooperate. The reason this becomes especially desirable with GUI applications is because it’s very difficult to make windowed applications speak a common language or work well with each other; aside from cutting and pasting text, they don’t share a common interface.
The interesting thing about this problem for shell users is that well-designed and enduring Unix tools already share a common user interface in streams of text and files as persistent objects, otherwise expressed in the axiom “everything’s a file”. Pretty much everything in Unix is built around these two concepts, and it’s this common user interface, coupled with a forty-year history of high-powered tools whose users and developers have especially prized interoperability, that goes a long way to making Unix as powerful as a full-blown IDE.
The right idea
This attitude isn’t the preserve of battle-hardened Unix greybeards; you can see it in another form in the way the modern incarnations of the two grand old text editors Emacs and Vi (GNU Emacs and Vim) have such active communities developing plugins to make them support pretty much any kind of editing task. There are plugins to do pretty much anything you could really want to do in programming in both editors, and any Vim junkie could spout off at least three or four that they feel are “essential”.
However, it often becomes apparent to me when reading about these efforts that
the developers concerned are trying to make these text editors into IDEs in
their own right. There are posts about never needing to leave Vim, or
never needing to leave Emacs. But I think that trying to shoehorn Vim or
Emacs into becoming something that it’s not isn’t quite thinking about the
problem in the right way. Bram Moolenaar, the author of Vim, appears to agree
to some extent, as you can see by reading :help design-not. The shell is
only ever a Ctrl+Z away, and its mature, highly composable toolset will afford
you more power than either editor ever could.
EDIT October 2017: New versions of Vim 8.x now include an embedded terminal accessible with the :terminal command. It works a lot better than previous plugin-based attempts to do this. Even with this new feature, I still strongly recommend the approach discussed in these posts instead.
About this series
In this series of posts, I will be going through six major features of an IDE, and giving examples showing how common tools available in GNU/Linux allow you to use them together with ease. This will by no means be a comprehensive survey, nor are the tools I will demonstrate the only options.
What I’m not trying to say
I don’t think IDEs are bad; I think they’re brilliant, which is why I’m trying to convince you that Unix can be used as one, or at least thought of as one. I’m also not going to say that Unix is always the best tool for any programming task; it is arguably much better suited for C, C++, Python, Perl, or Shell development than it is for more “industry” languages like Java or C#, especially if writing GUI-heavy applications. In particular, I’m not going to try to convince you to scrap your hard-won Eclipse or Microsoft Visual Studio knowledge for the sometimes esoteric world of the command line. All I want to do is show you what we’re doing on the other side of the fence.
Posted in GNU/Linux | Tagged ide, integrated development environment, unix, development, programming, environment, tools
One prominent feature of an IDE is a built-in system for managing files, both the elementary functions like moving, renaming, and deleting, and ones more specific to development, like compiling and checking syntax. It may also be useful to have operations on sets of files, such as finding files of a certain extension or size, or searching files for specific patterns. In this first article, I’ll explore some useful ways to use tools that will be familiar to most GNU/Linux users for the purposes of working with sets of files in a project.
Listing files
Using ls is probably one of the first commands an administrator will learn
for getting a simple list of the contents of the directory. Most administrators
will also know about the -a and -l switches, to show all files including
dot files and to show more detailed data about files in columns, respectively.
There are other switches to GNU ls which are less frequently used, some of
which turn out to be very useful for programming:
-t— List files in order of last modification date, newest first. This is useful for very large directories when you want to get a quick list of the most recent files changed, maybe piped throughheadorsed 10q. Probably most useful combined with-l. If you want the oldest files, you can add-rto reverse the list.-X— Group files by extension; handy for polyglot code, to group header files and source files separately, or to separate source files from directories or build files.-v— Naturally sort version numbers in filenames.-S— Sort by filesize.-R— List files recursively. This one is good combined with-land piped through a pager likeless.
Since the listing is text like anything else, you could, for example, pipe the
output of this command into a vim process, so you could add explanations of
what each file is for and save it as an inventory file or add it to a README:
$ ls -XR | vim -
This kind of stuff can even be automated by make with a little work, which
I’ll cover in another article later in the series.
Finding files
Funnily enough, you can get a complete list of files including relative paths
with no decoration by simply typing find with a . argument for the current
directory, though you may want to pipe it through sort:
$ find . | sort
.
./Makefile
./README
./build
./client.c
./client.h
./common.h
./project.c
./server.c
./server.h
./tests
./tests/suite1.pl
./tests/suite2.pl
./tests/suite3.pl
./tests/suite4.pl
If you want an ls -l style listing, you can add -ls as the action to find
results in GNU find(1):
$ find . -ls | sort -k11,11
1155096    4 drwxr-xr-x   4 tom      tom          4096 Feb 10 09:37 .
1155152    4 drwxr-xr-x   2 tom      tom          4096 Feb 10 09:17 ./build
1155155    4 -rw-r--r--   1 tom      tom          2290 Jan 11 07:21 ./client.c
1155157    4 -rw-r--r--   1 tom      tom          1871 Jan 11 16:41 ./client.h
1155159   32 -rw-r--r--   1 tom      tom         30390 Jan 10 15:29 ./common.h
1155153   24 -rw-r--r--   1 tom      tom         21170 Jan 11 05:43 ./Makefile
1155154   16 -rw-r--r--   1 tom      tom         13966 Jan 14 07:39 ./project.c
1155080   28 -rw-r--r--   1 tom      tom         25840 Jan 15 22:28 ./README
1155156   32 -rw-r--r--   1 tom      tom         31124 Jan 11 02:34 ./server.c
1155158    4 -rw-r--r--   1 tom      tom          3599 Jan 16 05:27 ./server.h
1155160    4 drwxr-xr-x   2 tom      tom          4096 Feb 10 09:29 ./tests
1155161    4 -rw-r--r--   1 tom      tom           288 Jan 13 03:04 ./tests/suite1.pl
1155162    4 -rw-r--r--   1 tom      tom          1792 Jan 13 10:06 ./tests/suite2.pl
1155163    4 -rw-r--r--   1 tom      tom           112 Jan  9 23:42 ./tests/suite3.pl
1155164    4 -rw-r--r--   1 tom      tom           144 Jan 15 02:10 ./tests/suite4.pl
Note that in this case I have to specify to sort that it should sort by the
11th column of output, the filenames; this is done with the -k option.
find has a complex filtering syntax all of its own; the following examples
show some of the most useful filters you can apply to retrieve lists of certain
files:
find . -name '*.c'— Find files with names matching a shell-style pattern. Use-inamefor a case-insensitive search.find . -path '*test*'— Find files with paths matching a shell-style pattern. Use-ipathfor a case-insensitive search.find . -mtime -5— Find files edited within the last five days. You can use+5instead to find files edited before five days ago.find . -newer server.c— Find files more recently modified thanserver.c.find . -type d— Find directories. For files, use-type f; for symbolic links, use-type l.
Note, in particular, that all of these can be combined, for example to find C source files edited in the last two days:
$ find . -name '*.c' -mtime -2
By default, the action find takes for search results is simply to list them
on standard output, but there are several other useful actions:
-ls— Provide anls -lstyle listing, as above (GNUfind(1))-delete— Delete matching files-exec— Run an arbitrary command line on each file, replacing{}with the appropriate filename, and terminated by\;; for example:$ find . -name '*.pl' -exec perl -c {} \;You can use
+as the terminating character instead if you want to put all of the results on one invocation of the command. One trick I find myself using often is usingfindto generate lists of files that I then edit in vertically split Vim windows:$ find . -name '*.c' -exec vim {} +
Earlier versions of Unix as IDE suggested the use of xargs with find
results. In most cases this should not really be necessary, and it’s more
robust to handle filenames with whitespace using -exec or a while read -r
loop.
Searching files
More often than attributes of a set of files, however, you want to find files
based on their contents, and it’s no surprise that grep, in particular
grep -R, is useful here. This searches the current directory tree recursively
for anything matching ‘someVar’:
$ grep -FR someVar .
Don’t forget the case insensitivity flag either, since by default grep works
with fixed case:
$ grep -iR somevar .
Also, you can print a list of files that match without printing the matches
themselves with grep -l:
$ grep -lR someVar .
If you write scripts or batch jobs using the output of the above, use a while
loop with read to handle spaces and other special characters in filenames:
grep -lR someVar | while IFS= read -r file; do
    head "$file"
done
If you’re using version control for your project, this often includes metadata
in the .svn, .git, or .hg directories. This is dealt with easily enough
by excluding (grep -v) anything matching an appropriate fixed (grep -F)
string:
$ grep -R someVar . | grep -vF .svn
Some versions of grep include --exclude and --exclude-dir options, which
may be tidier.
With all this said, there’s a very popular alternative to grep called
ack, which excludes this sort of stuff for you by default. It also allows you
to use Perl-compatible regular expressions (PCRE), which are a favourite for
many programmers. It has a lot of utilities that are generally useful for working
with source code, so while there’s nothing wrong with good old grep since you
know it will always be there, if you can install ack I highly recommend it.
There’s a Debian package called ack-grep, and being a Perl script it’s
otherwise very simple to install.
Unix purists might be displeased with my even mentioning a relatively new Perl
script alternative to classic grep, but I don’t believe that the Unix
philosophy or using Unix as an IDE is dependent on sticking to the same classic
tools when alternatives with the same spirit that solve new problems are
available.
File metadata
The file tool gives you a one-line summary of what kind of file you’re
looking at, based on its extension, headers and other cues. This is very handy
used with find when examining a set of unfamiliar files:
$ find . -exec file {} +
.:            directory
./hanoi:      Perl script, ASCII text executable
./.hanoi.swp: Vim swap file, version 7.3
./factorial:  Perl script, ASCII text executable
./bits.c:     C source, ASCII text
./bits:       ELF 32-bit LSB executable, Intel 80386, version ...
Matching files
As a final tip for this section, I’d suggest learning a bit about pattern matching and brace expansion in Bash, which you can do in my earlier post entitled Bash shell expansion.
All of the above make the classic UNIX shell into a pretty powerful means of managing files in programming projects.
Edited April 2017 to use POSIX-compatible examples for most of the find(1) invocations.
Posted in GNU/Linux | Tagged ls, grep, find, unix, file, management, list, sort, batch, ack
The text editor is the core tool for any programmer, which is why choice of editor evokes such tongue-in-cheek zealotry in debate among programmers. Unix is the operating system most strongly linked with two enduring favourites, Emacs and Vi, and their modern versions in GNU Emacs and Vim, two editors with very different editing philosophies but comparable power.
Being a Vim heretic myself, here I’ll discuss the indispensable features of Vim for programming, and in particular the use of shell tools called from within Vim to complement the editor’s built-in functionality. Some of the principles discussed here will be applicable to those using Emacs as well, but probably not for underpowered editors like Nano.
This will be a very general survey, as Vim’s toolset for programmers is
enormous, and it’ll still end up being quite long. I’ll focus on the
essentials and the things I feel are most helpful, and try to provide links to
articles with a more comprehensive treatment of the topic. Don’t forget that
Vim’s :help has surprised many people new to the editor with its high quality
and usefulness.
Filetype detection
Vim has built-in settings to adjust its behaviour, in particular its syntax
highlighting, based on the filetype being loaded, which it happily detects and
generally does a good job at doing so. In particular, this allows you to set an
indenting style conformant with the way a particular language is usually
written. This should be one of the first things in your .vimrc file.
if has("autocmd")
  filetype indent plugin on
endif
Syntax highlighting
Even if you’re just working with a 16-color terminal, just include the
following in your .vimrc if you’re not already:
syntax on
The colorschemes with a default 16-color terminal are not pretty largely by necessity, but they do the job, and for most languages syntax definition files are available that work very well. There’s a tremendous array of colorschemes available, and it’s not hard to tweak them to suit or even to write your own. Using a 256-color terminal or gVim will give you more options. Good syntax highlighting files will show you definite syntax errors with a glaring red background.
Line numbering
To turn line numbers on if you use them a lot in your traditional IDE:
set number
You might like to try this as well, if you have at least Vim 7.3 and are keen to try numbering lines relative to the current line rather than absolutely:
set relativenumber
Tags files
Vim works very well with the output from the ctags utility. This allows
you to search quickly for all uses of a particular identifier throughout the
project, or to navigate straight to the declaration of a variable from one of
its uses, regardless of whether it’s in the same file. For large C projects in
multiple files this can save huge amounts of otherwise wasted time, and is
probably Vim’s best answer to similar features in mainstream IDEs.
You can run :!ctags -R on the root directory of projects in many popular
languages to generate a tags file filled with definitions and locations for
identifiers throughout your project. Once a tags file for your project is
available, you can search for uses of an appropriate tag throughout the project
like so:
:tag someClass
The commands :tn and :tp will allow you to iterate through successive uses
of the tag elsewhere in the project. The built-in tags functionality for this
already covers most of the bases you’ll probably need, but for features such as
a tag list window, you could try installing the very popular Taglist
plugin. Tim Pope’s Unimpaired plugin also contains a couple of useful
relevant mappings.
Calling external programs
Until 2017, there were three major methods of calling external programs during a Vim session:
:!<command>— Useful for issuing commands from within a Vim context particularly in cases where you intend to record output in a buffer.:shell— Drop to a shell as a subprocess of Vim. Good for interactive commands.- Ctrl-Z — Suspend Vim and issue commands from the shell that called it.
Since 2017, Vim 8.x now includes a :terminal command to bring up a terminal emulator buffer in a window. This seems to work better than previous plugin-based attempts at doing this, such as Conque. For the moment I still strongly recommend using one of the older methods, all of which also work in other vi-type editors.
Lint programs and syntax checkers
Checking syntax or compiling with an external program call (e.g. perl -c,
gcc) is one of the calls that’s good to make from within the editor using
:! commands. If you were editing a Perl file, you could run this like so:
:!perl -c %

/home/tom/project/test.pl syntax OK

Press Enter or type command to continue
The % symbol is shorthand for the file loaded in the current buffer. Running
this prints the output of the command, if any, below the command line. If you
wanted to call this check often, you could perhaps map it as a command, or even
a key combination in your .vimrc file. In this case, we define a command
:PerlLint which can be called from normal mode with \l:
command PerlLint !perl -c %
nnoremap <leader>l :PerlLint<CR>
For a lot of languages there’s an even better way to do this, though, which
allows us to capitalise on Vim’s built-in quickfix window. We can do this by
setting an appropriate makeprg for the filetype, in this case including a
module that provides us with output that Vim can use for its quicklist, and a
definition for its two formats:
:set makeprg=perl\ -c\ -MVi::QuickFix\ %
:set errorformat+=%m\ at\ %f\ line\ %l\.
:set errorformat+=%m\ at\ %f\ line\ %l
You may need to install this module first via CPAN, or the Debian package
libvi-quickfix-perl. This done, you can type :make after saving the file to
check its syntax, and if errors are found, you can open the quicklist window
with :copen to inspect the errors, and :cn and :cp to jump to them within
the buffer.

This also works for output from gcc, and pretty much any other compiler
syntax checker that you might want to use that includes filenames, line
numbers, and error strings in its error output. It’s even possible to do this
with web-focused languages like PHP, and for tools like JSLint for
JavaScript. There’s also an excellent plugin named Syntastic that
does something similar.
Reading output from other commands
You can use :r! to call commands and paste their output directly into the
buffer with which you’re working. For example, to pull a quick directory
listing for the current folder into the buffer, you could type:
:r!ls
This doesn’t just work for commands, of course; you can simply read in other
files this way with just :r, like public keys or your own custom boilerplate:
:r ~/.ssh/id_rsa.pub
:r ~/dev/perl/boilerplate/copyright.pl
Filtering output through other commands
You can extend this to actually filter text in the buffer through external
commands, perhaps selected by a range or visual mode, and replace it with the
command’s output. While Vim’s visual block mode is great for working with
columnar data, it’s very often helpful to bust out tools like column, cut,
sort, or awk.
For example, you could sort the entire file in reverse by the second column by typing:
:%!sort -k2,2r
You could print only the third column of some selected text where the line
matches the pattern /vim/ with:
:'<,'>!awk '/vim/ {print $3}'
You could arrange keywords from lines 1 to 10 in nicely formatted columns like:
:1,10!column -t
Really any kind of text filter or command can be manipulated like this in Vim, a simple interoperability feature that expands what the editor can do by an order of magnitude. It effectively makes the Vim buffer into a text stream, which is a language that all of these classic tools speak.
There is a lot more detail on this in my “Shell from Vi” post.
Built-in alternatives
It’s worth noting that for really common operations like sorting and searching,
Vim has built-in methods in :sort and :grep, which can be helpful if you’re
stuck using Vim on Windows, but don’t have nearly the adaptability of shell
calls.
Diffing
Vim has a diffing mode, vimdiff, which allows you to not only view the
differences between different versions of a file, but also to resolve conflicts
via a three-way merge and to replace differences to and fro with commands like
:diffput and :diffget for ranges of text. You can call vimdiff from the
command line directly with at least two files to compare like so:
$ vimdiff file-v1.c file-v2.c
Version control
You can call version control methods directly from within Vim, which is
probably all you need most of the time. It’s useful to remember here that %
is always a shortcut for the buffer’s current file:
:!svn status
:!svn add %
:!git commit -a
Recently a clear winner for Git functionality with Vim has come up with Tim Pope’s Fugitive, which I highly recommend to anyone doing Git development with Vim. There’ll be a more comprehensive treatment of version control’s basis and history in Unix in Part 7 of this series.
The difference
Part of the reason Vim is thought of as a toy or relic by a lot of programmers used to GUI-based IDEs is its being seen as just a tool for editing files on servers, rather than a very capable editing component for the shell in its own right. Its own built-in features being so composable with external tools on Unix-friendly systems makes it into a text editing powerhouse that sometimes surprises even experienced users.
Posted in GNU/Linux | Tagged commands, diff, editor, unix, tools, editing, version control, external
There are a lot of tools available for compiling and interpreting code on the
Unix platform, and they tend to be used in different ways. However,
conceptually many of the steps are the same. Here I’ll discuss compiling C code
with gcc from the GNU Compiler Collection, and briefly the use of perl as
an example of an interpreter.
GCC is a very mature GPL-licensed collection of compilers, perhaps best-known for working with C and C++ programs. Its free software license and near ubiquity on free Unix-like systems like GNU/Linux and BSD has made it enduringly popular for these purposes, though more modern alternatives are available in compilers using the LLVM infrastructure, such as Clang.
The frontend binaries for GNU Compiler Collection are best thought of less as a set of complete compilers in their own right, and more as drivers for a set of discrete programming tools, performing parsing, compiling, and linking, among other steps. This means that while you can use GCC with a relatively simple command line to compile straight from C sources to a working binary, you can also inspect in more detail the steps it takes along the way and tweak it accordingly.
I won’t be discussing the use of make files here, though you’ll almost
certainly be wanting them for any C project of more than one file; that will be
discussed in the next article on build automation tools.
Compiling and assembling object code
You can compile object code from a C source file like so:
$ gcc -c example.c -o example.o
Assuming it’s a valid C program, this will generate an unlinked binary object
file called example.o in the current directory, or tell you the reasons it
can’t. You can inspect its assembler contents with the objdump tool:
$ objdump -D example.o
Alternatively, you can get gcc to output the appropriate assembly code for
the object directly with the -S parameter:
$ gcc -c -S example.c -o example.s
This kind of assembly output can be particularly instructive, or at least interesting, when printed inline with the source code itself, which you can do with:
$ gcc -c -g -Wa,-a,-ad example.c > example.lst
Preprocessor
The C preprocessor cpp is generally used to include header files and define
macros, among other things. It’s a normal part of gcc compilation, but you
can view the C code it generates by invoking cpp directly:
$ cpp example.c
This will print out the complete code as it would be compiled, with includes and relevant macros applied.
Linking objects
One or more objects can be linked into appropriate binaries like so:
$ gcc example.o -o example
In this example, GCC is not doing much more than abstracting a call to ld,
the GNU linker. The command produces an executable binary called example.
Compiling, assembling, and linking
All of the above can be done in one step with:
$ gcc example.c -o example
This is a little simpler, but compiling objects independently turns out to have some practical performance benefits in not recompiling code unnecessarily, which I’ll discuss in the next article.
Including and linking
C files and headers can be explicitly included in a compilation call with the
-I parameter:
$ gcc -I/usr/include/somelib.h example.c -o example
Similarly, if the code needs to be dynamically linked against a compiled system
library available in common locations like /lib or /usr/lib, such as
ncurses, that can be included with the -l parameter:
$ gcc -lncurses example.c -o example
If you have a lot of necessary inclusions and links in your compilation process, it makes sense to put this into environment variables:
$ export CFLAGS=-I/usr/include/somelib.h
$ export CLIBS=-lncurses
$ gcc $CFLAGS $CLIBS example.c -o example
This very common step is another thing that a Makefile is designed to
abstract away for you.
Compilation plan
To inspect in more detail what gcc is doing with any call, you can add the
-v switch to prompt it to print its compilation plan on the standard error
stream:
$ gcc -v -c example.c -o example.o
If you don’t want it to actually generate object files or linked binaries, it’s
sometimes tidier to use -### instead:
$ gcc -### -c example.c -o example.o
This is mostly instructive to see what steps the gcc binary is abstracting
away for you, but in specific cases it can be useful to identify steps the
compiler is taking that you may not necessarily want it to.
More verbose error checking
You can add the -Wall and/or -pedantic options to the gcc call to prompt
it to warn you about things that may not necessarily be errors, but could be:
$ gcc -Wall -pedantic -c example.c -o example.o
This is good for including in your Makefile or in your makeprg
definition in Vim, as it works well with the quickfix window discussed in the
previous article and will enable you to write more readable, compatible, and
less error-prone code as it warns you more extensively about errors.
Profiling compilation time
You can pass the flag -time to gcc to generate output showing how long each
step is taking:
$ gcc -time -c example.c -o example.o
Optimisation
You can pass generic optimisation options to gcc to make it attempt to build
more efficient object files and linked binaries, at the expense of compilation
time. I find -O2 is usually a happy medium for code going into production:
gcc -O1gcc -O2gcc -O3
Like any other Bash command, all of this can be called from within Vim by:
:!gcc % -o example
Interpreters
The approach to interpreted code on Unix-like systems is very different. In these examples I’ll use Perl, but most of these principles will be applicable to interpreted Python or Ruby code, for example.
Inline
You can run a string of Perl code directly into the interpreter in any one of the following ways, in this case printing the single line “Hello, world.” to the screen, with a linebreak following. The first one is perhaps the tidiest and most standard way to work with Perl; the second uses a heredoc string, and the third a classic Unix shell pipe.
$ perl -e 'print "Hello world.\n";'
$ perl <<<'print "Hello world.\n";'
$ echo 'print "Hello world.\n";' | perl
Of course, it’s more typical to keep the code in a file, which can be run directly:
$ perl hello.pl
In either case, you can check the syntax of the code without actually running
it with the -c switch:
$ perl -c hello.pl
But to use the script as a logical binary, so you can invoke it directly without knowing or caring what the script is, you can add a special first line to the file called the “shebang” that does some magic to specify the interpreter through which the file should be run.
#!/usr/bin/env perl
print "Hello, world.\n";
The script then needs to be made executable with a chmod call. It’s also good
practice to rename it to remove the extension, since it is now taking the shape
of a logic binary:
$ mv hello{.pl,}
$ chmod +x hello
And can thereafter be invoked directly, as if it were a compiled binary:
$ ./hello
This works so transparently that many of the common utilities on modern GNU/Linux systems,
such as the adduser frontend to useradd, are actually Perl or even Python
scripts.
In the next post, I’ll describe the use of make for defining and automating
building projects in a manner comparable to IDEs, with a nod to newer takes on
the same idea with Ruby’s rake.
Posted in GNU/Linux | Tagged python, ruby, unix, compiler, linker, assembler, interpreter, gcc, perl
Because compiling projects can be such a complicated and repetitive process, a
good IDE provides a means to abstract, simplify, and even automate software
builds. Unix and its descendents accomplish this process with a Makefile, a
prescribed recipe in a standard format for generating executable files from
source and object files, taking account of changes to only rebuild what’s
necessary to prevent costly recompilation.
One interesting thing to note about make is that while it’s generally used
for compiled software build automation and has many shortcuts to that effect,
it can actually effectively be used for any situation in which it’s required to
generate one set of files from another. One possible use is to generate
web-friendly optimised graphics from source files for deployment for a website;
another use is for generating static HTML pages from code, rather than
generating pages on the fly. It’s on the basis of this more flexible
understanding of software “building” that modern takes on the tool like Ruby’s
rake have become popular, automating the general tasks for producing and
installing code and files of all kinds.
Anatomy of a Makefile
The general pattern of a Makefile is a list of variables and a list of
targets, and the sources and/or objects used to provide them. Targets may not
necessarily be linked binaries; they could also constitute actions to perform
using the generated files, such as install to instate built files into the
system, and clean to remove built files from the source tree.
It’s this flexibility of targets that enables make to automate any sort of
task relevant to assembling a production build of software; not just the
typical parsing, preprocessing, compiling proper and linking steps performed by
the compiler, but also running tests (make test), compiling documentation
source files into one or more appropriate formats, or automating deployment of
code into production systems, for example, uploading to a website via a git
push or similar content-tracking method.
An example Makefile for a simple software project might look something like
the below:
all: example
example: main.o example.o library.o
gcc main.o example.o library.o -o example
main.o: main.c
gcc -c main.c -o main.o
example.o: example.c
gcc -c example.c -o example.o
library.o: library.c
gcc -c library.c -o library.o
clean:
rm *.o example
install: example
cp example /usr/bin
The above isn’t the most optimal Makefile possible for this project, but it
provides a means to build and install a linked binary simply by typing make.
Each target definition contains a list of the dependencies required for the
command that follows; this means that the definitions can appear in any order,
and the call to make will call the relevant commands in the appropriate
order.
Much of the above is needlessly verbose or repetitive; for example, if an
object file is built directly from a single C file of the same name, then we
don’t need to include the target at all, and make will sort things out for
us. Similarly, it would make sense to put some of the more repeated calls into
variables so that we would not have to change them individually if our choice
of compiler or flags changed. A more concise version might look like the
following:
CC = gcc
OBJECTS = main.o example.o library.o
BINARY = example
all: example
example: $(OBJECTS)
$(CC) $(OBJECTS) -o $(BINARY)
clean:
rm -f $(BINARY) $(OBJECTS)
install: example
cp $(BINARY) /usr/bin
More general uses of make
In the interests of automation, however, it’s instructive to think of this a
bit more generally than just code compilation and linking. An example could be
for a simple web project involving deploying PHP to a live webserver. This is
not normally a task people associate with the use of make, but the principles
are the same; with the source in place and ready to go, we have certain targets
to meet for the build.
PHP files don’t require compilation, of course, but web assets often do. An example that will be familiar to web developers is the generation of scaled and optimised raster images from vector source files, for deployment to the web. You keep and version your original source file, and when it comes time to deploy, you generate a web-friendly version of it.
Let’s assume for this particular project that there’s a set of four icons used
throughout the site, sized to 64 by 64 pixels. We have the source files to hand
in SVG vector format, safely tucked away in version control, and now need to
generate the smaller bitmaps for the site, ready for deployment. We could
therefore define a target icons, set the dependencies, and type out the
commands to perform. This is where command line tools in Unix really begin to
shine in use with Makefile syntax:
icons: create.png read.png update.png delete.png
create.png: create.svg
convert create.svg create.raw.png && \
pngcrush create.raw.png create.png
read.png: read.svg
convert read.svg read.raw.png && \
pngcrush read.raw.png read.png
update.png: update.svg
convert update.svg update.raw.png && \
pngcrush update.raw.png update.png
delete.png: delete.svg
convert delete.svg delete.raw.png && \
pngcrush delete.raw.png delete.png
With the above done, typing make icons will go through each of the source
icons files in a Bash loop, convert them from SVG to PNG using ImageMagick’s
convert, and optimise them with pngcrush, to produce images ready for
upload.
A similar approach can be used for generating help files in various forms, for example, generating HTML files from Markdown source:
docs: README.html credits.html
README.html: README.md
markdown README.md > README.html
credits.html: credits.md
markdown credits.md > credits.html
And perhaps finally deploying a website with git push web, but only after
the icons are rasterized and the documents converted:
deploy: icons docs
git push web
For a more compact and abstract formula for turning a file of one suffix into
another, you can use the .SUFFIXES pragma to define these using special
symbols. The code for converting icons could look like this; in this case, $<
refers to the source file, $* to the filename with no extension, and $@ to
the target.
icons: create.png read.png update.png delete.png

.SUFFIXES: .svg .png

.svg.png:
    convert $< $*.raw.png && \
    pngcrush $*.raw.png $@
Tools for building a Makefile
A variety of tools exist in the GNU Autotools toolchain for the construction of
configure scripts and make files for larger software projects at a higher
level, in particular autoconf and automake. The use of these
tools allows generating configure scripts and make files covering very
large source bases, reducing the necessity of building otherwise extensive
makefiles manually, and automating steps taken to ensure the source remains
compatible and compilable on a variety of operating systems.
Covering this complex process would be a series of posts in its own right, and is out of scope of this survey.
Thanks to user samwyse for the .SUFFIXES suggestion in the comments.
Posted in GNU/Linux | Tagged clean, install, unix, make, makefile, build, target, dependency, generate
When unexpected behaviour is noticed in a program, GNU/Linux provides a wide
variety of command-line tools for diagnosing problems. The use of gdb, the
GNU debugger, and related tools like the lesser-known Perl debugger, will be
familiar to those using IDEs to set breakpoints in their code and to examine
program state as it runs. Other tools of interest are available however to
observe in more detail how a program is interacting with a system and using its
resources.
Debugging with gdb
You can use gdb in a very similar fashion to the built-in debuggers in modern
IDEs like Eclipse and Visual Studio. If you are debugging a program that you’ve
just compiled, it makes sense to compile it with its debugging symbols added
to the binary, which you can do with a gcc call containing the -g option.
If you’re having problems with some code, it helps to also use -Wall to show
any errors you may have otherwise missed:
$ gcc -g -Wall example.c -o example
The classic way to use gdb is as the shell for a running program compiled in
C or C++, to allow you to inspect the program’s state as it proceeds towards
its crash.
$ gdb example
...
Reading symbols from /home/tom/example...done.
(gdb)
At the (gdb) prompt, you can type run to start the program, and it may
provide you with more detailed information about the causes of errors such as
segmentation faults, including the source file and line number at which the
problem occurred. If you’re able to compile the code with debugging symbols as
above and inspect its running state like this, it makes figuring out the cause
of a particular bug a lot easier.
(gdb) run
Starting program: /home/tom/gdb/example

Program received signal SIGSEGV, Segmentation fault.
0x000000000040072e in main () at example.c:43
43     printf("%d\n", *segfault);
After an error terminates the program within the (gdb) shell, you can type
backtrace to see what the calling function was, which can include the
specific parameters passed that may have something to do with what caused the
crash.
(gdb) backtrace
#0  0x000000000040072e in main () at example.c:43
You can set breakpoints for gdb using the break to halt the program’s run
if it reaches a matching line number or function call:
(gdb) break 42
Breakpoint 1 at 0x400722: file example.c, line 42.
(gdb) break malloc
Breakpoint 1 at 0x4004c0
(gdb) run
Starting program: /home/tom/gdb/example

Breakpoint 1, 0x00007ffff7df2310 in malloc () from /lib64/ld-linux-x86-64.so.2
Thereafter it’s helpful to step through successive lines of code using
step. You can repeat this, like any gdb command, by pressing Enter
repeatedly to step through lines one at a time:
(gdb) step
Single stepping until exit from function _start,
which has no line number information.
0x00007ffff7a74db0 in __libc_start_main () from /lib/x86_64-linux-gnu/libc.so.6
You can even attach gdb to a process that is already running, by finding the
process ID and passing it to gdb:
$ pgrep example
1524
$ gdb -p 1524
This can be useful for redirecting streams of output for a task that is taking an unexpectedly long time to run.
Debugging with valgrind
The much newer valgrind can be used as a debugging tool in a similar way. There are many different checks and debugging methods this program can run, but one of the most useful is its Memcheck tool, which can be used to detect common memory errors like buffer overflow:
$ valgrind --leak-check=yes ./example
==29557== Memcheck, a memory error detector
==29557== Copyright (C) 2002-2011, and GNU GPL'd, by Julian Seward et al.
==29557== Using Valgrind-3.7.0 and LibVEX; rerun with -h for copyright info
==29557== Command: ./example
==29557==
==29557== Invalid read of size 1
==29557==    at 0x40072E: main (example.c:43)
==29557==  Address 0x0 is not stack'd, malloc'd or (recently) free'd
==29557==
...
The gdb and valgrind tools can be used together for a very thorough
survey of a program’s run. Zed Shaw’s Learn C the Hard Way includes a
really good introduction for elementary use of valgrind with a deliberately
broken program.
Tracing system and library calls with ltrace
The strace and ltrace tools are designed to allow watching system calls and
library calls respectively for running programs, and logging them to the screen
or, more usefully, to files.
You can run ltrace and have it run the program you want to monitor in this
way for you by simply providing it as the sole parameter. It will then give you
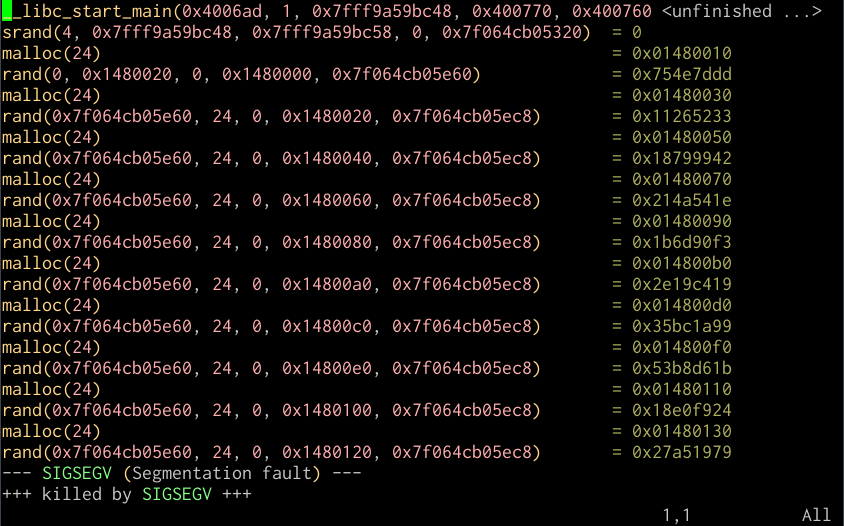
a listing of all the system and library calls it makes until it exits.
$ ltrace ./example
__libc_start_main(0x4006ad, 1, 0x7fff9d7e5838, 0x400770, 0x400760
srand(4, 0x7fff9d7e5838, 0x7fff9d7e5848, 0, 0x7ff3aebde320) = 0
malloc(24)                                                  = 0x01070010
rand(0, 0x1070020, 0, 0x1070000, 0x7ff3aebdee60)            = 0x754e7ddd
malloc(24)                                                  = 0x01070030
rand(0x7ff3aebdee60, 24, 0, 0x1070020, 0x7ff3aebdeec8)      = 0x11265233
malloc(24)                                                  = 0x01070050
rand(0x7ff3aebdee60, 24, 0, 0x1070040, 0x7ff3aebdeec8)      = 0x18799942
malloc(24)                                                  = 0x01070070
rand(0x7ff3aebdee60, 24, 0, 0x1070060, 0x7ff3aebdeec8)      = 0x214a541e
malloc(24)                                                  = 0x01070090
rand(0x7ff3aebdee60, 24, 0, 0x1070080, 0x7ff3aebdeec8)      = 0x1b6d90f3
malloc(24)                                                  = 0x010700b0
rand(0x7ff3aebdee60, 24, 0, 0x10700a0, 0x7ff3aebdeec8)      = 0x2e19c419
malloc(24)                                                  = 0x010700d0
rand(0x7ff3aebdee60, 24, 0, 0x10700c0, 0x7ff3aebdeec8)      = 0x35bc1a99
malloc(24)                                                  = 0x010700f0
rand(0x7ff3aebdee60, 24, 0, 0x10700e0, 0x7ff3aebdeec8)      = 0x53b8d61b
malloc(24)                                                  = 0x01070110
rand(0x7ff3aebdee60, 24, 0, 0x1070100, 0x7ff3aebdeec8)      = 0x18e0f924
malloc(24)                                                  = 0x01070130
rand(0x7ff3aebdee60, 24, 0, 0x1070120, 0x7ff3aebdeec8)      = 0x27a51979
--- SIGSEGV (Segmentation fault) ---
+++ killed by SIGSEGV +++
You can also attach it to a process that’s already running:
$ pgrep example
5138
$ ltrace -p 5138
Generally, there’s quite a bit more than a couple of screenfuls of text
generated by this, so it’s helpful to use the -o option to specify an output
file to which to log the calls:
$ ltrace -o example.ltrace ./example
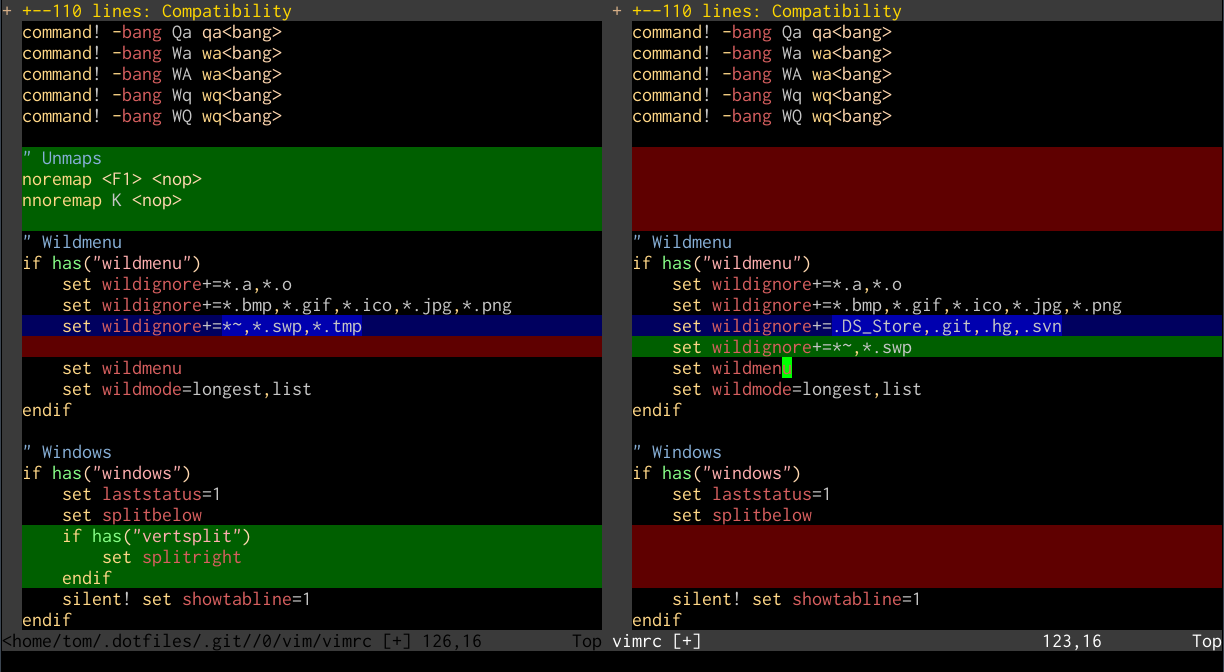
You can then view this trace in a text editor like Vim, which includes syntax
highlighting for ltrace output:
I’ve found ltrace very useful for debugging problems where I suspect improper
linking may be at fault, or the absence of some needed resource in a chroot
environment, since among its output it shows you its search for libraries at
dynamic linking time and opening configuration files in /etc, and the use of
devices like /dev/random or /dev/zero.
Tracking open files with lsof
If you want to view what devices, files, or streams a running process has open,
you can do that with lsof:
$ pgrep example
5051
$ lsof -p 5051
For example, the first few lines of the apache2 process running on my home
server are:
# lsof -p 30779
COMMAND   PID USER   FD   TYPE DEVICE SIZE/OFF    NODE NAME
apache2 30779 root  cwd    DIR    8,1     4096       2 /
apache2 30779 root  rtd    DIR    8,1     4096       2 /
apache2 30779 root  txt    REG    8,1   485384  990111 /usr/lib/apache2/mpm-prefork/apache2
apache2 30779 root  DEL    REG    8,1          1087891 /lib/x86_64-linux-gnu/libgcc_s.so.1
apache2 30779 root  mem    REG    8,1    35216 1079715 /usr/lib/php5/20090626/pdo_mysql.so
...
Interestingly, another way to list the open files for a process is to check the
corresponding entry for the process in the dynamic /proc directory:
# ls -l /proc/30779/fd
This can be very useful in confusing situations with file locks, or identifying whether a process is holding open files that it needn’t.
Viewing memory allocation with pmap
As a final debugging tip, you can view the memory allocations for a particular
process with pmap:
# pmap 30779
30779:   /usr/sbin/apache2 -k start
00007fdb3883e000     84K r-x--  /lib/x86_64-linux-gnu/libgcc_s.so.1 (deleted)
00007fdb38853000   2048K -----  /lib/x86_64-linux-gnu/libgcc_s.so.1 (deleted)
00007fdb38a53000      4K rw---  /lib/x86_64-linux-gnu/libgcc_s.so.1 (deleted)
00007fdb38a54000      4K -----    [ anon ]
00007fdb38a55000   8192K rw---    [ anon ]
00007fdb392e5000     28K r-x--  /usr/lib/php5/20090626/pdo_mysql.so
00007fdb392ec000   2048K -----  /usr/lib/php5/20090626/pdo_mysql.so
00007fdb394ec000      4K r----  /usr/lib/php5/20090626/pdo_mysql.so
00007fdb394ed000      4K rw---  /usr/lib/php5/20090626/pdo_mysql.so
...
total           152520K
This will show you what libraries a running process is using, including those in shared memory. The total given at the bottom is a little misleading as for loaded shared libraries, the running process is not necessarily the only one using the memory; determining “actual” memory usage for a given process is a little more in-depth than it might seem with shared libraries added to the picture.
Posted in GNU/Linux | Tagged ltrace, strace, memory, process, unix, file handle, file, debugging, gdb, breakpoint, trace, backtrace
Version control is now seen as an indispensable part of professional software
development, and GUI IDEs like Eclipse and Visual Studio have embraced it and
included support for industry standard version control systems in their
products. Modern version control systems trace their lineage back to Unix
concepts from programs such as diff and patch however, and there are plenty
of people who will insist that the best way to use a version control system is
still at a shell prompt.
In this last article in the Unix as an IDE series, I’ll follow the
evolution of common open-source version control systems from the basic concepts
of diff and patch, among the very first version control tools.
diff, patch, and RCS
A central concept for version control systems has been that of the unified
diff, a file expressing in human and computer readable terms a set of changes
made to a file or files. The diff command was first released by Douglas
McIlroy in 1974 for the 5th Edition of Unix, so it’s one of the oldest commands
still in regular use on modern systems.
A unified diff, the most common and interoperable format, can be generated by comparing two versions of a file with the following syntax:
$ diff -u example.{1,2}.c
--- example.1.c    2012-02-15 20:15:37.000000000 +1300
+++ example.2.c    2012-02-15 20:15:57.000000000 +1300
@@ -1,8 +1,9 @@
 #include <stdio.h>
+#include <stdlib.h>

 int main (int argc, char* argv[]) { printf("Hello, world!\n");
-    return 0;
+    return EXIT_SUCCESS; }
In this example, the second file has a header file added, and the call to
return changed to use the standard EXIT_SUCCESS rather than a literal 0
as the return value for main(). Note that the output for diff also includes
metadata such as the filename that was changed and the last modification time
of each of the files.
A primitive form of version control for larger code bases was thus for
developers to trade diff output, called patches in this context, so that
they could be applied to one another’s code bases with the patch tool. We
could save the output from diff above as a patch like so:
$ diff -u example.{1,2}.c > example.patch
We could then send this patch to a developer who still had the old version of the file, and they could automatically apply it with:
$ patch example.1.c < example.patch
A patch can include diff output from more than one file, including within
subdirectories, so this provides a very workable way to apply changes to a
source tree.
The operations involved in using diff output to track changes were
sufficiently regular that for keeping in-place history of a file, the Source
Code Control System and the Revision Control System that has pretty
much replaced it were developed. RCS enabled “locking” files so that they could
not be edited by anyone else while “checked out” of the system, paving the way
for other concepts in more developed version control systems.
RCS retains the advantage of being very simple to use. To place an existing
file under version control, one need only type ci <filename> and provide an
appropriate description for the file:
$ ci example.c
example.c,v  <--  example.c
enter description, terminated with single '.' or end of file:
NOTE: This is NOT the log message!
>> example file
>> .
initial revision: 1.1
done
This creates a file in the same directory, example.c,v, that will track the
changes. To make changes to the file, you check it out, make the changes,
then check it back in:
$ co -l example.c
example.c,v  -->  example.c
revision 1.1 (locked)
done
$ vim example.c
$ ci -u example.c
example.c,v  <--  example.c
new revision: 1.2; previous revision: 1.1
enter log message, terminated with single '.' or end of file:
>> added a line
>> .
done
You can then view the history of a project with rlog:
$ rlog example.c

RCS file: example.c,v
Working file: example.c
head: 1.2
branch:
locks: strict
access list:
symbolic names:
keyword substitution: kv
total revisions: 2; selected revisions: 2
description:
example file
----------------------------
revision 1.2
date: 2012/02/15 07:39:16;  author: tom;  state: Exp;  lines: +1 -0
added a line
----------------------------
revision 1.1
date: 2012/02/15 07:36:23;  author: tom;  state: Exp;
Initial revision
=============================================================================
And get a patch in unified diff format between two revisions with rcsdiff
-u:
$ rcsdiff -u -r1.1 -r1.2 ./example.c
===================================================================
RCS file: ./example.c,v
retrieving revision 1.1
retrieving revision 1.2
diff -u -r1.1 -r1.2
--- ./example.c 2012/02/15 07:36:23 1.1
+++ ./example.c 2012/02/15 07:39:16 1.2
@@ -4,6 +4,7 @@
 int main (int argc, char* argv[])
 {
     printf("Hello, world!\n");
+    printf("Extra line!\n");
     return EXIT_SUCCESS;
 }
It would be misleading to imply that simple patches were now in disuse as a method of version control; they are still very commonly used in the forms above, and also figure prominently in both centralised and decentralised version control systems.
CVS and Subversion
To handle the problem of resolving changes made to a code base by multiple developers, centralized version systems were developed, with the Concurrent Versions System (CVS) developed first and the slightly more advanced Subversion later on. The central feature of these systems are using a central server that contains the repository, from which authoritative versions of the codebase at any particular time or revision can be retrieved. These are termed working copies of the code.
For these systems, the basic unit of the systems remained the changeset, and
the most common way to represent these to the user was in the archetypal diff
format used in earlier systems. Both systems work by keeping records of these
changesets, rather than the actual files themselves from state to state.
Other concepts introduced by this generation of systems were of branching
projects so that separate instances of the same project could be worked on
concurrently, and then merged into the mainline, or trunk with appropriate
testing and review. Similarly, the concept of tagging was introduced to flag
certain revisions as representing the state of a codebase at the time of a
release of the software. The concept of the merge was also introduced;
reconciling conflicting changes made to a file manually.
Git and Mercurial
The next generation of version control systems are distributed or
decentralized systems, in which working copies of the code themselves contain
a complete history of the project, and are hence not reliant on a central
server to contribute to the project. In the open source, Unix-friendly
environment, the standout systems are Git and Mercurial, with their client
programs git and hg.
For both of these systems, the concept of communicating changesets is done with
the operations push, pull and merge; changes from one repository are
accepted by another. This decentralized system allows for a very complex but
tightly controlled ecosystem of development; Git was originally developed by
Linus Torvalds to provide an open-source DVCS capable of managing development
for the Linux kernel.
Both Git and Mercurial differ from CVS and Subversion in that the basic unit
for their operations is not changesets, but complete files (blobs) saved using
compression. This makes finding the log history of a single file or the
differences between two revisions of a file slightly more expensive, but the
output of git log --patch still retains the familiar unified diff output
for each revision, some forty years after diff was first being used:
commit c1e5559ddb09f8d02b989596b0f4100ad1aab422
Author: Tom Ryder <[email protected]>
Date:   Thu Feb 2 01:14:21 2012

Changed my mind about this one.

diff --git a/vim/vimrc b/vim/vimrc index cfbe8e0..65a3143 100644
--- a/vim/vimrc
+++ b/vim/vimrc
@@ -47,10 +47,6 @@
 set shiftwidth=4
 set softtabstop=4
 set tabstop=4

-" Heresy
-inoremap <C-a> <Home>
-inoremap <C-e> <End>
-
 " History
 set history=1000
The two systems have considerable overlap in functionality and even in command set, and the question of which to use provokes considerable debate. The best introductions I’ve seen to each are Pro Git by Scott Chacon, and Hg Init by Joel Spolsky.
Conclusion
This is the last post in the Unix as IDE series; I’ve tried to offer a rapid survey of the basic tools available just within a shell on GNU/Linux for all of the basic functionality afforded by professional IDEs. At points I’ve had to be not quite as thorough as I’d like in explaining certain features, but to those unfamiliar to development on GNU/Linux machines this will all have hopefully given some idea of how comprehensive a development environment the humble shell can be, and all with free, highly mature, and standard software tools.
Posted in GNU/Linux | Tagged unix, revision, version, log, git, patch, mercurial, diff, cvs, control, rcs, svn
Recommend
About Joyk
Aggregate valuable and interesting links.
Joyk means Joy of geeK