

Flask学习之Werkzeug
source link: https://www.biaodianfu.com/flask-werkzeug.html
Go to the source link to view the article. You can view the picture content, updated content and better typesetting reading experience. If the link is broken, please click the button below to view the snapshot at that time.

Werkzeug简介
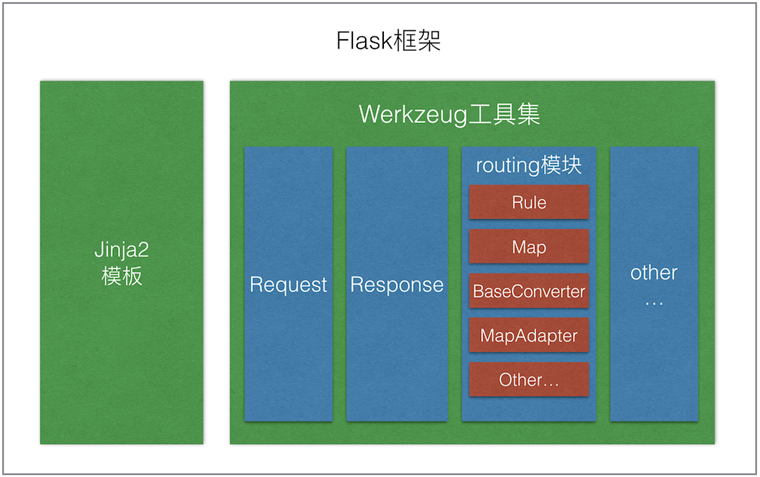
Flask 和 Werkzeug 之间的关系可以理解为 Flask 是建立在 Werkzeug 基础之上的一个 Web 框架。要了解它们之间的关系,我们需要先分别理解 Flask 和 Werkzeug 的角色和功能。
Werkzeug
Werkzeug 是一个 WSGI(Web Server Gateway Interface)工具库,它为 Python Web 应用提供了一系列实用的功能和组件。Werkzeug 的主要职责包括:
- 处理 HTTP 请求和响应。
- 提供路由系统。
- 实现请求和响应对象。
- 提供实用的调试和错误处理工具。
总的来说,Werkzeug 更像是一个底层的工具库,为构建 Web 应用提供了基础的构建块和工具。
Flask
Flask 是一个轻量级的 Web 框架,它使用 Werkzeug 作为其 WSGI 层和路由系统的基础。Flask 在 Werkzeug 提供的基础功能之上添加了:
- 更简洁易用的 API。
- 模板渲染机制(使用 Jinja2)。
- 支持插件和扩展。
- 更多的抽象层,使得开发 Web 应用更为方便。
可以这样理解,Werkzeug 是提供基础 Web 功能的工具集,而 Flask 则是在这个工具集的基础上构建的,提供了更完整的 Web 框架体验。在 Flask 应用中,当处理路由、请求和响应等核心 Web 功能时,实际上是在使用 Werkzeug 的功能。换句话说,Werkzeug 为 Flask 提供了底层的 Web 功能支持,而 Flask 则在此之上提供了更高层次的抽象和便利。
通过这种关系,Flask 成为了一个易于上手但功能强大的 Web 框架,适合于快速开发小到中型的 Web 应用,同时保持足够的灵活性和可扩展性。
为了更加深入的了解Flask和Werkzeug的关系,我们带来使用Werkzeug搭建一个应用来学习。
Hello World App
创建一个新的项目
$ mkdir werkzeug_movie_app
$ cd werkzeug_movie_app
$ python3 -m venv venv
$ source venv/bin/activate
(venv)$
安装 Werkzeug, Jinja,和 redis-py:
(venv)$ pip install Werkzeug Jinja2 redis
(venv)$ pip freeze > requirements.txt
Redis 会被用来存储电影数据。
Werkzeug 是用于构建 WSGI 兼容 Web 应用程序的库集合。它不提供高级类(如 Flask)来构建完整的 Web 应用程序。相反,您需要自己从 Werkzeug 的库创建应用程序。
在项目的顶级文件夹中创建一个新的 app.py 文件:
from werkzeug.wrappers import Request, Response


class MovieApp(object):
    """Implements a WSGI application for managing your favorite movies."""
    def __init__(self):
        pass

    def dispatch_request(self, request):
        """Dispatches the request."""
        return Response('Hello World!')

    def wsgi_app(self, environ, start_response):
        """WSGI application that processes requests and returns responses."""
        request = Request(environ)
        response = self.dispatch_request(request)
        return response(environ, start_response)

    def __call__(self, environ, start_response):
        """The WSGI server calls this method as the WSGI application."""
        return self.wsgi_app(environ, start_response)


def create_app():
    """Application factory function that returns an instance of MovieApp."""
    app = MovieApp()
    return app
MovieApp 类实现一个与 WSGI 兼容的 Web 应用程序,该应用程序处理来自不同用户的请求并生成返回给用户的响应。以下是此类与 WSGI 服务器交互的流程:
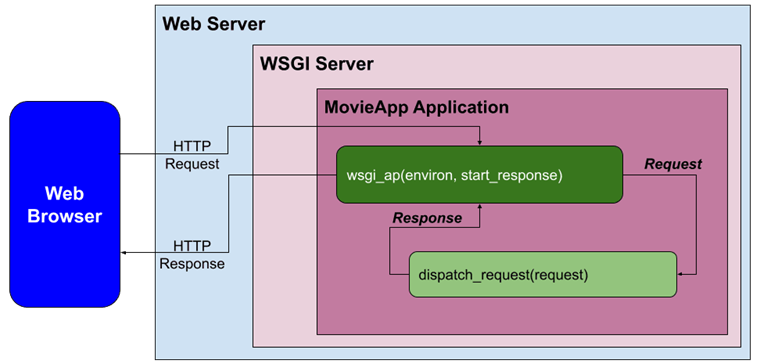
收到请求后,系统会在 wsgi_app(): 中对其进行处理:
def wsgi_app(self, environ, start_response):
    """WSGI application that processes requests and returns responses."""
    request = Request(environ)
    response = self.dispatch_request(request)
    return response(environ, start_response)
环境 (environ) 在 Request 类中自动处理,以创建 request 对象。然后在dispatch_request()中处理 request。对于此初始示例, dispatch_request()返回“Hello World!”响应。然后从wsgi_app()返回响应。
与Flask的比较:MovieApp是 Flask 类的简化版本。在Flask类中,wsgi_app()是与 WSGI 服务器交互的实际 WSGI 应用程序。此外,dispatch_request()和 full_dispatch_request()用于执行请求调度,该调度将 URL 与适用的视图函数匹配并处理异常。
将以下代码添加到 app.py 底部以运行 Werkzeug 开发服务器:
if __name__ == '__main__':
    # Run the Werkzeug development server to serve the WSGI application (MovieApp)
    from werkzeug.serving import run_simple
    app = create_app()
    run_simple('127.0.0.1', 5000, app, use_debugger=True, use_reloader=True)
运行程序:
(venv)$ python app.py
浏览 http://localhost:5000 可以查看到 “Hello World!”消息。
存储静态文件的中间件
在 Web 应用程序中,中间件是一个软件组件,可以添加到请求/响应处理管道中以执行特定功能。
Web 服务器/应用程序要执行的一项重要功能是提供静态文件(CSS、JavaScript 和图像文件)。Werkzeug 为此功能提供了一个称为 SharedDataMiddleware 的中间件。
SharedDataMiddleware非常适合使用 Werkzeug 开发服务器来提供静态文件。
要利用SharedDataMiddleware,新建一个“static”文件夹,并且在其下再创建 “css”和“img”文件夹:
├── app.py
├── requirements.txt
└── static
    ├── css
    └── img
在“static/img”文件夹中,添加 Flask的logo。将其另存为 flask.png。
接下里,我们应用工厂方法:
import os

from werkzeug.middleware.shared_data import SharedDataMiddleware
from werkzeug.wrappers import Request, Response

def create_app():
    """Application factory function that returns an instance of MovieApp."""
    app = MovieApp()
    app.wsgi_app = SharedDataMiddleware(app.wsgi_app, {
        '/static': os.path.join(os.path.dirname(__file__), 'static')
    })
    return app
现在,当 Werkzeug 应用程序处理请求时,它将首先被路由到appSharedDataMiddleware()以确定是否已请求静态文件:
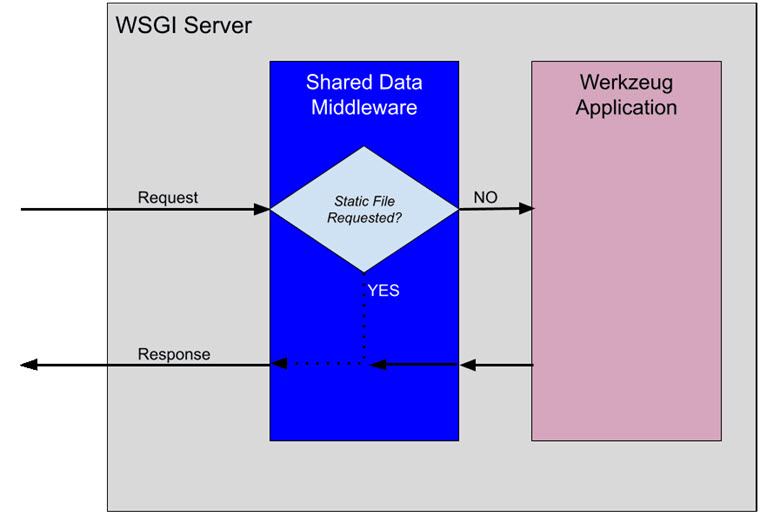
如果请求静态文件,SharedDataMiddlewarewsgi_app()将使用静态文件生成响应。否则,请求将向下传递到 Werkzeug 应用程序进行处理。
若要查看SharedDataMiddlewarewsgi_app()实际操作,请运行服务器并打开 http://localhost:5000/static/img/flask.png 查看 Flask Logo。
有关 Werkzeug 提供的中间件解决方案的完整列表,请查看中间件文档。
与Flask的比较:Flask 不使用SharedDataMiddleware。它采用不同的方法来提供静态文件。默认情况下,如果存在静态文件夹,Flask 会自动添加新的 URL 规则来提供静态文件。
为了说明此概念,请在 Flask 应用程序的项目中运行flask routes:
(venv)$ flask routes

Endpoint     Methods  Rule
-----------  -------  -----------------------
index        GET      /
static       GET      /static/<path:filename>
正如在 Flask 项目中通常所做的那样,我们将使用 Jinja 作为应用的模板引擎。
首先新建一个 “templates”文件夹:
├── app.py
├── requirements.txt
├── static
│   ├── css
│   └── img
│       └── flask.png
└── templates
为了利用Jinja,请扩展该MovieApp类的构造函数:
from jinja2 import Environment, FileSystemLoader

def __init__(self):
    """Initializes the Jinja templating engine to render from the 'templates' folder."""
    template_path = os.path.join(os.path.dirname(__file__), 'templates')
    self.jinja_env = Environment(loader=FileSystemLoader(template_path),
                                 autoescape=True)
与Flask的比较:Flask也是利用jinja的Environment 来创建模板引擎。
在MovieApp类中,添加一个新方法: render_template()
def render_template(self, template_name, **context):
    """Renders the specified template file using the Jinja templating engine."""
    template = self.jinja_env.get_template(template_name)
    return Response(template.render(context), mimetype='text/html')
此方法将template_name和变量传递给模板引擎(**context)。然后,它使用 Jinja 的render()方法生成一个Response。
与Flask比较:render_template()是不是非常的熟悉?他是Flask中最常用的功能之一。
若要查看render_template()实际操作,更新dispatch_request()来渲染模板:
def dispatch_request(self, request):
    """Dispatches the request."""
    return self.render_template('base.html')
针对此应用的所有请求将渲染templates/base.html模板:
<!DOCTYPE html>
<html lang="en">
<head>
    <meta charset="UTF-8">
    <title>Werkzeug Movie App</title>

    <!-- CSS file for styling the application -->
    <link rel="stylesheet" href="/static/css/style.css" type="text/css">
</head>
<body>
    <h1>Werkzeug Movie App</h1>
    {% block body %}
    {% endblock %}
</body>
</html>
URL路由
路由主要将将URL与视图函数做匹配,Werkzeug提供了一个Map类来处理。让我们一起来看下是怎么处理的:
from werkzeug.routing import Map, Rule

def __init__(self):
    """Initializes the Jinja templating engine to render from the 'templates' folder."""
    template_path = os.path.join(os.path.dirname(__file__), 'templates')
    self.jinja_env = Environment(loader=FileSystemLoader(template_path),
                                 autoescape=True)
    self.url_map = Map([
        Rule('/', endpoint='index'),
        Rule('/movies', endpoint='movies'),
    ])
每个Rule对象都定义了一个URL和视图函数,如果匹配到URL就调用此函数。例如访问主页(‘/’)时,index函数就会被调用。
与Flask比较:Flask使用的是@route装饰器,其原理就是使用装饰器更新url_map,与上面手动url_map的操作是一样的。
为了应用URL映射,需要更新dispatch_request():
from werkzeug.exceptions import HTTPException

def dispatch_request(self, request):
    """Dispatches the request."""
    adapter = self.url_map.bind_to_environ(request.environ)
    try:
        endpoint, values = adapter.match()
        return getattr(self, endpoint)(request, **values)
    except HTTPException as e:
        return e
现在,当请求进入dispatch_request()时,将进行匹配操作。如果请求的 URL 包含在url_map中,则将调用适用的视图函数。如果在url_map中找不到该 URL,则会引发异常。
我们在url_map中指定了两个视图函数,因此现在让我们在MovieApp类中创建它们:
def index(self, request):
    return self.render_template('base.html')

def movies(self, request):
    return self.render_template('movies.html')
templates/base.html 是在上一节中已经创建的,现在需要创建 templates/movies.html:
{% extends "base.html" %}

{% block body %}
<div class="table-container">
    <table>
        <!-- Table Header -->
        <thead>
            <tr>
                <th>Index</th>
                <th>Movie Title</th>
            </tr>
        </thead>

        <!-- Table Elements (Rows) -->
        <tbody>
            <tr>
                <td>1</td>
                <td>Knives Out</td>
            </tr>
            <tr>
                <td>2</td>
                <td>Pirates of the Caribbean</td>
            </tr>
            <tr>
                <td>3</td>
                <td>Inside Man</td>
            </tr>
        </tbody>
    </table>
</div>
{% endblock %}
此模板文件利用模板继承将 base.html 用作父模板。它生成一个包含三部电影的表。
完成后再打开浏览器查看最终的结果。
尝试访问http://localhost:5000/movies2,你会看到一个默认错误页面,原因是无法在url_map中找到对应的视图。
我们来通过扩展dispatch_request()创建一个自定义的错误页面:
from werkzeug.exceptions import HTTPException, NotFound

def dispatch_request(self, request):
    """Dispatches the request."""
    adapter = self.url_map.bind_to_environ(request.environ)
    try:
        endpoint, values = adapter.match()
        return getattr(self, endpoint)(request, **values)
    except NotFound:
        return self.error_404()
    except HTTPException as e:
        return e
现在如果URL在url_map中没有被匹配到,将会调用error_404()。我们在MovieApp类下面创建一个新的方法:
def error_404(self):
    response = self.render_template("404.html")
    response.status_code = 404
    return response
并且创建一个对应的模板templates/404.html:
% extends "base.html" %}

{% block body %}
<div class="error-description">
    <h2>Page Not Found (404)</h2>
    <h4>What you were looking for is just not there!</h4>
    <h4><a href="/">Werkzeug Movie App</a></h4>
</div>
{% endblock %}
错误页面就设置完成了。
与Flask比较:当full_dispatch_request ()在Flask类中检测到异常时,将在handle_user_exceptions()中正常处理。Flask 还允许所有 HTTP 错误代码的自定义错误页面。
在本节中,我们将向应用程序添加一个表单,以允许用户输入他们喜欢的电影。
如前所述,我们将使用 Redis来持久化电影,因为它的读/写速度快且易于设置。
启动并运行 Redis 的最快方法是使用 Docker:
$ docker run --name some-redis -d -p 6379:6379 redis
要检查 Redis 容器是否正在运行,请执行以下操作:
$ docker ps
要停止正在运行的 Redis 容器,请执行以下操作:
$ docker stop some-redis # Use name of Docker container
如果您不是 Docker 用户,请查看以下资源:
为了利用 Redis,首先更新MovieApp构造函数以创建一个StrictRedis实例:
from redis import StrictRedis

def __init__(self, config):  # Updated!!
    """Initializes the Jinja templating engine to render from the 'templates' folder,
    defines the mapping of URLs to view methods, and initializes the Redis interface."""
    template_path = os.path.join(os.path.dirname(__file__), 'templates')
    self.jinja_env = Environment(loader=FileSystemLoader(template_path),
                                 autoescape=True)
    self.url_map = Map([
        Rule('/', endpoint='index'),
        Rule('/movies', endpoint='movies'),
    ])
    self.redis = StrictRedis(config['redis_host'], config['redis_port'],
                             decode_responses=True)  # New!!
此外,构造函数还有一个附加参数(config),用于创建StrictRedis的实例。
传递给构造函数的配置参数需要在应用程序工厂函数中指定:
def create_app():
    """Application factory function that returns an instance of MovieApp."""
    app = MovieApp({'redis_host': 'localhost', 'redis_port': 6379})
    app.wsgi_app = SharedDataMiddleware(app.wsgi_app, {
        '/static': os.path.join(os.path.dirname(__file__), 'static')
    })
    return app
为了让用户在Redis存储中添加电影,我们需要在url_map中新增一个视图函数:
def __init__(self, config):
    """Initializes the Jinja templating engine to render from the 'templates' folder,
    defines the mapping of URLs to view methods, and initializes the Redis interface."""

    ...

    self.url_map = Map([
        Rule('/', endpoint='index', methods=['GET']),
        Rule('/movies', endpoint='movies', methods=['GET']),
        Rule('/add', endpoint='add_movie', methods=['GET', 'POST']),  # !!!
    ])

    ...
在url_map的Rule规则中我们还扩展了HTTP方法。如果’/add’被GET或POST请求就会调用add_movie()视图函数。
接下来我们需要再MovieApp类中增加add_movie()视图:
from werkzeug.utils import redirect

def add_movie(self, request):
    """Adds a movie to the list of favorite movies."""
    if request.method == 'POST':
        movie_title = request.form['title']
        self.redis.lpush('movies', movie_title)
        return redirect('/movies')
    return self.render_template('add_movie.html')
如果是GET请求,则add_movie()渲染templates/add_movie.html文件,如果是POST请求则将数据存储到Redis中,并且重定向网址到电影列表页。
创建templates/add_movie.html模板文件:
{% extends "base.html" %}

{% block body %}
<div class="form-container">
    <form method="post">
        <div class="field">
            <label for="movieTitle">Movie Title:</label>
            <input type="text" id="movieTitle" name="title"/>
        </div>
        <div class="field">
            <button type="submit">Submit</button>
        </div>
    </form>
</div>
{% endblock %}
由于我们现在将电影存储在 Redis 中,因此需要更新movie() 视图函数以从 Redis 中的列表中读取电影列表:
def movies(self, request):
    """Displays the list of favorite movies."""
    movies = self.redis.lrange('movies', 0, -1)
    return self.render_template('movies.html', movies=movies)
电影列表的信息会被传递到templates/movies.html模板文件,我们需要使用循环来读取这些信息:
{% extends "base.html" %}

{% block body %}
<div class="table-container">
    <table>
        <!-- Table Header -->
        <thead>
            <tr>
                <th>Index</th>
                <th>Movie Title</th>
            </tr>
        </thead>

        <!-- Table Elements (Rows) -->
        <tbody>
            {% for movie in movies %}
            <tr>
                <td>{{ loop.index }}</td>
                <td>{{ movie }}</td>
            </tr>
            {% endfor %}
        </tbody>
    </table>
</div>
{% endblock %}
至此,整个App基本上已经开发完毕。
为什么不使用Werkzeug替换掉Flask?
Werkzeug 提供了 Flask 中的许多关键功能,但 Flask 增加了许多强大的功能,例如:
- Sessions
- 应用程序和请求上下文
- Request callback functions
- Utilities:
- @route 装饰器
- url_for() 函数
- CLI 命令
- Test client
- Flask shell
- Logging
- Signals
- Extensions
与任何 Web 框架一样,不要重新发明轮子!Flask 是基于其丰富的功能集和大量扩展的 Web 开发选择(与 Werkzeug 相比)。
本文通过展示如何使用 Werkzeug 构建一个简单的 Web 应用程序,概述了 Flask 的关键组件之一 Werkzeug。虽然了解底层库在 Flask 中的工作方式很重要,但使用 Werkzeug 创建 Web 应用程序的复杂性应该说明使用 Flask 开发 Web 应用程序是多么容易!
参考链接:
Recommend
-
131
Flask Flask is a lightweight WSGI web application framework. It is designed to make getting started quick and easy, with the ability to scale up to complex applications. It began...
-
60
IBM Developer IBM Developer Learn in-demand skills, build solutions with real sample code, and connect with a global community of developers
-
71
website upgrading… 京ICP备110065...
-
57
IBM Developer Learn in-demand skills, build solutions with real sample code, and connect with a global communit...
-
75
机器学习之手把手实现,第 6 部分: 手把手教你实现一个 AdaBoost
-
16
README.rst Werkzeug werkzeug German noun: "tool". Etymology: werk ("work"), zeug ("stuff") Werkzeug is a comprehensiv...
-
3
This article explains what Werkzeug is and how Flask uses it for its core HTTP functionality. Along the way, you'll develop your own WSGI-com...
-
8
Overview This project demonstrates how to use Werkzeug (key module of Flask) to build a web application. The application stores your favorite movies in...
-
5
New Major Versions Released! Flask 2.0, Werkzeug 2.0, Jinja 3.0, Click 8.0, ItsDangerous 2.0, and MarkupSafe 2.0 written by David Lord on 2021-05-11 in...
-
4
Programmiersprache Rust: Makros - Einführung in ein unverzichtbares Werkzeug In Rust sind Makros ein mächtiges Werkzeug, das nicht mit den einfachen Textersetzungen i...
About Joyk
Aggregate valuable and interesting links.
Joyk means Joy of geeK