

MacOS 下高效窗口管理 Yabai
source link: https://blog.dreamtobe.cn/macos_yabai/
Go to the source link to view the article. You can view the picture content, updated content and better typesetting reading experience. If the link is broken, please click the button below to view the snapshot at that time.
MacOS 下高效窗口管理 Yabai
本文最后更新于:2023年10月3日 凌晨
如果用过Linux下的i3wm就知道其实窗口管理可以玩的多花,之前我主要是通过Moom + Raycast + Mac自带设置中的焦点快捷键工具来做窗口管理,另外Terminal中的窗口管理主要是通过iTerm2 + tmux + spaceVim来做,Chrome主要通过Vimium插件,但是近段时间尝试习惯Yabai后,发现通过Yabai + skhd + Mac自带调度快捷键 确实还是能再提高一些效率。
这里的前置配置我建议直接参考Youtuber Josean的配置:
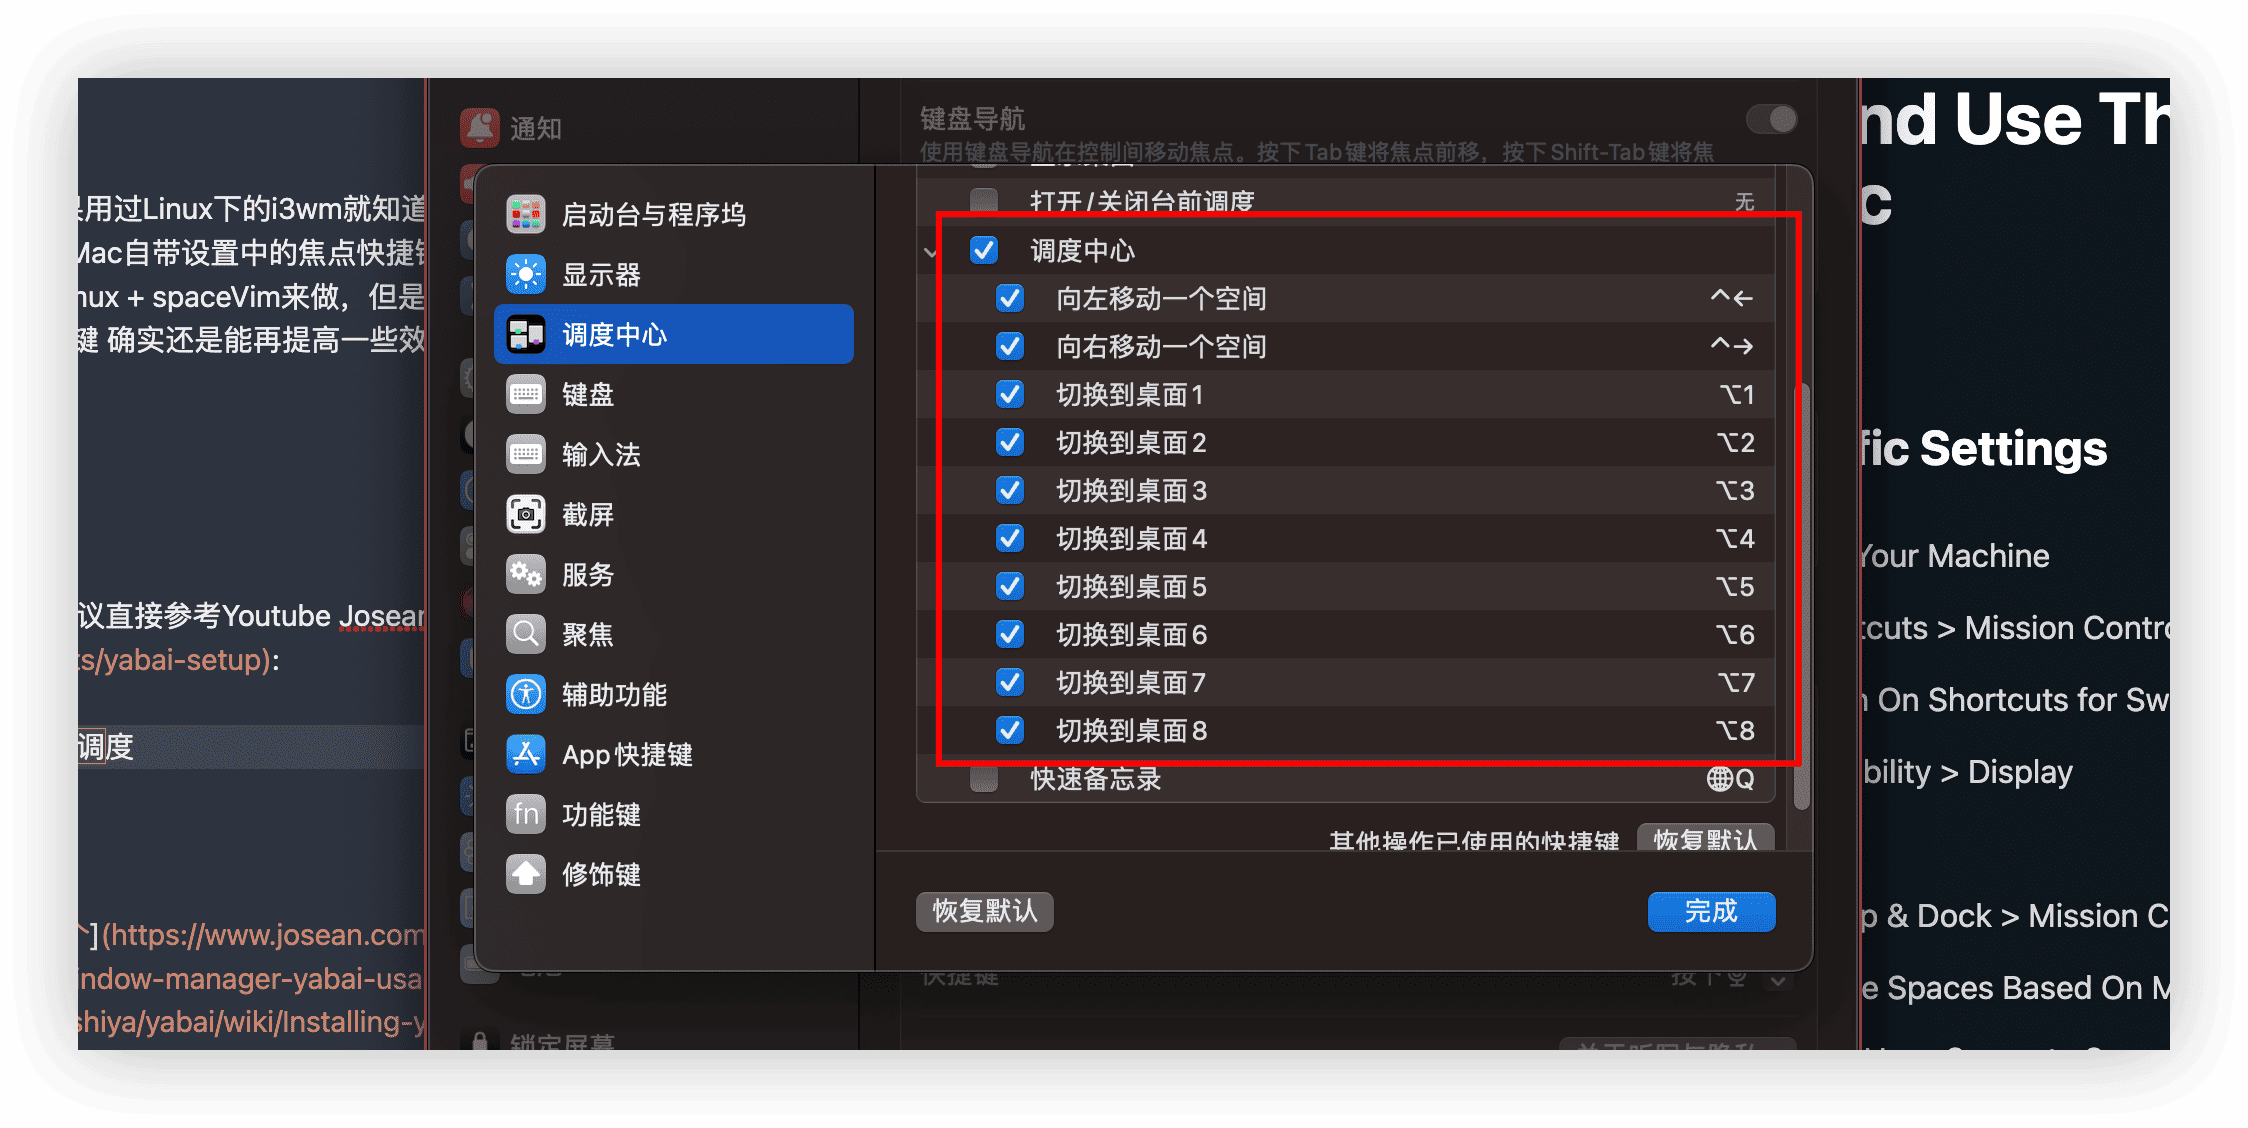
在键盘设置中,设置调度中心快捷键,下面是我的习惯,大家可以按照自己的习惯,默认是ctrl + [number]:
在系统设置->辅助功能->显示打开 减弱动态效果,这样可以避免切换桌面的动画,这样影响切换效率

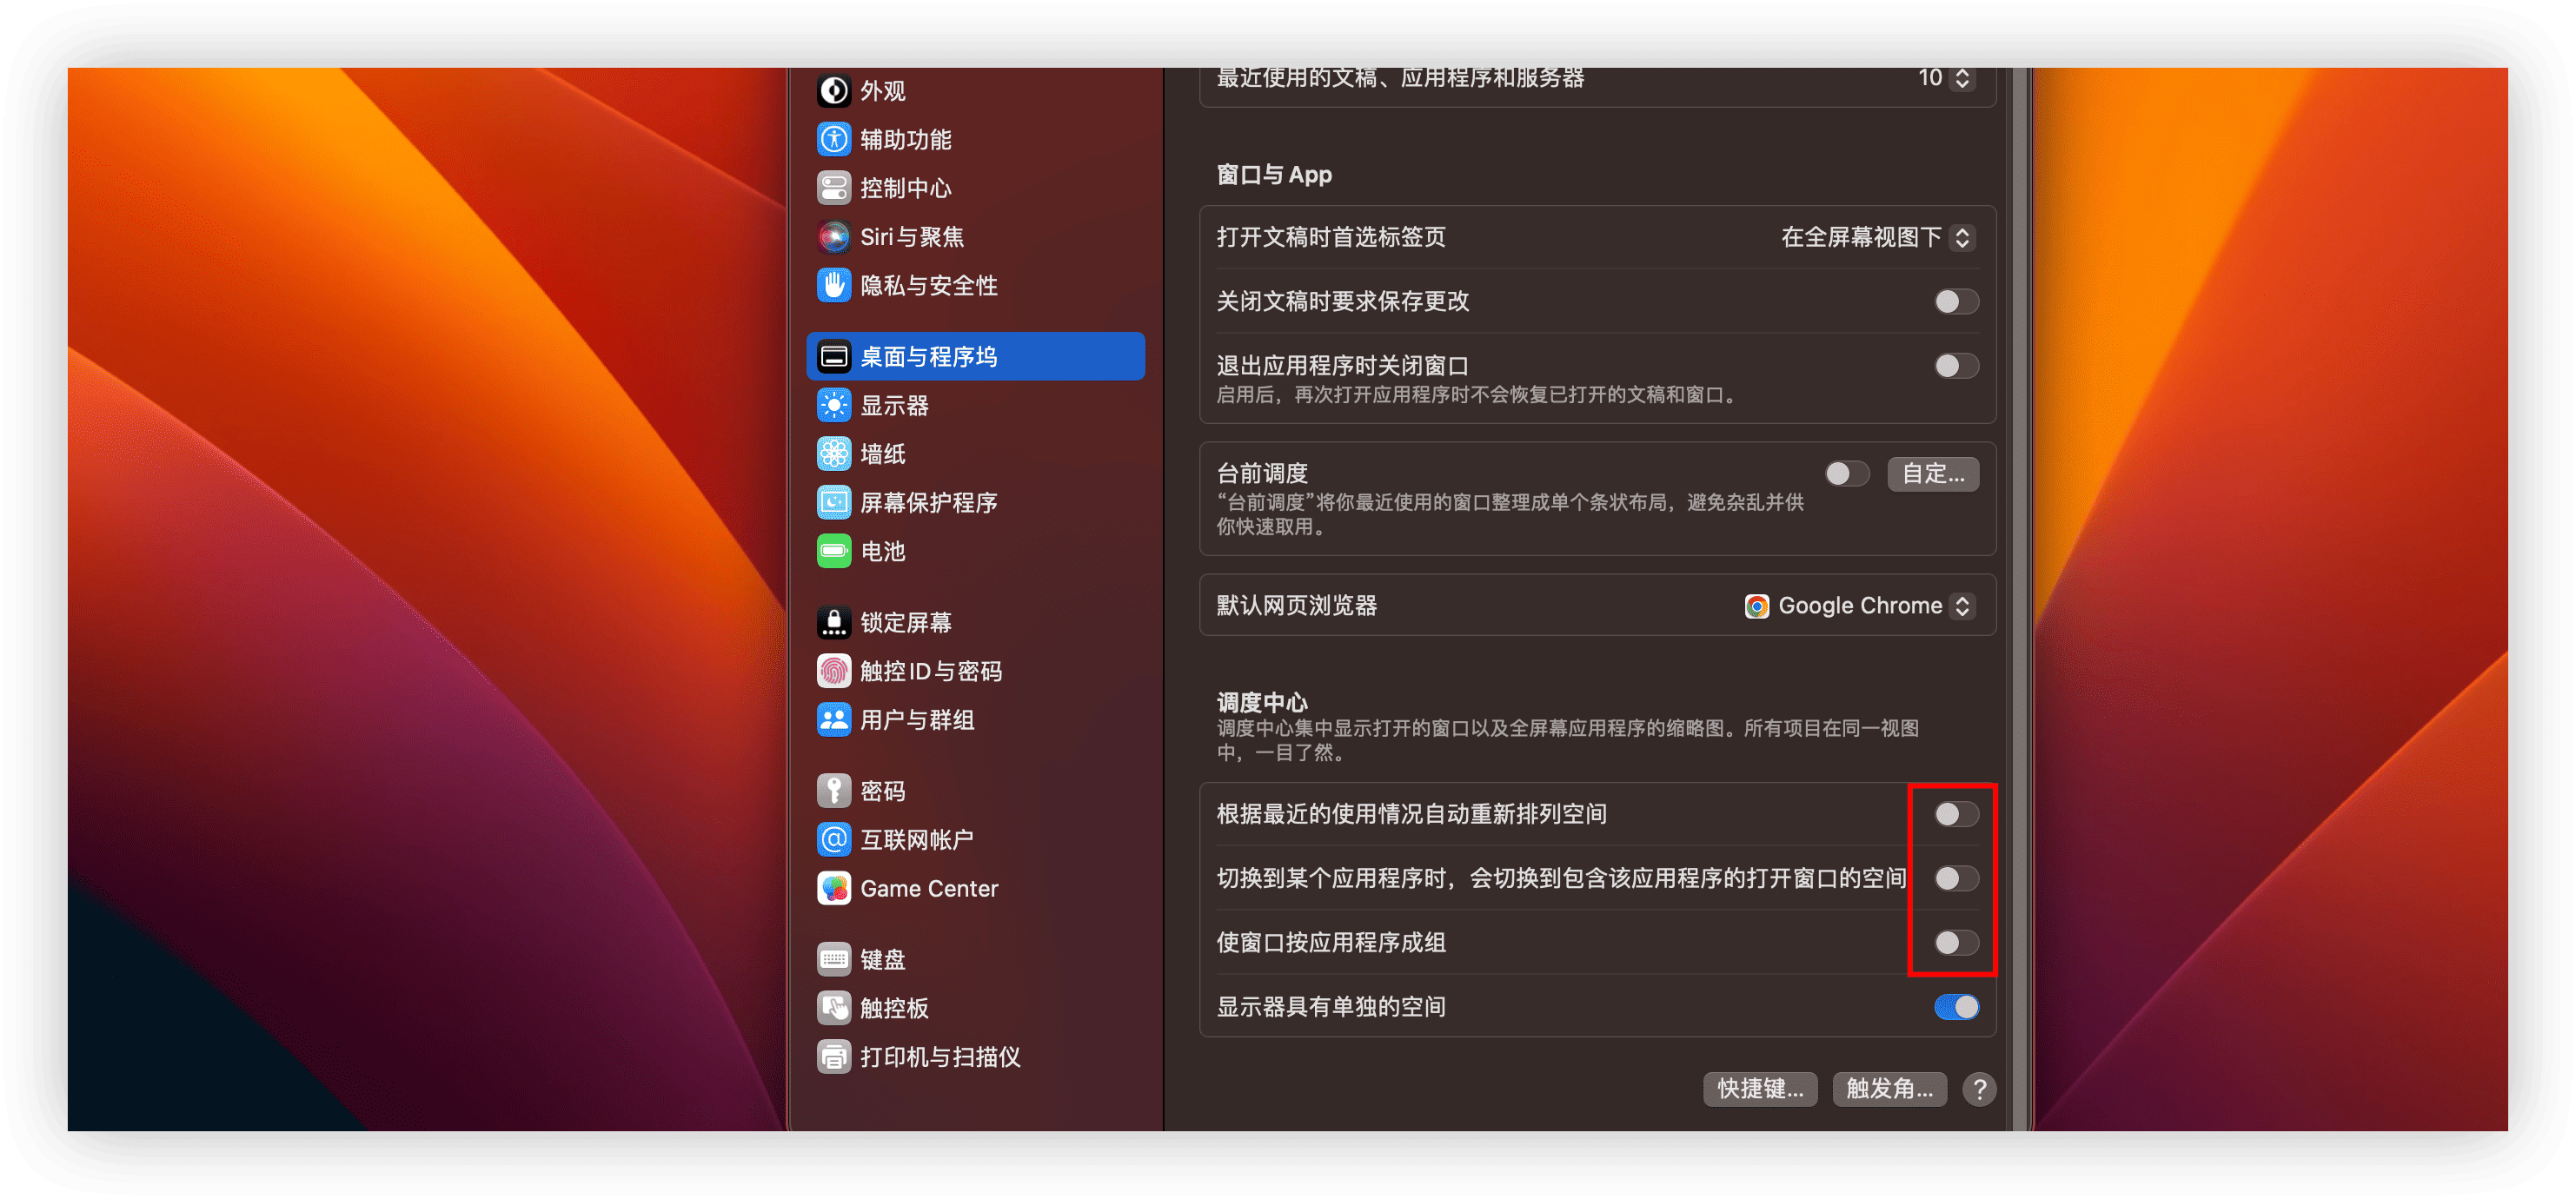
在系统设置->桌面与程序坞,划到最后的调度中心,将一些重排等功能关闭:
首先参考这篇官方 Wiki Disabling System Integrity Protection 关闭 SIP,然后参照如下流程安装 yabai 与 skhd。
# 安装yabai
brew install koekeishiya/formulae/yabai
sudo yabai --install-sa

# 启动yabai 这时候需要授权辅助功能
yabai --start-service

# 安装skhd
brew install koekeishiya/formulae/skhd
# 启动skhd 这时候需要授权辅助功能
skhd --start-service

########### 为 yabai 添加 sudo 权限 ###########
sudo yabai --load-sa
sudo visudo -f /private/etc/sudoers.d/yabai

# 然后输入以下内容 其中 <user> 修改为当前 mac 的用户名
# input the line below into the file you are editing.
#  replace <yabai> with the path to the yabai binary (output of: which yabai).
#  replace <user> with your username (output of: whoami).
#  replace <hash> with the sha256 hash of the yabai binary (output of: shasum -a 256 $(which yabai)).
#   this hash must be updated manually after running brew upgrade.
<user> ALL=(root) NOPASSWD: sha256:<hash> <yabai> --load-sa
kjkj
根据官方Wiki说明,配置可以放在多个地方,并且只要文件在,就会被读取,我比较习惯放在~/.config/yabai/yabairc中,我的配置可以参考:
该配置是以这个配置为底板,然后结合该作者的建议,以及我个人的行为习惯来添加的。
#!/usr/bin/env bash

set -x

# ====== Variables =============================

declare -A gaps
declare -A color

gaps["top"]="0"
gaps["bottom"]="0"
gaps["left"]="0"
gaps["right"]="0"
gaps["inner"]="2"

color["focused"]="0xff775759"
color["normal"]="0xff555555"
color["preselect"]="0xffd75f5f"

# Uncomment to refresh ubersicht widget on workspace change
# Make sure to replace WIDGET NAME for the name of the ubersicht widget
#ubersicht_spaces_refresh_command="osascript -e 'tell application id \"tracesOf.Uebersicht\" to refresh widget id \"WIDGET NAME\"'"

# ===== Loading Scripting Additions ============

# See: https://github.com/koekeishiya/yabai/wiki/Installing-yabai-(latest-release)#macos-big-sur---automatically-load-scripting-addition-on-startup
sudo yabai --load-sa
yabai -m signal --add event=dock_did_restart action="sudo yabai --load-sa"

# ===== Tiling setting =========================

yabai -m config layout                      bsp

yabai -m config top_padding                 "${gaps["top"]}"
yabai -m config bottom_padding              "${gaps["bottom"]}"
yabai -m config left_padding                "${gaps["left"]}"
yabai -m config right_padding               "${gaps["right"]}"
yabai -m config window_gap                  "${gaps["inner"]}"

yabai -m config mouse_follows_focus         on
yabai -m config focus_follows_mouse         off

yabai -m config window_topmost              off
yabai -m config window_opacity              off
yabai -m config window_opacity_duration     2000.0
yabai -m config window_shadow               float

yabai -m config window_border               on
yabai -m config window_border_width         2
yabai -m config active_window_border_color  "${color["focused"]}"
yabai -m config normal_window_border_color  "${color["normal"]}"
yabai -m config insert_feedback_color       "${color["preselect"]}"

yabai -m config active_window_opacity       1.0
yabai -m config normal_window_opacity       0.90
yabai -m config split_ratio                 0.50

yabai -m config auto_balance                off

yabai -m config mouse_modifier              fn
yabai -m config mouse_action1               move
yabai -m config mouse_action2               resize

yabai -m config window_placement            second_child
yabai -m config external_bar                all:0:0

yabai -m config debug_output                off

# ===== Rules ==================================

yabai -m rule --add label="Finder" app="^访达$" title="(Co(py|nnect)|Move|Info|Pref)" manage=off
yabai -m rule --add label="Safari" app="^Safari$" title="^(General|(Tab|Password|Website|Extension)s|AutoFill|Se(arch|curity)|Privacy|Advance)$" manage=off
yabai -m rule --add label="System Preferences" app="^系统设置$" title=".*" manage=off
yabai -m rule --add label="App Store" app="^App Store$" manage=off
yabai -m rule --add label="Activity Monitor" app="^活动监视器$" manage=off
yabai -m rule --add label="Software Update" title="Software Update" manage=off
yabai -m rule --add label="About This Mac" app="关于本机" title="About This Mac" manage=off
yabai -m rule --add app="^Raycast$" manage=off
yabai -m rule --add app="^微信$" manage=off
yabai -m rule --add app="^Obsidian$" manage=off
yabai -m rule --add app="^QQ音乐$" manage=off
yabai -m rule --add app="^Lark$" manage=off
yabai -m rule --add app="^Airmail$" manage=off
yabai -m rule --add app="^CleanMyMac X$" manage=off
yabai -m rule --add app="^Home Assistant$" manage=off

set +x
printf "yabai: configuration loaded...\\n"
检查配置文件是否被正确读取
我们可以在配置文件中通过echo等指令输出日志,然后通过yabai -m config debug_output on让其打出日志,来调试配置文件,然后通过持续读取日志流来检查配置文件:
# view the last lines of the error log
tail -f /tmp/yabai_$USE
# view the last lines of the debug log
tail -f /tmp/yabai_$USER.out.log
重启yabai
yabai --restart-service
最后,如果是因为第一次使用Yabai,不适应BSP的形式展示窗口,可以尝试修改默认的layout或者是,直接将所有窗口管理默认都设置为非Yabai管理,然后通过需要的时候快捷键切换为管理:
yabai -m rule --add app="^.*$" manage=off
绑定快捷键执行
前面在安装的时候已经按照官方建议使用skhd来进行快捷键绑定,我的skhd的配置也是以这个为基础,然后结合该作者的建议,以及我个人的行为习惯来添加的。配置文件是放在~/.config/skhd:
# Navigation
alt - h : yabai -m window --focus west
alt - j : yabai -m window --focus south
alt - k : yabai -m window --focus north
alt - l : yabai -m window --focus east

#change focus between external displays (left and right)
shift + ctrl - h: yabai -m display --focus west
shift + ctrl - j: yabai -m display --focus south
shift + ctrl - k: yabai -m display --focus north
shift + ctrl - l: yabai -m display --focus east

# move window to display left and right
shift + ctrl + alt - j : yabai -m window --display south; yabai -m display --focus south;
shift + ctrl + alt - k : yabai -m window --display north; yabai -m display --focus north;

# Set insertion point for focused container
#shift + ctrl + alt - h : yabai -m window --insert west
#shift + ctrl + alt - j : yabai -m window --insert south
#shift + ctrl + alt - k : yabai -m window --insert north
#shift + ctrl + alt - l : yabai -m window --insert east

# Moving windows
#shift + alt - h : yabai -m window --warp west
#shift + alt - j : yabai -m window --warp south
#shift + alt - k : yabai -m window --warp north
#shift + alt - l : yabai -m window --warp east

# swap windows
shift + alt - j : yabai -m window --swap south
shift + alt - k : yabai -m window --swap north
shift + alt - h : yabai -m window --swap west
shift + alt - l : yabai -m window --swap east
shift + alt - c : yabai -m space --create


# Move focus container to workspace
shift + ctrl - m : yabai -m space --focus last
shift + ctrl - p : yabai -m space --focus prev
shift + ctrl - n : yabai -m space --focus next

shift + alt - m : yabai -m window --space last; yabai -m space --focus last
shift + alt - p : yabai -m window --space prev; yabai -m space --focus prev
shift + alt - n : yabai -m window --space next; yabai -m space --focus next
shift + alt - 1 : yabai -m window --space 1; yabai -m space --focus 1
shift + alt - 2 : yabai -m window --space 2; yabai -m space --focus 2
shift + alt - 3 : yabai -m window --space 3; yabai -m space --focus 3
shift + alt - 4 : yabai -m window --space 4; yabai -m space --focus 4

# Resize windows
ctrl + alt - h : yabai -m window --resize left:-50:0; \
                 yabai -m window --resize right:-50:0
ctrl + alt - j : yabai -m window --resize bottom:0:50; \
                 yabai -m window --resize top:0:50
ctrl + alt - k : yabai -m window --resize top:0:-50; \
                 yabai -m window --resize bottom:0:-50
ctrl + alt - l : yabai -m window --resize right:50:0; \
                 yabai -m window --resize left:50:0

# Equalize size of windows
ctrl + alt - e : yabai -m space --balance

# Enable / Disable gaps in current workspace
ctrl + alt - g : yabai -m space --toggle padding; yabai -m space --toggle gap

# Rotate windows clockwise and anticlockwise
alt - r         : yabai -m space --rotate 270
shift + alt - r : yabai -m space --rotate 90

# Rotate on X and Y Axis
shift + alt - x : yabai -m space --mirror x-axis
shift + alt - y : yabai -m space --mirror y-axis


# Float / Unfloat window
shift + alt - space : \
    yabai -m window --toggle float --grid 1:3:1:1:2:2; \
    yabai -m window --toggle border

# Restart Yabai
#shift + ctrl + alt - r : \
#    /usr/bin/env osascript <<< \
#        "display notification \"Restarting Yabai\" with title \"Yabai\""; \
#    launchctl kickstart -k "gui/${UID}/homebrew.mxcl.yabai"

# Make window native fullscreen
alt - f         : yabai -m window --toggle zoom-fullscreen
#shift + alt - f : yabai -m window --toggle native-fullscreen

## stop/start/restart yabai
ctrl + alt - q : yabai --stop-service
ctrl + alt - s : yabai --start-service
ctrl + alt - r : yabai --restart-service
重启配置:
skhd --restart-service
升级只需要使用brew升级即可:
brew update
brew upgrade yabai
不过每次升级之后需要注意(参考该同学的提醒),由于yabai的执行文件发生了变化,需要重新参考 官网配置一遍sudo权限:
# create a new file for writing - visudo uses the vim editor by default.
# go read about this if you have no idea what is going on.

sudo visudo -f /private/etc/sudoers.d/yabai

# input the line below into the file you are editing.
#  replace <yabai> with the path to the yabai binary (output of: which yabai).
#  replace <user> with your username (output of: whoami).
#  replace <hash> with the sha256 hash of the yabai binary (output of: shasum -a 256 $(which yabai)).
#   this hash must be updated manually after running brew upgrade.

<user> ALL=(root) NOPASSWD: sha256:<hash> <yabai> --load-sa
搞定后重启yabai即可:
yabai --restart-service
我们在用yabai的时候,通常会结合着space来用,当前处于哪个space,可以借助spaceman这个小工具在menu bar上显示:
Recommend
About Joyk
Aggregate valuable and interesting links.
Joyk means Joy of geeK