

掌握这五种多线程方法,提高Java代码效率
source link: https://www.51cto.com/article/770026.html
Go to the source link to view the article. You can view the picture content, updated content and better typesetting reading experience. If the link is broken, please click the button below to view the snapshot at that time.

掌握这五种多线程方法,提高Java代码效率
如果您的应用程序与那些能够同时处理多个任务的应用程序相比表现不佳,很可能是因为它是单线程的。解决这个问题的方法之一是采用多线程技术。
以下是一些可以考虑的方法:
- 线程(Thread)
- 并行流(Parallel Streams)
- ExecutorService
- ForkJoinPool
- CompletableFuture
适当地使用这些方法,可以彻底改变您的应用程序,并推动您的职业发展。下面我们来看看如何将您的应用程序转变为高效的多线程应用。

1. 线程(Thread)
第一种选择是使用线程(Thread)类。通过这种方式,您可以直接控制线程的创建和管理。以下是一个示例:
CustomTask 每隔50毫秒从0数到 count - 1。
public class CustomTask implements Runnable {
private final String name;
private final int count;
CustomTask(String name, int count) {
this.name = name;
this.count = count;
}
@Override
public void run() {
for (int i = 0; i < count; i++) {
System.out.println(name + "-" + i + " from " +
Thread.currentThread().getName());
try {
Thread.sleep(50);
} catch (InterruptedException e) {
throw new RuntimeException(e);
}
}
}
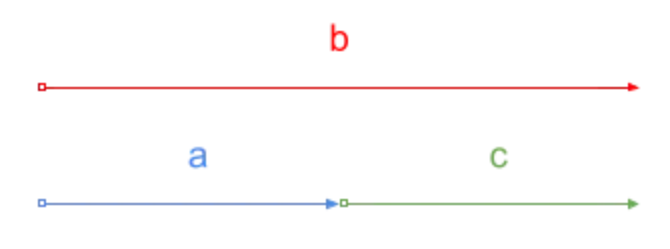
}a、b 和 c 是该类的三个实例。
Thread a = new Thread(new CustomTask("a", 5));
Thread b = new Thread(new CustomTask("b", 10));
Thread c = new Thread(new CustomTask("c", 5));
请注意,b 预计计数的次数是其他实例的两倍。您希望在 a 和 c 顺序运行的同时运行 b。
您可以非常容易地实现这种行为。
// 首先启动 a 和 b。
a.start();
b.start();

//  a 完成后开始 c。
a.join();
c.start();
以下是结果:
a-0 from Thread-0
b-0 from Thread-1
b-1 from Thread-1
a-1 from Thread-0
b-2 from Thread-1
a-2 from Thread-0
b-3 from Thread-1
a-3 from Thread-0
b-4 from Thread-1
a-4 from Thread-0
b-5 from Thread-1
c-0 from Thread-2
b-6 from Thread-1
c-1 from Thread-2
b-7 from Thread-1
c-2 from Thread-2
b-8 from Thread-1
c-3 from Thread-2
b-9 from Thread-1
c-4 from Thread-2
a 和 b 同时开始运行,轮流输出。a 完成后,c 开始执行。此外,它们全部在不同的线程中运行。通过手动创建 Thread 实例,您可以完全控制它们。
然而,请注意,低级线程处理也需要同步和资源管理,这可能更容易出错和复杂。
2. 并行流(Parallel Streams)
当您需要对大型集合中的所有元素应用相同、重复且独立的任务时,并行流非常有效。
例如,图像调整大小是一个需要按顺序运行的繁重任务;当您有多个图像需要调整大小时,如果按顺序执行,将需要很长时间才能完成。在这种情况下,您可以使用并行流并行调整它们的大小,如下所示。
private static List<BufferedImage> resizeAll(List<BufferedImage> sourceImages,
                                             int width, int height) {
    return sourceImages
            .parallelStream()
            .map(source -> resize(source, width, height))
            .toList();
}
这样,图像将同时调整大小,节省了大量宝贵的时间。
3. ExecutorService
当实现不需要精确的线程控制时,可以考虑使用 ExecutorService。ExecutorService 提供了更高层次的线程管理抽象,包括线程池、任务调度和资源管理。
ExecutorService 是一个接口,它最常见的用法是线程池。假设您有大量的异步任务堆积在一起,但是同时运行所有任务——每个任务占用一个线程——似乎太多了。线程池可以通过限制最大线程数来帮助您。
下面的示例中,我们使用 Executors.newFixedThreadPool() 实例化 ExecutorService 来使用 3 个线程运行 10 个任务。每个任务只打印一行。请注意,我们在之前的部分中重用了之前定义的 CustomTask。
ExecutorService executorService = Executors.newFixedThreadPool(3);

for (int i = 0; i < 10; i++) {
    executorService.submit(new CustomTask(String.valueOf(i), 1));
}

executorService.shutdown();
这将打印以下结果:
0-0 from pool-1-thread-1
2-0 from pool-1-thread-3
1-0 from pool-1-thread-2
4-0 from pool-1-thread-3
3-0 from pool-1-thread-2
5-0 from pool-1-thread-1
6-0 from pool-1-thread-1
7-0 from pool-1-thread-3
8-0 from pool-1-thread-2
9-0 from pool-1-thread-3
10 个任务在 3 个线程中运行。通过限制特定任务使用的线程数,您可以根据优先级分配线程数:对于重要且频繁的任务使用更多线程,对于琐碎或偶尔的任务使用较少线程。ExecutorService 具有高效和简洁的特点,是大多数多线程场景的首选选项。
如果您需要更多的控制和灵活性,请查看 ThreadPoolExecutor,它是 Executors.newFixedThreadPool() 返回的 ExecutorService 的实际实现。您可以直接创建其实例或将返回的 ExecutorService 实例转换为 ThreadPoolExecutor 实例以获得更多控制权。
4. ForkJoinPool
ForkJoinPool是另一种线程池,正如其名称所示。虽然它在许多其他异步方法的底层使用中,但对于可以分解为较小且独立子任务的任务来说,它也非常强大,这些任务可以通过分而治之的策略来解决。
其中一个任务是图像调整大小。图像调整大小是分而治之问题的一个很好的例子。使用ForkJoinPool,您可以将图像分成两个或四个较小的图像,并同时调整它们的大小。以下是ImageResizeAction的示例,它将图像调整为给定的大小。
package multithreading;

import java.awt.image.BufferedImage;
import java.util.concurrent.RecursiveAction;

public class ImageResizeAction extends RecursiveAction {
    private static final int THRESHOLD = 100;

    private final BufferedImage sourceImage;
    private final BufferedImage targetImage;
    private final int startRow;
    private final int endRow;
    private final int targetWidth;
    private final int targetHeight;

    public ImageResizeAction(BufferedImage sourceImage,
                             BufferedImage targetImage,
                             int startRow, int endRow,
                             int targetWidth, int targetHeight) {
        this.sourceImage = sourceImage;
        this.targetImage = targetImage;
        this.startRow = startRow;
        this.endRow = endRow;
        this.targetWidth = targetWidth;
        this.targetHeight = targetHeight;
    }

    @Override
    protected void compute() {
        if (endRow - startRow <= THRESHOLD) {
            resizeImage();
        } else {
            int midRow = startRow + (endRow - startRow) / 2;
            invokeAll(
                    new ImageResizeAction(sourceImage, targetImage,
                            startRow, midRow, targetWidth, targetHeight),
                    new ImageResizeAction(sourceImage, targetImage,
                            midRow, endRow, targetWidth, targetHeight)
            );
        }
    }

    private void resizeImage() {
        int sourceWidth = sourceImage.getWidth();
        double xScale = (double) targetWidth / sourceWidth;
        double yScale = (double) targetHeight / sourceImage.getHeight();

        for (int y = startRow; y < endRow; y++) {
            for (int x = 0; x < sourceWidth; x++) {
                int targetX = (int) (x * xScale);
                int targetY = (int) (y * yScale);
                int rgb = sourceImage.getRGB(x, y);
                targetImage.setRGB(targetX, targetY, rgb);
            }
        }
    }
}
请注意,ImageResizeAction继承了RecursiveAction。RecursiveAction用于定义递归的调整大小操作。在此示例中,图像被分成两半并并行调整大小。
您可以使用以下代码运行ImageResizeAction:
public static void main(String[] args) throws IOException {
    String sourceImagePath = "source_image.jpg";
    String targetImagePath = "target_image.png";
    int targetWidth = 300;
    int targetHeight = 100;

    BufferedImage sourceImage = ImageIO.read(new File(sourceImagePath));
    BufferedImage targetImage = new BufferedImage(targetWidth, targetHeight,
            BufferedImage.TYPE_INT_RGB);

    ForkJoinPool forkJoinPool = new ForkJoinPool();
    forkJoinPool.invoke(new ImageResizeAction(sourceImage, targetImage,
            0, sourceImage.getHeight(), targetWidth, targetHeight));

    ImageIO.write(targetImage, "png", new File(targetImagePath));

    System.out.println("图像调整大小成功!");
}
借助ForkJoinPool的帮助,您现在能够更高效地调整图像的大小,具有更好的可伸缩性,并最大程度地利用资源。
5. CompletableFuture
通过CompletableFuture,您可以完全发挥Future的功能,并拥有许多额外的特性。其中最突出的功能是它能够链式地连接异步操作,使您能够构建复杂的异步管道。
public static void main(String[] args) {
    CompletableFuture<Void> future = CompletableFuture.supplyAsync(() -> {
        System.out.println(Thread.currentThread().getName());
        return "Hyuni Kim";
    }).thenApply((data) -> {
        System.out.println(Thread.currentThread().getName());
        return "我的名字是" + data;
    }).thenAccept((data) -> {
        System.out.println(Thread.currentThread().getName());
        System.out.println("结果:" + data);
    });

    future.join();
}
上述代码展示了CompletableFuture的一个关键方面:链式操作。通过CompletableFuture.supplyAsync(),首先创建并运行一个返回字符串结果的CompletableFuture。thenApply()接受前一个任务的结果,并执行其他操作,本例中是添加一个字符串。最后,thenAccept()打印生成的数据。结果如下所示:
ForkJoinPool.commonPool-worker-1
ForkJoinPool.commonPool-worker-1
ForkJoinPool.commonPool-worker-1
Result: My name is Hyuni Kim
有3个任务没有在主线程中运行,这表明它们与主逻辑并行运行。当您有具有结果并需要链接的任务时,CompletableFuture将是一个很好的选择。
多线程是一种强大的工具,可以帮助开发人员优化性能、提升用户体验、增强并发处理能力,并充分利用计算机的资源。
Recommend
-
53
前言 目录 一、方法参数限制 二、反汇编 switch case & if else 三、C 中写汇编代码 四、 __builtin_expect 、分支执行概率 ...
-
30
从生理上进入工作状态
-
13
【51CTO.com快译】常言道:“工欲善其事,必先利其器。”开发人员时常需要使用各种工具,来加快其代码的编写速度。就算在代码的测试环境,他们也会趋...
-
4
前几天面试,被大师虐残了,好多基础知识必须得重新拿起来啊。闲话不多说,进入正题。 二、为什么要线程同步 因为当我们有多个线程要同时访问一个变量或对象时,如果这些线程中既有读又有写操作时,就会导致变量值或对象的状态出现混乱,从而导...
-
6
大家好,我是林三心,在日常开发中,正则表达式是非常有用的,正则表达式在每个语言中都是可以使用的,他就跟JSON一样,是通用的。在日常开发中,了解一些常用的正则表达式,能大大提高你的工作效率,例如...
-
13
工作效率如何提高?提高工作效率的经典方法有哪些?...
-
5
识别低代码/无代码流程自动化用例的五种方法 此博文是翻譯文 原始作者為 Hemant Rachh Five ways...
-
11
选好关键词,掌握拓词方法,词库大10倍,效率提升100%-鸟哥笔记 首页 >...
-
5
提高服务器效率的五种方法 2023-07-06 17:00:44 服务器 适当调整工作负载规模、升级到最新一代服务器以及管理功耗可以帮助企业实现数据中心...
-
19
优化数据中心气流效率的五种方法 2024-03-08 10:55:31 几乎所有数据中心都至少部分依赖流动空气来防止IT设备过热。但一些数据中心比其他数据中心更有效地做到这一点。为了充分利用气流,请确保消除可能导致空气最...
About Joyk
Aggregate valuable and interesting links.
Joyk means Joy of geeK