

基于JavaFX的扫雷游戏实现(二)——游戏界面 - 郭小柒w
source link: https://www.cnblogs.com/xiao-qi-w/p/17522371.html
Go to the source link to view the article. You can view the picture content, updated content and better typesetting reading experience. If the link is broken, please click the button below to view the snapshot at that time.

基于JavaFX的扫雷游戏实现(二)——游戏界面
废话环节:看过上期文章的小伙伴现在可能还是一头雾水,怎么就完成了核心内容,界面呢?哎我说别急让我先急,博主这不夜以继日地肝出了界面部分嘛。还是老规矩,不会把所有地方都照顾到,只挑一些有代表性的内容介绍,您各位多担待?。另外博主的JavaFX是跟着B站视频速成的,指路?:https://www.bilibili.com/video/BV1Qf4y1F7Zv 有哪些地方讲的不对欢迎在评论区友好交流?。
上期内容已经介绍了游戏初始数据,即地雷和数字分布情况的二维数组,那么如何把它与图形界面对应到一起呢?如果您熟悉JavaFX的各种布局和控件的话,很容易会联想到GridPane布局。至于可以点击的格子,用label或button也好,用rectangle绘制矩形也罢,只要看起来像那回事,能设置对应点击事件就OK。选完角儿后就是代码环节了,考虑到纯java代码实现界面不够直观,所以推荐使用fxml文件,因为有对应的可视化设计工具。这里我采用的是Scene Builder,建议大家也了解下。下面给出游戏界面设计图:
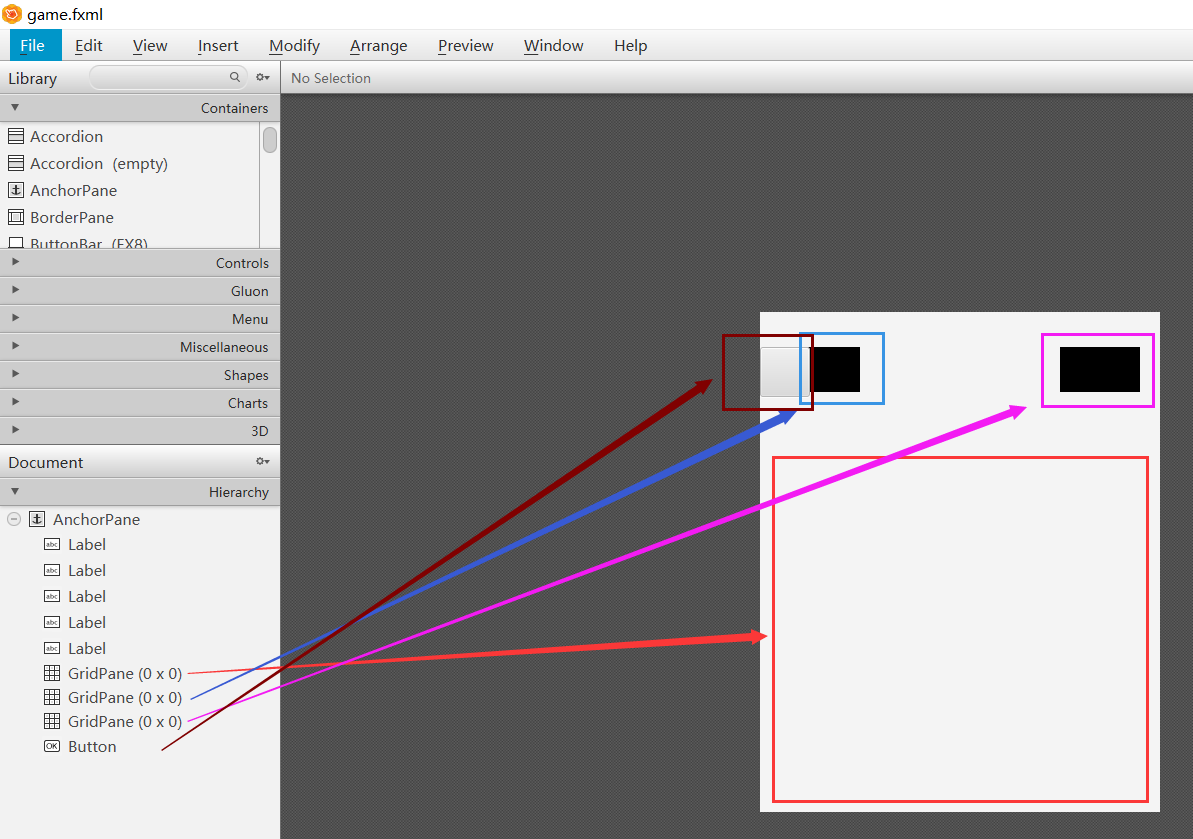
图中各部分内容所要承担的功能如下:
- 上方左右两侧的黑色格子是用于显示剩余标记计数和游戏用时的;
- 按钮是游戏重置按钮,不论游戏是否结束,点击就可以重新开局;
- 下方大片区域是要存放格子的GridPane布局;
设计完毕后生成的fxml文件如下(对于 controller 或 fx:id 等内容需要手动设置):
game.fxml
 <?xml version="1.0" encoding="UTF-8"?>

<?import javafx.scene.control.Button?>
<?import javafx.scene.control.Label?>
<?import javafx.scene.layout.AnchorPane?>
<?import javafx.scene.layout.GridPane?>
<?import javafx.scene.text.Font?>

<AnchorPane fx:id="anchorPane"
            prefWidth="400" prefHeight="500"
            maxHeight="-Infinity" maxWidth="-Infinity"
            minHeight="-Infinity" minWidth="-Infinity"
            xmlns="http://javafx.com/javafx/8.0.171" xmlns:fx="http://javafx.com/fxml/1"
            fx:controller="controllers.GameController">
    <children>
        <Label fx:id="labelTop" style="-fx-background-color: #8e7f7f; ">
            <font>
                <Font size="1.0"/>
            </font>
        </Label>
        <Label fx:id="labelBottom" style="-fx-background-color: #8e7f7f;">
            <font>
                <Font size="1.0"/>
            </font>
        </Label>
        <Label fx:id="labelLeft" style="-fx-background-color: #8e7f7f;">
            <font>
                <Font size="1.0"/>
            </font>
        </Label>
        <Label fx:id="labelRight" style="-fx-background-color: #8e7f7f;">
            <font>
                <Font size="1.0"/>
            </font>
        </Label>
        <Label fx:id="labelCenter" style="-fx-background-color: #8e7f7f;">
            <font>
                <Font size="1.0"/>
            </font>
        </Label>
        <GridPane fx:id="grid"/>
        <GridPane fx:id="mark" prefWidth="80.0" prefHeight="45.0" AnchorPane.topAnchor="35.0"
                  AnchorPane.leftAnchor="20.0" style="-fx-background-color: #000000; -fx-hgap: 5.0"/>
        <GridPane fx:id="time" prefWidth="80.0" prefHeight="45.0" AnchorPane.topAnchor="35.0"
                  AnchorPane.rightAnchor="20.0" style="-fx-background-color: #000000; -fx-hgap: 5.0"/>
        <Button fx:id="reset" prefHeight="50.0" prefWidth="50.0" AnchorPane.topAnchor="35.0" onAction="#onResetClick"/>
    </children>
</AnchorPane>
你可能会有疑问,为什么图中没有格子按钮呢?原因很简单,以扫雷简单模式为例,9*9大小,一共要81个格子。这部分内容如果手动添加可太费时费力了,因为它们初始状态完全一致,所以建议在代码中通过循环来实现,如下:
for (int i = 0; i < GAME.height; ++i) {
    for (int j = 0; j < GAME.width; ++j) {
        Button button = new Button();
        // 设置边界线的外观效果, 使按钮看起来更突出
        button.setBorder(new Border(new BorderStroke(Color.web("#737373"), BorderStrokeStyle.SOLID, new CornerRadii(4), new BorderWidths(1))));
        button.setPadding(new Insets(0));
        // 设置按钮大小和点击事件
        button.setPrefSize(GAME.buttonSize, GAME.buttonSize);
        button.setOnMouseClicked(event -> {
            handleEvent(event);
        });
        // 添加按钮到指定位置
        grid.add(button, j, i);
    }
}
而对于错位的重置按钮和暂时不可见的五个label边框,考虑到后续设置不同游戏难度的情况,这部分内容在代码中设置比较合适,我的做法如下:
/**
  * 调整边框以及其他组件的位置和大小
  */
private void adjustControls() {
    HashMap<String, Double> params = GAME.genParamsMap();
    double thickness = params.get("thickness");
    double offset = params.get("offset");
    double lenVertical = params.get("lenVertical");
    double lenHorizontal = params.get("lenHorizontal");

    // 计算实际窗口宽高
    WIDTH_OFFSET += lenHorizontal + thickness * 2;
    HEIGHT_OFFSET += lenVertical;

    // 设置窗口大小
    anchorPane.setPrefSize(WIDTH_OFFSET, lenVertical);

    // 设置网格布局位置
    AnchorPane.setTopAnchor(grid, offset + thickness);
    AnchorPane.setLeftAnchor(grid, thickness);

    // 设置重置按钮的位置
    reset.setStyle("-fx-background-size: contain; -fx-background-image: url(" + SMILE_IMG + ")");
    AnchorPane.setLeftAnchor(reset, thickness + (lenHorizontal - 50) / 2);

    // 设置边框标签的大小和位置
    labelTop.setPrefSize(lenHorizontal, thickness);
    AnchorPane.setLeftAnchor(labelTop, thickness);
    AnchorPane.setTopAnchor(labelTop, 0.0);

    labelCenter.setPrefSize(lenHorizontal, thickness);
    AnchorPane.setLeftAnchor(labelCenter, thickness);
    AnchorPane.setTopAnchor(labelCenter, offset);

    labelBottom.setPrefSize(lenHorizontal, thickness);
    AnchorPane.setLeftAnchor(labelBottom, thickness);
    AnchorPane.setTopAnchor(labelBottom, lenVertical - thickness);

    labelLeft.setPrefSize(thickness, lenVertical);
    AnchorPane.setLeftAnchor(labelLeft, 0.0);
    AnchorPane.setTopAnchor(labelLeft, 0.0);

    labelRight.setPrefSize(thickness, lenVertical);
    AnchorPane.setLeftAnchor(labelRight, lenHorizontal + thickness);
    AnchorPane.setTopAnchor(labelRight, 0.0);
}注:GAME为游戏难度枚举类实例,genParamsMap是用于生成计算所需数据的静态方法
完整的枚举类代码如下:
GameEnum
 package components;

import java.util.HashMap;

/**
 * @description: 游戏难度枚举
 * @author: 郭小柒w
 * @time: 2023/6/11
 */
public enum GameEnum {
    EASY(9, 9, 10, 40.0, 30.0),
    MEDIUM(16, 16, 40, 35.0, 25.0),
    HARD(30, 16, 99, 30.0, 20.0),
    CUSTOM();

    // 游戏难度规格[宽 x 高], 相应地雷个数
    public int width, height, bomb;
    // 网格按钮尺寸, 数字字体大小
    public double buttonSize, numSize;

    GameEnum(int width, int height, int bomb, double buttonSize, double numSize) {
        this.width = width;
        this.height = height;
        this.bomb = bomb;
        this.buttonSize = buttonSize;
        this.numSize = numSize;
    }

    GameEnum() {
        this.buttonSize = 35.0;
        this.numSize = 25.0;
    }

    // 宽和高限制在简单和困难之间
    public void setWidth(int width) {
        if (width < EASY.width) {
            this.width = EASY.width;
        } else if (width > HARD.width) {
            this.width = HARD.width;
        } else {
            this.width = width;
        }
    }

    public void setHeight(int height) {
        if (height < EASY.height) {
            this.height = EASY.height;
        } else if (height > HARD.height) {
            this.height = HARD.height;
        } else {
            this.height = height;
        }
    }

    // 地雷数介于格子数之间
    public void setBomb(int bomb) {
        if (bomb < 0) {
            this.bomb = 0;
        } else if (bomb > width * height) {
            this.bomb = width * height;
        } else {
            this.bomb = bomb;
        }
    }

    /**
     * 生成游戏窗口和边框大小计算需要用到的参数
     * @return 参数集合
     */
    public HashMap<String, Double> genParamsMap() {
        HashMap<String, Double> params = new HashMap();
        // 标签宽度, 固定值10
        double thickness = 10.0;
        params.put("thickness", thickness);
        // 中间位置的标签框相对于布局顶部的偏移量, 固定值110
        double offset = 110.0;
        params.put("offset", offset);
        // 边框标签边的水平和竖直长度, 宽度为固定值10
        double lenVertical = height * buttonSize + thickness * 2 + offset;
        double lenHorizontal = width * buttonSize;
        params.put("lenVertical", lenVertical);
        params.put("lenHorizontal", lenHorizontal);
        return params;
    }
}
为什么要使用枚举类对游戏难度进行区分呢?如果您完整地阅读过我的代码,就会发现MineSweeper类仅负责对接游戏进行中的各种逻辑,对于游戏难度、计时判断、排行计算等功能可以说完全不参与。这是因为和win7自带的扫雷不同,我打算新增一个菜单页,而不是运行程序直接开始游戏。这就需要我合理划分每个类负责的功能,不然就要全部塞进MineSweeper类里,显得过于臃肿(事实上大二时期我用awt和swing干过这种蠢事,那一版扫雷几百行的代码全在一个类里,没有注释还bug百出?)。你也可以把难度作为MineSweeper类的一个属性来处理,不过这会导致和难度有关的逻辑修改起来比较麻烦,比如下面的代码是我进行游戏初始化的部分:
public void initialize() {
    // 重置剩余可用标记数
    REST_FLAG = GAME.bomb;
    // 重置点击状态
    CLICKED = NO;
    // 重置游戏状态
    STATE = UNSURE;
    // 重置计时器
    if (TIMELINE != null) {
        TIMELINE.stop();
        TIMELINE = null;
    }
    // 生成新游戏的用到的数据
    mineSweeper = new MineSweeper(GAME.width, GAME.height, GAME.bomb, new int[GAME.height][GAME.width]);
    // 设置监听
    addListener();
    // 绘制界面
    adjustControls();
    // 填充网格布局
    addToGrid();
}
很显然,如果没有使用枚举类,创建minesweeper对象的语句将会更繁琐。因为那需要你根据一个难度全局变量,使用if-else或者switch语句对其进行判断,然后才能设置对应长宽地雷数,另外想要增加一个新的难度时也不可避免地要修改多处代码。而现在仅需要这个全局变量是枚举类实例。
至于图中计数和计时两个黑框框为什么不显示内容,这是因为我想实现液晶数字显示的效果,就像计算器(时代眼泪)的显示风格那样。这种情况没有官方类库可以使用,只能魔改大神轮子做一个自定义控件来满足我的需求,内容较多放在下期再说。
有了fxml文件和初始化代码(下期展开讲),通过这段代码来生成界面:
/**
 * 打开新窗口
 *
 * @param filePath fxml文件相对路径
 * @param method   方法名
 */
public void openNewWindow(String filePath, String method) {
    try {
        parent = (Stage) anchorPane.getScene().getWindow();
        // 加载设置界面布局文件
        FXMLLoader loader = new FXMLLoader();
        loader.setLocation(getClass().getResource(filePath));
        Parent root = loader.load();
        Scene scene = new Scene(root);
        // 设置Stage
        Stage stage = new Stage();
        stage.setResizable(false);
        if ("onPlayClick".equals(method)) {
            // 根据实际效果重置窗口大小
            stage.setOnShown(event -> {
                stage.setWidth(WIDTH_OFFSET);
                stage.setHeight(HEIGHT_OFFSET);
            });
        }
        // 设置左上角图标
        stage.getIcons().add(new Image(ICON_IMG));
        stage.setScene(scene);
        // 设置父窗体
        stage.initOwner(anchorPane.getScene().getWindow());
        // 设置除当前窗体外其他窗体均不可编辑
        stage.initModality(Modality.WINDOW_MODAL);
        // 隐藏父窗口
        parent.hide();
        stage.setOnCloseRequest(event -> {
            if(TIMELINE != null) {
                TIMELINE.stop();
                TIMELINE = null;
            }
            // 显示父窗口
            parent.show();
            // 还原更改的值
            WIDTH_OFFSET = 6.0;
            HEIGHT_OFFSET = 35.0;
        });
        stage.showAndWait();
    } catch (IOException e) {
        System.out.println("Error on [Class:MenuController, Method:" + method + "]=>");
        e.printStackTrace();
    }
}
打开游戏界面:
/**
* 点击开始新游戏
*/
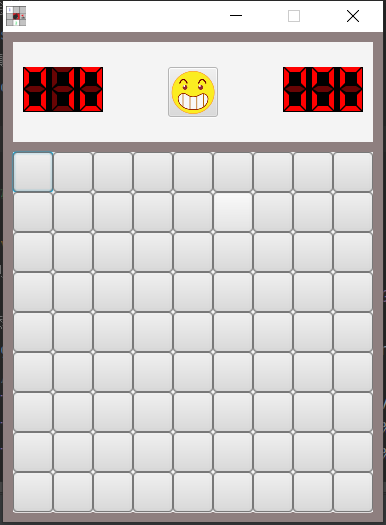
public void onPlayClick() { openNewWindow("/fxmls/game.fxml", "onPlayClick"); }最终效果图如下(以简单模式为例):
——————————————我———是———分———割———线——————————————
不知道本期的介绍有没有让您对项目更加了解呢?是否对没有讲的部分更加期待呢?如果看完所有代码后仍有不清楚地方,请在评论区中指出。我会抽时间回复或者出一期答疑?。下期的话打算讲讲交互的实现,网格按钮点击事件第一期已经介绍过了所以下期不会着重说明。感谢各位阅读,我们下期不见不散?
Recommend
About Joyk
Aggregate valuable and interesting links.
Joyk means Joy of geeK