
11

Wake Word Detection with React.js
source link: https://picovoice.ai/blog/wake-word-detection-with-reactjs/
Go to the source link to view the article. You can view the picture content, updated content and better typesetting reading experience. If the link is broken, please click the button below to view the snapshot at that time.
Wake Word Detection with React.js
December 10, 2022 · 1 min readLearn how to add wake words, like Alexa or Hey Siri, to any React app. This tutorial takes 15 minutes or less from the start to a working demo. We learn how to train custom wake word models, like Hey Jarvis, that fit your product, not Big Tech's brand. In this article, we use Picovoice Porcupine Wake Word Engine React SDK.
Wake Word Detection is also known as Keyword Spotting, Hotword Detection, Always-Listening Voice Commands, Trigger Word Detection, and Voice Activation.
Setup the Project
- Create a new React app:
npx create-react-app porcupine-react- Install the dependencies:
npm install @picovoice/porcupine-react @picovoice/web-voice-processor- Download the Porcupine model (i.e. Deep Neural Network). From the project folder, run the following to turn the binary model into a
base64string. Remember that you need to replace${DOWNLOADED_MODEL_PATH}with the path to the model you downloaded (e.g.~/Downloads/porcupine_params.pvon my Ubuntu machine).
npx pvbase64 -i ${DOWNLOADED_MODEL_PATH} -o src/porcupine_params.js- Run the local server to load the page:
yarn startTrain Wake Word Models
- Sign up for Picovoice Console .
- Go to the
Porcupine Page. - Select
Englishas the language for your model. - Type in
Hey Jarvisas the phrase you want to build the model for.
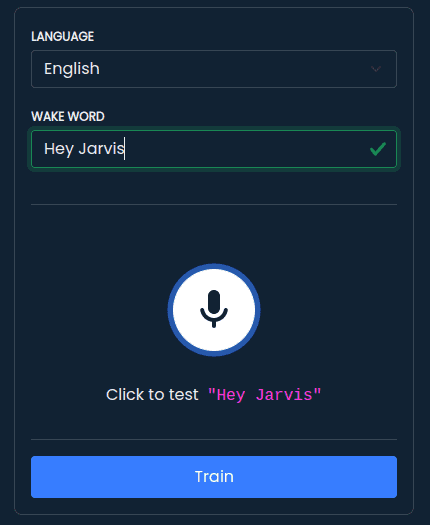
- Optionally, you can try it within the browser
- Once you are happy, click on the train button.
- Select
Web (WASM)as the platform.
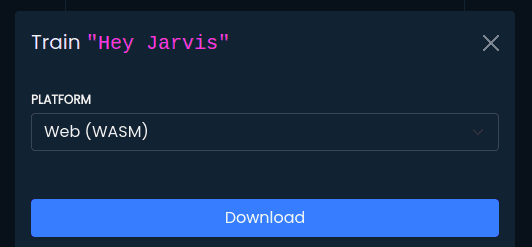
- Click on Download. You should have a
.zipfile in your download folder now. - Unzip it. Inside the folder, you see a file with the suffix
.ppn. That's our model. Transform it into abase64string. Remember that you need to replace${DOWNLOADED_PPN_PATH}with the path to downloaded file (e.g.~/Downloads/Hey-Jarvis_en_wasm_v2_1_0/Hey-Jarvis_en_wasm_v2_1_0.ppnon my Ubuntu machine)
npx pvbase64 \-i ${DOWNLOADED_PPN_PATH} \-o src/hey_jarvis.js \-n heyJarvisKeywordModelWire it up
- Go to Picovoice Console's dashboard. Copy your
AccessKey.

- Create a file within
srccalledVoiceWidget.jsand paste the below into it. The code uses Porcupine's hook to create and start the wake word detection. Remember to replace${ACCESS_KEY}with yourAccessKeyobtained from Picovoice Console.
import {useEffect, useState} from "react";import {usePorcupine} from "@picovoice/porcupine-react";import heyJarvisKeywordModel from "./hey_jarvis"import modelParams from "./porcupine_params";export default function VoiceWidget() { const [keywordDetections, setKeywordDetections] = useState([]); const { keywordDetection, isLoaded, isListening, error, init, start, stop, release } = usePorcupine(); const initEngine = async () => { await init( ${ACCESS_KEY}, "base64": heyJarvisKeywordModel, "label": "Hey Jarvis" {base64: modelParams} start() useEffect(() => { if (keywordDetection !== null) { setKeywordDetections((oldVal) => [...oldVal, keywordDetection.label]) }, [keywordDetection]) return ( <div className="voice-widget"> <h3> <label> <button className="init-button" onClick={() => initEngine()} Start </button> </label> </h3> {keywordDetections.length > 0 && ( <ul> {keywordDetections.map((label, index) => ( <li key={index}>{label}</li> </ul> </div>- Modify the
App.jsto display theVoiceWidgetand click start:
import './App.css';import VoiceWidget from "./VoiceWidget";function App() { return ( <div className="App"> <h1> Porcupine React Demo </h1> <VoiceWidget /> </div>export default App;Additional Languages
Porcupine supports many more languages aside from English. To use models in other languages, refer to the quick start.
Source Code
The source code for a fully-working demo with Porcupine is available on its GitHub repository .
Recommend
About Joyk
Aggregate valuable and interesting links.
Joyk means Joy of geeK