

PicoRV32-on-PYNQ-Z2: An FPGA-based SoC System——RISC-V On PYNQ项目复现 - Mundane-...
source link: https://www.cnblogs.com/Qzzz/p/17489110.html
Go to the source link to view the article. You can view the picture content, updated content and better typesetting reading experience. If the link is broken, please click the button below to view the snapshot at that time.

PicoRV32-on-PYNQ-Z2: An FPGA-based SoC System——RISC-V On PYNQ项目复现
本文参考:
? 1️⃣ 原始工程
? 2️⃣ 原始工程复现教程
? 3️⃣ RISCV工具链安装教程
本文工程:
https://bhpan.buaa.edu.cn:443/link/4B08916BF2CDB42DB78976BCCDB712E2
1.准备工作
?下面以LOCATION代表本地源存储库的安装目录,以home/xilinx代表在PYNQ-Z2开发板上的目录 ❗
-
下载Vivado2017.4
由于最初的源工程是利用Vivado2017.4来创建的,可能也有一些方法可以在其他版本打开,但没有原始工程的xpr文件,所以下载了一个Vivado2017.4,网上的安装教程很多。 -
下载两个源存储库:
git clone https://github.com/drichmond/RISC-V-On-PYNQ
其中,RISC-V-On-PYNQ中的Picrov32是以子模块的形式链接在仓库中,需要通过下面的链接下载后再传入RISC-V-On-PYNQ中相应的位置。
https://github.com/YosysHQ/picorv32/tree/9b6ea045f9b539b0f708d71962716e5dde865181
或者可以通过下面的命令直接递归下载子文件夹?
git clone --recursive https://github.com/drichmond/RISC-V-On-PYNQ
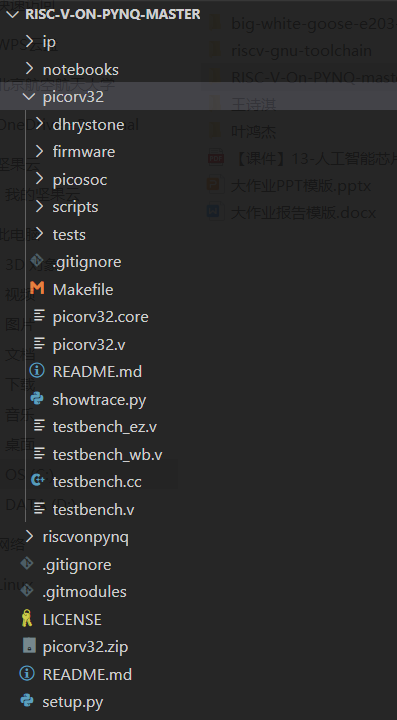
最后RISC-V-On-PYNQ中的目录结构应如下图所示
git clone --recursive https://github.com/riscv/riscv-gnu-toolchain \home\xilinx\riscv-gnu-toolchain
此为RISC-V工具链,在下载过程中可能会遇到以下报错:

单纯的网络连接不稳定,可以网页开个github试下,什么时候能打开了,这边也就通了。
若报错Git 客户端无法验证服务器证书的有效性,因此无法建立与服务器的安全连接,可以使用以下命令来配置 Git 客户端:
git config --global http.sslVerify falsegit config --global https.sslVerify false
以及如果网络一直不太好的话,据说有这个方法可以通过增加缓存大小来提速(因为没有对比测试过,所以我也不太确定这个有没有大用つ﹏⊂)
git config --global http.postBuffer 524288000
再如果说,一直出现各种报错的话,可以将本工程文件中主目录下的makefile文件通过WinSCP传入PYNQ-Z2,并在相应目录下执行?
make download-tools
此为自动下载的脚本,来源于Picorv32工程,可以判断目录下的递归文件夹是否安装,但也会由于网络连接问题重开,如果说网络问题是在无法解决,gitee上据说有相应的库,可能会好一些。
2.生成RISC-V处理器比特流
- 将Picrov32封装成为Vivado IP:
使用Vivado 2017.4创建一个工程:
Project name: picorv32_prjProject location: LOCATION/RISC-V-On-PYNQ/ip/Project Type: RTL ProjectSource files: picorv32.v LOCATION/RISC-V-On-PYNQ/picorv32Constraint files: Noneparts: xc7z020clg400-1

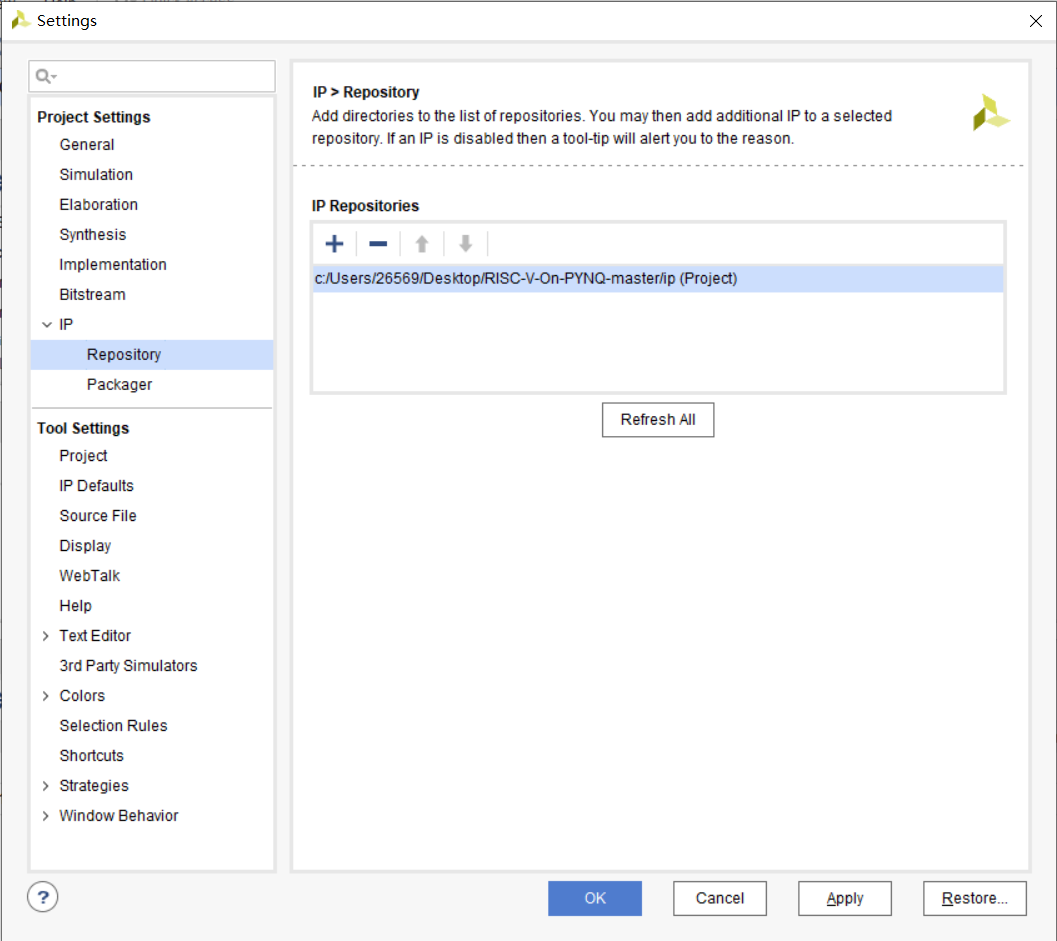
将自定义接口IP添加到Vivado工程:Flow Navigator->PROJECT MANAGER->Settings
将该工程封装为IP核:Tools -> Create and Package New IP…
Packaging Options: Package your current projectIP location: LOCATION/RISC-V-On-PYNQ/ip/picorv32_tut
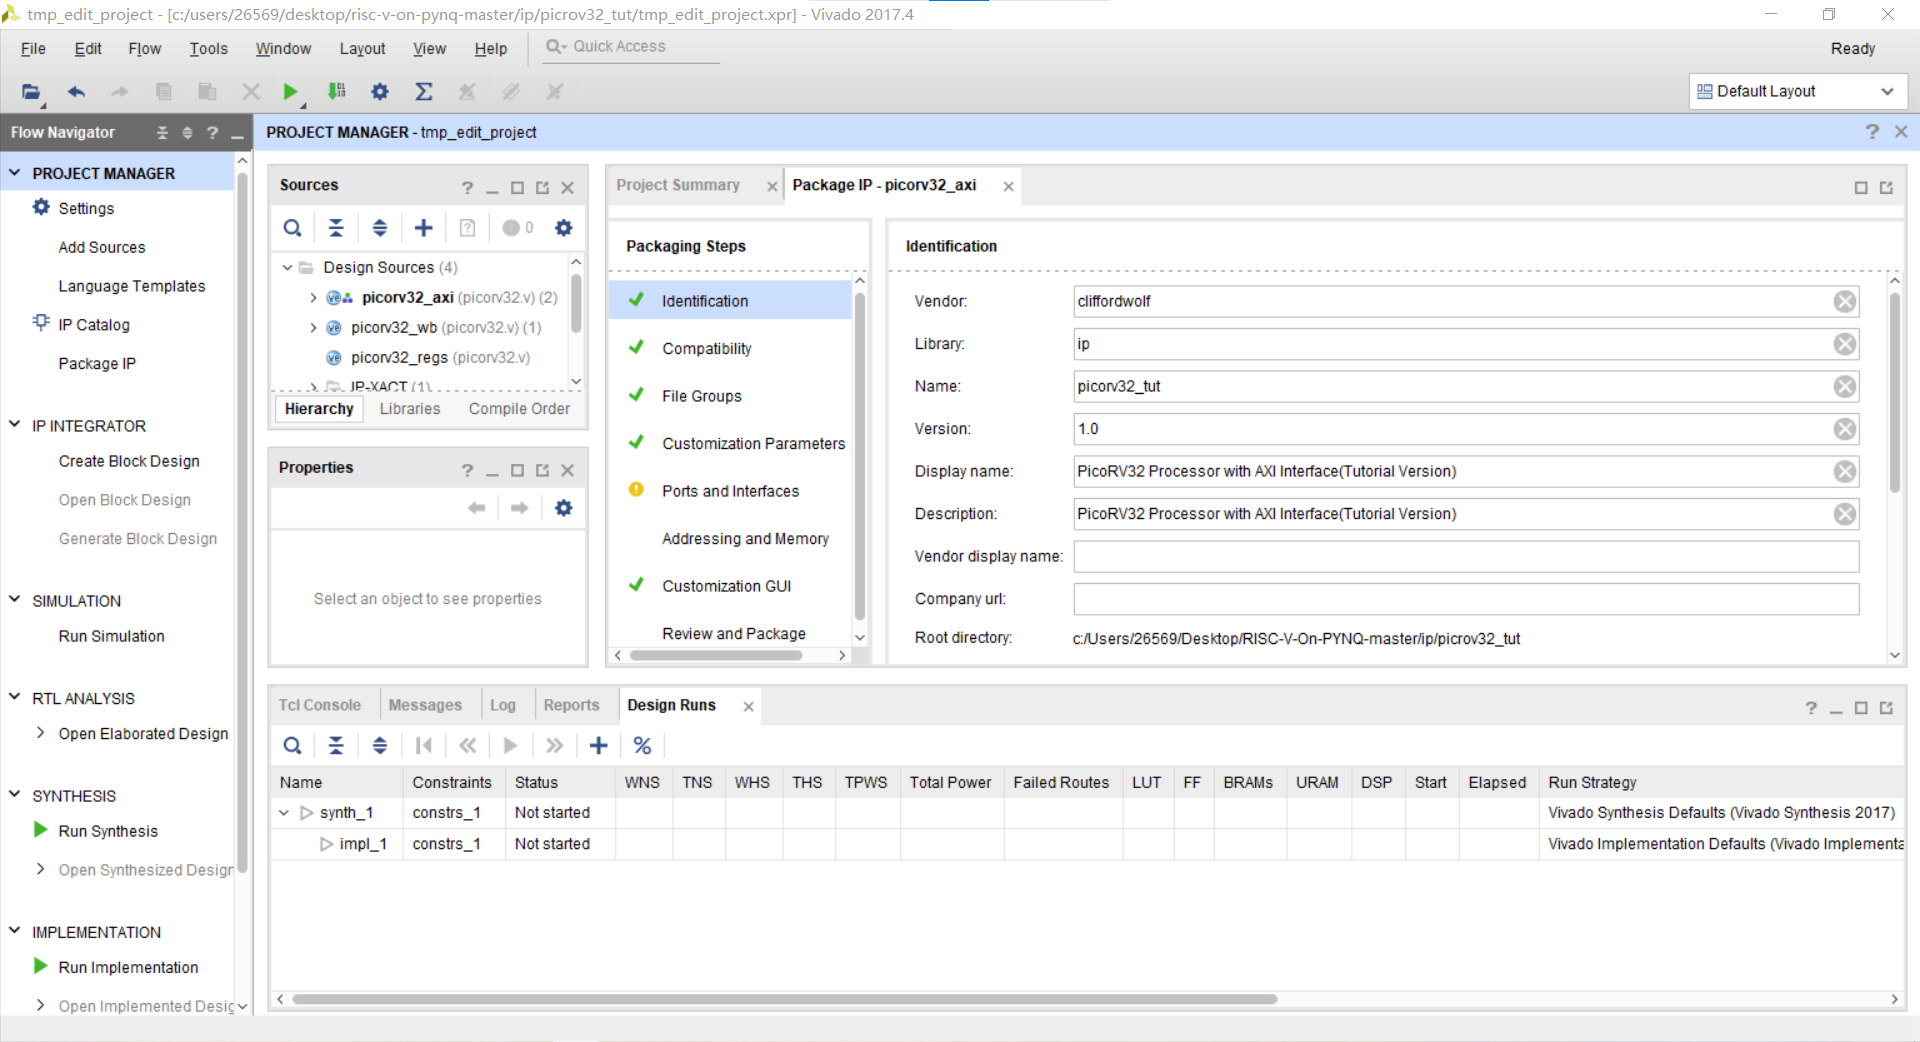
Identification:
Vendor: cliffordwolfLibrary: ipName: picorv32_tutDisplay name: PicoRV32 Processor with AXI Interface(Tutorial Version)Vendor display name: PicoRV32 Processor with AXI Interface(Tutorial Version)
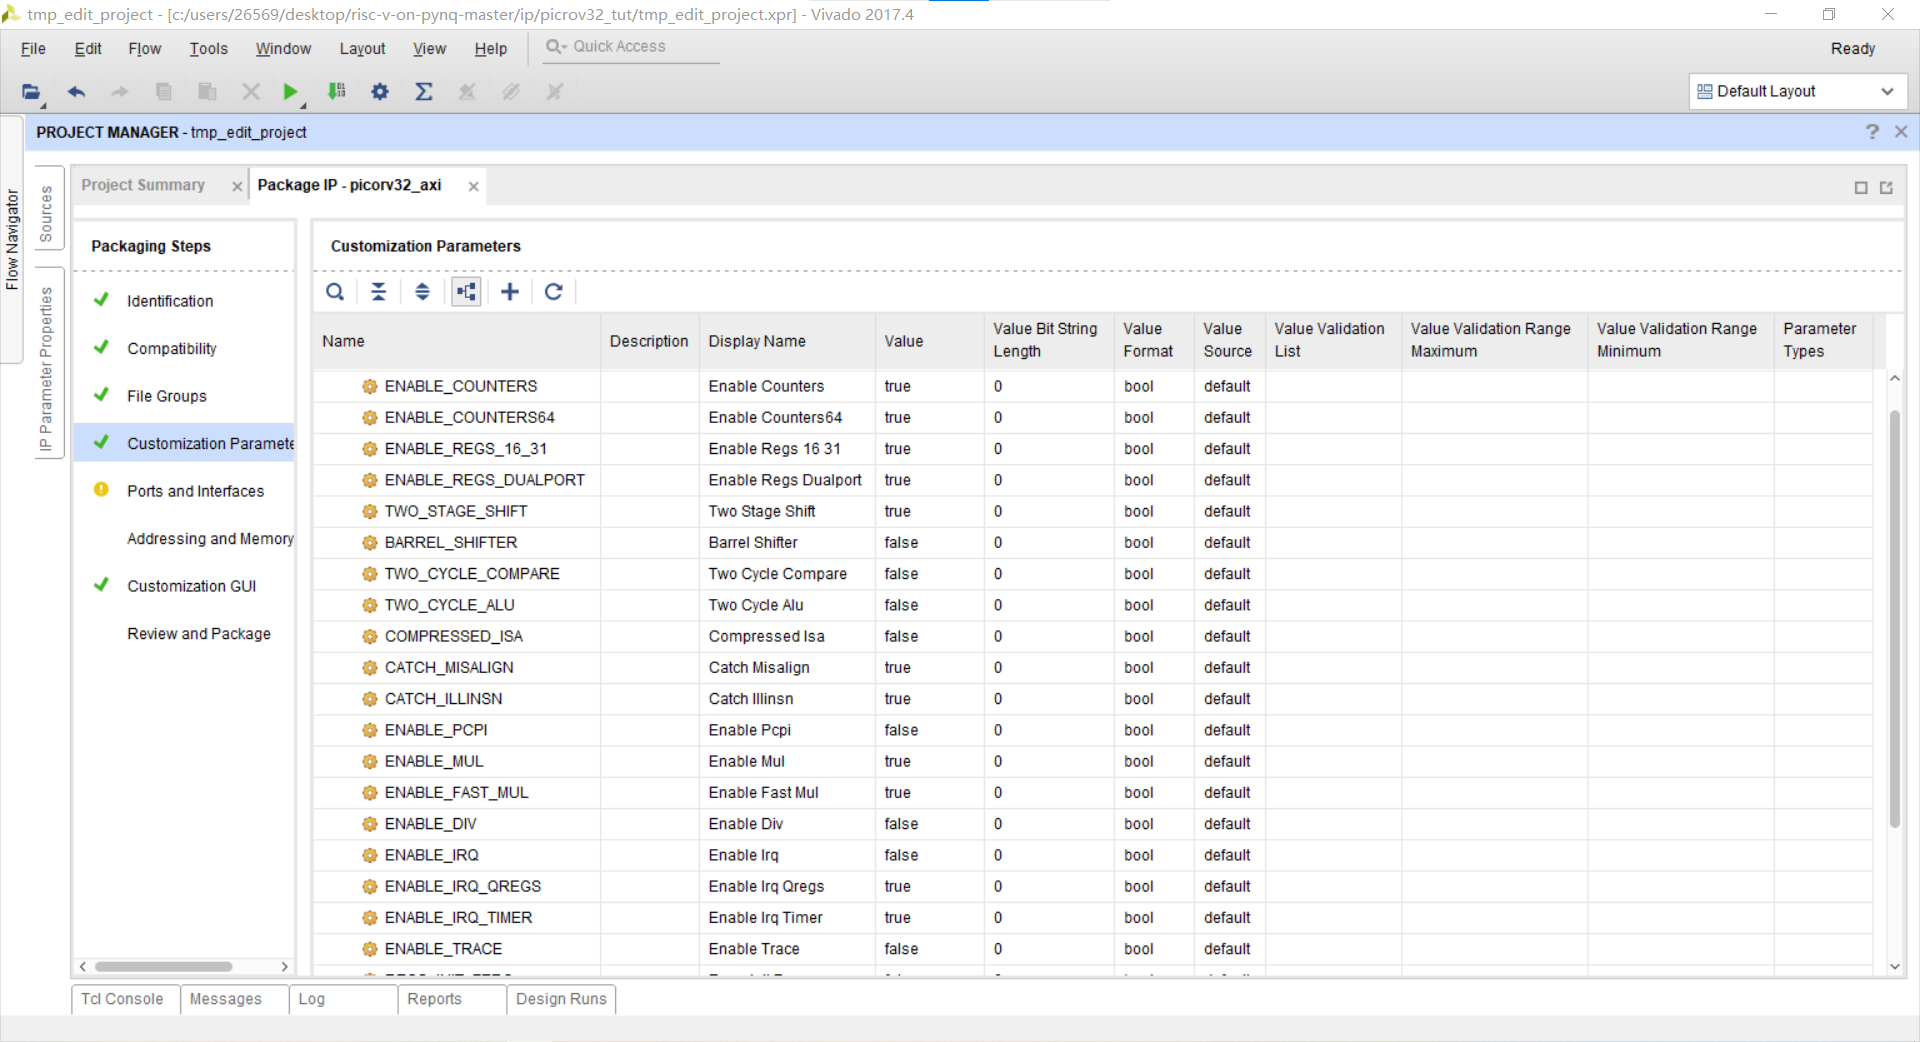
Customization Parameters:
就所有参数值的格式均改为bool,并按照图中所示的值对参数值进行修改
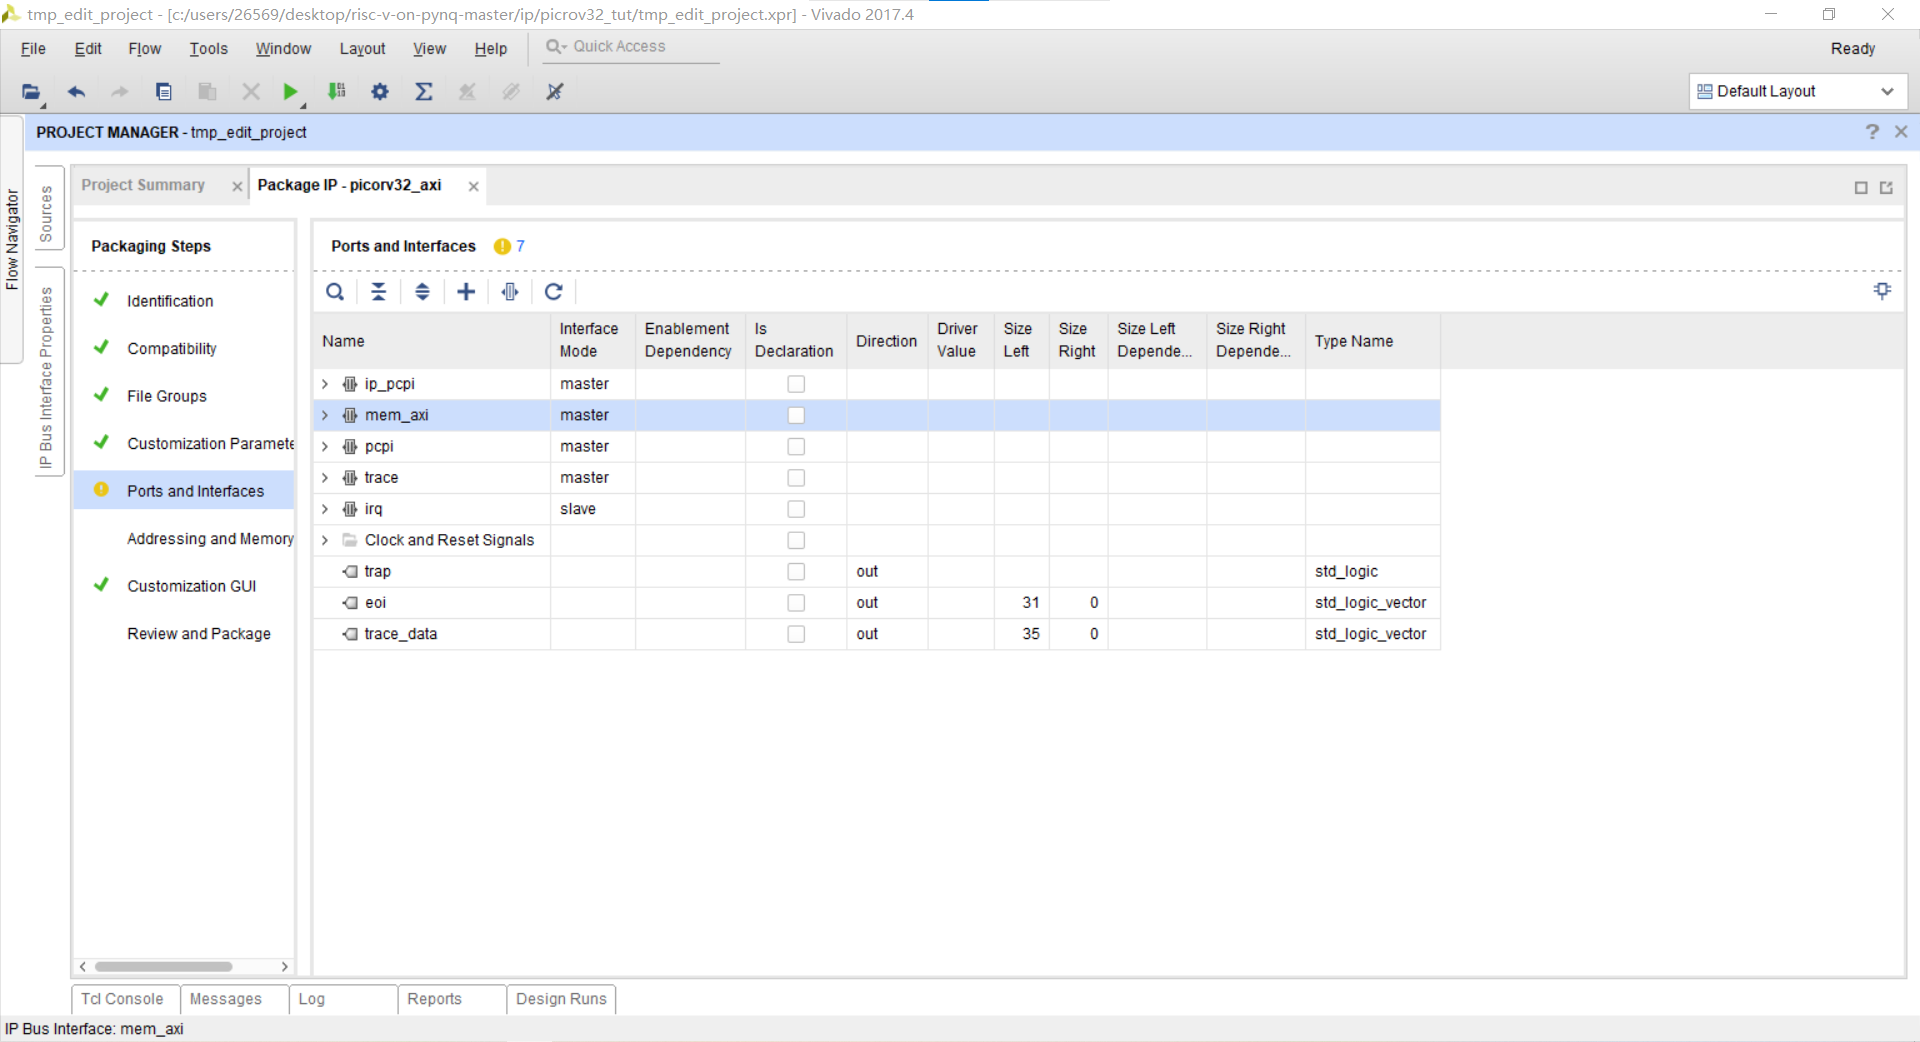
Ports and Interfaces:
右键mem_axi->Edit Interface…
**General:** Interface Definition: aximm_rtl**Port Mapping:** AWADDR - mem_axi_awaddr AWPROT - mem_axi_awprot AWVALID - mem_axi_awvalid AWREADY - mem_axi_awready WDATA - mem_axi_wdata WSTRB - mem_axi_wstrb WVALID - mem_axi_wvalid WREADY - mem_axi_wready BVALID - mem_axi_bvalid BREADY - mem_axi_bready ARADDR - mem_axi_araddr ARPROT - mem_axi_arprot ARVALID - mem_axi_arvalid ARREADY - mem_axi_arready RDATA - mem_axi_rdata RVALID - mem_axi_rvalid RREADY - mem_axi_rready
Addressing and Memory:
运行Addressing and Memory Map Wizard,选择mem_axi,相关设置如下图所示?

Review and Package:
点击Package IP即可。
- 为PYNQ-Z2创建RISC-V比特流:
将LOCATION/RISC-V-On-PYNQ/riscvonpynq/目录下的PYNQ-Z1.xdc文件的72,73行改为如下:
set_property -dict {PACKAGE_PIN P15 IOSTANDARD LVCMOS33} [get_ports arduino_iic_scl_io]set_property -dict {PACKAGE_PIN P16 IOSTANDARD LVCMOS33} [get_ports arduino_iic_sda_io]
在目录LOCATION/RISC-V-On-PYNQ下右键打开MobaXterm,执行以下命令:
make synthvivado tutorial/tutorial.xpr
若报错没有make命令,则可apt−getapt−get makemake进行安装;
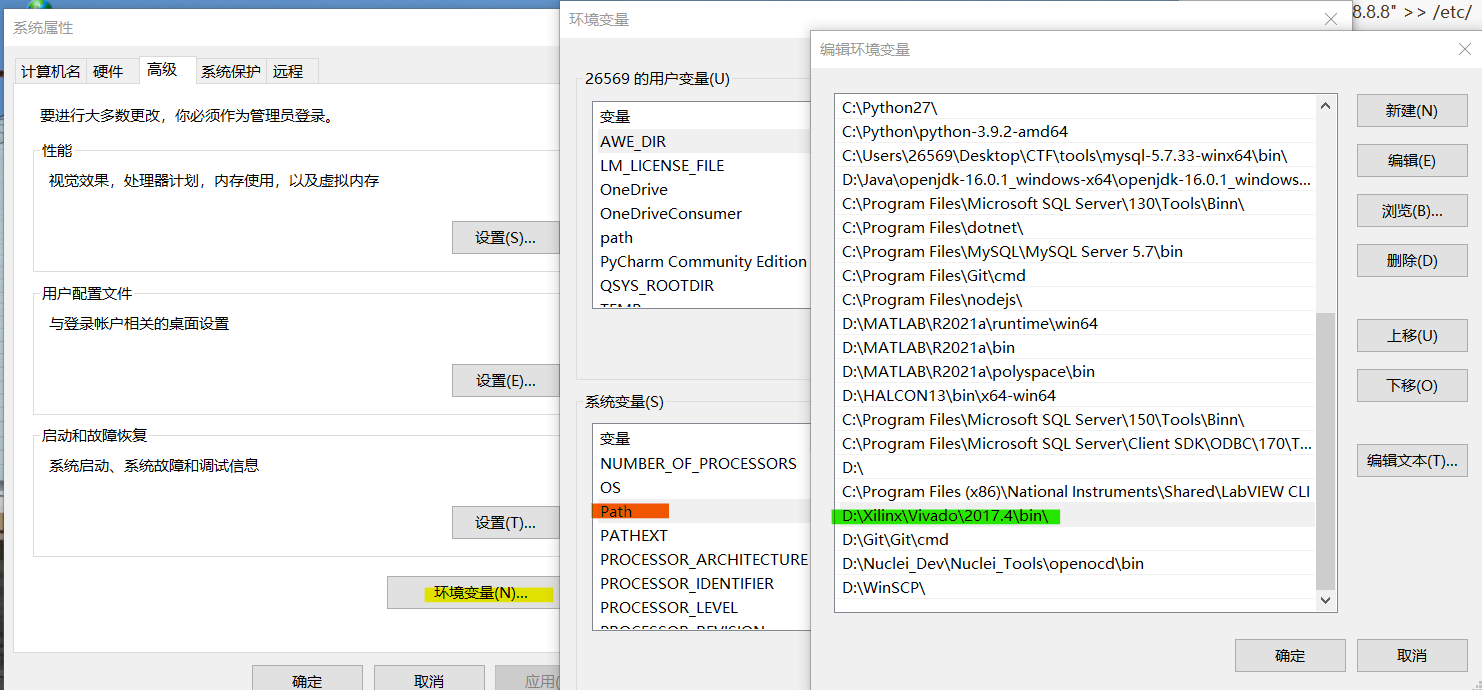
若报错没有vivado命令,则是由于未将Vivado添加到环境变量中,找到Vivado的安装目录下的bin目录,按下图所示添加到环境变量中,
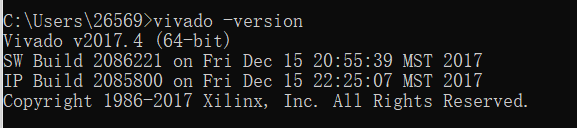
Win+R打开cmd,输入vivadovivado −version−version检查环境变量是否配置成功,成功则有如下显示?
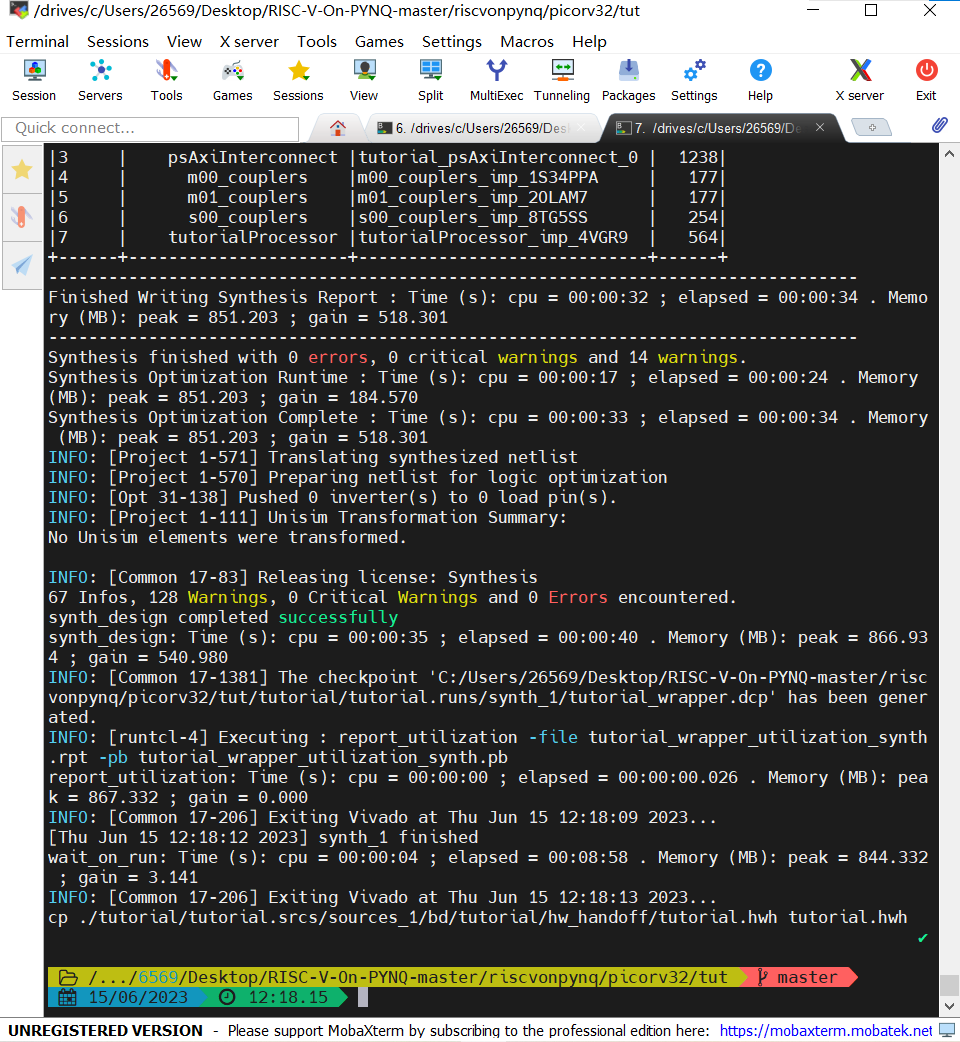
执行上面的第一条命令,vivado将进行创建工程并综合,综合结果如下?,即可输入第二条命令打开工程
执行命令完成后将打开tutorial.xpr工程,打开其中的tutorial.bd文件
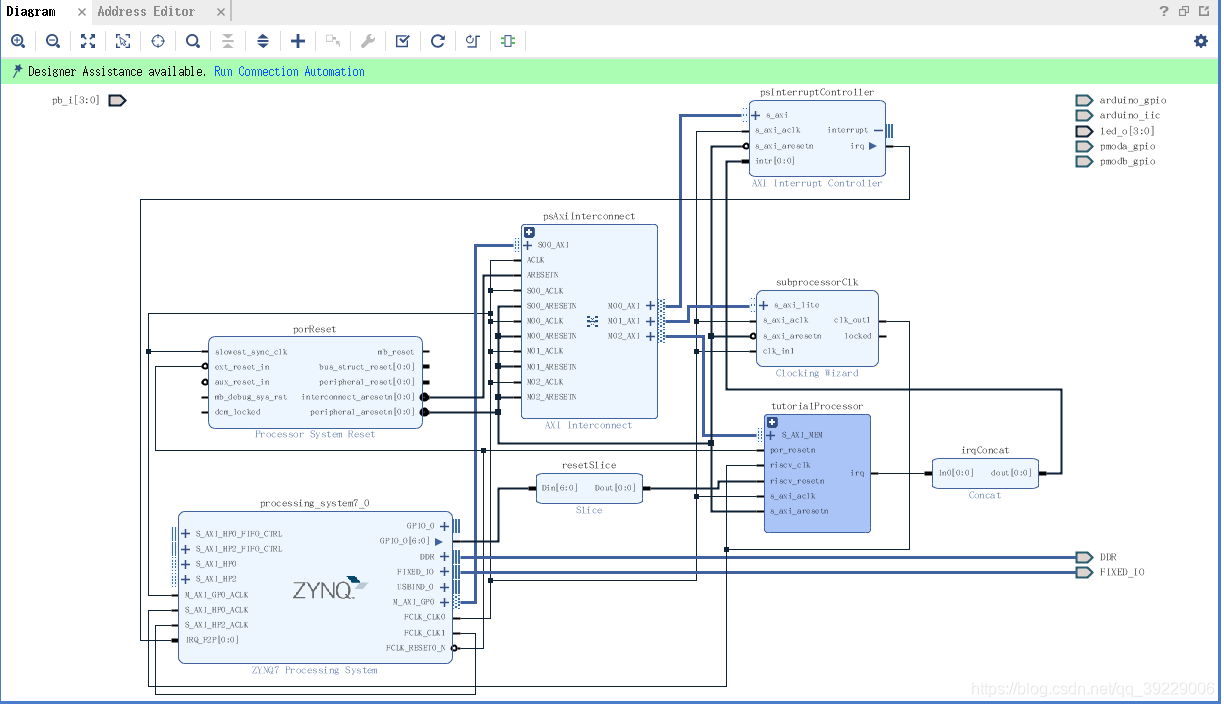
双击tutorialProcessor:
点击+号 , 将PicoRV32 Processor with AXI Interface (Tutorial Version) IP添加进去:
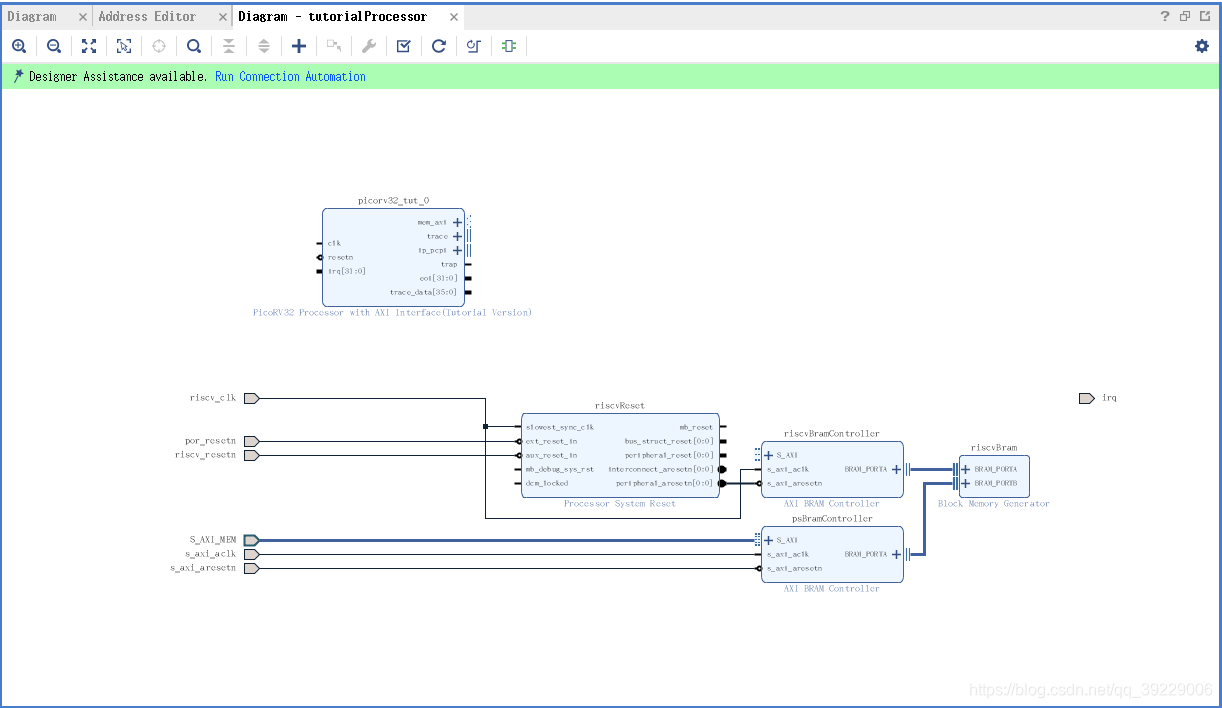
双击端口mem_axi,修改其频率为50000000。
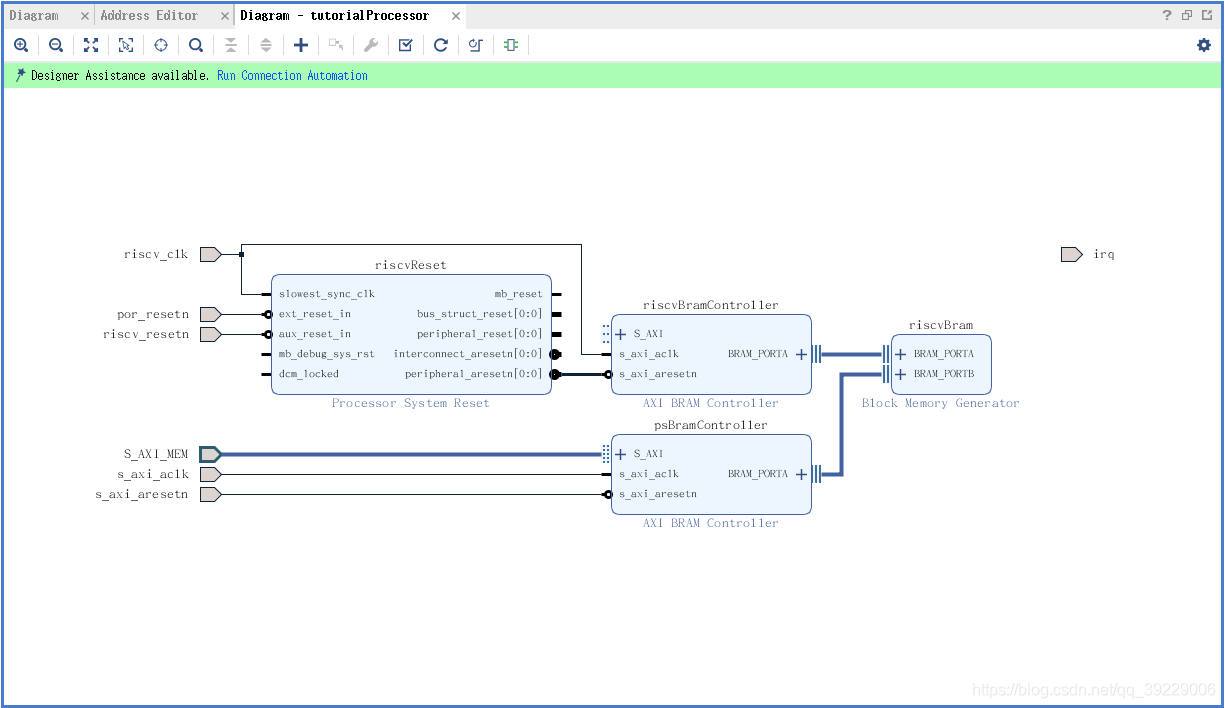
并按照下图连线:

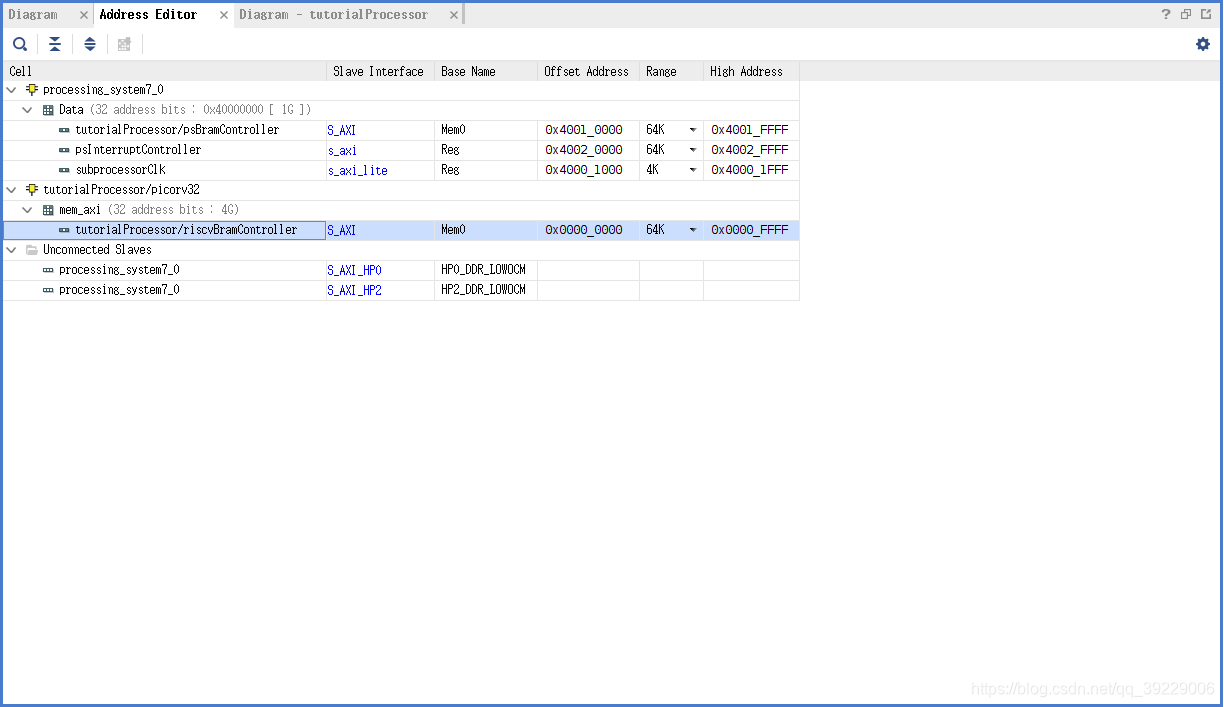
进入Address Editor窗口,分配地址映射:
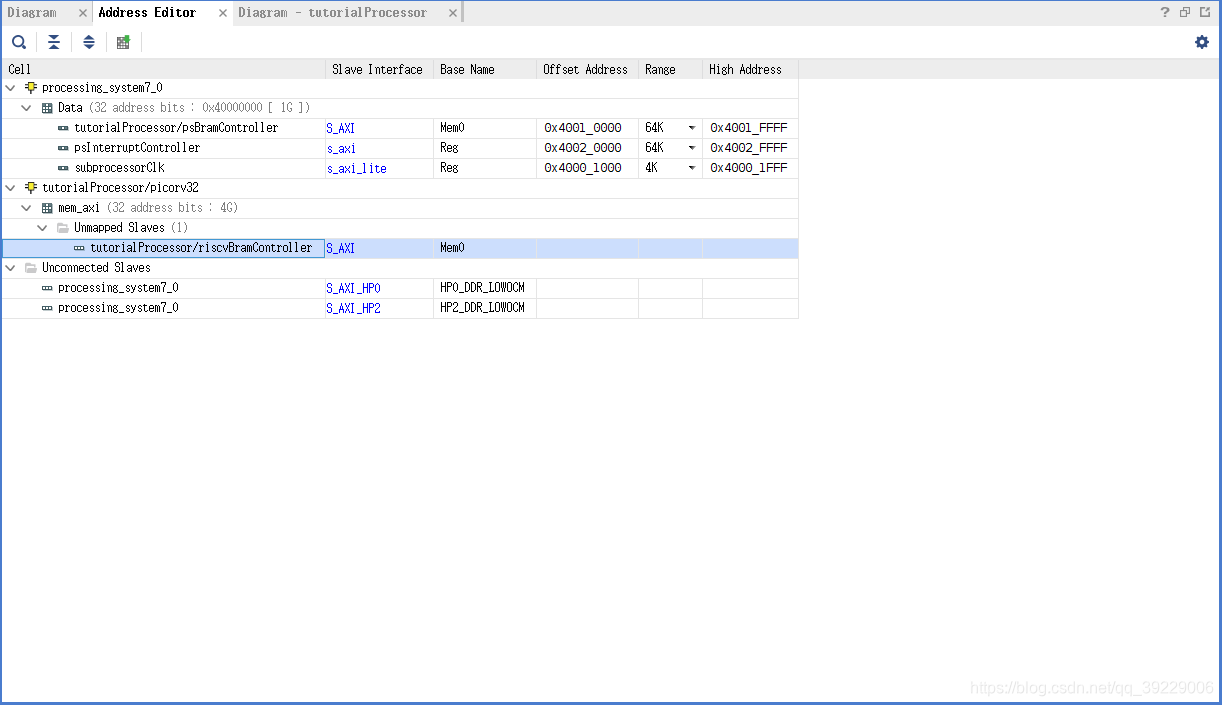
右击tutorialProcessor/riscvBramController->Assign Address
Offset Address: 0x0000_0000High Address: 0x0000_FFFF
运行Tools-Validate Design,提示有warning直接跳过
点击Generate Bitstream生成比特流文件,文件位置为:/tut/tutorial/tutorial.runs/impl_1/tut/tutorial/tutorial.runs/impl_1,将tutorial_wrapper.bit文件转移到tut目录下,并改名为tutorial.bit
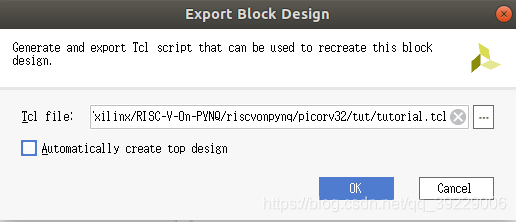
点击File->Exports…->Export Block Design,导出设计到tcl文件中并覆盖之前的文件,同时需确保Automatically create top design没有被勾选
将操作完成的整个工程放到PYNQ-Z2的home/xilinx目录下
3.在PYNQ-Z2上编译RISC-V GCC工具链
- 工具链的下载:
在按照官方例程进行下载时,出现了很多的报错问题,反复尝试了很多次都未能解决,而且经常由于网络连接问题而重开。
最终在上面的参考博客中找到了整个工具链的自动安装脚本,即工程主目录下的Makefile文件。
在目标安装目录下执行命令?
make download-tools
便开始了漫长的下载过程,期间在安装完一个子模块后可能会卡住然后报错,这种情况绝大多数是因为网络原因造成的,如果失败了可以再执行一次上述的命令,当一个子模块安装好,重新执行命令时会自动跳过安装好的模块,继续下一个模块的安装。
在安装完所有的模块后,执行如下命令?,便可以构建一个纯RV32IM CPU的完整工具链了
make -j$(nproc) build-riscv32im-tools
回车后在命令行输入YES即可执行。
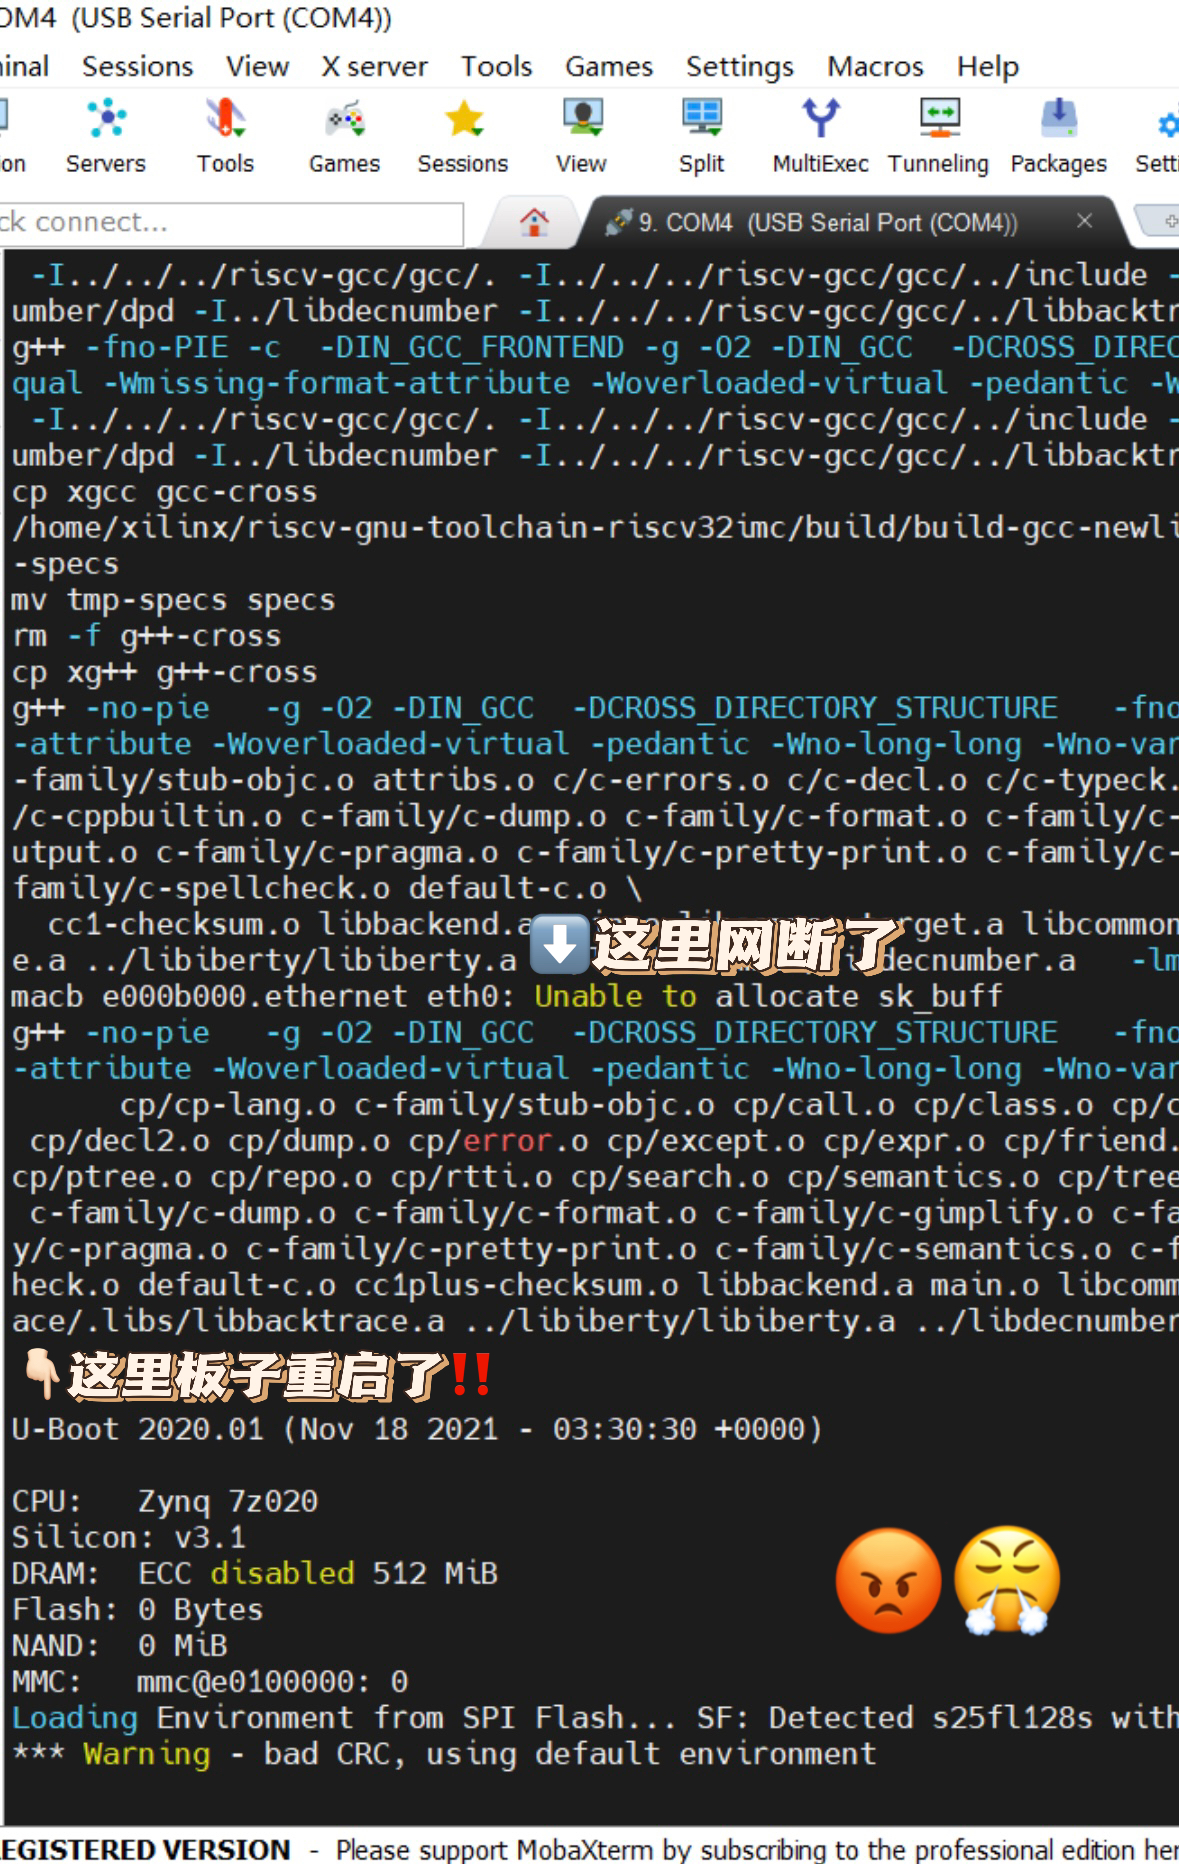
该步骤会等待的时间较长,去问了相关的博主,他们的编译时间大概在1h左右,猜测可能是由于我是通过PYNQ联网的原因,我的执行时间大概在四五个小时左右,过程中最好别碰,一断网那种心碎?
编译成功后的界面如下?
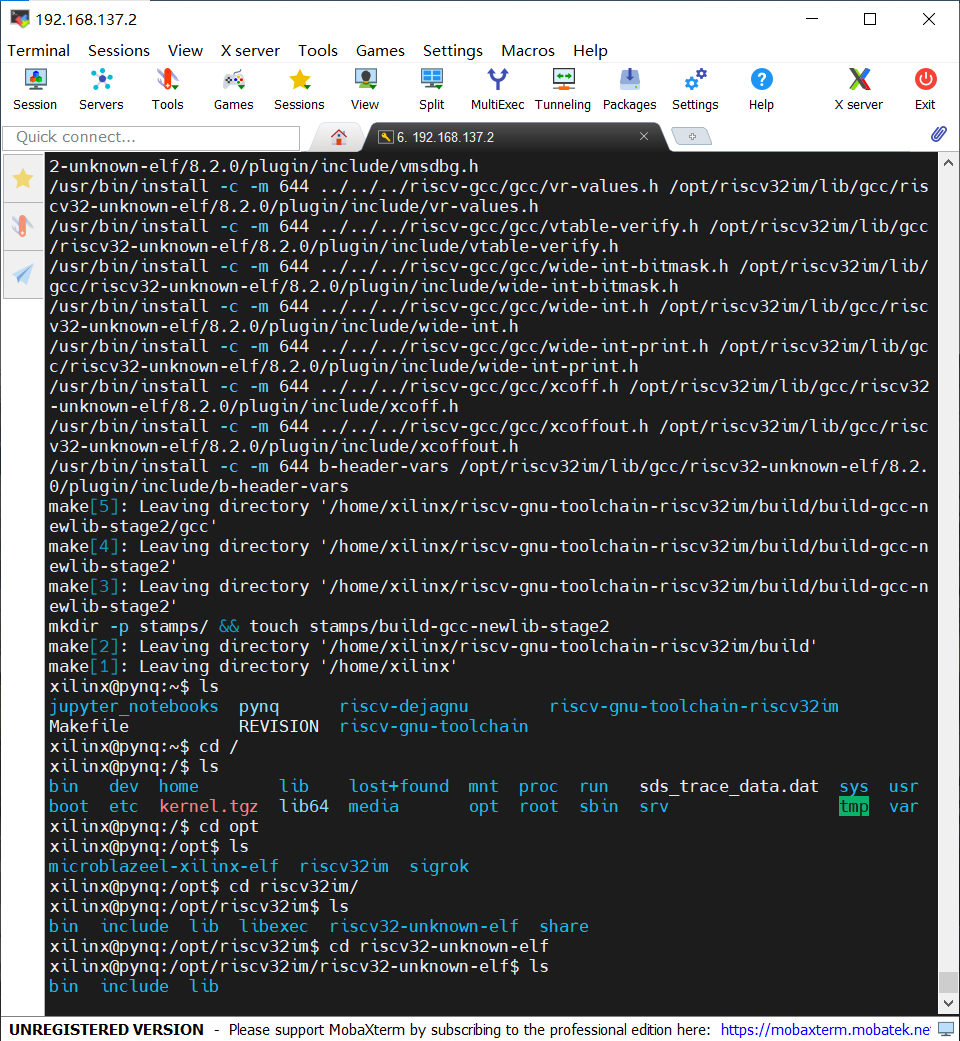
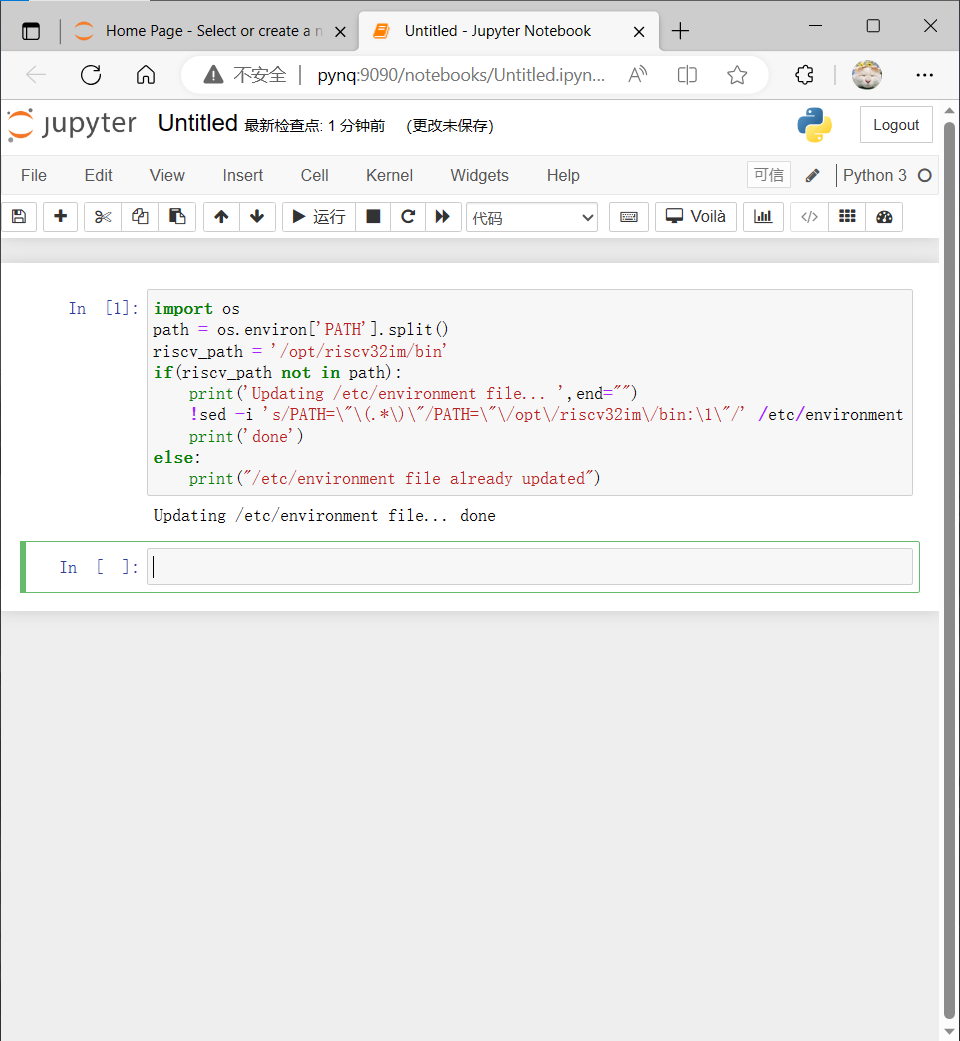
执行下面语句将编译生成的opt/riscv32im/binopt/riscv32im/bin配置到环境变量中,在JupyterNotebook中执行如下代码?
import ospath = os.environ['PATH'].split()riscv_path = '/opt/riscv32im/bin'if(riscv_path not in path): print('Updating /etc/environment file... ',end="") !sed -i 's/PATH=\"\(.*\)\"/PATH=\"\/opt\/riscv32im\/bin:\1\"/' /etc/environment print('done')else: print("/etc/environment file already updated")
显示 Updating /etc/environment file… done即配置完成。
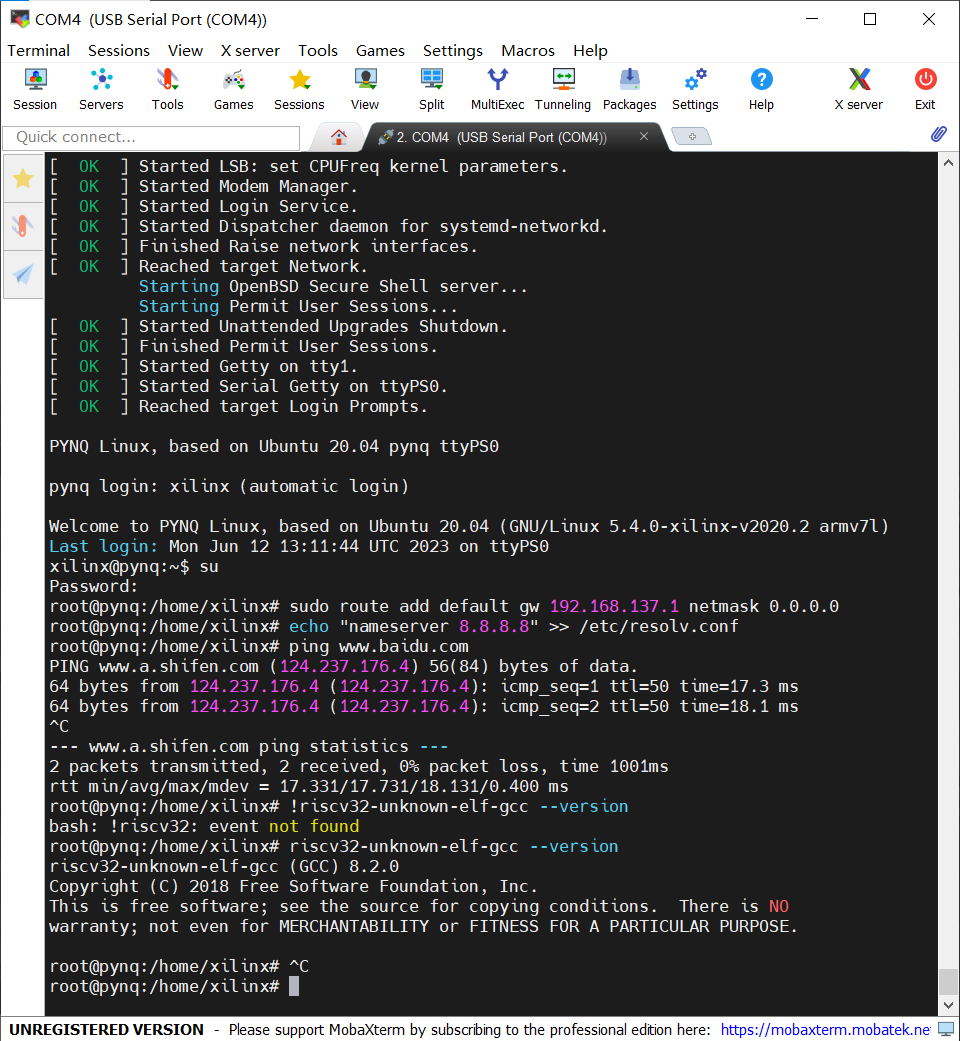
重启PYNQ-Z2: ``` shutdown -r now #如在JupyterNotebook中,前面需要加感叹号! ``` 重启后确认RISC-V工具链已成功安装 ``` riscv32-unknown=elf-gcc --version ``` 显示版本号即成功安装
在home/xilinx/RISC−V−On−PYNQ/riscvonpynq/picorv32/tut/home/xilinx/RISC−V−On−PYNQ/riscvonpynq/picorv32/tut/目录下创建tutorial.py文件,文件内容如下?
from pynq import Overlay, GPIO, Registerimport osimport inspectfrom riscvonpynq.Processor import BramProcessor#--------class TutorialOverlay(Overlay): """Overlay driver for the PicoRV32 bram Overlay Note ---- This class definition must be co-located with the .tcl and .bit file for the overlay for the search path modifications in riscvonpynq.Overlay to work. __init__ in riscvonpynq.Overlay uses the path of this file to search for the .bit file using the inspect package. """ pass class TutorialProcessor(BramProcessor): """Hierarchy driver for the PicoRV32 BRAM Processor Note ---- In order to be recognized as a RISC-V Processor hierarchy, three conditions must be met: First, there must be a PS-Memory-Mapped Block RAM Controller where the name matches the variable _bram. Second, the hierarchy name (fullpath) must equal the variable _name. Finally, there must be a GPIO port with the name _reset_name. Subclasses of this module are responsible for setting _name (The name of the Hierarchy), _bits (Processor bit-width), _proc (Processor Type Name) This class must be placed in a known location relative to the build files for this processor. The relative path can be modified in __get_path. """ _name = 'tutorialProcessor' _proc = 'picorv32' _bits = 32 @classmethod def checkhierarchy(cls, description): return super().checkhierarchy(description) def __get_path(self): """Get the directory path of this file, or the directory path of the class that inherits from this class. """ # Get file path of the current class (i.e. /opt/python3.6/<...>/stream.py) file_path = os.path.abspath(inspect.getfile(inspect.getmodule(self))) # Get directory path of the current class (i.e. /opt/python3.6/<...>/stream/) return os.path.dirname(file_path) def __init__(self, description, *args): """Return a new Processor object. Parameters ---------- description : dict Dictionary describing this processor. """ build_path = os.path.join(self.__get_path(), "build") reset_value = 0 super().__init__(build_path, reset_value, description, *args)
在home/xilinx/RISC−V−On−PYNQ/riscvonpynq/picorv32/tut/home/xilinx/RISC−V−On−PYNQ/riscvonpynq/picorv32/tut/目录下创建__init__.py文件,文件内容如下?
from . import tutorialfrom . import build
将../bram/build拷贝到../tut/build中
在JupyterNotebook中执行以下代码设置当前工作路径为home/xilinx/RISC−V−On−PYNQhome/xilinx/RISC−V−On−PYNQ
import osos.chdir("/home/xilinx/RISC-V-On-PYNQ/")print(os.getcwd())
执行下面代码导入Overlay?
import syssys.path.insert(0, '/home/xilinx/RISC-V-On-PYNQ/riscvonpynq/picorv32/') from tut.tutorial import TutorialOverlay overlay = TutorialOverlay("/home/xilinx/RISC-V-On-PYNQ/riscvonpynq/picorv32/tut/tutorial.bit")
若没有报错执行以下代码,进行移植的测试?
%%riscvc test overlay.tutorialProcessor int main(int argc, char ** argv){ unsigned int * arr = (unsigned int *)argv[1]; return arr[2];}
但在这里我一直遇到下图的报错,问了很多人都没能解决
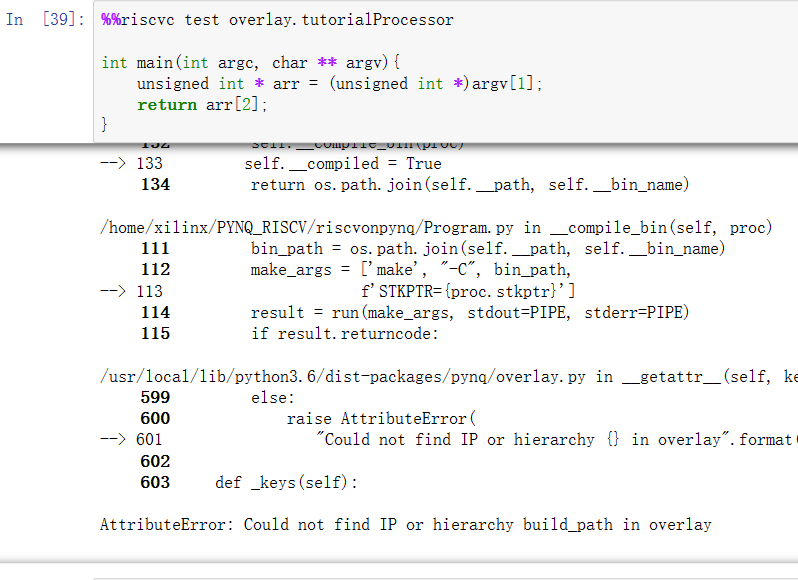
如果有大佬做过这个项目,还请方便的话指点俺一下下つ﹏⊂
Recommend
About Joyk
Aggregate valuable and interesting links.
Joyk means Joy of geeK