

深入了解 SwiftUI 5 中 ScrollView 的新功能
source link: https://www.fatbobman.com/posts/new-features-of-ScrollView-in-SwiftUI5/
Go to the source link to view the article. You can view the picture content, updated content and better typesetting reading experience. If the link is broken, please click the button below to view the snapshot at that time.

在 SwiftUI 5.0 中,苹果大幅强化了 ScrollView 功能。新增了大量新颖、完善的 API。本文将对这些新功能进行介绍,希望能够让它们更多、更早的帮助到有需要的开发者。
可以在 此处 获取完整的演示代码
contentMargins
public func contentMargins(_ edges: Edge.Set = .all, _ length: CGFloat?, for placement: ContentMarginPlacement = .automatic) -> some View
为可滚动容器的内容或滚动指示器(Scroll Indicator)添加外边距(Margin)。
- 不限于 ScrollView,支持所有可滚动容器(包括 List、TextEditor 等)。
- 将可滚动容器内的所有子视图视为一个整体,并为其添加 margin。之前在 List 或 TextEditor 中实现类似操作是十分困难的。
- 默认的 ContentMarginPlacement(.automatic)将导致指示器与内容之间的长度不一致。如果想保持长度一致,应使用
.scrollContent。 - 适用于作用域内的所有可滚动容器。
struct ContentMarginsForScrollView: View {
    @State var text = "Hello world"
    var body: some View {
        VStack {
            ScrollView(.horizontal) {
                HStack {
                    CellView(color: .yellow)
                        // a custom overlay view for easy display of auxiliary information
                        .idView("leading")
                    ForEach(0 ..< 5) { i in
                        CellView()
                            .idView(i)
                    }
                    CellView(color: .green)
                        .idView("trailing")
                }
            }

            // Also affected by contentMargins
            TextEditor(text: $text)
                .border(.red)
                .padding()
                .contentMargins(.all, 30, for: .scrollContent)
        }
        // Applies to all scrollable containers within the scope
        .contentMargins(.horizontal, 50, for: .scrollContent)
    }
}
 demo2023-06-1211.02.35.2023-06-12 1104_43" />
健康笔记是一款智能的数据管理和分析工具,让您完全掌控自己和全家人的健康信息。作为慢性病患者,肘子深知健康管理的重要与难度。创建健康笔记的初心,就是要为您提供一款轻松高效的健康信息记录与分析工具
safeAreaPadding
为视图的安全区域添加内嵌。在某些场景下,其效果与 safeAreaInset 十分相似。例如,在下面的代码中,为 ScrollView 的 leading 方向添加安全区域的两种方式效果是一致的。
struct SafeAreaPaddingDemo: View {
    var body: some View {
        VStack {
            ScrollView {
                ForEach(0 ..< 20) { i in
                    CellView(width: nil)
                        .idView(i)
                }
            }
            .safeAreaPadding(.leading,20)
            // .safeAreaInset(edge: .leading){
            //       Color.clear.frame(width:20)
            //  }
        }
    }
}
- 该属性不仅适用于可滚动视图,而适用于所有类型的视图。
- 它只会影响最近的一个视图。
- 对于全面屏的额外安全区域,safeAreaInset 和 safeAreaPadding 的处理逻辑不一致。
例如,下面的两种实现中,ScrollView 的底部空间是不同的。
使用 safeAreaInset:
ScrollView {
    ForEach(0 ..< 20) { i in
        CellView(width: nil)
            .idView(i)
    }
}
.safeAreaInset(edge: .bottom){
    Text("Bottom View")
        .font(.title3)
        .foregroundColor(.indigo)
        .frame(maxWidth: .infinity, maxHeight: 40)
        .background(.green.opacity(0.6))
}

使用 safeAreaPadding:
ZStack(alignment: .bottom) {
    ScrollView {
        ForEach(0 ..< 20) { i in
            CellView(width: nil)
                .idView(i)
        }
    }
    .safeAreaPadding(.bottom, 40)

    Text("Bottom View")
        .font(.title3)
        .foregroundColor(.indigo)
        .frame(maxWidth: .infinity, maxHeight: 40)
        .background(.green.opacity(0.6))
}

阅读 掌握 SwiftUI 的 Safe Area 一文,了解更多有关安全区域的内容。
scrollIndicatorsFlash
控制滚动指示器
使用 scrollIndicatorsFlash(onAppear: true) 可以在滚动视图出现时使其滚动指示器短暂闪烁。
使用 scrollIndicatorsFlash(trigger:) 可以在提供的值更改时,修饰符作用域范围内的所有可滚动容器的滚动指示器短暂闪烁。
struct ScrollIndicatorsFlashDemo: View {
    @State private var items = (0 ..< 50).map { Item(n: $0) }
    var body: some View {
        VStack {
            Button("Remove First") {
                guard !items.isEmpty else { return }
                items.removeFirst()
            }.buttonStyle(.bordered)
            ScrollView {
                ForEach(items) { item in
                    CellView(width: 100, debugInfo: "\(item.n)")
                        .idView(item.n)
                        .frame(maxWidth:.infinity)
                }
            }
            .animation(.bouncy, value: items.count)
        }
        .padding(.horizontal,10)
        .scrollIndicatorsFlash(onAppear: true)
        .scrollIndicatorsFlash(trigger: items.count)
    }
}
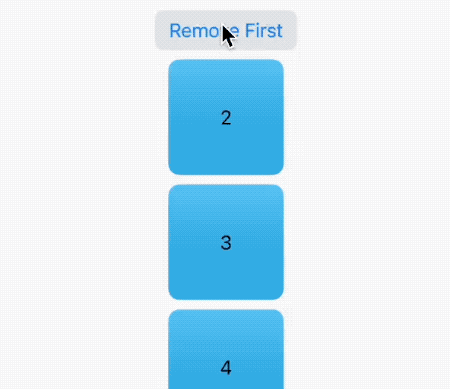 demo2023-06-1213.44.03.2023-06-12 1344_40" />
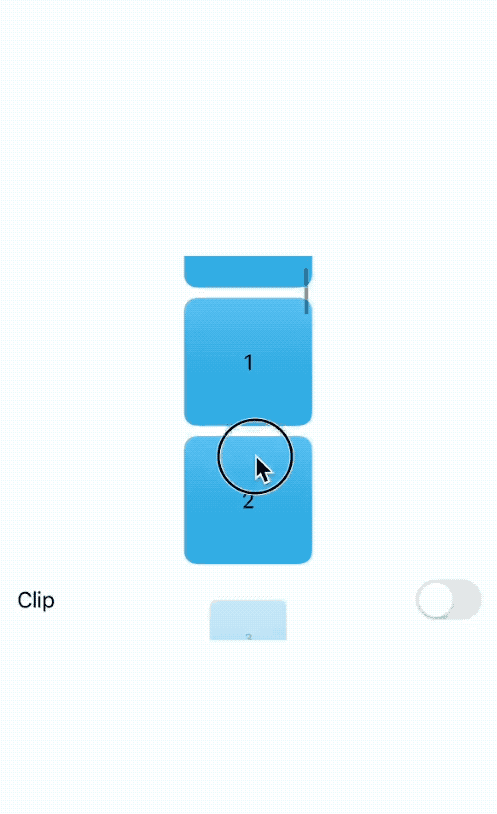
scrollClipDisable
scrollClipDisable 用于控制是否对滚动内容应用裁剪以适应滚动容器的边界。
当 scrollClipDisable 为 false 时,滚动内容会被裁剪以适应滚动容器边界。任何超出边界的部分将不会显示。
当 scrollClipDisable 为 true 时,滚动内容不会被裁剪。它可以延伸超出滚动容器的边界,从而显示更多内容。
- 仅适用于 ScrollView
- 适用于作用域内的所有可滚动容器
struct ScrollClipDisableDemo: View {
    @State private var disable = true
    var body: some View {
        VStack {
            Toggle("Clip Disable", isOn: $disable)
                .padding(20)
            ScrollView {
                ForEach(0 ..< 10) { i in
                    CellView()
                        .idView(i)
                        .shadow(color: .black, radius: 50)
                }
            }
        }
        .scrollClipDisabled(disable)
    }
}
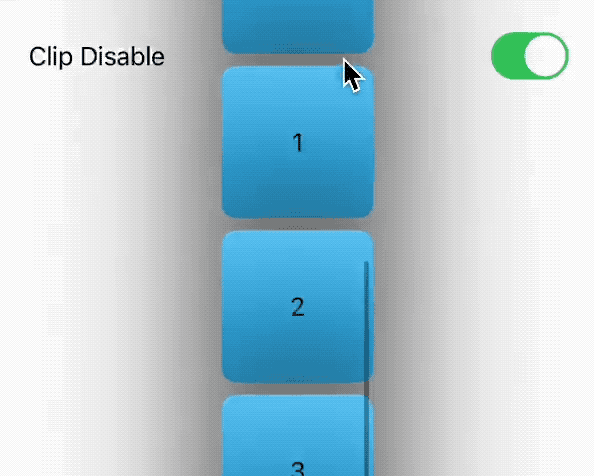 demo2023-06-1213.58.10.2023-06-12 1358_50" />
scrollTargetLayout
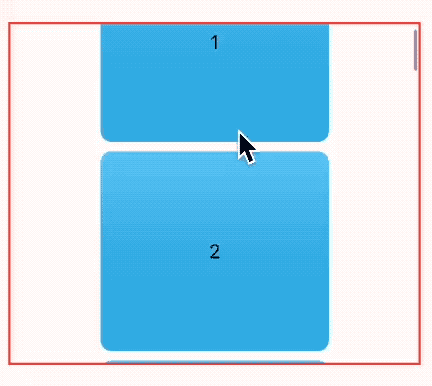
此修饰符用于配合下文介绍的 scrollTargetBehavior( ViewAlignedScrollTargetBehavior 模式) 或 scrollPosition(id:) 使用。
应将此修饰符应用于 ScrollView 中包含主要重复内容的布局容器,如 LazyHStack 或 VStack。
@State private var isEnabled = true

ScrollView {
    LazyVStack {
        ForEach(items) { item in
            CellView(width: 200, height: 140)
                .idView(item.n)
        }
    }
    .scrollTargetLayout(isEnabled: isEnabled)
}
scrollPosition(initialAnchor:)
使用此修饰符可以指定滚动视图内容最初可见部分的锚点。它只影响滚动视图的初始状态,一次性设置。通常用于实现类似初始状态从底部显示的 IM 应用、从 trailing 开始显示数据等情况。通过 UnitPoint 可以同时设置两个轴向的初始位置。
struct ScrollPositionInitialAnchorDemo: View {
    @State private var show = false
    @State private var position: Position = .leading
    var body: some View {
        VStack {
            Toggle("Show", isOn: $show)
            Picker("Position", selection: $position) {
                ForEach(Position.allCases) { p in
                    Text(p.rawValue).tag(p)
                }
            }
            .pickerStyle(.segmented)
            if show {
                ScrollView(.horizontal) {
                    LazyHStack {
                        ForEach(0 ..< 10000) { i in
                            CellView(debugInfo: "\(i)")
                                .idView(i)
                        }
                    }
                }
                .scrollPosition(initialAnchor: position.unitPoint)
            }
        }
        .padding()
    }

    enum Position: String, Identifiable, CaseIterable {
        var id: UnitPoint { unitPoint }
        case leading, center, trailing
        var unitPoint: UnitPoint {
            switch self {
            case .leading:
                .leading
            case .center:
                .center
            case .trailing:
                .trailing
            }
        }
    }
}
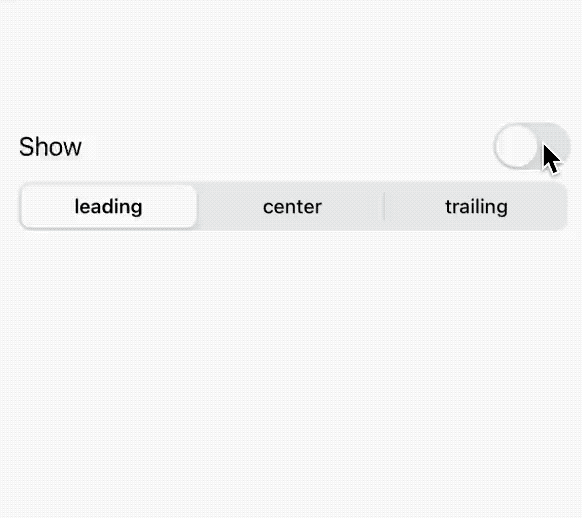 initialAnchordemo2023-06-1214.37.09.2023-06-12 143747" />
尽管使用此修饰符实现初始定位十分容易,但当数据集很大时,仍然会有较严重的性能问题。可采用 优化在 SwiftUI List 中显示大数据集的响应效率 一文中介绍的方式来解决。
scrollPostion(id:)
使用此修饰符可以让滚动视图滚动到特定的位置。可以将其理解为 ScrollViewReader 的简化版本。
- 仅适用于 ScrollView
- 当 ForEach 中的数据源遵循 Identifiable 协议时,无需显式使用
id修饰符设置标识 - 与 scrollTargetLayout 配合使用,可以获取当前的滚动位置(视图标识)
- 不支持锚点设定,固定锚点为子视图的 center
- 正如 优化在 SwiftUI List 中显示大数据集的响应效率 一文所提到的,当数据集很大时,也会出现性能问题。
struct ScrollPositionIDDemo: View {
    @State private var show = false
    @State private var position: Position = .trailing
    @State private var items = (0 ..< 500).map {
        Item(n: $0)
    }

    @State private var id: UUID?

    var body: some View {
        VStack {
            Picker("Position", selection: $position) {
                ForEach(Position.allCases) { p in
                    Text(p.rawValue).tag(p)
                }
            }
            .pickerStyle(.segmented)
            Text(id?.uuidString ?? "").fixedSize().font(.caption2)
            ScrollView(.horizontal) {
                LazyHStack {
                    ForEach(items) { item in
                        CellView(debugInfo: "\(item.n)")
                            .idView(item.n)
                    }
                }
            }
            .scrollPosition(id: $id)
            .scrollTargetLayout()
        }
        .animation(.default, value: id)
        .padding()
        .frame(height: 300)
        .task(id: position) {
            switch position {
            case .leading:
                id = items.first!.id
            case .center:
                id = items[250].id
            case .trailing:
                id = items.last!.id
            }
        }
    }
}
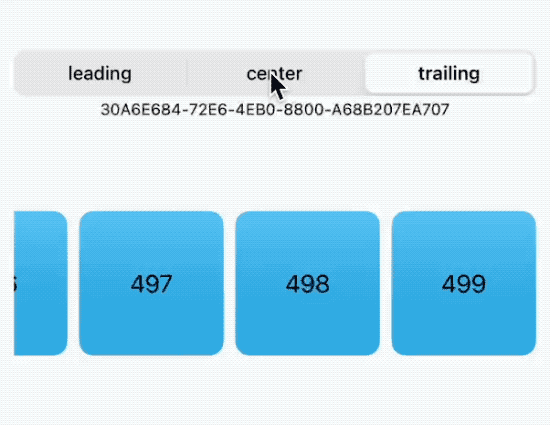 demo2023-06-1215.38.35.2023-06-12 1539_13" />
对应的 ScrollViewReader 版本:
ScrollViewReader { proxy in
    ScrollView(.horizontal) {
        LazyHStack {
            ForEach(items) { item in
                CellView(debugInfo: "\(item.n)")
                    .idView(item.n)
                    .id(item.id)
            }
        }
    }
    .task(id: position) {
        switch position {
        case .leading:
            proxy.scrollTo(items.first!.id)
        case .center:
            proxy.scrollTo(items[250].id)
        case .trailing:
            proxy.scrollTo(items.last!.id)
        }
    }
}
ScrollViewReader 和 scrollPostion(id:) 的内部实现原理应该差不多。但是,ScrollViewReader 可用于 List 中,还可设置锚点。scrollPostion(id:) 与 scrollTargetLayout 配合使用时,可获取当前滚动位置(标识)。
健康笔记是一款智能的数据管理和分析工具,让您完全掌控自己和全家人的健康信息。作为慢性病患者,肘子深知健康管理的重要与难度。创建健康笔记的初心,就是要为您提供一款轻松高效的健康信息记录与分析工具
scrollTargetBehavior
scrollTargetBehavior 用于设置 ScrollView 的滚动行为:分页还是与子视图对齐。
使用 .scrollTargetBehavior(.paging) 可以使 ScrollView 分页滚动,每次滚动一页(即 ScrollView 的可视尺寸)。
LazyVStack {
    ForEach(items) { item in
        CellView(width: 200, height: 140)
            .idView(item.n)
    }
}
.scrollTargetBehavior(.paging)
 pagingdemo2023-06-1215.55.29.2023-06-12 155555" />
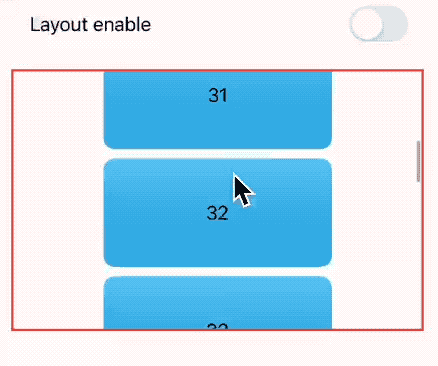
当设置为 .scrollTargetBehavior(.viewAligned) 时,需要与 scrollTargetLayout 一同使用。滚动停止时,容器顶端将与子视图的顶部对齐(在垂直模式下)。开发者可以通过控制 scrollTargetLayout 的启用与否来开关 viewAligned 的行为。
struct ScrollTargetBehaviorDemo: View {
    @State var items = (0 ..< 100).map { Item(n: $0) }
    @State private var isEnabled = true
    var body: some View {
        VStack {
            Toggle("Layout enable", isOn: $isEnabled).padding()
            ScrollView {
                LazyVStack {
                    ForEach(items) { item in
                        CellView(width: 200, height: 95)
                            .idView(item.n)
                    }
                }
                .scrollTargetLayout(isEnabled: isEnabled)
            }
            .border(.red, width: 2)
        }
        .scrollTargetBehavior(.viewAligned)
        .frame(height: 300)
        .padding()
    }
}
 viewAligneddemo2023-06-1216.11.06.2023-06-12 161142" />
通过 .scrollTargetBehavior(.viewAligned(limitBehavior:)) 我们可以定义对齐滚动目标行为的机制。
.automatic是默认行为,在紧凑的水平尺寸类中受限,否则不受限。.always始终限制可滚动视图的数量。.never不限制可滚动视图的数量。
同时,通过 ViewAlignedScrollTargetBehavior ,开发者还可以基于系统提供的目标覆盖滚动视图的滚动位置( 尚未仔细研究实现细节 )。
NamedCoordinateSpace.scrollView
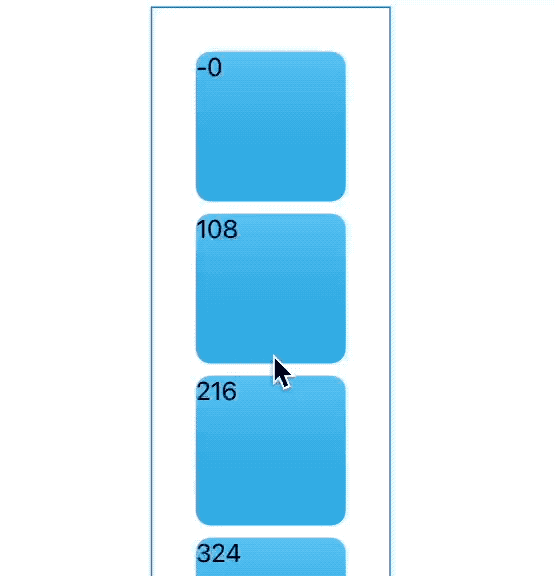
在 SwiftUI 5 中,苹果新增了 NamedCoordinateSpace 类型,方便用户命名坐标系,并提供了预置的 .scrollView 坐标系(仅支持 ScrollView)。通过这个坐标系,开发者可以非常容易地获取子视图与滚动视图之间的位置关系。利用这些信息,我们可以轻松地实现很多效果,尤其是配合另一个新 API,visualEffect 修饰符。
struct CoordinatorDemo: View {
    var body: some View {
        ScrollView {
            ForEach(0 ..< 30) { _ in
                CellView()
                    .overlay(
                        GeometryReader { proxy in
                            if let distanceFromTop = proxy.bounds(of: .scrollView)?.minY {
                                Text(distanceFromTop * -1, format: .number)
                            }
                        }
                    )
            }
        }
        .border(.blue)
        .contentMargins(30, for: .scrollContent)
    }
}
 coodinatorNamedemo2023-06-1217.28.22.2023-06-12 172854" />
与使用 .coordinateSpace(.named("MyScrollView")) 设置的坐标系不同,预设的 .scrollView 坐标系可以正确处理 contentMargins 创建的 margin。
ScrollView {
    ForEach(0 ..< 30) { _ in
        CellView()
            .overlay(
                GeometryReader { proxy in
                    if let distanceFromTop = proxy.bounds(of: .named("MyScrollView"))?.minY {
                        Text(distanceFromTop * -1, format: .number)
                    }
                }
            )
    }
}
.border(.blue)
.contentMargins(30, for: .scrollContent)
// margin not recognized
.coordinateSpace(.named("MyScrollView"))
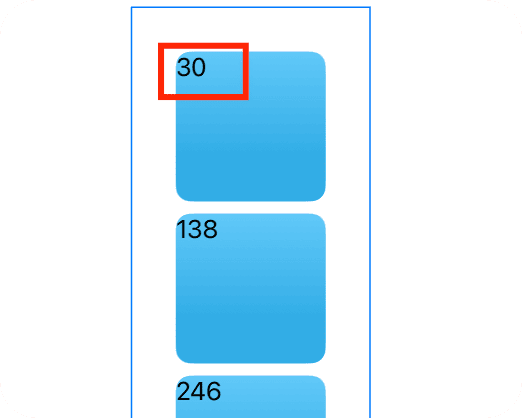
bounds(of coordinateSpace: NamedCoordinateSpace) -> CGRect?是今年新增的 API,用于获取指定坐标空间的边界矩形。
scrollTransition
其实,在很多场景下,我们并不需要通过 NamedCoordinateSpace.scrollView 获取非常精确的位置关系。苹果为我们提供了另一个 API,可以简化上述过程。
当子视图滑入和滑出包含它的滚动视图的可视区域时,scrollTransition 会对该视图应用给定的过渡动画,并在不同阶段之间平滑地过渡。
目前定义了三种阶段状态(Phase):
topLeading: 视图滑入滚动容器的可见区域identity: 表示视图目前在可见区域中bottomTrailing: 视图滑出滚动容器的可见区域
scrollTransition 的 transition 闭包要求你返回一个符合 VisualEffect 协议的类型(VisualEffect 协议定义了一种不影响视图布局的效果类型,苹果已经让很多 Modifier 符合了该协议)。
struct ScrollTransitionDemo: View {
    @State var clip = false
    var body: some View {
        ZStack(alignment: .bottom) {
            ScrollView {
                ForEach(0 ..< 30) { i in
                    CellView()
                        .idView(i)
                        .scrollTransition(.animated) { content, phase in
                            content
                                .scaleEffect(phase != .identity ? 0.6 : 1)
                                .opacity(phase != .identity ? 0.3 : 1)
                        }
                }
            }
            .frame(height: 300)
            .scrollClipDisabled(clip)
            Toggle("Clip", isOn: $clip)
                .padding(16)
        }
    }
}
 demo2023-06-1219.19.19.2023-06-12 1920_18" />
可以将 scrollTransition 视为 NamedCoordinateSpace.scrollView 和 visualEffect(视图修饰符)的缩减版本,用于更方便地实现效果。
我完全没有想到,在 SwiftUI 5 中,苹果对 ScrollView 进行了全面增强。值得赞赏的是,他们不仅提供了一些一直期待的功能,而且在 API 的设计和实现完成度上都非常出色。
就我个人而言,在 SwiftUI 5 中,ScrollView 的原生方案已经能够满足大多数需求,因此我们将看到更多人采用 ScrollView + LazyStack 的组合方式。
欢迎你通过 Twitter、 Discord 频道 或博客的留言板与我进行交流。
订阅下方的 邮件列表,可以及时获得每周最新文章。
</div
Recommend
-
98
本文原创,转载请注明出处http://www.cnblogs.com/AdvancePikachu/p/7908754.html前段时间在做一个类似AnimationCurve的可视化编辑器,其中在做
-
68
前言,一天在点外卖的时候,注意到饿了么列表页的滑动效果不错,但是觉得其中的手势滑动还是挺复杂的,正好又碰到了在熟悉Touch事件的理解当中,所以就抽空对着饿了么的列表页面尝试写写这个效果1.先贴一个实现的效果图逻辑是当外部的ScrollView没有滑到底部的时候...
-
73
最近实际应用中遇到了滑动冲突的相关问题,在解决过程中,有些需要注意的问题,特别记录一下。 一、应用场景 在解决具体问题之前,先介绍下实际应用场景及问题状况。 从图中可以看出,一个ScrollView内部嵌套三个RecyclerView,其中两个Recycl
-
62
iOS 12 更新后的相册结合了苹果的机器学习技术,可通过地点、人物、时间等条件来提供智能的搜索建议,还增加了「为你推荐」功能,向用户推荐值得分享的照片,并提供照片后期处理建议。
-
66
连接万物的第一步开始了。 苹果在今年 6 月份的 WWDC 2018 上带来了令人振奋的新功能「捷径」(Shortcuts),这项功能的亮点在于将苹果此前收购的 Workflow 直接抬升为「系统级」,同时,还是挽救地主家傻儿子 Siri 的一记杀...
-
30
iOS 上的很多原生 App 都受到忽视,语音备忘录也是其中之一。这次,苹果希望用 App 上的改动来告诉用户:“用原生的,就够了。”
-
8
Mastering ScrollView in SwiftUI 24 Sep 2020We had the scroll view from the very first version of SwiftUI. It was quite limited. But this year changed everything when Apple released ScrollViewReader during WWDC 20. This wee...
-
9
How to use ScrollView in SwiftUI Part 2 in the series "Building Lists and Navigation in SwiftUI". We will explore a ScrollView, UIScrollView equivalent in SwiftUI. List...
-
8
Disable scrolling in SwiftUI ScrollView and List Table of Contents In iOS 16,...
-
6
SwiftUI Design A SwiftUI Onboarding Slideshow For Your App With ScrollView What I like the most about Swif...
About Joyk
Aggregate valuable and interesting links.
Joyk means Joy of geeK