

Build an API with Postman, Node.js, and MySQL
source link: https://blog.postman.com/build-an-api-with-postman-node-js-and-mysql/
Go to the source link to view the article. You can view the picture content, updated content and better typesetting reading experience. If the link is broken, please click the button below to view the snapshot at that time.

Build an API with Postman, Node.js, and MySQL


This guest post was written by Greg Bulmash, author of Hell on $5 A Day, blogger at LetMyPeopleCode, and content creator for some of the biggest names in tech.
If you’re looking to build an API that’s highly performant, scalable, and flexible, using technologies that have strong developer communities, Node.js and MySQL make a great pair. Node.js’s asynchronous, event-driven architecture can handle a large number of concurrent requests, so scaling your API is no problem. MySQL is highly scalable as well, and its large community of users and extensive documentation make it a strong choice for a relational database.
In this Postman Quickstarts tutorial, we’ll walk you through creating a ToDo API with an OpenAPI 3 definition using Postman’s API Builder. You’ll learn how to generate code for your API, add business logic, and finally, generate a collection from the API definition so that you can send requests to the API.
Before you begin
For this tutorial, you should have some familiarity with Postman Collections, and you should have a workspace ready to use. As long as you have at least a beginner’s understanding of Node.js and MySQL, you’re ready to get started.
Make sure you have the following:
- Node.js installed and in your path
- XAMPP installed (or another tool you prefer for installing and administering MySQL)
- Visual Studio Code (recommended)
If you need more information about installing any of the items above, see the Install the Prerequisites step for this Postman Quickstart.
Step 1: Create the database
First, let’s create the MySQL database in XAMPP:
-
- Open XAMPP’s Control Panel app.
- Select the Manage Servers tab.
- Select the MySQL Database, followed by the Start button.
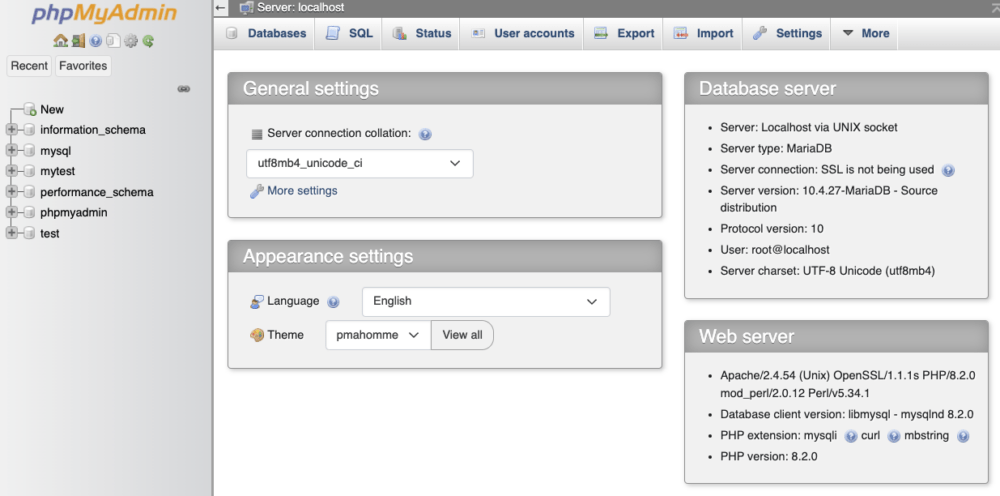
- Select the Apache Web Server, followed by the Start button. Starting the web server allows you to access phpMyAdmin, which is a browser-based GUI tool for managing your MySQL server. When both Apache and MySQL have started, you can access phpMyAdmin at http://localhost/phpmyadmin:
- In phyMyAdmin, select the SQL tab and add the following SQL to the text box:
CREATE DATABASE todo; CREATE TABLE todo.todos ( id_code varchar(36) NOT NULL UNIQUE, to_do varchar(255) NOT NULL, completed boolean ); CREATE USER 'todo_admin'@'localhost' IDENTIFIED BY 'leelu_dallas_multipass-6'; GRANT SELECT, INSERT, UPDATE ON todo.* TO 'todo_admin'@'localhost'; use todo; INSERT INTO todos (id_code, to_do, completed) VALUES ('todo1','Get something done', TRUE); INSERT INTO todos (id_code, to_do, completed) VALUES ('todo2','Get another thing done', FALSE); - Select Go to run the query. The query creates a database and adds a table to hold your records, and then it creates a user with privileges to access and update the table. It also creates some records so that we have something to query later on.
Don’t panic if you see a few Error: #1046 No database selected warnings while the query runs—this is expected. When the query’s done, you can turn off the Apache Web Server in the XAMPP app. Only the MySQL server is needed from here.
Step 2: Define the API
We’ll use OpenAPI 3 to define the ToDo API. You can download the full API definition for this tutorial from GitHub. If you want more details about this definition, see Define the API in the Postman Quickstart for a closer look at each section.
Step 3: Add the API to Postman
Let’s add the API to Postman:
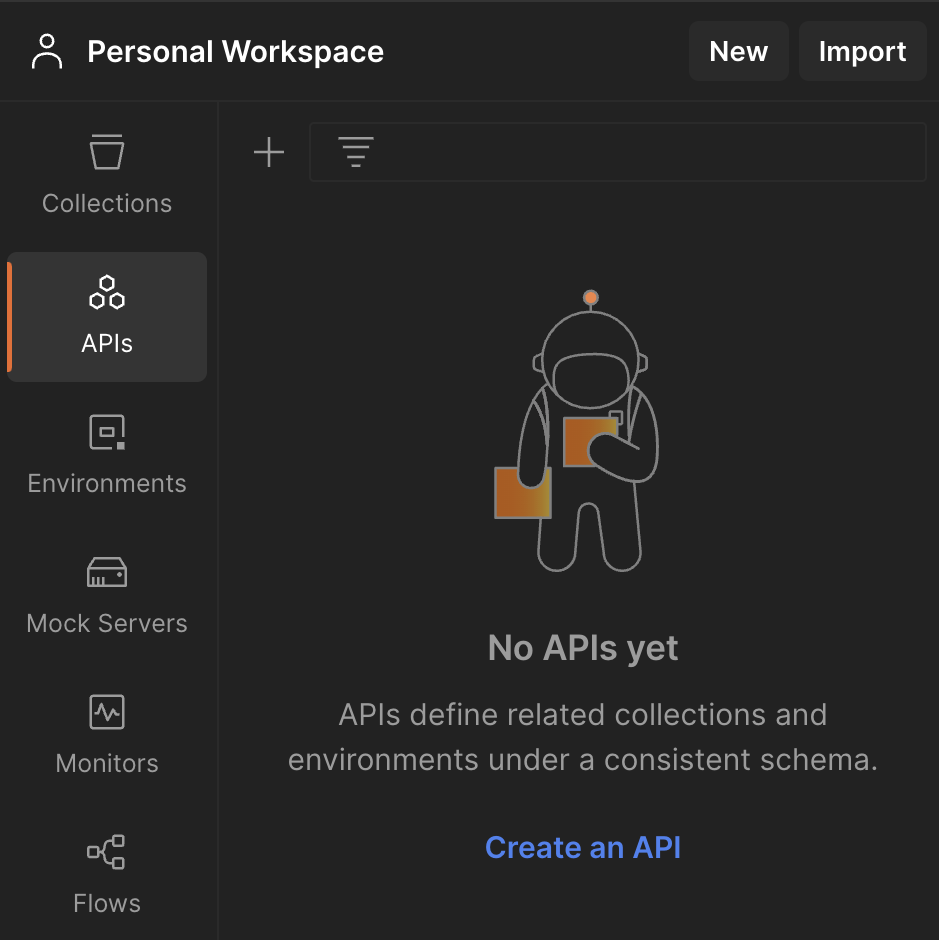
- With the Postman app or web client open, go to your workspace and select APIs, followed by Create an API:
- Select the pencil icon that appears when you hover over the API’s name, and name it “ToDos”.
- Select + to the right of the Definition option, then select Author from scratch.
- Select or accept OpenAPI 3.0 as the Definition type and YAML as the Definition Format.
- Select Create Definition. This opens a code editor.
- Copy the full ToDo API definition from GitHub and paste it into the code editor:
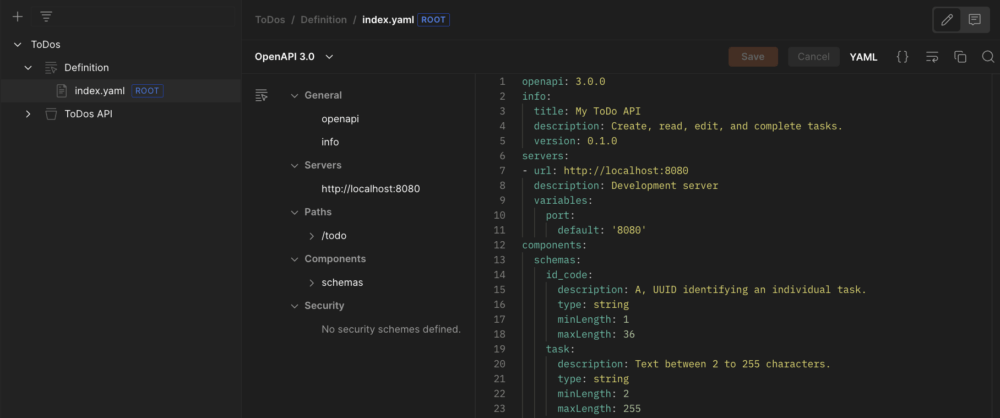
- Select Save.
Step 4: Code the API
You might already know that Postman can generate code to scaffold your API for multiple programming languages. If you want to code the API yourself, see Code the API in the Postman Quickstart. Otherwise, follow these steps to have Postman generate Node.js code for you:
- Select the top level of the ToDos API.
- Select </> in the context bar.
- Under Language and framework, select NodeJs – Express. Leave Only generate routes and interfaces unchecked.
- Select Generate Code and download the ZIP file.
Step 5: Run requests in Postman
In order to run requests in Postman, we’ll need to generate a collection that creates GET, POST, and PUT queries, and then start the ToDo server to connect to the MySQL database.
Generate a Postman Collection
First, let’s generate a collection in Postman:
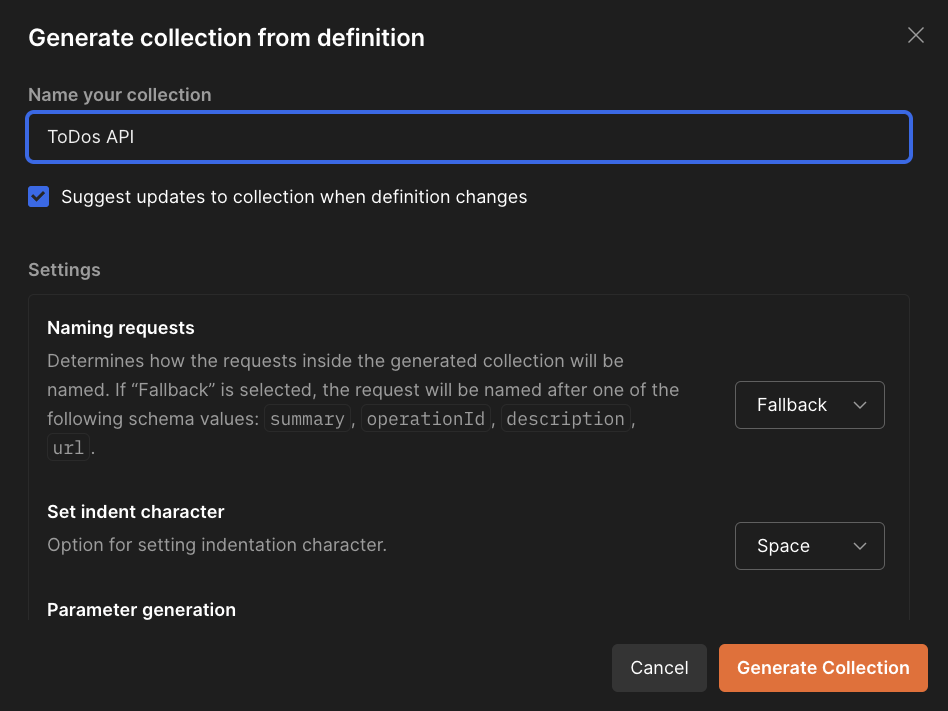
- With the ToDos API selected, select + under Collections, and then select Generate from definition:
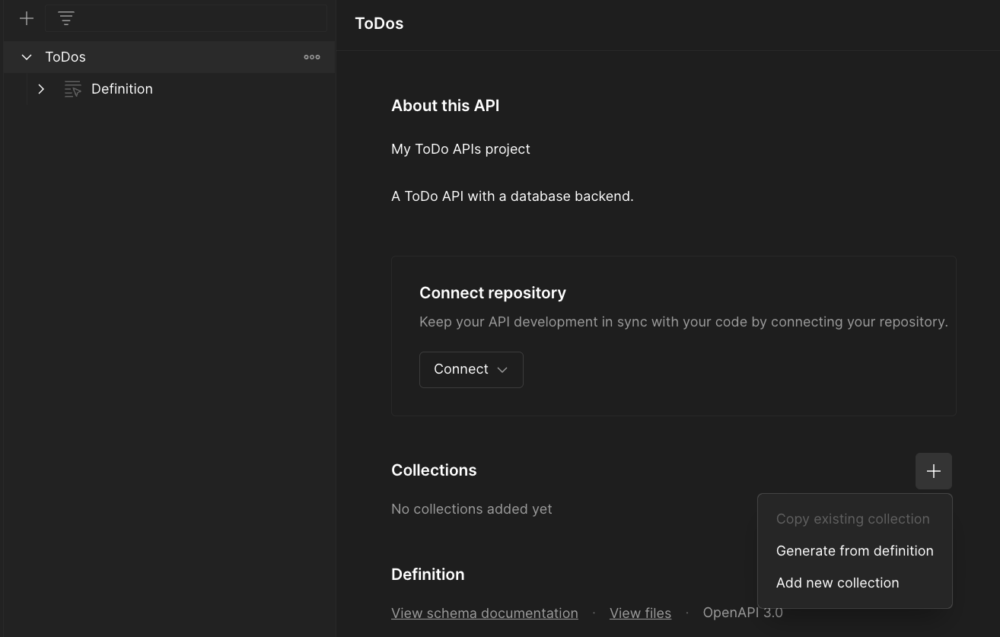
- Name your collection, and then select Generate Collection:
Run the ToDO server
With the collection generated, it’s time to get the ToDo server up and running:
- In the XAMPP Control Panel, make sure that your MySQL database is running.
- Clone the ToDo API project repository from GitHub.
- In a terminal window, navigate to the top level of the repo.
- In the terminal, enter
npm install. - When the installation is complete, enter
node run start.
Try a GET request
From your generated collection in the sidebar, select the GET request and then select Send:
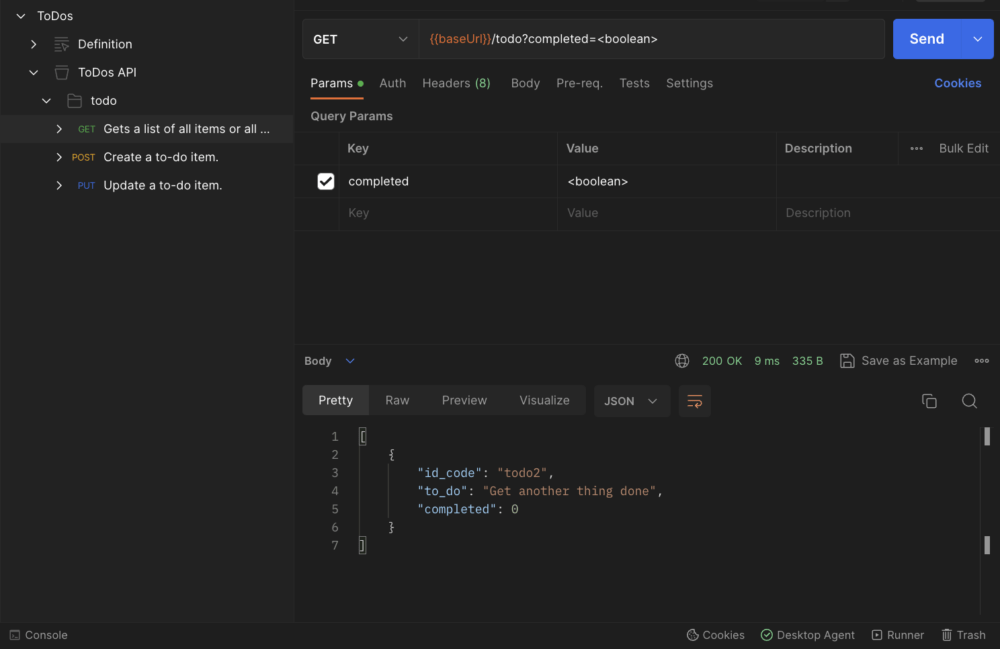
In the parameters, you can try changing <boolean> to true to receive a different response.
Try a POST request
Select the POST request and then select the Body tab:
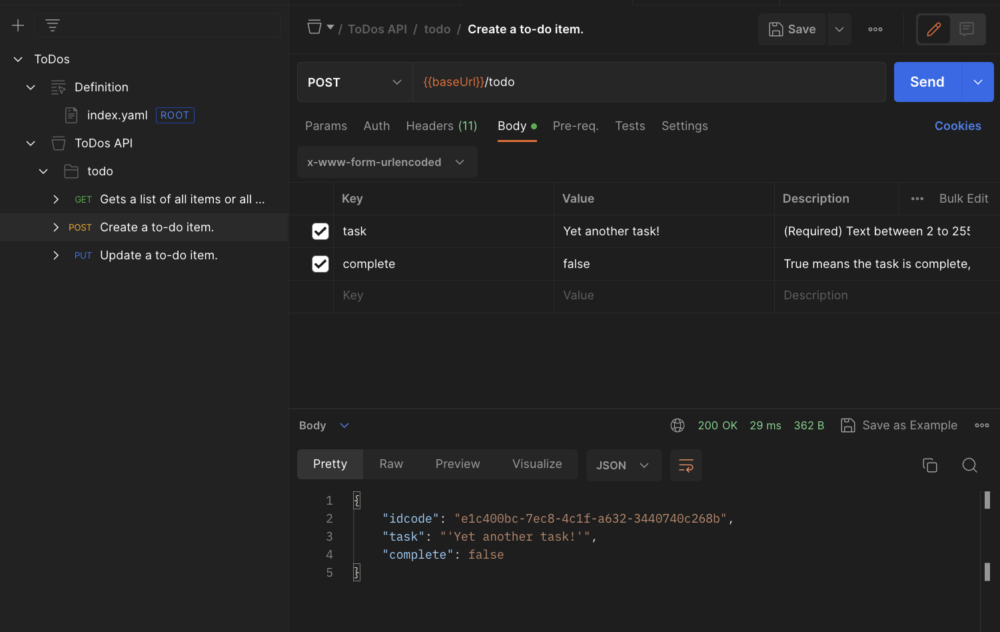
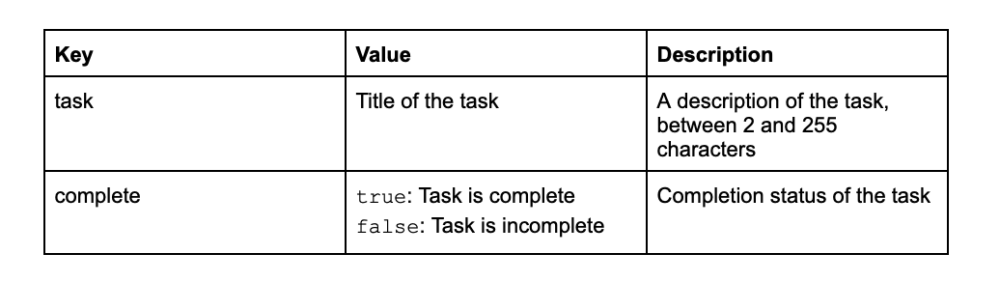
Try replacing the default values with some tasks of your own. Use the following table as a reference when you create your tasks:
If you want to verify that your new tasks were added to the database, run another GET request.
Try a PUT request
Select the PUT request and then select the Body tab:
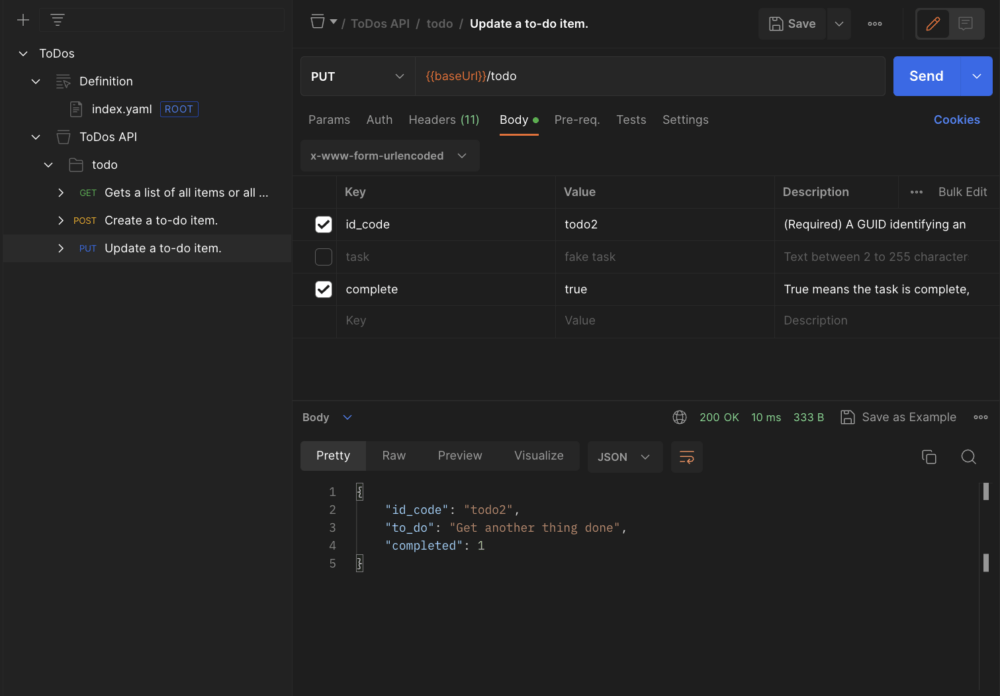
The only required parameter for this request is id_code. Follow these steps to set it up:
- Set
id_codetotodo2. This is a value we pre-populated when creating the database. - Set
completetotrue, and then clear thetaskfield. - Select Send.
Sending this request updates the server to show the task is complete, then queries the database for the item and returns it to confirm the database was updated.
Go back and run the GET request again to see that the task shows it’s complete.
Taking it further
Congratulations! You’ve defined an API using OpenAPI 3, generated Node.js server code in Postman, created a collection to send requests to the server, and updated the MySQL database. If you want to keep going, here are some other things you can try:
- Add a
DELETEmethod to the API definition. - Update the MySQL server permissions for
todo_adminand Node.js server code to add aDELETEmethod, then regenerate your collection to test theDELETEmethod. - Try another Postman Quickstart, or contribute your own!
Recommend
-
15
For those who haven't heard of it, postman is a tool for interacting with and exploring API's. Effectively it's a pretty UI on top of curl; but it makes a big difference when figuring out how exactly to structure an API call, or testing what...
-
17
自从开始做API开发之后,我就在寻找合适的API测试工具。一开始不是很想用Chrome扩展,用的WizTools的工具,后来试过一次
-
10
V2EX › 程序员 postman 记录的 API 能否转成 IDEA HTTP? iloooo · 17 小时 51 分...
-
8
Postman /me API Experimentation 24 Sep 2021 I was doing...
-
12
daspecialman Posted on...
-
3
Introduction Whether you’re a longtime Salesforce developer, new to the platform, or just need to integrate your system of choice to Salesforce, Postman brings you all the tools you need to make the process easier, faster, and more s...
-
7
Build a REST API with Node.js and ExpressWhat is REST? What is an API? Learn how to build a simple RESTful API with Node.js and ExpressPhoto by
-
3
Using Postman documentation in DotKernel API 3 Starting from version 3.0 DotKernel API provides it’s documentation using Postman. In this article we will go into the details of crea...
-
11
The Tyk API Gateway and Postman Kin Lane March 22, 2022· 4 mins If you Google the...
-
0
Build eSignature Workflows with Postman and Signeasy
About Joyk
Aggregate valuable and interesting links.
Joyk means Joy of geeK